Whirlpool refrigerators are known for their reliability and thoughtful design. But even the best appliances need a little help sometimes—especially when it comes to simple tasks like changing a light bulb or removing the light bulb cover. If you’ve ever opened your fridge and noticed the light is out, you might have wondered: How do I safely remove the light bulb cover? This seemingly simple task can be confusing if you don’t want to break anything or void your warranty. This guide will walk you through every detail, with step-by-step instructions, safety tips, and answers to common questions. Whether you’re a new homeowner or just want to avoid a service call, you’ll learn exactly what to do.
Why You Might Need To Remove The Light Bulb Cover
There are a few reasons why you may need to remove the light bulb cover in your Whirlpool refrigerator. The most common is to replace a burnt-out bulb. Sometimes, the bulb may flicker, dim, or stop working completely. In other cases, you might want to clean the cover if dust or spilled food has collected inside. Occasionally, troubleshooting other electrical issues will require you to access the bulb area. Knowing how to do this safely and correctly can help you avoid damaging your refrigerator or injuring yourself.
Types Of Light Bulb Covers In Whirlpool Refrigerators
Before you begin, it’s important to know that Whirlpool refrigerators come in several styles, and so do their light bulb covers. Identifying the right type will help you use the correct removal method. Here are the most common types:
- Snap-on covers: These covers usually have small plastic tabs that snap into place.
- Screw-in covers: These covers are held by one or more screws.
- Slide-out covers: Less common, these covers slide into grooves and can be pulled out.
- Twist-off covers: These covers rotate slightly to unlock from their base.
Each type may look similar, but their removal steps are different. Always check your refrigerator’s user manual if you’re not sure which type you have. You can often find a digital manual on the Whirlpool website by searching your model number.
Tools And Materials You Will Need
Most Whirlpool refrigerator light bulb covers can be removed with minimal tools. Still, preparing your workspace and collecting the right tools can make the job easier and safer. Here’s what you should have on hand:
- Flathead screwdriver (for prying or unscrewing)
- Phillips screwdriver (if screws are present)
- Clean cloth (for cleaning the cover or wiping dust)
- Gloves (optional, to protect your hands and the bulb)
- Replacement bulb (if you plan to change the bulb)
- Small container (to hold screws, so you don’t lose them)
A flathead screwdriver is especially useful for prying off snap-on covers without breaking the plastic. Gloves can help prevent fingerprints on the new bulb and protect against sharp edges.
Safety Precautions Before You Begin
Working with electrical appliances always requires caution. Here are essential safety steps before you touch the light bulb cover:
- Unplug the refrigerator: Always unplug from the wall before working inside. Even if you only plan to remove the cover, there’s a risk of electric shock.
- Wait for the bulb to cool: If the bulb was recently on, it could be hot. Wait at least 15 minutes for it to cool.
- Clear the area: Remove food or items from the shelf near the light so you have clear access.
- Use a step stool: For top-freezer or tall models, use a sturdy step stool rather than stretching.
Skipping these steps is a common mistake, especially forgetting to unplug the fridge. Electric shock from a refrigerator light is rare but can be dangerous.
Step-by-step Guide: Removing The Light Bulb Cover
Now, let’s get into the detailed process. The exact steps will depend on your cover type, but these instructions cover the most common Whirlpool refrigerator designs.
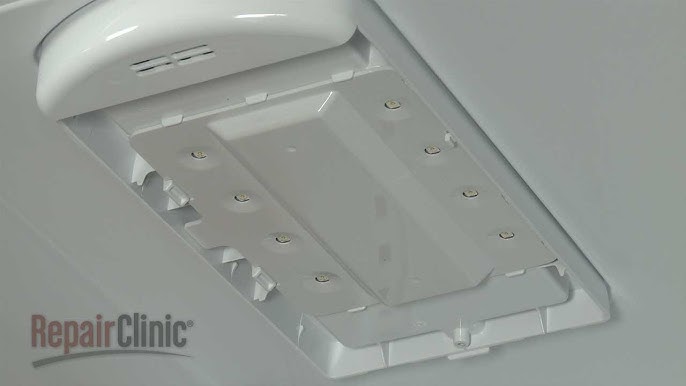
1. Locate The Light Bulb Cover
Open your refrigerator and look for the light bulb cover. It’s usually on the ceiling of the main compartment, near the back. In some side-by-side or French door models, the cover is mounted on the side wall or even inside the freezer. If you have trouble finding it, consult your user manual.
2. Identify The Cover Type
Look closely at how the cover is attached. Are there visible screws? Do you see tabs or grooves? Gently try to move the cover. This will help you determine whether it’s a snap-on, screw-in, slide-out, or twist-off cover.
3. Remove Food Items And Trays
Before you begin, take out any food or trays that are in the way. This will prevent spills and give you more room to work. Place them on the counter or a clean towel.
4. Removing A Snap-on Cover
- Insert a flathead screwdriver under one edge of the cover.
- Gently twist or pry to release the plastic tab.
- Move to the opposite side and repeat if necessary.
- When all tabs are free, carefully pull the cover off.
Tip: Don’t force the cover. If it doesn’t come off easily, double-check for hidden screws or latches.
5. Removing A Screw-in Cover
- Use a Phillips screwdriver to remove the screws holding the cover.
- Place the screws in your small container so you don’t lose them.
- Support the cover with your other hand as you remove the last screw.
- Carefully lower the cover and set it aside.
Tip: Some models have screws hidden behind a small plastic cap. Pry off the cap to access the screw.
6. Removing A Slide-out Cover
- Check for any locking tabs or small levers.
- Slide the cover toward you or in the direction of the arrows (if marked).
- Gently pull the cover out along the grooves.
Tip: If the cover gets stuck, make sure all locking tabs are disengaged.
7. Removing A Twist-off Cover
- Hold the cover with both hands.
- Twist gently in the direction shown on the cover (usually counterclockwise).
- Once it unlocks, pull it down.
Tip: Twist-off covers can sometimes be stiff. Don’t use excessive force, or you may crack the plastic.
8. Clean Or Replace The Bulb
With the cover off, you can now clean it with a damp cloth or replace the bulb. If the bulb is stuck, gently wiggle it back and forth as you unscrew it.
9. Reassemble The Cover
After cleaning or replacing the bulb:
- Align the cover with its slots or tabs.
- Snap, screw, slide, or twist it back into place.
- Plug the refrigerator back in and check that the light works.
Comparing Light Bulb Covers: A Quick Reference
To help you identify your cover type and the right removal method, here’s a quick comparison:
| Cover Type | Attachment Method | Typical Tool Needed | Removal Difficulty |
|---|---|---|---|
| Snap-on | Plastic tabs | Flathead screwdriver | Easy |
| Screw-in | One or more screws | Phillips screwdriver | Moderate |
| Slide-out | Grooves and tabs | None/Flathead screwdriver | Easy |
| Twist-off | Twist and lock | None | Easy to Moderate |
Knowing your cover type can save time and reduce frustration.
Credit: www.youtube.com
Practical Tips For A Smooth Process
Removing the light bulb cover in a Whirlpool refrigerator is simple, but a few practical tips can make the job even easier:
- Take a photo before starting. This helps you remember how the cover fits back on.
- Don’t overtighten screws when reassembling. Plastic covers can crack if too much force is used.
- Check the replacement bulb type. Whirlpool refrigerators use special appliance bulbs, often 15 or 40 watts. Using the wrong bulb can cause overheating or poor lighting.
- Label your screws if you have more than one size. Mixing up screws can make reassembly tricky.
- Test the bulb before replacing the cover. Plug in the fridge and check the new bulb works, then unplug again and finish reassembly.
Many beginners forget to check bulb compatibility. Appliance bulbs are designed to withstand cold and vibration. Regular household bulbs may burn out quickly.
Common Mistakes And How To Avoid Them
Even a simple job like this can go wrong. Here are some mistakes people often make, and how to avoid them:
- Not unplugging the refrigerator: This is a safety hazard. Always cut power first.
- Using too much force: If the cover doesn’t come off easily, check for hidden screws or tabs.
- Losing screws or parts: Use a small container to keep all hardware together.
- Touching the bulb with bare hands: Oils from your skin can shorten the bulb’s life, especially for halogen bulbs.
- Forgetting the cover orientation: Take a picture before removal to guide you during reassembly.
An extra insight: Some Whirlpool models have a safety switch that automatically cuts power to the bulb when the cover is removed. Don’t be surprised if the bulb doesn’t light up until the cover is back in place and the door is closed.
Cleaning The Light Bulb Cover
While you have the cover off, it’s a good idea to clean it. Dust and food splatters can block light and lead to odors. Here’s how to clean it safely:
- Rinse the cover in warm, soapy water.
- Use a soft sponge to avoid scratching.
- Dry thoroughly with a towel before reinstalling.
Never put the plastic cover in the dishwasher, as high heat can warp it. If you see cracks or discoloration, you may want to replace the cover. Whirlpool sells replacement parts online and through authorized dealers.
Replacing The Light Bulb
If the bulb is burnt out, replacement is straightforward:
- Check the bulb type. Most Whirlpool refrigerators use an E26 or E27 appliance bulb, 15 or 40 watts.
- Unscrew the old bulb by turning counterclockwise.
- Screw in the new bulb gently but firmly.
- Plug in and test. Make sure the bulb works before reattaching the cover.
If the new bulb doesn’t light up, double-check that the refrigerator is fully plugged in and the door switch is working.

Credit: www.youtube.com
When To Call For Professional Help
In some cases, it’s better to call a Whirlpool service technician:
- If the cover is stuck and won’t come off without breaking.
- If you see signs of electrical damage, such as burned wires or a melted socket.
- If the new bulb doesn’t light up and you’re sure it’s installed correctly.
- If your refrigerator is still under warranty, and you don’t want to risk voiding it.
Attempting to force a stuck cover can break the plastic or damage the mount, leading to expensive repairs. Whirlpool’s official service team can usually handle stubborn cases without harm.
Light Bulb Cover Replacement Parts: What To Know
If your cover is cracked, yellowed, or lost, you can order a replacement. Here’s what to keep in mind:
- Find your model number. It’s usually on a label inside the fridge, on the side wall.
- Order from a trusted supplier. Whirlpool’s official website or authorized dealers are best.
- Check part numbers. Even similar-looking covers can have small differences in fit.
- Replacement cost: Most covers cost between $10 and $30 USD, depending on the model.
Here’s a quick comparison of where to buy replacement covers:
| Source | Pros | Cons | Price Range |
|---|---|---|---|
| Whirlpool official website | Guaranteed fit, warranty support | May be more expensive, shipping time | $20-30 |
| Authorized parts dealer | Often in stock, local pickup | May not support returns | $15-25 |
| Online marketplaces (eBay, Amazon) | Wide selection, fast shipping | Some generic parts may not fit | $10-25 |
Getting the right replacement part the first time saves time and frustration.
Whirlpool Refrigerator Models And Light Bulb Cover Variations
Not all Whirlpool refrigerators use the same light bulb cover. Here’s how some popular models differ:
- Top Freezer Models: Usually have a simple snap-on or screw-in cover in the main fridge compartment.
- Side-by-Side Models: May have covers in both the fridge and freezer sections; covers are often screw-in or slide-out.
- French Door Models: Can have more decorative or complex covers, sometimes with integrated LED panels.
- Bottom Freezer Models: Light bulb covers may be smaller and located near the top of the fridge section.
If you’re unsure, search your model number online. Whirlpool’s support site (Whirlpool Manuals) offers model-specific guides, diagrams, and part numbers.
Light Bulb Cover Troubleshooting: If It Won’t Come Off
Sometimes, the light bulb cover seems stuck. Here’s what to check:
- Hidden screws: Look carefully for screws under a small plastic cap or behind a label.
- Sticky plastic: Over time, the cover can stick due to temperature changes. Gently wiggle it or use a plastic pry tool.
- Ice buildup: In some freezers, ice may freeze the cover in place. Defrost the area first.
- Broken tabs: If a tab is broken, the cover may be jammed. Pry gently from the opposite side.
If the cover breaks, don’t panic. Replacement covers are available, and your fridge will still work without the cover for a few days.
How Whirlpool Light Bulb Covers Compare To Other Brands
Is removing the cover in a Whirlpool refrigerator different from other brands? Here’s a quick look:
| Brand | Typical Cover Type | Removal Difficulty | Special Tools Needed |
|---|---|---|---|
| Whirlpool | Snap-on, screw-in, slide-out, twist-off | Easy to moderate | No |
| Samsung | Snap-on, screw-in | Easy | No |
| LG | Twist-off, screw-in | Moderate | Sometimes |
| GE | Screw-in, slide-out | Moderate | Yes (rarely) |
Whirlpool covers are among the simplest to remove, and rarely require special tools.
Extra Insights: What Most People Overlook
Here are two details most beginners miss:
- Door Switch Activation: The refrigerator light only turns on when the door switch is pressed. If the door switch is faulty, the light may stay off even with a new bulb.
- LED Panel Models: Some newer Whirlpool models use LED panels instead of bulbs. These panels are not user-replaceable; if the light fails, you’ll need professional service.
Always check if your model uses a standard bulb or a sealed LED panel before buying a replacement.

Credit: www.ifixit.com
Frequently Asked Questions
How Do I Know Which Bulb To Use In My Whirlpool Refrigerator?
Most Whirlpool refrigerators use a 15-watt or 40-watt appliance bulb with an E26 or E27 base. Check your user manual or the old bulb for specifications. Never use a regular household bulb; it may not be suitable for cold temperatures and can cause overheating.
Is It Safe To Remove The Light Bulb Cover Without Unplugging The Refrigerator?
No, it is not safe. Always unplug the refrigerator before removing the cover to avoid risk of electric shock. Even if you turn off the power at the breaker, unplugging is the safest method.
My Light Bulb Cover Is Yellowed Or Cracked. Can I Keep Using It?
You can use a yellowed cover temporarily, but it may block light and affect visibility. A cracked cover can fall and break further or touch food. It’s best to replace a damaged cover as soon as possible.
What Should I Do If The New Bulb Doesn’t Work After Replacement?
Check that the new bulb is screwed in tightly, the refrigerator is plugged in, and the door switch is working. If the bulb still doesn’t work, test another bulb. If none of these steps help, there may be an electrical problem—call a service technician.
Where Can I Find The Model Number For My Whirlpool Refrigerator?
The model number is usually on a sticker inside the refrigerator, often on the side wall or ceiling near the door. You can also find it in your user manual or on the original purchase receipt. Having the model number is important when ordering replacement parts.
Removing the light bulb cover in your Whirlpool refrigerator is a simple task that anyone can learn. With the right tools, safety steps, and a little patience, you can keep your fridge bright and safe for years to come. If you’re ever unsure, don’t hesitate to check the official Whirlpool manuals or call a professional for help. Your kitchen will thank you for the extra care!