Replacing a Kohler canister flush valve with a flapper might sound like a simple plumbing project, but there’s more to it than just swapping two parts. Homeowners often want to make this change to fix leaks, lower maintenance, or just because flapper valves are easier to find and replace. But Kohler toilets use a unique canister system, so converting to a flapper can be tricky if you don’t know what to expect. This guide will walk you through the process, from understanding how the systems differ to step-by-step installation, common issues, and expert tips you won’t find on the box.
You’ll learn how to select the right parts, which tools really help, and what mistakes people often make when attempting this conversion. Whether you’re a homeowner who likes to fix things yourself or a landlord trying to save on repairs, this article will help you make smart choices. Let’s break down everything you need to know about how to replace a Kohler canister flush valve with a flapper—and do it right the first time.
Understanding The Kohler Canister Flush Valve
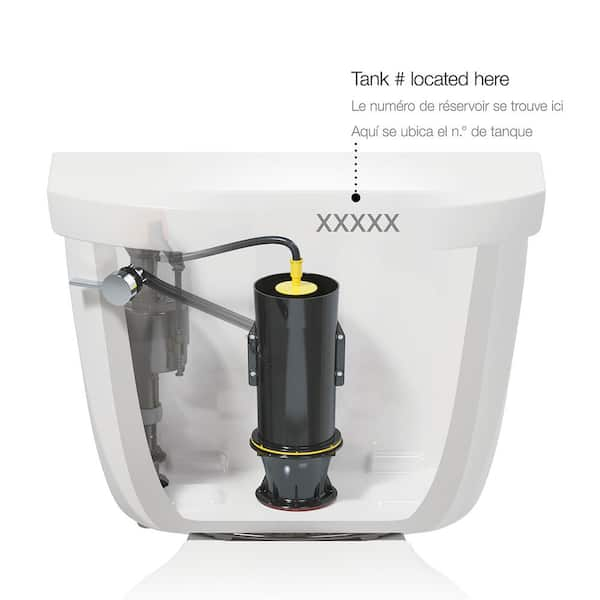
Before starting any replacement, it’s important to know what you’re working with. Kohler’s canister flush valve is different from a flapper system. The canister is a tall, cylindrical piece in the center of the tank. When you flush, the canister lifts straight up, allowing water to flow evenly into the bowl.
This design gives a powerful, consistent flush and was introduced to solve problems like uneven water flow and weak flushing.
Kohler canister valves are found in many models like the Kohler Cimarron and Kohler Wellworth. They’re reliable, but not always easy to fix. Replacement parts can cost more and are sometimes hard to find locally. Many homeowners prefer the flapper valve because it’s simple, cheap, and widely available.
Why Replace A Canister With A Flapper?
Switching from a canister to a flapper isn’t just about price. Here are some reasons people make the change:
- Ease of Maintenance: Flapper valves are much easier to replace or clean. Most hardware stores sell universal flappers that fit many toilets.
- Cost: Canister flush valves are often double the price of a basic flapper.
- Leak Issues: Canisters sometimes develop leaks that are tough to fix. Flappers are less likely to leak if installed correctly.
- Availability: Flapper valves are standard; you won’t have trouble finding one, even in small towns.
- Compatibility with Repair Kits: Many universal repair kits include everything you need for a flapper but not for a canister.
However, keep in mind that not all Kohler toilets are easily converted. Some bowls are designed specifically for the canister’s water flow. If you’re not sure, check your toilet’s model number and look for compatibility or ask a plumbing expert.
Tools And Materials You Will Need
Gathering the right tools and parts is key to a smooth replacement. Here’s what you’ll need:
- Adjustable wrench: For removing water supply and tank bolts
- Screwdriver: Flathead and Phillips
- New flapper valve kit: Make sure it fits Kohler 2-inch or 3-inch flush valves, depending on your model
- Flush valve seat adapter: Some kits include a special seat to convert the canister opening for a flapper
- Sponge or towel: For soaking up water left in the tank
- Bucket: To catch water when you disconnect the tank
- New tank-to-bowl gasket: Recommended for a good seal
- New tank bolts and washers: If the old ones are corroded
If you’re buying a conversion kit, choose one from a reputable brand and check reviews. Not all flapper kits fit perfectly in Kohler toilets, so look for one that mentions Kohler compatibility.
Comparing Canister Vs Flapper Flush Systems
To help you understand the key differences, here’s a simple comparison:
| Feature | Canister Valve | Flapper Valve |
|---|---|---|
| Flush Power | Strong, even | Varies, sometimes less powerful |
| Ease of Replacement | Complex, specific parts | Simple, universal |
| Price | More expensive | Cheaper |
| Leak Frequency | Moderate | Low if seated well |
| Availability | Limited (Kohler only) | High (any hardware store) |
The main takeaway: Flappers are easier and cheaper, but you may notice a small drop in flush power if your toilet was optimized for the canister.
Credit: www.homedepot.com
Checking Toilet Compatibility
Not all Kohler toilets can be converted to a flapper system. Here’s how to check:
- Model Number: Find your toilet’s model number (usually inside the tank or under the lid).
- Bowl Shape: If your bowl is designed for a wide, fast flush, a flapper may not work as well.
- Flush Valve Opening: Measure the hole size at the bottom of the tank. Most flappers fit a 2-inch or 3-inch opening.
- Manufacturer Advice: Some Kohler models warn against conversion. Check the manual or Kohler’s website.
- Online Forums: Plumber forums often have real-world feedback on which models work well after conversion.
Non-obvious insight: Some canister toilets use a special rim wash system that relies on the canister’s even flow. If you switch to a flapper, you might get a weaker rinse, leading to stains around the bowl. Consider this if your toilet needs strong rim cleaning.
Step-by-step Guide To Replace Canister With Flapper
This is where most people get stuck, so let’s walk through the steps in detail.
1. Turn Off The Water
Start by turning the water supply valve (usually behind the toilet) clockwise until it stops. Flush the toilet and hold the handle to drain as much water as possible. Use a sponge to soak up any left in the tank.
2. Disconnect The Water Supply Line
Use an adjustable wrench to unscrew the nut connecting the water line to the bottom of the tank. Place a bucket underneath to catch any drips.
3. Remove The Tank From The Bowl
Unscrew the two or three bolts at the bottom of the tank using a wrench. Lift the tank straight up and place it on a towel.
Pro tip: If the bolts are rusty or stuck, spray them with penetrating oil and let it sit for 10 minutes.
4. Remove The Old Canister Flush Valve
Unscrew the large plastic nut holding the canister valve to the tank. This nut is under the tank, around the flush hole. You might need a special flush valve wrench (some kits include one), but large pliers work too. Pull the canister valve straight out.
5. Clean The Flush Valve Opening
Use a rag to clean the ceramic opening and remove any old gasket pieces or grime. A clean surface ensures a good seal for the new flapper adapter.
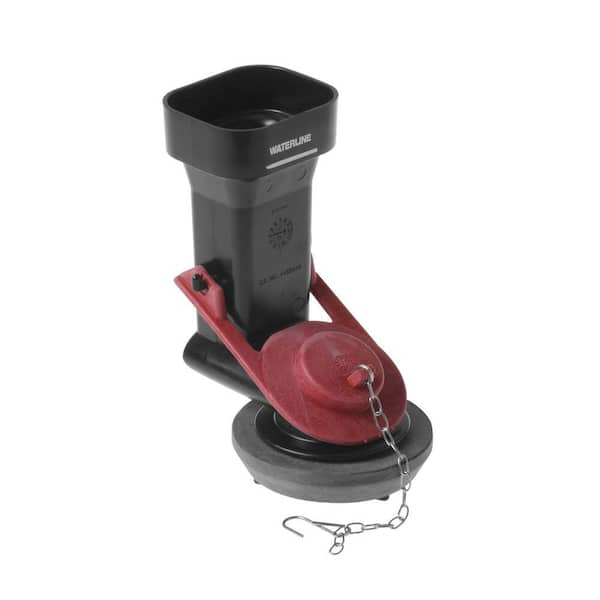
6. Install The Flapper Valve Adapter
Most flapper conversion kits include an adapter seat that fits into the old canister hole. Fit the adapter into the hole, making sure the rubber gasket is snug and flat. Tighten the new plastic nut from below.
- Common mistake: Over-tightening can crack the tank. Hand-tighten, then give an extra 1/4 turn with the wrench.
7. Attach The Flapper Valve
Connect the flapper to the posts or hooks on the new seat. Attach the chain to the flush lever. Adjust the chain so there’s just enough slack (about 1/2 inch) when the flapper is closed.
8. Replace The Tank Gasket And Bolts
Install a new tank-to-bowl gasket on the bottom of the tank. Insert new bolts and washers if needed.
9. Reattach The Tank
Carefully lower the tank onto the bowl, aligning the bolts with the holes. Tighten the nuts evenly in small steps to avoid cracking the porcelain.
10. Reconnect The Water Supply
Reattach the water line and tighten the nut with a wrench. Open the water supply valve slowly.
11. Test For Leaks
Let the tank fill, then flush several times. Check under the tank and around the bolts for leaks. If you see drips, tighten the nuts a little more.
12. Adjust The Flapper Chain And Water Level
Make final adjustments to the chain length or float. Set the water level so it’s about 1 inch below the top of the overflow tube for best flush performance.
Non-obvious insight: If your flapper closes too fast or the flush is weak, try a different flapper style (rigid or flexible) or adjust the float on the fill valve.

Credit: www.youtube.com
Common Problems And How To Fix Them
After replacing the flush valve, some users notice issues. Here’s how to solve them:
- Weak Flush: Check the chain slack and water level. Some flapper valves restrict water flow; try a “high performance” flapper if needed.
- Flapper Won’t Seal: Make sure the seat adapter is clean and fully tightened. Debris or a warped gasket can prevent a good seal.
- Tank Leaks at Bolts: Always replace the rubber washers. Don’t overtighten.
- Phantom Flushes: If the toilet refills on its own, the flapper isn’t sealing—try a different brand or reseat the adapter.
- Water Runs Continuously: Check the fill valve height and make sure the refill tube isn’t stuck in the overflow tube.
Some older Kohler toilets have unique tank shapes that make it hard to get a perfect seal with universal kits. If this is your case, consider buying a Kohler-specific flapper conversion kit.
Tips For A Successful Conversion
A few expert tips can help you avoid headaches:
- Buy quality parts. Cheap flappers often warp or leak after a few months. Spend a little more for a trusted brand.
- Keep the old canister. If the conversion fails, you’ll want to be able to reinstall it.
- Double-check measurements. Not all Kohler tanks have the same valve opening size.
- Take photos during disassembly. It helps when you need to put everything back.
- Label parts if you’re not sure where they go.
How To Choose The Right Flapper Kit
There are many flapper kits on the market, but only a few work well for Kohler canister conversions. Here’s what to look for:
- Adapter seat included: Essential for converting the large canister hole to a flapper style.
- Gasket quality: A thick, flexible gasket will seal better.
- Chain and hook design: Make sure the chain is long enough and the hook fits your flush lever.
- Brand reputation: Fluidmaster, Korky, and Kohler itself make high-quality kits.
Here’s a quick comparison of three popular flapper kits:
| Kit Name | Fits Kohler? | Adapter Seat | Price Range |
|---|---|---|---|
| Fluidmaster 507AK | Most models | Yes | $15–$22 |
| Korky Universal | Some models | Yes | $12–$20 |
| Kohler GP85160 | All Kohler | Yes | $22–$28 |
Always read the packaging and reviews to confirm compatibility with your toilet’s model number.
Flapper Types: Which One Is Best?
There are several flapper types, each with pros and cons:
- Universal Rubber Flapper: Fits most toilets; cheap and flexible but can degrade in hard water.
- Rigid Frame Flapper: More durable; closes quickly, good for high-pressure systems.
- Adjustable Flapper: Lets you change how long the flapper stays open; useful if your flush is too short or long.
- Chlorine-Resistant Flapper: Best for homes with chlorinated city water; lasts longer.
If you’re not sure which type to pick, start with an adjustable flapper. You can fine-tune the flush for your toilet.
Credit: www.homedepot.com
Is It Worth Converting Or Should You Just Repair?
Some homeowners wonder if it’s better to convert or just repair the canister valve. Here’s a look at when conversion makes sense:
- Canister replacement parts are too expensive or hard to find
- You plan to stay in the home for many years and want easy repairs
- You have multiple toilets and want all to use the same repair parts
- You have tried repairing the canister and still have leaks
But if your Kohler toilet is new or still under warranty, it may be better to stick with the canister design. Switching to a flapper could void warranties or affect flush performance.
The Cost And Time Involved
Replacing a canister flush valve with a flapper is a low-cost project compared to hiring a plumber. Expect to spend:
- Flapper conversion kit: $15–$30
- New tank bolts and washers: $5–$10
- Time required: About 1–2 hours for most DIYers
If you’re paying a plumber, labor will cost much more, usually $75–$150 depending on your location.
Non-obvious tip: If your house has several Kohler canister toilets, buy conversion kits in bulk online for better deals.
Long-term Maintenance After Conversion
Flapper valves are easy to maintain, but here’s what you need to know:
- Check the flapper every year for wear or warping. Replace if it feels hard or has mineral buildup.
- Clean the valve seat if you notice leaks. A toothbrush can help remove grime.
- Test for leaks by putting a few drops of food coloring in the tank. If color appears in the bowl after 30 minutes, the flapper isn’t sealing.
- Use chlorine-resistant flappers if you use bleach tablets in the tank.
Flapper replacements usually take less than 10 minutes after the initial conversion.
Environmental Impact: Water Savings
One reason Kohler designed the canister flush was to meet new water-saving standards. Flapper conversions can affect water usage:
- Older flappers may use more water per flush (up to 3.5 gallons)
- Modern adjustable flappers can be set to match original flush volume (usually 1.28 or 1.6 gallons)
If you want to save water, choose an adjustable flapper and set it to close quickly. Avoid generic flappers that stay open too long.
According to the Environmental Protection Agency, a leaking toilet can waste up to 200 gallons a day. Fixing leaks with a new flapper can help lower your water bill and is better for the environment.
Real-world Example: Homeowner’s Story
Take Mark, a homeowner with three Kohler Cimarron toilets. After his second canister started leaking, he decided to try a flapper conversion. He bought a Korky kit for $18 and finished the job in about an hour. The conversion worked well, though the flush was a bit softer. A year later, he has had no leaks and replaced a flapper in less than five minutes—something that took much longer with the old canister. Mark’s advice: “Take your time, double-check the fit, and buy a good kit.”
When To Call A Plumber
Some situations are best left to the pros:
- You find cracks in the tank or bowl
- You can’t stop leaks after several tries
- The tank bolts are rusted and won’t budge
- The toilet is a high-end or special model
A plumber can also tell you if conversion is possible for your toilet. Don’t risk breaking your toilet to save a few dollars on labor.
More Resources
For official Kohler manuals and troubleshooting, visit the Kohler Support Center.
Frequently Asked Questions
Can I Replace A Kohler Canister Flush Valve With Any Flapper?
No, not all flappers will fit. You need a flapper kit with an adapter seat designed for Kohler canister openings. Check your toilet’s model number and buy a kit that lists Kohler compatibility.
Will Converting To A Flapper Affect My Toilet’s Flush Performance?
Possibly. Some Kohler toilets are designed for the strong, even flush of a canister. After converting, you might notice a slightly weaker flush or less rim cleaning. Adjustable flappers can help fine-tune performance.
How Long Does It Take To Do The Conversion?
For most DIYers, it takes about 1 to 2 hours. If you’ve never removed a toilet tank before, give yourself extra time. Having all the parts ready before you start will speed things up.
What If My Toilet Leaks After Conversion?
Check that all gaskets are seated correctly and bolts are tight (but not overtightened). If leaks continue, the flapper seat adapter might not be fitting well. Try a different brand or consult a plumber.
Where Can I Find A Reliable Flapper Conversion Kit For Kohler Toilets?
Look for kits from trusted brands like Kohler, Fluidmaster, or Korky. Buy from reputable hardware stores or check user reviews online. The Home Depot Toilet Flappers section is a good place to start.
—
Changing a Kohler canister flush valve to a flapper is a smart, cost-effective upgrade for many homeowners. With the right tools, a quality kit, and careful installation, you can enjoy easier maintenance and fewer leaks for years to come. Take your time, check compatibility, and don’t be afraid to call a pro if you hit a snag.
Your toilet—and your wallet—will thank you.