
Keeping your home looking fresh often means paying attention to the small details. One of those details is the hardware on cabinets—the handles, knobs, pulls, and hinges that get touched every day. Over time, grease, dust, and fingerprints can dull their shine and even make them sticky. Clean cabinet hardware not only makes your kitchen or bathroom look better but also helps extend its life. Many people forget or avoid cleaning these pieces because they think it’s hard, but with the right approach, it’s easy and can even be satisfying. This guide will walk you through every step to make your cabinet hardware sparkle, whether it’s brass, stainless steel, or painted, and share some tricks you won’t find in basic cleaning tips.
Why Clean Cabinet Hardware?
Cabinet hardware is one of the most touched surfaces in your home. Every time you open a door or drawer, you transfer oils, dirt, and sometimes even food residue. Over time, this buildup doesn’t just look bad—it can actually damage the hardware and the cabinet surface around it.
For example, sticky residue can attract more dust, and moisture from hands can cause metals to tarnish or rust.
Regular cleaning helps:
- Maintain appearance: Shiny, clean hardware makes the whole room look better.
- Prevent damage: Removing grime stops corrosion and staining.
- Improve hygiene: Hardware can harbor germs, especially in kitchens and bathrooms.
Cleaning cabinet hardware is a quick way to refresh your space and protect your investment.
Understanding Cabinet Hardware Types
Not all hardware is the same. Before you start cleaning, it’s important to know what material you’re dealing with. Using the wrong cleaner can ruin the finish or cause discoloration. Here are the most common types:
| Material | Common Appearance | Care Needed |
|---|---|---|
| Brass | Yellow-gold, can be shiny or aged | Needs gentle cleaning, can tarnish |
| Stainless Steel | Silver, smooth, and shiny | Resists rust, but shows fingerprints |
| Nickel | Silver, often matte or satin finish | Can spot easily, avoid harsh scrubbers |
| Bronze | Dark brown or black, sometimes with copper highlights | Often has a protective coating |
| Ceramic/Glass | Colored, painted, or clear | Fragile, needs gentle handling |
| Painted/Coated | Any color, smooth or textured | Can chip, avoid abrasive cleaners |
Non-obvious insight: Sometimes, hardware is plated rather than solid metal. For example, what looks like brass may just be brass-plated. Test with a magnet: if it sticks, it’s likely plated steel.
Tools And Supplies You Will Need
Gathering the right tools before you start will save time and prevent mistakes. Basic cleaning doesn’t need fancy products, but a few specific items can make the job easier and safer.
Must-have supplies:
- Soft microfiber cloths
- Mild dish soap
- Warm water
- Old toothbrush (soft bristles)
- Small bowl or bucket
- Cotton swabs
- Dry towel
Helpful extras for deeper cleaning:
- White vinegar (for mineral deposits)
- Baking soda (for tough stains)
- Lemon juice (for natural cleaning)
- Non-abrasive sponge
- Protective gloves
Pro tip: Avoid steel wool or harsh scrub pads. These can scratch most hardware surfaces, especially plated or coated types.
Preparing For Cleaning
Before you start scrubbing, take a minute to set up the area:
- Clear the workspace: Remove items from around the cabinets so you have room to work.
- Decide: Remove hardware or clean in place? You can clean hardware while it’s still on the cabinet, but for best results, remove it. This lets you clean every angle and prevents water from getting into the wood or finish of your cabinets.
- Take photos: If you remove hardware, take a quick picture with your phone. This helps you remember where each piece goes, especially if you have different sizes or types.
- Collect screws and pieces: Use a small container or zip bag to keep all screws together.
Beginner’s mistake: Skipping removal can leave grime on the back or around the base of the hardware. If you want a true deep clean, take the extra step to remove everything.
Step-by-step Cleaning Process
1. Basic Cleaning For Everyday Dirt
If your hardware just has fingerprints and light dust, basic cleaning is enough.
- Mix a few drops of dish soap with warm water in a small bowl.
- Dip a microfiber cloth in the soapy water, wring it out so it’s damp, not soaked.
- Wipe the hardware gently, working in small circles.
- Use an old toothbrush for grooves, ridges, or detailed areas. Dip it in the soapy water and scrub gently.
- Rinse the cloth in clean water and wipe off soap residue.
- Dry thoroughly with a towel to prevent water spots.
Non-obvious insight: Always dry hardware right away. Water left behind can cause spotting, especially on nickel and brass.
2. Deep Cleaning For Heavy Grime
If you see sticky spots, old grease, or caked-on dirt, you need a deeper clean.
- Remove hardware from the cabinet (if possible).
- Place pieces in a bowl of warm, soapy water. Let soak for 10–15 minutes.
- Scrub with a toothbrush, focusing on tight spots and threads.
- For stubborn grime, make a paste of baking soda and water. Apply with the toothbrush and scrub gently.
- Rinse under warm water and dry completely.
Pro tip: For painted or delicate pieces, skip soaking. Instead, use a damp cloth and spot-clean sticky areas.
3. Removing Tarnish And Stains
Some hardware develops tarnish or stains, especially brass or copper. Here’s how to handle it:
Brass And Copper
- Mix equal parts lemon juice and baking soda to make a paste.
- Rub onto tarnished spots using a soft cloth or toothbrush.
- Wait 5–10 minutes, then rinse and dry.
- For stubborn spots, repeat or use a commercial brass cleaner (test in a small area first).
Stainless Steel
- Wipe with a vinegar-soaked cloth to remove fingerprints or mineral spots.
- Buff with a dry microfiber cloth for extra shine.
Painted Or Coated Hardware
- Avoid acids (vinegar, lemon) and scrubbing. Use only mild soap and water.
4. Cleaning Hinges And Moving Parts
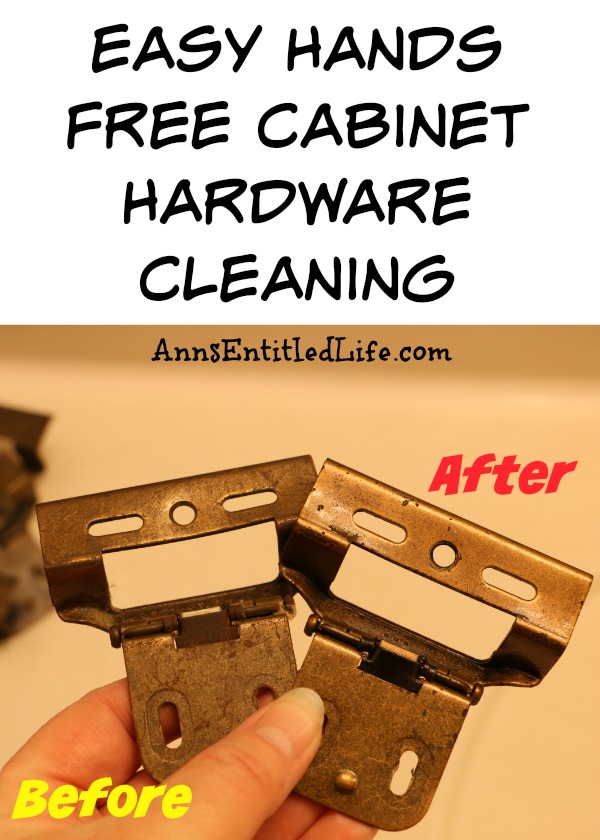
Hinges are often overlooked. Dirty hinges can creak or feel stiff.
- Remove the hinge from the cabinet if possible.
- Wipe with a damp cloth. Use a toothbrush to clean in grooves.
- For sticky or noisy hinges, add a drop of mineral oil or silicone spray after cleaning. Wipe off extra oil so it doesn’t attract dust.
Beginner’s mistake: Using WD-40 as a cleaner. It’s a lubricant, not a cleaner, and can attract dust if not wiped off.
5. Polishing And Protecting
After cleaning, polishing can make hardware shine and add a layer of protection.
- For metals, use a small amount of metal polish on a soft cloth. Rub gently, then buff with a clean cloth.
- For glass or ceramic, buff with a dry towel.
- For antique or aged finishes, avoid polishes that remove patina (the dark, aged look).
Practical tip: A thin coat of car wax on metal hardware can help prevent fingerprints and stains.
Cleaning By Hardware Type
Let’s break down the ideal method for each hardware material so you can get the best results without damage.
Brass Hardware
- Test for solid brass by holding a magnet to it. If it doesn’t stick, it’s solid brass.
- Use lemon juice and baking soda paste for tarnish.
- Avoid ammonia-based cleaners—they can damage brass.
- Dry thoroughly to avoid water spots.
Stainless Steel Hardware
- Clean with mild soap and water.
- Wipe in the direction of the grain for best results.
- For extra shine, a little olive oil on a cloth can help.
- Never use bleach or abrasive pads.
Nickel And Chrome
- Use only mild soap and water.
- Rinse and dry right away.
- Avoid acidic or abrasive cleaners.
- Use a soft cloth to buff.
Bronze And Oil-rubbed Finishes
- Clean with a soft, damp cloth.
- If the finish is “living” (not sealed), avoid all polishes and acids.
- For sticky spots, use a little mild soap, then dry immediately.
- Never soak in water.
Painted Or Powder-coated Hardware
- Only use a damp cloth and mild soap.
- Avoid scrubbing, which can chip or scratch the finish.
- Buff dry with a clean towel.
Glass Or Ceramic Knobs
- Wipe with a damp cloth.
- For stuck-on dirt, use a little vinegar, but avoid the metal parts.
- Dry completely.
Special Cases: Cleaning Antique Or Delicate Hardware
Antique or heirloom hardware often has finishes that can be damaged easily. Here’s how to protect it:
- Avoid soaking in water. Use a damp cloth only.
- Test any cleaner on the back or a hidden area first.
- Don’t use commercial polishes unless the manufacturer recommends them.
- For heavy tarnish, contact a professional restorer.
How Often Should You Clean Cabinet Hardware?
The right frequency depends on where the hardware is and how often it’s used. Here’s a quick guide:
| Room | Recommended Cleaning |
|---|---|
| Kitchen | Every 2–4 weeks |
| Bathroom | Every 4–6 weeks |
| Bedroom/Closet | Every 2–3 months |
| Office/Laundry | Every 2–3 months |
Pro tip: Wipe hardware lightly every week with a dry microfiber cloth to reduce the need for deep cleaning.
Common Mistakes To Avoid
Many people damage their hardware by making these common mistakes:
- Using harsh chemicals: Bleach, ammonia, and strong acids can strip finishes.
- Scrubbing with abrasive pads: Steel wool and rough sponges scratch metal and paint.
- Skipping the dry step: Leaving hardware wet encourages water spots and rust.
- Ignoring the back side: Dirt can build up behind knobs and handles.
- Mixing hardware: When removing, mixing up different screws or pieces can make reassembly hard.
- Not checking for loose parts: Cleaning is a good time to tighten loose screws or replace worn hardware.
Non-obvious insight: Many hardware finishes are protected with a thin lacquer. If you use the wrong cleaner, you can remove this coating, making future cleaning much harder.
When To Replace Instead Of Clean
Sometimes, cleaning isn’t enough. If your hardware is chipped, pitted, or rusted beyond repair, it might be time to replace it.
- If the finish is flaking or peeling, cleaning won’t restore it.
- If screws are stripped or won’t tighten, consider new hardware.
- If hardware feels rough or sharp, it may be corroded underneath.
Tip: Take one piece with you when shopping for replacements to match size and style.
Sustainable And Eco-friendly Cleaning Options
Many commercial cleaners contain chemicals that aren’t good for your health or the environment. Here are some greener alternatives:
- Vinegar and water: Great for removing fingerprints and mineral spots.
- Baking soda paste: Effective for tough stains without scratching.
- Lemon juice: Natural acid for tarnish, but use only on real brass or copper.
- Reusable cloths: Microfiber cloths trap dust and can be washed and reused.
Pro tip: Avoid disposable wipes—they often leave residue and create extra waste.
For more on eco-friendly cleaning, see EPA’s guide to greener products.
Maintaining Hardware Between Cleanings
You don’t have to wait until your hardware looks dirty. Light, regular maintenance keeps your cabinets looking their best.
- Wipe hardware with a dry or lightly damp microfiber cloth weekly.
- Spot-clean sticky spots right away to prevent buildup.
- Check for loose screws and tighten as needed.
- If you have small children, wipe down hardware more often to avoid sticky fingerprints.
Practical tip: Keep a small cleaning kit (cloth, mild soap, toothbrush) in your kitchen or bathroom for quick touch-ups.
Credit: www.annsentitledlife.com
Diy Cleaning Solution Recipes
Commercial cleaners can be expensive and unnecessary. Here are some simple, safe recipes you can make at home:
All-purpose Hardware Cleaner
- 1 cup warm water
- 1 teaspoon mild dish soap
Mix in a bowl and use with a cloth or toothbrush for most hardware.
Brass Or Copper Tarnish Remover
- 1 tablespoon baking soda
- 1 tablespoon lemon juice
Mix into a paste. Apply with a cloth, wait a few minutes, then rinse and dry.
Stainless Steel Shine Spray
- 1 cup water
- 1/2 cup white vinegar
Mix in a spray bottle. Spray on hardware, then wipe with a soft cloth.
Non-obvious insight: Always rinse hardware after using vinegar or lemon juice to prevent long-term corrosion.
How To Reinstall Hardware After Cleaning
Once your hardware is clean and dry, reinstalling it correctly is key to making everything look neat and work smoothly.
- Check for any remaining dirt: Wipe the area where the hardware attaches to the cabinet.
- Align holes carefully: Use your photo from earlier as a guide to place each piece back in the right spot.
- Tighten screws firmly but not too tight: Over-tightening can crack wood or strip screws.
- Test each piece: Open and close doors and drawers to make sure everything moves smoothly.
- Check for squeaks: If a hinge squeaks, add a drop of oil and wipe off the extra.
Pro tip: If you find a loose screw hole, fill it with a wooden toothpick and glue. Let dry, then reinstall the screw.
Credit: hapnyhome.com
Troubleshooting Common Problems
Even after cleaning, you might face some issues. Here’s how to handle them:
Hardware Still Looks Dull
- Try a metal polish (test first).
- Make sure all soap and cleaner residue is removed.
- Buff with a clean, dry microfiber cloth.
Sticky Residue Won’t Come Off
- Use a small amount of rubbing alcohol on a cloth (test in a small area).
- For heavy grease, try a paste of baking soda and water.
Rust Spots
- For small spots, use a paste of baking soda and water.
- For larger areas or deep rust, replacement may be necessary.
Hardware Won’t Tighten
- Check for stripped screw holes.
- Fill holes with wood filler or toothpicks and glue, then reinstall.
Squeaky Hinges
- Add a drop of mineral oil or silicone spray.
- Wipe away any extra to prevent dust buildup.
Frequently Asked Questions
How Do I Know What Material My Cabinet Hardware Is?
Most hardware will look like brass, nickel, or stainless steel, but looks can be deceiving. Test with a magnet: if it sticks, it’s likely plated steel. For more details, check with the manufacturer or look for markings on the back.
Can I Use Vinegar On All Types Of Hardware?
No. Vinegar is safe on stainless steel and glass but can damage brass, nickel, and certain coatings. Always test in a small, hidden area first or stick to mild soap and water if you’re unsure.
What Should I Do If My Hardware Has Green Or Blue Stains?
This usually means copper or brass is reacting to moisture (verdigris). Use a baking soda and lemon juice paste to remove it, then rinse and dry well. If stains return, check for leaks or high humidity.
Is It Safe To Put Hardware In The Dishwasher?
It’s not recommended. The heat and detergent can damage coatings and paint, and small parts can get lost. Always clean by hand for the best and safest results.
How Do I Prevent Fingerprints On Shiny Hardware?
Regular cleaning and a thin layer of car wax or furniture polish can help reduce fingerprints. Buff with a microfiber cloth for a lasting shine.
Caring for your cabinet hardware doesn’t have to be a chore. With these tips and a little attention to detail, you’ll keep every handle, knob, and hinge in top shape for years. Clean hardware can make your kitchen or bathroom look new again—and sometimes, the smallest changes make the biggest difference.

Credit: www.youtube.com