
Moving to a new home can be both exciting and stressful. If you own a KitchenAid mixer, you know how valuable and heavy this kitchen tool is. Packing it the right way can prevent damage, save you repair costs, and make your unpacking much smoother. Many people think you just need a box and some tape, but there are important steps and insider tips that make a big difference. Let’s walk through the best way to pack your KitchenAid mixer for moving, so you can enjoy baking in your new kitchen without any worries.
Why Proper Packing Matters
A KitchenAid mixer is not just another appliance. It’s a combination of strong metal parts, sensitive electronics, and heavy attachments. If not packed well, the mixer can get scratched, dented, or even broken during the move. Repairs are expensive, and some damages can’t be fixed. Careful packing protects your investment and helps your mixer last for many years.
Many mixers are damaged during moving because people forget to secure the bowl, remove attachments, or pad the appliance well. Taking time now to pack it right can save you many problems later.
Supplies You’ll Need
Gathering the right packing materials before you start makes the process much easier and safer. Here’s what you’ll need:
- Sturdy box (preferably the original KitchenAid box or a heavy-duty moving box)
- Bubble wrap for cushioning
- Packing paper for extra padding
- Packing tape (strong and wide)
- Zip ties or twist ties for cables
- Plastic bags for small parts and attachments
- Permanent marker for labeling
- Foam sheets or towels for added protection
Choosing The Best Box
If you still have the original KitchenAid box and foam inserts, use them. They are designed to fit the mixer perfectly and keep it safe. If not, pick a box that is slightly larger than your mixer, strong enough to hold its weight, and has room for padding on all sides.
Why Quality Materials Matter
Cheap or thin boxes can break under the weight of a KitchenAid mixer, especially if it’s a larger model. Low-quality bubble wrap tears easily and won’t protect against bumps. Investing in good materials is a small cost compared to the price of a mixer.
Preparing The Mixer Before Packing
Before putting your mixer in a box, it’s important to get it ready. This step stops parts from moving around and getting damaged.
Unplug And Clean
Always unplug your KitchenAid mixer before packing. This protects you from electric shock and prevents damage to the cord. Clean the mixer thoroughly. Wipe away any flour, sugar, or food bits. If you pack it dirty, you might attract pests or cause sticky messes during the move.
Remove Attachments And Accessories
All removable parts should be taken off the mixer. This includes:
- The mixing bowl
- The flat beater
- The whisk
- The dough hook
- Splash guard, pouring shield, and other extras
Each of these should be cleaned, dried, and packed separately. Packing them with the mixer can cause scratching or dents.
Secure Loose Parts
Some parts, like the bowl locking plate or tilt-head lever, can move during transit. Use painter’s tape or a soft cloth to hold them in place. Never use strong tapes directly on the mixer’s finish, as they can leave sticky marks or peel the paint.
Coil The Power Cord
Gently wrap the power cord and secure it with a zip tie or twist tie. Do not wrap the cord too tightly, as this can damage the wire inside.
Dry Everything
Before packing, make sure all parts are completely dry. Moisture can cause mold or rust during a long move.
Packing The Main Mixer Unit
This is the most important step. The mixer body is heavy and needs strong support.
Wrapping The Mixer
Place the mixer on its side on a thick layer of bubble wrap. Wrap the mixer with at least two layers of bubble wrap, covering all surfaces. Pay special attention to the mixing head and the base, as these parts are most likely to be damaged.
After bubble wrapping, you can add a layer of packing paper for extra protection. If you want, use foam sheets or a towel for more padding.
Placing The Mixer In The Box
Put a thick layer of crumpled packing paper or bubble wrap at the bottom of the box. This gives the mixer a soft base to rest on. Gently lower the wrapped mixer into the box. The mixer should fit snugly but not tightly.
If there is too much space, it can shift and get damaged.
Fill any gaps around the mixer with more packing paper, bubble wrap, or towels. Make sure the mixer cannot move inside the box. If you can shake the box and hear the mixer shift, add more padding.
Protecting The Mixer Head
Some KitchenAid mixers have a tilt-head design. For these, make sure the head is locked in the down position. Add extra padding under and around the head to stop it from moving.
Packing The Attachments And Bowl
The attachments and mixing bowl need special care. They are smaller but can still break or scratch.
Wrapping Each Attachment
Wrap each attachment separately in bubble wrap or soft paper. Secure with tape, but don’t tape directly to the metal. Place smaller parts (like screws or pins) in a small plastic bag.
For glass or ceramic bowls, use extra bubble wrap. Metal bowls are strong but can dent or scratch, so add a soft towel or foam sheet between the bowl and other items.
Packing The Bowl
If the bowl fits inside the box with the mixer (with enough padding and without making the box too heavy), put it in. If not, pack it in a separate box. Place the wrapped bowl in the center and surround it with padding.
Keeping Small Parts Together
Put all small parts and attachments in a plastic bag. Label the bag clearly (“KitchenAid Attachments”) and tape it to the side of the box or pack it on top. This way, you won’t lose anything during the move.
Labeling And Sealing The Box
Once everything is packed, seal the box with strong packing tape. Run tape along all seams and across the top for extra strength.
Use a permanent marker to write “KitchenAid Mixer” on the box. Add “Fragile” and “This Side Up” if needed. A clear label helps you and the movers handle the box with care and makes unpacking easier.
Moving Day: Handling Your Packed Mixer
On moving day, carry the box from the bottom, not the sides. The mixer is heavy, and boxes can tear. Don’t stack heavy boxes on top of the mixer box. Place it upright in the moving truck, away from sharp objects or liquids.
If you’re hiring movers, tell them about the mixer’s value and weight. Ask them to keep it in a safe spot. If you’re moving it yourself, keep it with other fragile kitchen items.
Unpacking And Reassembly
Once you arrive at your new home, unpack the KitchenAid mixer as soon as possible. Check for any signs of damage. Reassemble the mixer by attaching the bowl and accessories. Plug it in and run a quick test to make sure everything works.
If you notice any problems (like strange noises or a jammed head), check the manual or contact customer support before using it again.
Common Mistakes To Avoid
Even careful people sometimes make mistakes when packing a KitchenAid mixer. Here are some errors to watch for:
1. Using A Box That’s Too Big Or Too Small
A box that’s too big lets the mixer move around, risking damage. A box that’s too small doesn’t allow for enough padding.
2. Packing The Mixer With Attachments Still On
This can cause scratches, dents, or broken parts.
3. Forgetting To Pad The Bottom And Sides
Most damage happens from bumps on the bottom or sides during moving.
4. Using Newspaper For Wrapping
The ink can rub off and stain the mixer’s surface.
5. Packing A Wet Or Dirty Mixer
This can cause mold, rust, or sticky messes.
6. Not Labeling The Box Clearly
If the box isn’t marked, it might get stacked at the bottom or opened roughly.
7. Packing The Power Cord Loosely
Loose cords can get caught or damaged.
8. Ignoring The Mixer’s Weight
Some people let the mixer box sit on top of lighter boxes, which can crush them.
Avoiding these mistakes will help protect your mixer and make your move smoother.
Packing A Kitchenaid Mixer Vs. Other Small Appliances
It’s easy to think all kitchen appliances are the same, but a KitchenAid mixer is different because of its weight, size, and value. Here’s a quick comparison:
| Appliance | Average Weight | Packing Difficulty | Special Precautions |
|---|---|---|---|
| KitchenAid Mixer | 20-30 lbs | High | Remove attachments, pad well |
| Toaster | 2-4 lbs | Low | Empty crumbs, pack cord |
| Blender | 5-10 lbs | Medium | Remove blade, secure jar |
| Coffee Maker | 5-8 lbs | Medium | Empty water, remove pot |
As you can see, the KitchenAid mixer is heavier and more complex to pack than most other small appliances.
Packing For Short Moves Vs. Long Distance Moves
How you pack can change depending on the distance you’re moving. Here’s how the two compare:
| Move Type | Packing Needed | Risks | Extra Tips |
|---|---|---|---|
| Short Move (across town) | Standard padding, sturdy box | Minor bumps | Carry yourself if possible |
| Long Distance (across country) | Extra padding, double boxing | More shaking, temperature | Use climate-safe truck if possible |
For long moves, consider double boxing: pack the mixer in one box, then put that box inside a larger box with more padding. This gives you extra protection.
Tips For International Moves
If you’re shipping your KitchenAid mixer overseas, there are extra things to consider:
- Voltage: North American mixers use 110V, but other countries may use 220V. You may need a transformer or adapter.
- Customs: Some countries charge import taxes on kitchen appliances. Check the rules before you move.
- Insurance: Get moving insurance that covers the full value of your mixer.
- Shipping Method: Air shipping is faster but more expensive. Sea shipping is slower and can expose the mixer to moisture, so seal it well.

Credit: transcanadautilities.com
How To Store A Kitchenaid Mixer After Moving
Sometimes, you might not need your mixer right away. Maybe your kitchen isn’t set up yet, or you’re remodeling. Here’s how to store it safely:
- Keep it in the box with all padding if possible.
- Store in a dry, cool place to prevent rust or mold.
- Avoid stacking heavy items on top of the box.
- Check the mixer every few weeks for moisture or pests if storage is long-term.
What To Do If You Lose The Original Box
Don’t worry if you don’t have the original KitchenAid mixer box. You can still pack your mixer safely:
- Visit a moving supply store and ask for a “dish pack” or “appliance box”. These boxes are thick and strong.
- Use foam boards or thick towels to mimic the foam inserts of the original box.
- Make sure there are at least 2 inches of padding on all sides.
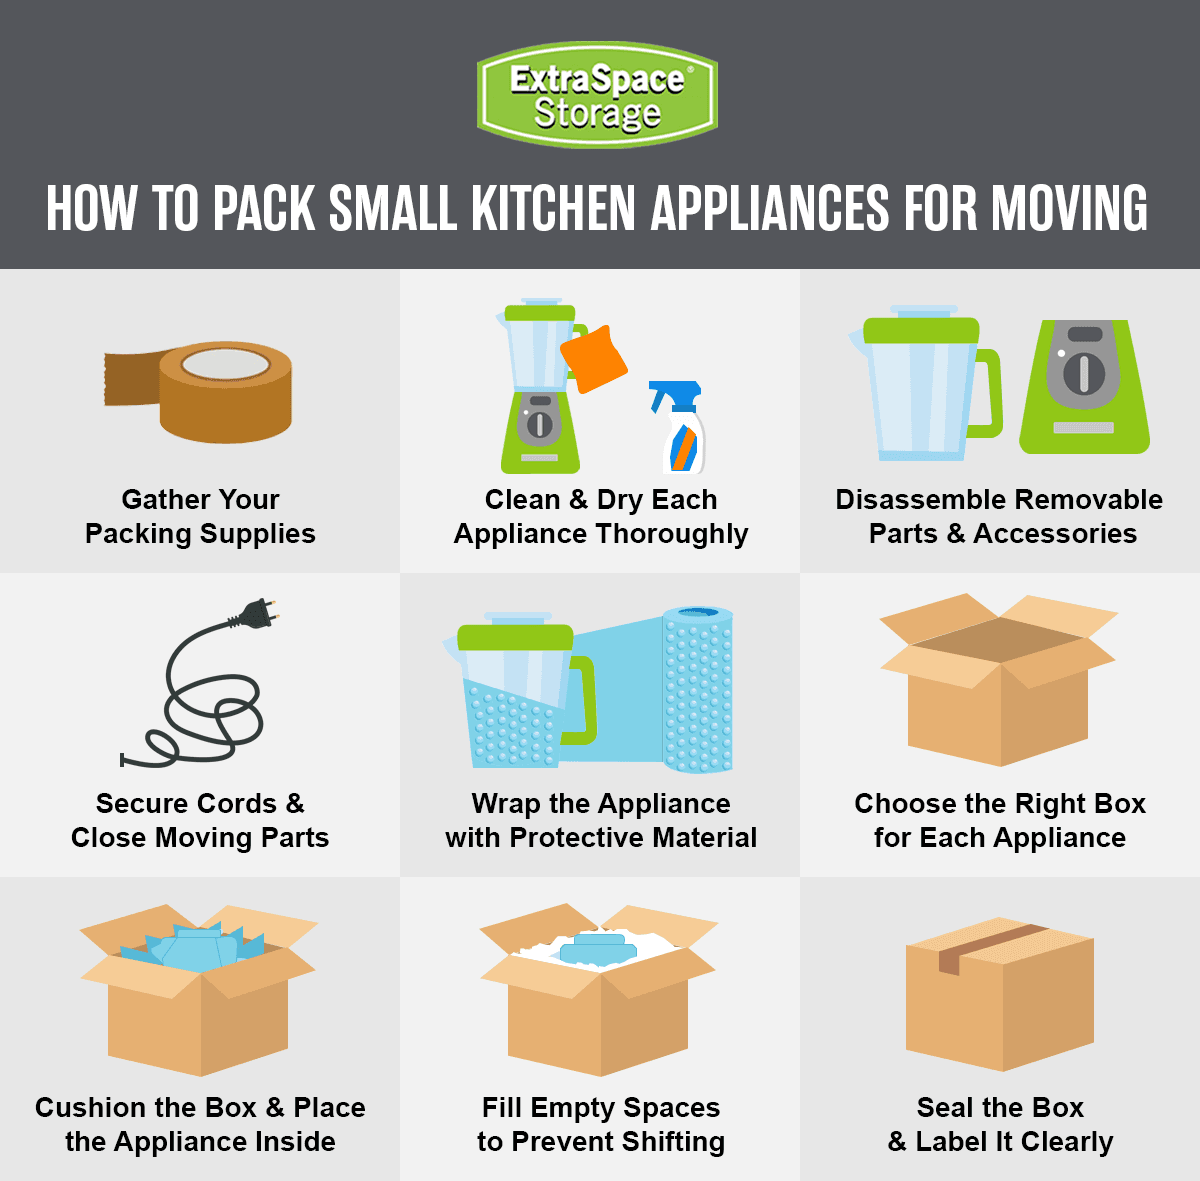
Credit: www.extraspace.com
Cost Of Replacing Damaged Kitchenaid Mixers
Many people don’t realize how expensive it is to fix or replace a damaged KitchenAid mixer. Here are some typical costs in the US:
| Repair/Replacement | Average Cost |
|---|---|
| Replace mixing bowl | $40 – $80 |
| Replace attachments | $20 – $60 each |
| Fix motor | $120 – $200 |
| New KitchenAid mixer | $300 – $700 |
Packing your mixer well is a small effort compared to the cost of repairs or buying a new one.
Two Non-obvious Insights For Packing Success
- Check for hidden screws or pins: Some KitchenAid models have small screws or pins that keep attachments secure. These can fall out during a move and are easy to miss. Check your model’s manual and secure all screws before packing.
- Keep a photo record: Before disassembling your mixer, take clear photos of how everything fits together. This makes reassembly much easier, especially if you forget where a part goes.

Credit: www.guardianstorage.com
Final Packing Checklist
Before sealing your mixer box, check these steps:
- Mixer is clean and dry
- All attachments removed and packed separately
- Power cord coiled and secured
- Mixer wrapped with bubble wrap and paper
- Box padded on all sides
- Bowl and attachments labeled and in plastic bags
- Box sealed tightly and labeled “Fragile”
- Mixer cannot move inside the box
If you can check off every item, you’re ready for a safe move.
Where To Find More Help
If you want more information, the official KitchenAid website has detailed manuals for each model and extra tips for care and transport. You can visit the KitchenAid Official Guide for more packing details.
Frequently Asked Questions
What If I Can’t Find A Box The Right Size For My Kitchenaid Mixer?
You can use two smaller boxes taped together or buy a heavy-duty “appliance” or “dish pack” box from moving supply stores. Just make sure there’s enough padding on all sides and that the box is strong enough for the mixer’s weight.
Should I Keep The Original Kitchenaid Box After Buying The Mixer?
Yes, if possible. The original box and foam inserts give the best protection during a move. If you don’t have them, use a similar-sized heavy-duty box with lots of padding.
Can I Pack My Kitchenaid Mixer With Other Kitchen Items?
It’s best to pack your mixer alone in its own box. If you must pack it with other items, use lots of padding and keep heavy objects away from the mixer to avoid damage.
What Is Double Boxing, And Should I Use It?
Double boxing means putting your packed mixer box inside a second, larger box with extra padding between the two. This gives extra protection, especially for long-distance or international moves.
How Do I Clean My Mixer Before Packing?
Unplug the mixer and wipe all surfaces with a damp cloth. Remove and wash all attachments and the bowl. Dry everything completely before packing to avoid mold or rust.
Moving your KitchenAid mixer doesn’t have to be stressful. With careful packing, good materials, and a little extra attention, you can protect your favorite kitchen tool and enjoy it for years to come in your new home.