
Making your own oven mitt can be a deeply satisfying project. Whether you love to cook, want a unique kitchen gift, or need a new craft idea, sewing an oven mitt is a great choice. You get to choose the fabric, decide the shape, and ensure it fits your hand perfectly.
Even if you are new to sewing, this project is doable with patience and attention. By the end, you will have a practical tool that adds a bit of personality to your kitchen.
Creating an oven mitt also teaches you useful sewing skills. You learn about layering fabrics, working with insulation, and adding details like bias tape. These skills can help you with other sewing projects in the future. Plus, a homemade oven mitt is often sturdier and more comfortable than many store-bought ones.
Let’s break down every step, from picking materials to the final stitch, so you end up with a mitt you’ll be proud to use.
Why Make Your Own Oven Mitt?
Sewing your own oven mitt offers many advantages. First, it lets you pick materials that suit your taste and needs. You can use fun prints, match your kitchen colors, or use recycled fabrics. Homemade mitts often fit better, especially if you have large or small hands.
Another benefit is custom insulation. Many store-bought mitts use thin or low-quality padding. When you make your own, you can choose thicker batting or special heat-resistant layers. This helps prevent burns and makes handling hot pans safer. You also get to control the shape—some people prefer classic mitts, while others want a long glove or even a double-handed version.
Finally, making a mitt is a budget-friendly option. High-quality mitts can be expensive, but making one at home costs less, especially if you use fabric you already have. And for people who enjoy crafts, the process is relaxing and creative.
Materials And Tools Needed
Before you begin, gather all the supplies. Using the right materials ensures your mitt will be safe, durable, and comfortable.
Essential Fabrics
- Outer Fabric: Choose 100% cotton. It’s durable, handles heat well, and is easy to sew. Avoid synthetics, as they can melt under high temperatures.
- Lining Fabric: Again, 100% cotton is best. You can use old cotton sheets or pillowcases.
- Insulation: The key to a good oven mitt. Many people use Insul-Bright, a heat-reflective batting. You can also use two layers of cotton batting, but never use polyester—it can melt.
- Bias Tape: This finishes the edge neatly. You can buy it or make your own from cotton fabric.
Tools
- Sewing machine (can sew by hand, but machine is faster)
- Cotton thread (matches fabric color)
- Sewing scissors or rotary cutter
- Straight pins or sewing clips
- Fabric marker or chalk
- Oven mitt pattern (store-bought or homemade)
- Iron and ironing board
- Ruler or measuring tape
- Safety pins (optional, for turning)
Extra Supplies
- Quilting gloves (if you quilt the mitt)
- Spray adhesive (helps keep layers in place)
- Thimble (protects your finger during hand sewing)
Pro tip: Always pre-wash your fabrics so they don’t shrink after you sew the mitt.
Choosing The Right Pattern
The pattern is the backbone of your oven mitt. You have several options:
- Printable Patterns: Many websites offer free downloadable mitt patterns. Print at full scale for accuracy.
- Store-Bought Patterns: Craft stores sell oven mitt patterns. These often include several sizes.
- Create Your Own: Trace your hand, adding at least 1 inch around for seam allowance and thickness. Make the thumb area wide for comfort.
If you want a long mitt (past your wrist), extend the pattern. For a double oven mitt (one piece with two pockets), you’ll need a rectangular pattern with rounded ends.
Non-obvious insight: The mitt shape affects how easily you can grip pans. A wide thumb makes the mitt easier to use, especially for larger hands.
Cutting The Fabric
Once you have your pattern, it’s time to cut the fabric. Accurate cutting is key for a neat final product.
Steps
- Prepare the Fabric: Iron out wrinkles. Lay all fabrics flat.
- Trace the Pattern: Place your pattern on the outer fabric, lining, and insulation. Trace with fabric marker.
- Cut Carefully: You need two pieces of each material—one for the palm, one for the back. For a pair of mitts, cut four of each.
- Layering: Remember, each mitt side will have:
- Outer cotton
- Insulation
- Lining cotton
Make sure the layers match up. Cutting all layers at once can save time but can be tricky for beginners.
Tips
- Use sharp scissors for clean edges.
- Mark the thumb on each piece, so you don’t mix up left/right sides.
- Stack pieces by mitt side to keep organized.
Layering And Quilting
The layers are what keep your hand safe from heat. Proper layering is essential, and quilting holds everything together.
Making The Layers
- Place the lining fabric down first (wrong side up).
- Put the insulation on top.
- Add the outer fabric (right side up).
Pin or clip these three layers together for both the palm and back.
Quilting
Quilting isn’t just decorative—it helps the layers stay together and improves durability. Here’s how to quilt:
- Draw Lines: With a ruler and fabric marker, draw diagonal lines 1.5 to 2 inches apart, forming a grid.
- Sew Along Lines: Stitch through all three layers, following your lines. Use a walking foot if you have one (helps feed thick layers evenly).
You can quilt simple grids or get creative with diamonds or waves. The key is keeping stitches even.
Common beginner mistake: Skipping quilting or not securing layers. This can cause the insulation to bunch up after washing.
Sewing The Oven Mitt Shape
With your quilted pieces ready, it’s time to assemble the mitt.
Steps
- Place Both Sides Together: Put the two quilted pieces right sides together (outer fabrics facing each other).
- Pin Around Edges: Pin or clip all around, leaving the wrist opening unpinned.
- Sew: Using a 1/4 to 3/8 inch seam allowance, sew around the mitt’s edge. Go slowly, especially around the thumb curve.
- Trim Excess: Clip curves and trim seam allowances, especially around the thumb. This helps the mitt turn smoothly.
- Turn Right Side Out: Carefully turn the mitt inside out. Use a blunt tool (like a chopstick) to push out the thumb and seams.
Second non-obvious insight: Double-stitch around the thumb and palm area for extra strength. These spots get the most stress.
:max_bytes(150000):strip_icc()/hero-5ba3f551c9e77c005042246c.jpg)
Credit: www.thesprucecrafts.com
Finishing The Edge With Bias Tape
The wrist opening needs a clean finish. Bias tape makes this easy and strong.
Applying Bias Tape
- Open Tape: If using store-bought, unfold one side of the tape.
- Pin Tape: Align raw edge of tape with the mitt’s opening edge, right sides together. Pin in place.
- Sew: Stitch along the fold line of the tape.
- Wrap Around: Fold the tape over the raw edge to the inside of the mitt.
- Finish: Pin and sew the tape down, either by hand or machine, for a neat look.
You can use matching or contrasting bias tape for style. For homemade tape, cut fabric strips on the bias (45-degree angle) for stretch.
Optional Features To Add
Personalizing your oven mitt can make it unique and more useful.
Hanging Loop
A small loop lets you hang the mitt on a hook. To add one:
- Cut a 4-inch strip of bias tape.
- Fold and sew the long edge.
- Fold into a loop and sew into the wrist seam before adding bias tape.
Extra Padding
If you handle very hot items, add a second layer of insulation. Sandwich it between the lining and the main insulation.
Decorative Touches
- Embroider a name or design on the outer fabric before quilting.
- Use contrasting thread for visible stitching.
- Add a small patch pocket for style.

Credit: www.youtube.com
Testing Your Oven Mitt
Before using your mitt in the kitchen, test its heat resistance.
- Hold a Hot Pan: Carefully grip a hot (but not boiling) pan for 10 seconds.
- Feel for Heat: If you feel warmth but not burning, your insulation is good. If it feels too hot, add another layer next time.
- Check Fit: Make sure your hand moves easily inside and you can grip handles.
Pro tip: Wash the mitt once before first use to soften layers and catch any loose threads.
Cleaning And Maintenance
Keeping your oven mitt clean extends its life and keeps your kitchen safe.
- Machine Wash: Most cotton mitts are machine washable. Use gentle cycle, cold water.
- Drying: Air dry or tumble dry on low. High heat can shrink fabrics or damage insulation.
- Spot Clean: For small stains, use mild soap and water.
- Inspect Regularly: Check for worn spots, tears, or thin areas. Replace if you see damage.
Note: Never iron mitts with synthetic insulation. It can melt and ruin the mitt.
Credit: sewhayleyjane.com
Comparing Homemade And Store-bought Oven Mitts
Let’s see how your homemade mitt stacks up against typical store options.
| Feature | Homemade Mitt | Store-Bought Mitt |
|---|---|---|
| Material Quality | Custom, usually 100% cotton | Often polyester blends |
| Insulation | Can add extra layers | Standard (may be thin) |
| Fit | Custom to your hand size | One-size-fits-most |
| Style | Personalized | Limited designs |
| Cost | Usually lower (using own materials) | Varies, can be expensive |
Homemade mitts excel in fit, style, and insulation, while store-bought ones are faster to get if you need something right away.
Safety Tips For Oven Mitts
A good oven mitt is only safe if used correctly.
- Always use dry mitts. Wet mitts transfer heat quickly and can cause burns.
- Replace worn mitts. Thin or torn spots mean less protection.
- Keep away from open flames. Even cotton can burn if left near a gas burner.
- Never use for grilling unless designed for high heat. Standard mitts may not protect against extreme temperatures.
Non-obvious tip: Some ovens release steam when you open the door. Steam can seep through seams, so always keep your hand above the oven door when reaching inside.
Customizing For Left Or Right Hand
Most oven mitts are ambidextrous, but you can make a left or right-handed version for a better fit.
How To Adjust
- Flip the Pattern: For a left-handed mitt, flip the pattern horizontally before cutting fabric.
- Mark Clearly: Mark the hand orientation on each piece to avoid confusion.
- Pair Them: Make two mitts (left and right) for a set.
This is especially useful for bakers or cooks who use both hands for hot trays.
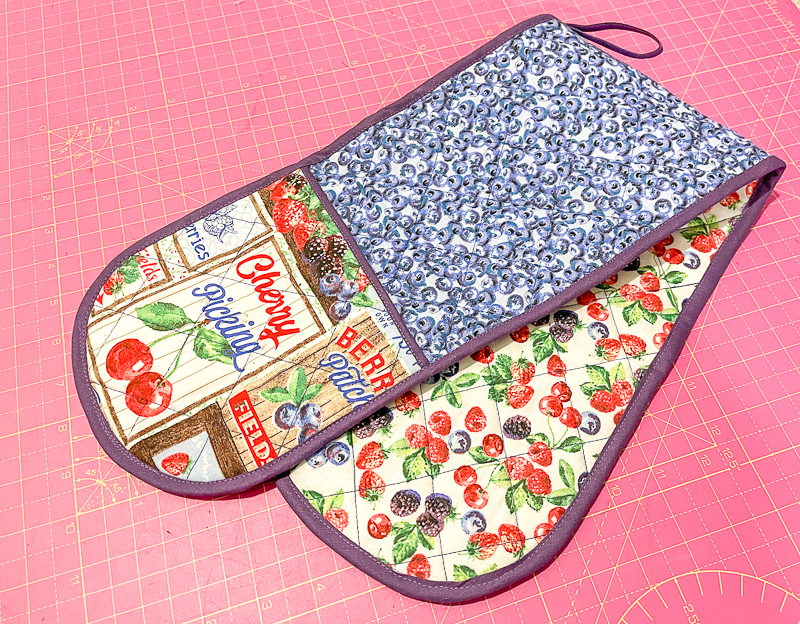
Making A Double Oven Mitt
A double oven mitt covers both hands and the area between. Great for lifting large pans or hot casserole dishes.
Steps
- Pattern: Draw a long rectangle (about 36 inches by 7 inches) with rounded ends for hand pockets.
- Cut Pieces: Outer fabric, insulation, and lining—one of each for the main piece, two each for the pockets.
- Quilt Layers: Quilt the main rectangle and pockets separately.
- Attach Pockets: Sew pockets to each end of the main rectangle.
- Finish Edges: Use bias tape around the whole edge for a neat look.
Double mitts are bulkier but offer more protection for big jobs.
Creative Ideas For Oven Mitts
Let your creativity shine with these unique ideas:
- Patchwork Mitt: Use leftover fabric scraps for a quilted look.
- Themed Mitts: Make holiday or seasonal designs (pumpkins, snowflakes, etc. ).
- Kids’ Mitts: Shrink pattern for child-sized mitts.
- Gift Sets: Pair a mitt with a matching potholder or apron for a personalized gift.
Some people even add a waterproof inner layer for extra protection, though this makes sewing harder.
Common Problems And How To Fix Them
Even with care, mistakes happen. Here’s how to solve common issues.
| Problem | Solution |
|---|---|
| Mitt feels too tight | Add more seam allowance next time; use thinner insulation |
| Seams burst after washing | Double-stitch seams; use stronger thread |
| Heat comes through quickly | Add extra insulation layer; use specialty batting like Insul-Bright |
| Edges look messy | Practice applying bias tape; use clips instead of pins |
| Thumb area is hard to turn | Clip curves more closely; use a blunt tool for turning |
Don’t get discouraged by small mistakes. Each mitt you make will look and work better than the last.
Oven Mitt Patterns You Can Try
If you want to experiment, there are many pattern styles:
- Basic Mitt: The standard shape with a thumb.
- Long Mitt: Covers the forearm for extra protection.
- Double Mitt: One piece with two hand pockets.
- Fingered Mitt: Has individual finger sections (rare but possible).
- Potholder Mitt: Small, just covers the hand.
- Animal-Shaped Mitt: Fun for kids, shaped like animals or objects.
- Quilted Mitt: Uses patchwork for design.
- Lined Mitt: Has a soft inner lining for comfort.
Try different styles to see what you like best.
Sustainability And Upcycling Ideas
Making your own oven mitt is a great way to recycle old materials.
- Old Jeans: Denim is thick and heat-resistant.
- Towels: Use old cotton towels for the inner lining.
- Fabric Scraps: Patchwork mitts use up leftovers from other projects.
- Recycled Cotton Clothing: Shirts or skirts can become mitts.
Using recycled materials saves money and reduces waste. Just make sure all materials are clean and 100% cotton for safety.
Interesting fact: According to the EPA, textiles make up about 5% of landfill waste. Upcycling helps reduce this number.
Troubleshooting Your Sewing Machine For Oven Mitts
Thicker layers can cause sewing machines to jam or skip stitches.
Tips For Trouble-free Sewing
- Use a heavy-duty needle (size 90/14 or 100/16).
- Switch to a walking foot for even feeding.
- Go slow over bulky spots, especially where seams overlap.
- Increase stitch length slightly for thick layers.
- Test on scraps before sewing the real mitt.
If your machine struggles, hand sew small areas with a strong needle and thimble.
Giving Oven Mitts As Gifts
Handmade oven mitts make thoughtful gifts. Here’s how to make them extra special:
- Personalize: Add an embroidered name or initial.
- Bundle: Pair with a homemade recipe card, kitchen towel, or apron.
- Gift Wrap: Use a reusable fabric bag for eco-friendly wrapping.
- Include care instructions: A small tag with washing tips helps the recipient keep it looking new.
Pro tip: For holidays, use themed fabrics or colors.
Where To Learn More
If you want to explore more patterns, techniques, or heat-resistant materials, visit The Spruce Crafts for tutorials and ideas.
Frequently Asked Questions
How Thick Should The Insulation Be For An Oven Mitt?
For good protection, use at least one layer of specialty heat-resistant batting like Insul-Bright, plus one layer of cotton batting. Avoid polyester, as it can melt. If you handle very hot pans, add a second layer of cotton batting.
Can I Make An Oven Mitt Without A Sewing Machine?
Yes, you can sew an oven mitt by hand. Use a strong needle and sturdy cotton thread. Hand stitching takes longer and may not be as durable, so double-stitch seams for strength.
What Fabric Is Best For The Outside Of An Oven Mitt?
100% cotton is safest. It resists heat and washes well. Avoid synthetic fabrics, which can melt and stick to your skin if they get hot. Denim or canvas also work well for heavy-duty mitts.
How Do I Keep My Mitt From Shrinking?
Pre-wash and dry all your fabrics before cutting and sewing. This removes sizing and prevents shrinking after the mitt is made. Always use cold water and low heat when washing finished mitts.
Can I Repair A Damaged Oven Mitt?
Small holes or loose seams can be fixed by hand sewing with strong thread. For large worn spots, it’s safer to make a new mitt. Damaged insulation can’t be replaced easily, so check for thin areas often.
Making an oven mitt is not just about sewing—it’s about safety, style, and creativity in the kitchen. With these steps, tips, and ideas, you’re ready to make a mitt that works well and looks great. Enjoy crafting a tool you’ll use every day!