
Making coffee in a stove top percolator is a ritual that blends tradition with the simple pleasure of brewing a robust cup. Many coffee lovers find the percolator method to be both practical and rewarding, but there are important details to get right if you want that perfect taste.
Whether you’re a beginner or someone looking to improve your percolator skills, this guide will walk you through every step, share insider tips, and help you avoid common mistakes that can ruin your brew.
What Is A Stove Top Percolator?
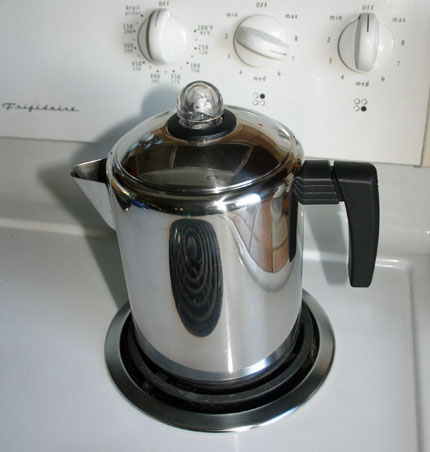
A stove top percolator is a type of coffee pot that uses boiling water to cycle through ground coffee until the desired strength is reached. It’s made of several parts: a bottom chamber for water, a vertical tube, a filter basket for coffee grounds, and a top lid. As the water heats, pressure pushes it up the tube and over the grounds, extracting flavor with each cycle.
Percolators have a long history. They were popular before drip coffee makers became common. Even today, many campers, travelers, and home brewers love the rich, bold flavor percolators produce.
Why Choose A Percolator?
People pick percolators for a few reasons:
- Strong, full-bodied coffee: Percolators extract more oils and flavors, leading to a richer taste.
- No paper filters needed: They use a metal filter basket, saving money and reducing waste.
- Durability: Most percolators are made of stainless steel or enamel, which lasts for years.
- Versatility: You can use them on a home stove, camping stove, or open fire.
One thing that surprises many beginners: percolator coffee can be stronger and more bitter if over-brewed. Learning the right balance is key.
Credit: www.youtube.com
Essential Equipment And Ingredients
To get started, you need the right tools and ingredients. Here’s what you’ll need:
- Stove top percolator (usually 6-12 cup size)
- Fresh coffee beans or ground coffee
- Grinder (if using whole beans)
- Filtered water
- Stove (gas or electric)
- Measuring spoon or scale
Pro tip: Using freshly ground coffee beans makes a big difference in flavor. Pre-ground coffee works, but you may lose some aroma and taste.
Equipment Comparison
The market offers different types of percolators. Here’s a quick look at common materials and features:
| Type | Material | Capacity | Notes |
|---|---|---|---|
| Classic Stove Top | Stainless Steel | 6–12 cups | Most durable, easy to clean |
| Glass Percolator | Borosilicate Glass | 8–12 cups | Watch the brewing process, fragile |
| Enamel Percolator | Enamel-Coated Steel | 6–14 cups | Great for camping, colorful designs |
Most people choose stainless steel for its durability and heat retention. Glass lets you see the coffee as it brews, but it’s less practical for camping or rough handling.
Choosing The Right Coffee Beans
The quality of your coffee starts with the beans. For percolators, medium to dark roast beans are popular, as the method brings out bold flavors. Lighter roasts can taste weak or sour.
Grind Size
Grind size is crucial for percolator success. Too fine, and grounds slip through the filter, making your coffee gritty. Too coarse, and the water passes too quickly, resulting in weak coffee.
- Best grind: Coarse, like breadcrumbs or sea salt
- Avoid: Fine espresso or Turkish coffee grinds
If you use pre-ground coffee, check the label for “percolator grind” or “coarse grind. ” If grinding at home, use a burr grinder for even size.
Non-obvious tip: Freshly roasted beans can give off carbon dioxide, which impacts flavor. Let beans rest for 3–7 days after roasting before brewing.
Credit: www.coffeedetective.com
Water Quality And Measurement
Coffee is mostly water, so quality matters. Use filtered water for the best taste. Tap water with chlorine or minerals can change the flavor.
How Much Water To Use?
Most percolators measure in “cups,” but these are usually 5–6 ounces, not the standard 8-ounce cup. Check your percolator’s markings.
- Rule of thumb: 1 cup of water per serving
Don’t overfill your percolator. Leave some space at the top to prevent boiling over.
Measuring Coffee
The standard ratio is:
- 1 tablespoon of ground coffee per cup of water
If you like stronger coffee, add an extra half tablespoon per cup. For lighter coffee, reduce the amount slightly.
Example:
- For 8 cups (40–48 ounces), use 8 tablespoons (about 40 grams) of coffee.
A kitchen scale provides the most accuracy, but a measuring spoon works well.
Assembling Your Percolator
Putting your percolator together is simple, but each part must be placed correctly for the coffee to brew well.
- Remove the lid and stem from the percolator.
- Add cold, filtered water to the bottom chamber, using the percolator’s markings.
- Insert the metal stem (vertical tube) into the center of the water chamber.
- Place the filter basket onto the stem.
- Add ground coffee to the basket, spreading it evenly. Do not tamp or press it down.
- Attach the lid securely.
Make sure the filter basket sits flat and the stem is straight. If it’s tilted, brewing can be uneven.
Insider tip: Some percolators have a small paper filter, called a “permanent disc” or “percolator disc,” that fits inside the basket. This helps catch fines and keeps your coffee clearer.
Step-by-step Brewing Process
Now, let’s brew your coffee. Each step matters for great results.
1. Place The Percolator On The Stove
Set the assembled percolator on a burner. Use medium heat to avoid scorching the coffee.
2. Heat Slowly
Bring the water to a gentle boil. You’ll hear the percolator start to “perk”—a soft, bubbling sound. Some models have a glass knob on top so you can watch the color change.
- Target temperature: 195–205°F (90–96°C)
If the water boils too hard, the coffee will be bitter. If it’s too cool, the extraction will be weak.
3. Monitor The Perk
This is where patience pays off. Watch the percolator as the color in the glass knob darkens. Listen to the rhythm of the perk—it should be steady, not rapid.
4. Brew Time
- Mild coffee: 4–5 minutes
- Medium: 6–8 minutes
- Strong: 8–10 minutes
Do not exceed 10 minutes. Over-brewing extracts too much bitterness.
Practical example: For most people, 7 minutes gives a balanced cup.
5. Remove From Heat
When you reach your desired strength, take the percolator off the stove. Use oven mitts if the handle is hot.
6. Let It Settle
Allow the percolator to sit for 1–2 minutes. This lets grounds settle at the bottom, making your coffee less gritty.
7. Serve
Open the lid carefully (steam will escape), remove the basket and stem, and pour your coffee. Enjoy black or add milk, sugar, or flavors as you like.
Pro tip: Don’t leave coffee sitting on the heat. It will continue to “cook” and turn bitter. Transfer leftovers to a thermal carafe.
Cleaning And Maintenance
A clean percolator makes better coffee. Old grounds or oils can add off-flavors.
Daily Cleaning
- Allow the percolator to cool.
- Disassemble all parts.
- Wash with warm, soapy water. Use a soft brush for the stem and basket.
- Rinse well and dry completely.
Avoid using abrasive pads, which can scratch the surface and damage your percolator.
Deep Cleaning (weekly Or Biweekly)
Coffee oils can build up over time. To deep clean:
- Fill the percolator with water and 2 tablespoons of baking soda or vinegar.
- Run a brew cycle (no coffee).
- Discard the solution, rinse well, and run a plain water cycle.
Non-obvious insight: Check the rubber gasket (if your percolator has one) for wear. Replace it if cracked, as leaks affect brewing.
Troubleshooting Common Problems
Even experienced brewers face issues. Here’s how to fix them:
Weak Coffee
- Possible causes: Too little coffee, too coarse grind, short brew time, water not hot enough.
- Fix: Use more grounds, grind slightly finer, or brew longer.
Bitter Coffee
- Possible causes: Over-brewing, too fine grind, water too hot, using dark roast for too long.
- Fix: Shorten brew time, use coarser grind, lower heat.
Grounds In Coffee
- Possible causes: Grind too fine, overloaded basket, missing paper disc.
- Fix: Use coarser grind, don’t overfill, add a paper percolator disc.
Percolator Boils Over
- Possible causes: Overfilled with water, heat too high, lid not secure.
- Fix: Fill to marked line, reduce heat, make sure lid is tight.
Insider tip: If your percolator spits or makes loud noises, the water may be boiling too rapidly. Lower the heat and check for blockages in the stem.
Percolator Coffee Vs. Other Brewing Methods
How does percolator coffee compare to other popular styles? Here’s a breakdown to help you choose.
| Method | Flavor Profile | Brewing Time | Strength | Ease of Use |
|---|---|---|---|---|
| Percolator | Bold, robust, sometimes bitter | 7–10 min | Strong | Medium |
| Drip Coffee | Balanced, clean | 5–7 min | Medium | Easy |
| French Press | Rich, full-bodied | 4–5 min | Medium–Strong | Easy |
| Espresso | Intense, concentrated | 0.5–1 min | Very Strong | Complex |
| Pour Over | Clean, nuanced | 3–4 min | Mild–Medium | Medium |
Percolators are best for those who enjoy strong, old-fashioned coffee and don’t mind a bit of boldness. If you prefer a lighter or cleaner taste, try pour over or drip.
Tips For Better Percolator Coffee
Even small changes can upgrade your percolator coffee. Here’s how to get more flavor and less bitterness.
- Use freshly ground coffee for best aroma.
- Preheat your water before assembling the percolator. This speeds up brewing and reduces bitterness.
- Use a timer so you don’t over-brew by accident.
- Don’t pack the grounds—spread them evenly but do not tamp.
- Keep the lid closed tightly so steam doesn’t escape.
- Clean all parts regularly to avoid stale flavors.
- Experiment with ratios and grind size to match your taste.
Hidden detail: If your percolator has a “keep warm” feature, avoid using it for long periods. Coffee continues to extract and can become unpleasant.
Adding Flavors And Variations
While classic black coffee is great, you can experiment with flavors to suit your mood.
- Add a cinnamon stick to the water chamber for a hint of spice.
- Drop in a few cardamom pods for Middle Eastern flair.
- Mix in cocoa powder with the grounds for a mocha twist.
- Try flavored syrups after brewing (vanilla, hazelnut, caramel).
If you add spices, clean your percolator thoroughly to avoid lingering flavors.
Non-obvious insight: Some people add a pinch of salt to the grounds to smooth out bitterness.
Health And Safety Considerations
Percolator coffee has more oils and sometimes higher caffeine than drip or pour over. For most people, this is safe and enjoyable. However, if you have heart issues or are sensitive to caffeine, monitor your intake.
- Caffeine content: 80–200 mg per 8-ounce cup, depending on strength
- Cholesterol: Percolator coffee is unfiltered, so it may contain more cafestol, a natural oil that can raise cholesterol. If you drink several cups daily, consider using a paper disc filter.
Always handle the percolator with care. The metal body, lid, and handle can become very hot during brewing.
Common Mistakes And How To Avoid Them
Many new users make avoidable errors that spoil the coffee or damage the percolator. Here are some to watch out for:
- Using the wrong grind size – Too fine and you get muddy coffee; too coarse and it’s weak.
- Overfilling with water – This can cause dangerous boiling over.
- Brewing too long – Results in bitter, unpleasant taste.
- Neglecting regular cleaning – Old oils and grounds make coffee taste stale.
- Leaving coffee on heat – It keeps extracting and becomes sour.
- Ignoring percolator maintenance – Worn gaskets or seals can lead to leaks and poor brewing.
Insider tip: If your percolator handle is loose or wobbly, tighten it before use. Hot coffee can spill unexpectedly.
Environmental Impact And Sustainability
Percolators are more eco-friendly than many electric machines. They use no disposable filters, and most are built to last for decades. If you want to reduce your coffee footprint:
- Choose stainless steel over plastic
- Use reusable filters or discs
- Buy fair trade or organic coffee
When you’re finished, coffee grounds make excellent compost for gardens.
Percolator Coffee Around The World
Different cultures use percolators in unique ways. In the US, they’re classic for camping and family breakfasts. In Italy, a similar device called the Moka pot brews strong, espresso-like coffee on the stove. Scandinavian countries favor enamel percolators, often brewed over open fires.
Fun fact: During the 20th century, percolators were the primary coffee method in North America until the 1970s, when drip machines took over.
Comparing Percolator Brands
If you’re buying your first percolator, choosing the right brand matters. Here’s a quick comparison of popular options:
| Brand | Material | Features | Price Range |
|---|---|---|---|
| Farberware | Stainless Steel | Classic design, dishwasher safe | $30–$60 |
| GSI Outdoors | Enamel-coated Steel | Great for camping, easy pour spout | $20–$45 |
| Coletti Bozeman | Stainless Steel | No aluminum, lifetime warranty | $40–$75 |
| Medelco | Borosilicate Glass | See-through brewing, BPA free | $18–$35 |
Choose based on your lifestyle—campers may prefer enamel, home brewers might like classic stainless steel.
When To Use A Percolator
Percolators shine in certain situations:
- Camping trips: Durable and doesn’t need electricity.
- Large gatherings: Most hold 8–12 cups—perfect for sharing.
- Retro kitchens: Adds vintage charm.
- Travel: Works anywhere you have a heat source.
But they do require attention. If you want “set it and forget it,” a drip machine may be better.

Credit: coletticoffee.com
Final Thoughts
Learning how to make coffee in a stove top percolator is about understanding technique, patience, and a few small details. When done well, you’ll enjoy a cup that’s rich, aromatic, and full of character. The process can be almost meditative—measuring, listening, and watching as your coffee perks to perfection.
Don’t be discouraged by a few missteps early on. Every percolator has its quirks, but with practice, you’ll develop a routine that produces consistent, delicious coffee. Start with the basics, experiment with different beans and grind sizes, and always keep your equipment clean.
For more on the science and history behind percolation brewing, check out this excellent resource: Wikipedia: Coffee Percolator.
Frequently Asked Questions
How Much Coffee Do I Put In A Percolator?
Use 1 tablespoon of ground coffee per 6-ounce cup of water. Adjust up or down based on your taste. For a standard 8-cup percolator, start with 8 tablespoons.
Can I Use Regular Ground Coffee In A Percolator?
Yes, but make sure it’s a coarse grind. Regular supermarket “drip” grind can be too fine and may pass through the basket, making your coffee gritty.
Why Is My Percolator Coffee Bitter?
Bitterness usually comes from over-brewing or using too fine a grind. Try shortening the brew time, using a coarser grind, or lowering the heat.
Is Percolator Coffee Stronger Than Drip Coffee?
Typically, yes. Percolator coffee extracts more flavor and caffeine because the water cycles through the grounds multiple times, making it bolder and sometimes stronger than drip.
Can I Use A Percolator On An Induction Stove?
Most stainless steel percolators work on induction stoves, but some aluminum or glass models do not. Check for compatibility before using.