
Decorating your kitchen can completely change how the space feels. Sometimes, you don’t need a full renovation to create a fresh look. One simple idea is to put ribbon on your kitchen cabinets. This small detail can add color, style, and even a bit of charm.
You can do it for holidays, special occasions, or just to brighten your daily routine. Many people overlook this budget-friendly option, but it can make your kitchen feel new without spending much. This guide will walk you through every step, from choosing the right ribbon to creative ideas and common mistakes to avoid.
Whether you want something elegant or playful, you’ll learn how to put ribbon on kitchen cabinets with confidence.
Why Use Ribbon On Kitchen Cabinets?
Adding ribbon to your cabinets does more than just decorate. It’s a flexible way to update your kitchen without painting or replacing anything. Here are a few reasons why people choose this method:
- Affordable Transformation: Ribbons are much cheaper than new hardware or a paint job. You can often buy enough for your whole kitchen for less than the price of one can of paint.
- Easy to Change: If you get bored, simply swap the ribbon for another color or pattern. No damage is left behind.
- Seasonal Flexibility: Match ribbons to holidays, seasons, or special events. For example, red and green for Christmas, pastels for spring, or bold colors for birthdays.
- Adds Personality: Ribbon styles can be elegant, rustic, playful, or classic. You can let your personality shine through your choices.
You don’t need to be a craft expert to get beautiful results. Even beginners can achieve a professional look with a few simple tips.
Tools And Materials You’ll Need
Before you start, gather the right tools. Not all ribbons or adhesives work well for cabinets. Here’s what you’ll need:
- Ribbon: Choose the width, color, and material that suits your kitchen and the look you want.
- Scissors: Sharp scissors are important for clean edges.
- Measuring Tape: For accurate ribbon lengths.
- Adhesive: Consider double-sided tape, removable glue dots, or low-tack painter’s tape. Avoid strong glues that can damage cabinet finish.
- Optional Items:
- Hot glue gun (for permanent designs)
- Decorative pins or tacks (for soft wood cabinets or inside doors)
- Ruler (for straight lines)
- Cloth (for cleaning cabinet surfaces)
- Level (to keep lines straight if you want a very neat look)
Ribbon Types: A Quick Comparison
To help you choose the right ribbon, here’s a comparison of common types:
| Ribbon Type | Look & Feel | Best For | Washability |
|---|---|---|---|
| Satin | Glossy, smooth | Elegant, formal designs | Low (spot clean only) |
| Grosgrain | Textured, matte | Durable, everyday use | Medium (hand wash) |
| Organza | Sheer, light | Delicate, airy looks | Low |
| Burlap | Rough, rustic | Farmhouse, vintage | Medium |
| Velvet | Soft, plush | Luxurious, cozy | Low |
Non-obvious tip: Consider washability if your cabinets are near the stove or sink. Some ribbons stain easily.
How To Choose The Right Ribbon
Picking the right ribbon is more than finding a color you like. Think about these factors:
- Width: Wider ribbons (1.5–2.5 inches) stand out more, while thin ribbons (½ inch) give a subtle accent.
- Material: Satin and grosgrain hold their shape well. Organza and velvet are more delicate but show stains easily.
- Color & Pattern: Match your kitchen’s theme. Solid colors are classic, while stripes or polka dots are playful. Metallics add shine for special occasions.
- Length: Measure your cabinets before buying. Always get a bit extra for mistakes or bows.
If you want to make bows, buy wire-edged ribbon—it holds shapes better. For flat wraps, soft ribbon works fine.
Planning Your Design
Before you touch the cabinets, plan your look. A little extra time here saves frustration later.
Decide Where To Place The Ribbon
You have several options:
- Vertical center: Run ribbon from top to bottom, centered on each door.
- Horizontal band: Place ribbon across the width, usually near the top or bottom of the door.
- Edges: Frame the cabinet’s perimeter with ribbon.
- Handles/knobs: Tie a small bow or knot directly onto hardware.
For visual balance, use the same placement style on all cabinets. Mixing styles can look messy unless you have a clear plan.
Sketch Your Layout
Draw a quick diagram of your kitchen. Mark where each ribbon will go and note the length needed. This helps you buy the right amount and prevents waste.
Non-obvious tip: If your cabinets are different sizes, measure each one. It’s common to underestimate total ribbon length.
Preparing The Cabinets
Clean surfaces are key for good adhesion and a neat look.
- Wipe Down Doors: Use a damp cloth and mild soap. Remove grease and dust.
- Dry Thoroughly: Let cabinets dry completely before attaching ribbon.
- Remove Hardware (optional): If you want a super flat look, take off handles or knobs first. This step is not required but can make wrapping easier.
Avoid attaching ribbon to wet or dirty surfaces—adhesive won’t stick, and ribbons may fall off.
Step-by-step: How To Put Ribbon On Kitchen Cabinets
Now, let’s get practical. Here’s how to put ribbon on your cabinets, step by step.
1. Measure And Cut
- Measure the area where you want to place the ribbon. Add 2–3 inches extra for overlap or bows.
- Cut all ribbon pieces before you start attaching. This saves time and keeps the process tidy.
2. Attach Ribbon
- For vertical or horizontal wraps, start at the back of the door (the part not usually visible).
- Place a small piece of double-sided tape or a glue dot at the start point.
- Press the ribbon onto the adhesive, then stretch it across the front of the cabinet.
- Keep the ribbon flat and taut but not stretched too tight (to avoid warping).
- Secure the end on the back side with another piece of tape or adhesive.
If you want a removable design, use low-tack tape. For a more permanent hold, a hot glue gun works, but be careful: hot glue can damage painted or wood surfaces.
3. Make Bows Or Knots
- For a bow on the handle, cut a ribbon piece about 10–12 inches long.
- Tie a simple bow, adjust the loops, and trim the tails at an angle for a neat look.
- For a knot, just tie and trim. Knots look more modern and are less fussy than bows.
4. Double-check Placement
- Step back and look at your cabinets.
- Adjust ribbons so they are straight and evenly spaced.
- If a ribbon sags, add a small piece of tape behind the center.
5. Finish Touches
- If you removed hardware, put it back.
- Smooth out any wrinkles.
- Clean off fingerprints.
Pro tip: For a seamless look, use matching thread to tack down corners of the ribbon with a needle. This is especially useful for textured cabinets.
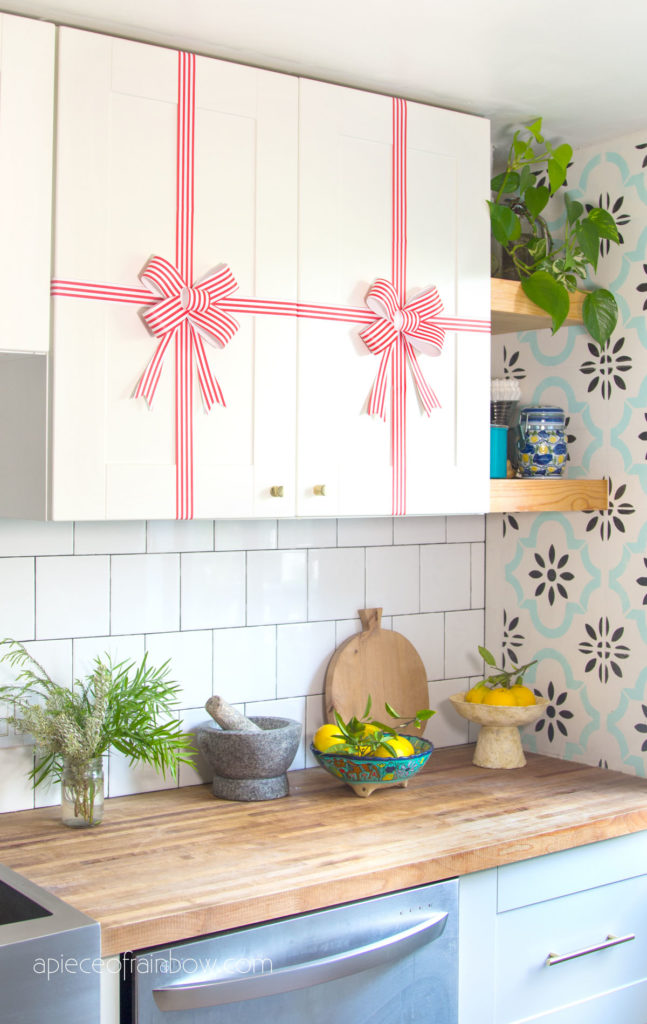
Credit: www.apieceofrainbow.com
Creative Ideas For Ribbon Designs
Ribbon on cabinets doesn’t have to be boring. Here are creative ways to make your kitchen stand out:
1. Holiday Themes
- Christmas: Use red, green, or gold ribbon. Add small ornaments or bells to bows.
- Halloween: Try black and orange ribbons. Add tiny plastic spiders for fun.
- Easter: Pastel ribbons with small faux flowers or eggs.
2. Everyday Elegance
- Use white satin ribbon for a clean, classic look.
- Tie navy blue grosgrain for a modern touch.
- Add pearl pins in the center of each bow for subtle luxury.
3. Rustic Farmhouse
- Use burlap ribbon for a natural, textured feel.
- Add sprigs of dried lavender or wheat behind each bow.
4. Kids’ Kitchens
- Bright, primary colored ribbons.
- Add cute charms (stars, hearts) with safety pins.
5. Special Occasions
- Birthdays: Multi-colored ribbons and small balloons.
- Anniversaries: Gold or silver ribbon, maybe with a love note tucked behind a bow.
Layered Ribbons
Combine two ribbons of different widths. Place a thin, contrasting ribbon on top of a wide one for a layered effect.
Use Ribbon As Labels
Attach a small chalkboard tag or paper label to the ribbon to mark cabinet contents (e. g. , “Snacks,” “Plates”). This is both decorative and practical.
How To Make Ribbon Last Longer
Many people find that ribbons get dirty or wrinkled quickly, especially in busy kitchens. Here are ways to keep them looking fresh:
- Choose Washable Ribbons: Grosgrain and polyester are easier to wash than satin or velvet.
- Spot Clean Regularly: Use a damp cloth to remove splashes or dust.
- Remove When Cooking Greasy Foods: If you’re frying or making a mess, take ribbons off and reattach later.
- Store Flat: If you switch ribbons often, store them flat or rolled—never crumpled.
- Replace Seasonally: Even durable ribbons need replacing after a few months.
Common Mistakes And How To Avoid Them
Many beginners make small errors that ruin the look or waste ribbon. Here are common mistakes and ways to avoid them:
Using Too Much Adhesive
Strong glues can damage cabinet finishes. Use just enough to hold the ribbon. Double-sided tape and removable glue dots are safe choices.
Ignoring Cabinet Function
If you wrap ribbon too tightly, doors may not close properly. Make sure ribbons don’t block hinges or prevent access.
Mismatching Colors
Choose ribbon colors that match or complement your kitchen. Too many colors can look messy. If unsure, go for classic choices like white, navy, or gray.
Not Securing Ends Properly
If ends stick out or fray, the look becomes untidy. Fold ends under or use a lighter to carefully seal synthetic ribbon edges.
Skipping Surface Prep
Dust or grease prevents adhesive from sticking. Always clean cabinets first.
Overcomplicating The Design
Simple designs often look best. Too many bows or layers can overwhelm a small kitchen.
How Ribbon Compares To Other Cabinet Decoration Methods
Some people wonder if ribbon is better than other quick fixes, like decals or contact paper. Here’s a comparison to help you decide:
| Method | Cost | Ease of Use | Removability | Damage Risk |
|---|---|---|---|---|
| Ribbon | Low | Easy | High | Low |
| Decals | Medium | Medium | Medium | Low |
| Contact Paper | Low-Medium | Difficult | Low | Medium |
| Paint | High | Hard | None | High |
Ribbon is the safest and easiest for temporary decoration.
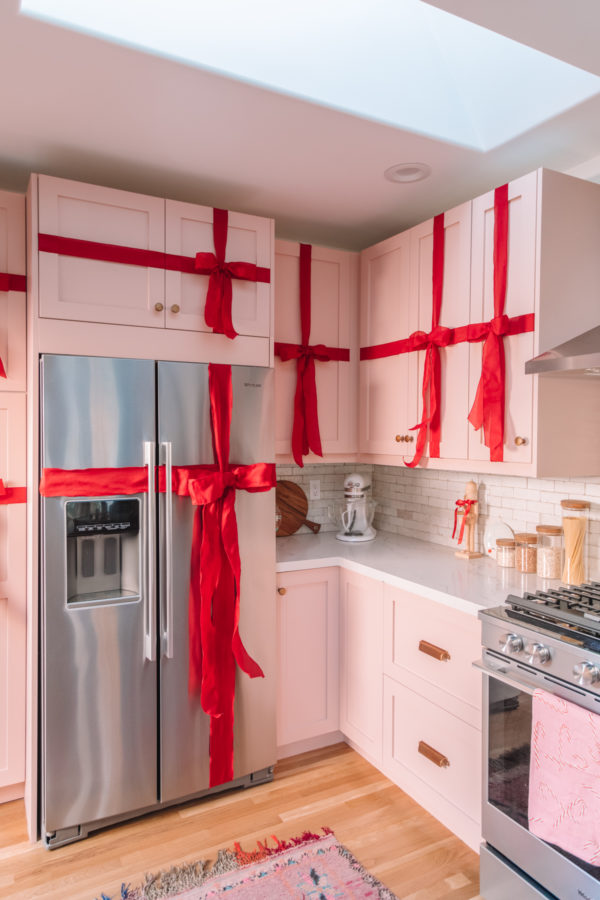
Credit: studiodiy.com
Advanced Tips For A Professional Look
If you want your ribbon cabinets to look like a magazine photo, try these advanced ideas:
- Symmetry Matters: Place ribbons the same way on each cabinet for a polished look.
- Use Ribbon Clips: Small, clear clips can hold ribbon in place without glue, especially inside cabinet doors.
- Coordinate With Other Decor: Match ribbon colors with window treatments, chair cushions, or tablecloths.
- Finish Edges: Fold over or angle-cut ribbon edges to prevent fraying.
- Layer With Other Materials: Combine ribbon with lace, string lights, or small garlands for a unique effect.
Safety Considerations
If you have young children or pets, keep these points in mind:
- Avoid ribbons that dangle too far—they can be a choking hazard.
- Use non-toxic adhesives.
- Don’t use pins or tacks where they can be reached by small hands.
Extra insight: For families with kids, consider using Velcro strips instead of tape. Kids can help decorate, and there’s less risk if the ribbon gets pulled off.
How To Remove Ribbon Without Damaging Cabinets
Ribbon is easy to remove, but adhesive can sometimes leave marks. Here’s the safe way:
- Peel Gently: Remove ribbon slowly. Don’t yank.
- Remove Adhesive Residue: Use a soft cloth with a bit of rubbing alcohol to wipe away any sticky spots. Test on a hidden area first.
- Polish: If your cabinets are wood, apply a bit of furniture polish after removal.
Never scrape with sharp objects. This can scratch cabinet surfaces.
Real-life Examples And Inspiration
Many homeowners and renters use ribbon for different reasons. Here are a few real-life examples:
- Holiday Homeowners: One family decorates their cabinets with red velvet ribbon and silver bells every December. The look is festive but easy to remove in January.
- Apartment Renters: A renter uses pastel ribbons to brighten up plain cabinets, matching them with her curtains for a coordinated look. Since she can’t paint, ribbon is the perfect solution.
- DIY Enthusiasts: Some people create complex patterns, weaving two colors of ribbon in a crisscross pattern for a custom look. This takes more time but gets lots of compliments.
If you want more inspiration, visit Good Housekeeping for photo galleries and style ideas.
Ribbon On Different Cabinet Types
Not all cabinets are the same. Here’s how ribbon works on different surfaces:
| Cabinet Surface | Best Ribbon | Adhesive Type | Notes |
|---|---|---|---|
| Painted Wood | Satin, grosgrain | Tape, glue dots | Test adhesive on small spot first |
| Laminate | Burlap, grosgrain | Double-sided tape | Surface is slick; use stronger tape |
| Glass-front | Organza, satin | Removable tape | Attach ribbon to frame, not glass |
| Unfinished Wood | Any | Pins, tape | Pins work if inside door is soft wood |
Some adhesives leave marks on glossy cabinets. Always test first.
Eco-friendly Options
If you want to decorate without waste, consider these choices:
- Reusable Ribbon: Choose polyester or grosgrain, which can be washed and reused many times.
- Natural Materials: Burlap or cotton ribbons are biodegradable.
- No Adhesive: Tie ribbons around handles instead of taping to the door.
After each season, store ribbons for next year instead of throwing them away.
Troubleshooting: What To Do If Something Goes Wrong
Sometimes, things don’t go as planned. Here’s how to fix common problems:
Ribbon Won’t Stick
- Make sure the surface is clean and dry.
- Try a different adhesive—double-sided tape usually works best.
- For textured or oily cabinets, use removable mounting putty.
Ribbon Sags Or Wrinkles
- Pull ribbon gently while attaching.
- Add a small piece of tape behind the center.
- For bows, fluff them after tying and trim ends evenly.
Adhesive Leaves Marks
- Remove sticky residue with a soft cloth and mild cleaner.
- For stubborn spots, try a little oil (like olive oil) to lift adhesive, then wash with soap.
Ribbon Frays At The Ends
- Cut ends at a diagonal.
- For synthetic ribbons, carefully melt the edge with a lighter.
- Use clear nail polish on ends to seal.
Making Ribbon Decorating A Family Activity
Decorating cabinets with ribbon can be a fun family project. Kids can choose colors or help tie bows. This is a simple way to involve everyone in making the kitchen feel special.
- Let children pick one cabinet to decorate as they like.
- Use craft glue instead of pins for safety.
- Take photos of your finished work to remember each season’s design.
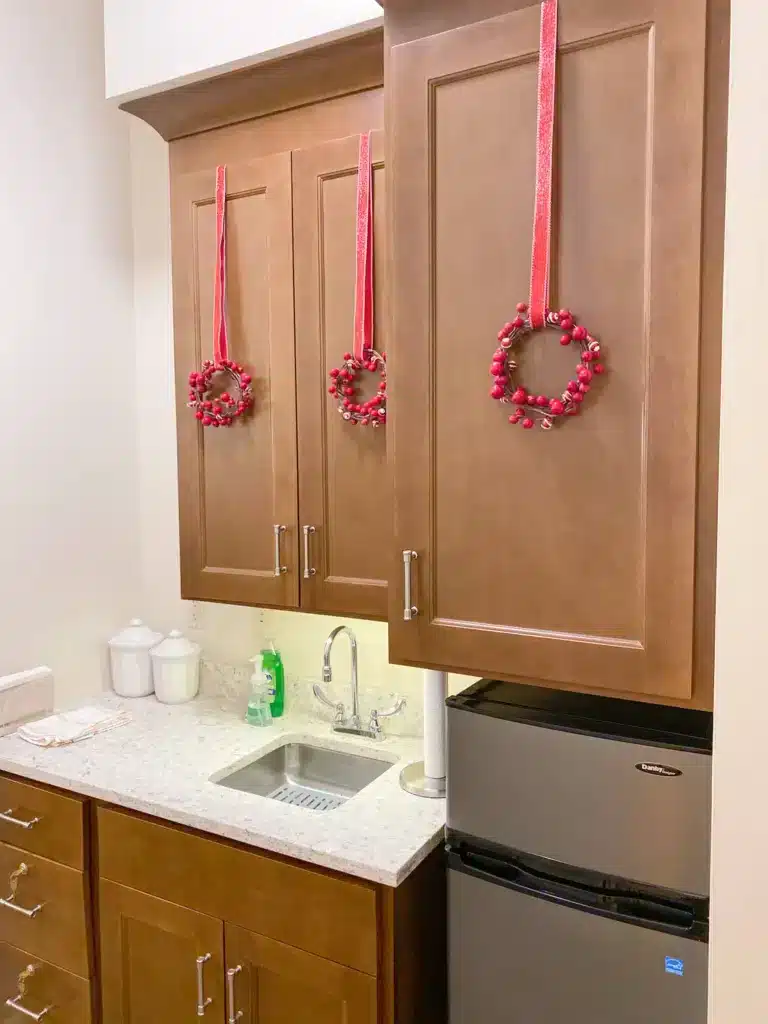
Credit: teacherbakermaker.com
Frequently Asked Questions
How Do I Keep Ribbon From Slipping On Slick Cabinet Surfaces?
Use double-sided tape or removable glue dots at several points along the ribbon, not just the ends. For extra hold, try clear adhesive strips made for decorations.
Can I Put Ribbon On Cabinet Drawers As Well As Doors?
Yes, you can add ribbon to drawers! Use the same method as for doors. Just make sure ribbons don’t block the drawer from opening or closing.
Is Ribbon Safe To Use In Kitchens With High Heat Or Moisture?
Most ribbons are safe, but avoid placing them too close to the stove or sink. Heat and moisture can cause adhesive to fail and may discolor some ribbon materials.
How Often Should I Replace Or Wash Ribbon On Cabinets?
Replace or wash ribbons every 2–3 months or sooner if they become dirty. Grosgrain and polyester ribbons are more washable than satin or velvet.
What’s The Best Way To Store Seasonal Ribbons For Reuse?
Roll up ribbons and secure with a rubber band or twist tie. Store them in a sealed bag or box to prevent dust and fading. Keep them flat to avoid wrinkles.
Decorating with ribbon is one of the easiest ways to refresh your kitchen. It’s affordable, flexible, and fun. With a little planning, the right materials, and these tips, you’ll give your cabinets a brand-new look—no renovation required.