
Removing oven shelf supports can feel tricky, especially if you have never done it before. Many people worry about damaging their oven, bending the supports, or getting stuck halfway through. But with the right steps and some helpful tips, you can remove oven shelf supports safely—even if you are not a DIY expert.
This guide will walk you through the whole process, explain why you might need to remove them, and help you avoid common mistakes. Whether you want to clean your oven, replace the supports, or just figure out how things work, this article will give you everything you need.
Why Remove Oven Shelf Supports?
Oven shelf supports are the rails or racks fixed inside the oven. They hold the removable wire shelves or trays. Sometimes, you need to take them out for a deep clean, replacement, or to fit larger items. Here are the main reasons people remove them:
- Deep cleaning: Food spills, grease, and grime often gather around the supports, making cleaning difficult if they stay in place.
- Replacing damaged supports: Over time, supports may bend, rust, or break, especially with heavy use.
- Fixing oven parts: Some oven repairs (like fan or element replacement) are easier when the supports are out.
- Installing new accessories: If you want to add special racks, like telescopic runners, you must remove the old supports first.
- Fitting large dishes: Occasionally, shelf supports block space for big trays or self-cleaning cycles.
Many oven owners do not realize that supports are designed to come out—and go back in—without tools or much effort. But each oven brand and model has its own system, so it helps to understand the basics before you start.
Tools And Safety Precautions
Before you begin, gather a few items and keep safety in mind. Removing oven shelf supports is not usually dangerous, but these steps will help you avoid problems:
What You’ll Need
- Heat-resistant gloves: Ovens can stay hot for hours after use.
- Screwdriver: Some models use screws to secure the supports.
- Flashlight: Helps you see clips or catches in dark oven corners.
- Towel or mat: To protect your kitchen floor from scratches or dirt.
- Non-abrasive cleaner: For cleaning grime after removing supports.
Safety First
- Unplug the oven or switch off the circuit breaker if it is hardwired.
- Make sure the oven is completely cool before starting.
- If your oven is gas-powered, turn off the gas supply to be extra careful.
- Remove all oven racks and trays first to give yourself space.
- Read your oven’s manual if you have it—some brands have unique clips or parts.
Even though most shelf supports are simple to remove, do not force anything. If something feels stuck, double-check for hidden screws or locks.

Credit: www.youtube.com
Understanding Different Types Of Oven Shelf Supports
Not all oven shelf supports look or work the same way. Knowing which type you have helps you avoid damage. Here are the most common designs you will find:
1. Clip-in Supports
These supports have hooks or tabs that click into slots in the oven walls. They are easy to remove and replace, often without tools.
2. Screw-fixed Supports
Some supports are screwed directly to the oven wall. You will need a screwdriver (usually a Phillips or flathead) to remove them.
3. Rail Or Ladder Supports
These look like metal ladders or rails attached to both sides of the oven. They often have two or more anchor points at the top and bottom.
4. Integrated Moulded Supports
Found mostly in older or basic ovens, these are built into the oven’s inner walls. They cannot be removed, only cleaned in place.
5. Telescopic Runners
Advanced ovens use sliding runners that pull out smoothly. These supports often have extra locking mechanisms or clips.
Comparison Of Support Types
Below is a simple comparison to help you identify your oven’s shelf supports:
| Support Type | Removable? | Tools Needed | Common in |
|---|---|---|---|
| Clip-in | Yes | Usually No | Modern ovens |
| Screw-fixed | Yes | Screwdriver | All oven types |
| Rail/Ladder | Yes | Sometimes | Mid-high end ovens |
| Integrated/Moulded | No | — | Older/basic ovens |
| Telescopic runners | Yes | Sometimes | Premium ovens |
If you are unsure, check your oven’s manual or look for your oven model number online.
Step-by-step Guide To Removing Oven Shelf Supports
Removing shelf supports is usually easy, but each type needs a slightly different approach. Here’s how to do it safely for most ovens.
Step 1: Preparation
- Switch off power: Always start by disconnecting the oven from power or gas.
- Clear the oven: Take out all loose racks, trays, and accessories.
- Wear gloves: Protect your hands from sharp edges or leftover heat.
Step 2: Identify Your Support Type
- Look for clips, screws, or tabs holding the supports in place.
- If you see screws, pick the right screwdriver.
- If there are hooks or tabs, check if they lift, slide, or pull sideways.
Step 3: Removing Clip-in Shelf Supports
- Find the fixing points: Usually at the top and bottom of each side.
- Press or lift the tab: Some supports need you to push a metal tab with your thumb or a small tool.
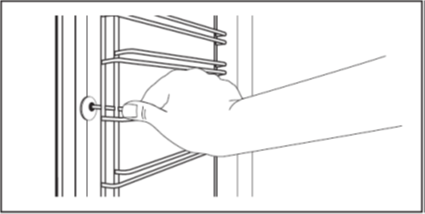
- Tilt and pull: Once the tab is released, tilt the support away from the oven wall and gently pull it out.
- Repeat: Do the same for the other side.
Step 4: Removing Screw-fixed Shelf Supports
- Locate all screws: Usually, there are two to four per support.
- Loosen the screws: Use a screwdriver (usually Phillips). Turn them counterclockwise.
- Support the rail: Hold the support with one hand as you remove the last screw to prevent it from dropping.
- Remove the support: Gently pull it away from the oven wall.
Step 5: Removing Rail Or Ladder Supports
- Look for locking clips: Some rails have small locking pieces at the top or bottom.
- Release the locks: Use your fingers or a flat tool to push the clips.
- Slide the support out: Once unlocked, the ladder should slide out easily.
Step 6: Removing Telescopic Runners
- Extend the runner fully: Pull it towards you until it stops.
- Press release clips: Many telescopic runners have small plastic or metal clips on both sides.
- Lift or slide: With the clips pressed, lift the runner up or slide it out as directed by your oven’s instructions.
Step 7: Cleaning And Maintenance
- Once the supports are out, clean them with warm, soapy water and a sponge.
- Clean the oven walls where the supports sat, as grime often builds up here.
- Dry everything fully before reinstalling to prevent rust.
Step 8: Reinstalling The Supports
- Reverse the removal steps. Make sure all clips, tabs, or screws are secure.
- Test by sliding a rack in and out to check stability.
- If you face resistance, do not force the support—double-check alignment.

Credit: www.youtube.com
Special Tips For Different Oven Brands
Every oven brand has unique designs. While the general steps above cover most cases, here are some brand-specific insights:
Bosch And Siemens
These ovens often use clip-in ladder supports. You usually push the bottom of the support outwards, then slide the whole rail down and out. Do not force the top if it feels stuck—check for a hidden tab.
Samsung And Lg
Samsung and LG models may use screw-fixed rails. Look closely for screws at both top and bottom. If your model has telescopic runners, press the release tabs before pulling.
Whirlpool, Ge, And Frigidaire
These ovens may use a mix of clip-in and screw-fixed supports. Always check for small screws hidden under grime. For older models, consult the manual to avoid bending metal.
Aeg And Electrolux
Many of these ovens use clip-in runners. Some have safety locks to prevent supports from coming loose during cleaning cycles. Look for small plastic locks at the back.
Professional Tip
If you do not have the manual, search for your oven’s model number (usually found on a sticker around the oven door frame) online. Many manufacturers provide free manuals in PDF format.
What To Do If Supports Are Stuck
Sometimes, shelf supports will not budge. Before you panic, try these steps:
- Check for hidden screws: Use a flashlight to look closely at the top and bottom.
- Wiggle gently: Some supports only come out after a gentle side-to-side movement.
- Spray with cleaner: Grease or burnt food can glue supports in place. Spray with a non-abrasive cleaner, wait 10 minutes, and try again.
- Use a plastic tool: Avoid metal prying tools, which can scratch enamel. A plastic spatula can help loosen stuck supports.
- Ask for help: If you are unsure, call a local appliance technician or check online forums for your oven model.
Never force a stuck support, as this can break the enamel or bend the metal.
Cleaning Oven Shelf Supports
Now that you have removed the supports, it is a great time to clean them. Clean supports help your oven cook more evenly and last longer.
Cleaning Steps
- Soak in warm, soapy water: Fill a sink or tub with water and mild detergent.
- Scrub with a non-scratch pad: Use a sponge or soft brush to remove grease.
- Tackle stubborn stains: For baked-on food, sprinkle baking soda, add a bit of vinegar, and let it fizz for 10 minutes before scrubbing.
- Rinse well: Remove all soap and residue.
- Dry completely: Water left on supports can cause rust or pitting.
Cleaning The Oven Walls
- Use a damp cloth and a gentle cleaner. Avoid harsh chemicals, as these can damage the enamel.
- For burnt-on grime, let the cleaner soak for a while before wiping.
- If your oven has a self-cleaning mode, run it only after you have removed all supports and racks.
Quick Cleaning Table
Here is a summary of cleaning methods for different support materials:
| Material | Best Cleaner | What to Avoid |
|---|---|---|
| Stainless Steel | Mild detergent, baking soda | Abrasive pads, bleach |
| Chrome | Warm soapy water | Steel wool, harsh chemicals |
| Enamel-coated | Gentle oven cleaner | Acidic cleaners, rough brushes |
Replacing Or Upgrading Oven Shelf Supports
Sometimes, you may need to replace damaged supports or upgrade to a better type.
How To Find The Right Replacement
- Check your model number: Look for a sticker around the oven door or inside the oven frame.
- Search for official parts: Most oven brands sell replacement parts on their websites.
- Compare the shapes: The new support must match the mounting points in your oven.
- Consider upgrades: Some brands offer telescopic runners as an upgrade.
What To Watch Out For
- Do not buy generic supports unless they are listed as compatible with your oven model.
- Avoid used supports unless you can inspect them for rust or bends.
- Check the package: Make sure you get all screws or clips needed for installation.
Example: Comparing Support Types For Upgrades
Upgrading to telescopic runners can make your oven safer and easier to use. Here’s a quick comparison:
| Feature | Standard Supports | Telescopic Runners |
|---|---|---|
| Cost | Low | High |
| Ease of use | Basic | Very smooth |
| Installation | Simple | Needs more steps |
| Cleaning | Easy | Can be tricky |
If you bake often or have heavy trays, telescopic runners are worth the investment.
Credit: support.electrolux.co.uk
Common Mistakes When Removing Oven Shelf Supports
Beginners often make a few simple errors. Here is how to avoid them:
- Forgetting to unplug the oven: Always start with safety.
- Using the wrong tool: Forcing a screw with the wrong screwdriver can strip it.
- Losing small screws or clips: Place all hardware in a bowl or bag as soon as you remove it.
- Bending the supports: Supports are strong but can bend if twisted or forced.
- Not cleaning after removal: Grime left behind can burn or smoke later.
- Reinstalling backwards: Check the orientation before fitting the support back in.
One non-obvious tip: take a photo of the supports before removal. This helps you remember the correct position and angle when reinstalling.
How Often Should You Remove And Clean Shelf Supports?
The answer depends on how much you cook and what you cook. For most households:
- Every 3-6 months: Remove supports for a deep clean.
- After big spills: If something overflows and bakes onto the supports, clean them as soon as possible.
- When replacing racks or runners: Always remove and clean supports before installing new accessories.
Frequent cleaning keeps your oven working efficiently and reduces smoke or bad smells.
Troubleshooting After Reinstalling Supports
Sometimes, after putting supports back, you may notice problems:
- Racks do not slide smoothly: Remove and check if the support is seated properly.
- Support is loose: Tighten screws or check that all tabs are locked.
- Oven door will not close: Supports may be upside down or not fully inserted.
- Noise during cooking: Check for loose screws or parts.
If you cannot fix the issue, refer to your oven manual or contact a technician.
When To Call A Professional
While removing shelf supports is a DIY job, there are times you should get expert help:
- Support is rusted in place: Trying to force it could damage the oven.
- You see exposed wires or insulation: Do not touch—call a professional.
- Oven is still under warranty: Removing parts yourself could void the warranty.
- You feel unsure: It is safer to ask for help than risk breaking something.
A local appliance repair service can remove stubborn supports and check for other problems.
Non-obvious Insights Beginners Miss
- Supports may have hidden safety clips: Many modern ovens use small clips to keep supports from moving during self-cleaning. These are easy to miss if you do not look closely.
- Not all supports are symmetrical: Some supports are designed for the left or right side only. Mixing them up can cause racks to sit unevenly or jam.
- Cleaning after removal is much more effective: Scrubbing supports while inside the oven is much less effective than soaking them in the sink. You will save time and get better results by removing them first.
- Supports should not rattle: If supports rattle after reinstalling, it means something is loose. It is not normal, and you should double-check the fixings.
Frequently Asked Questions
How Do I Know If My Oven Shelf Supports Are Removable?
Most oven shelf supports are designed to be removable, but some older models have fixed supports. Check your oven manual or look for screws, tabs, or clips at the ends of each support. If you see these, you can likely remove them.
Can I Clean Shelf Supports In The Dishwasher?
Yes, most stainless steel and chrome shelf supports are dishwasher safe. However, check your oven manual to be sure. Do not put enamel-coated supports in the dishwasher, as the high heat and strong detergents may damage them.
What If I Lose A Screw Or Clip When Removing Supports?
Losing small parts is common. Check your oven brand’s website for replacement hardware, or take the old piece to a hardware store to match it. Never use a random screw, as it may not fit correctly and could damage your oven.
Do I Need To Remove Supports For Self-cleaning Cycles?
Yes, if your oven has a self-cleaning function, always remove all racks and supports. High temperatures can discolor or warp metal supports and make them harder to remove later.
Where Can I Find A Video Or Manual For My Oven Model?
Search for your oven’s model number on the manufacturer’s website or on YouTube. Many brands offer free manuals and video guides. For example, the GE Appliances Manuals page is a reliable resource.
Removing oven shelf supports is a simple but important task for keeping your oven in top shape. With a little care and the right steps, you will make cleaning, repairs, and upgrades much easier—without damaging your appliance. Remember, always put safety first and do not hesitate to ask for help if something feels wrong.