
Setting the clock on your Samsung Smart Things Oven may seem like a small task, but it is essential for every kitchen. A correctly set clock ensures recipes are cooked on time, delayed start features work properly, and your oven matches the time in your home.
For many users, especially those new to smart appliances, the process can feel confusing. With a mix of touchscreens, mobile apps, and physical buttons, it’s easy to miss a step. This guide will help you set the clock on any Samsung Smart Things Oven with confidence, covering every method and troubleshooting tip you need.
If you own a Samsung Smart Things Oven, you already know it is more than just a regular oven. It connects with your home network, lets you control it from your phone, and is packed with features to make cooking easier.
But all these smart features work best when the clock is correct. This article will show you, step by step, how to set the clock—whether you use the oven’s panel, the SmartThings app, or even voice assistants. You’ll also learn how to fix problems, understand daylight saving time changes, and get answers to common questions.
By the end, your oven will be perfectly in sync with your kitchen routine.
Why Setting The Clock On Your Samsung Smart Things Oven Matters
Many people overlook the importance of the oven clock. But a correct clock is the backbone of your oven’s smart features. Here are a few reasons why you should set it up properly:
- Delayed start and timer functions rely on the correct time.
- Recipes that need precise timing will turn out better.
- The clock display helps everyone in the kitchen keep track of time.
- Some smart features, like remote monitoring, depend on accurate time to send notifications.
- If you use voice assistants, they often reference the oven’s clock for commands.
A wrong time can lead to food being ready too early or too late, alarms going off at the wrong moment, or even confusion during busy family dinners. Taking the few minutes needed to set the clock will save you time and stress later.
Understanding Your Samsung Smart Things Oven
Before you begin, it helps to know the type of control your oven has. Samsung Smart Things Ovens come in different models, each with its own way of setting the clock.
- Touchscreen models: These have a digital screen where you tap to control the oven.
- Button-based models: These use physical buttons for settings.
- Hybrid models: These combine a small display with physical buttons.
- Smart app control: All Smart Things Ovens can also be controlled through the SmartThings app on your phone or tablet.
Each method is a little different, so knowing your model will help you follow the right instructions.
Common Features Across Models
- Wi-Fi connection: All Smart Things Ovens connect to your home Wi-Fi.
- SmartThings app compatibility: You can use your phone for many functions, including setting the clock.
- Manual override: If the app is not working, you can set the clock directly on the oven.
Some models have extra features, like automatic time syncing or voice control, but the basic clock setup remains similar.

Credit: www.youtube.com
Getting Ready: What You Need Before Setting The Clock
To avoid frustration, gather everything you’ll need:
- Check your oven’s model number—usually found inside the oven door or on the back panel.
- Connect your oven to Wi-Fi—most Smart Things features require a stable network.
- Download the SmartThings app—available for iOS and Android.
- Register or log in to your Samsung account in the app.
- Make sure your phone and oven are on the same Wi-Fi network for smooth setup.
- Have the user manual handy—it can help with model-specific questions.
If you’re missing any of these, take a moment to get ready. Most problems with setting the clock come from missing a step at the beginning.
Method 1: Setting The Clock Using The Oven Control Panel
For many users, the oven’s control panel is the fastest way to set the clock. The steps depend on your model, but most Samsung Smart Things Ovens follow a similar process.
Basic Steps
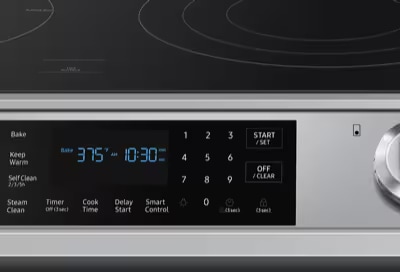
- Wake up the control panel by pressing any button or tapping the screen.
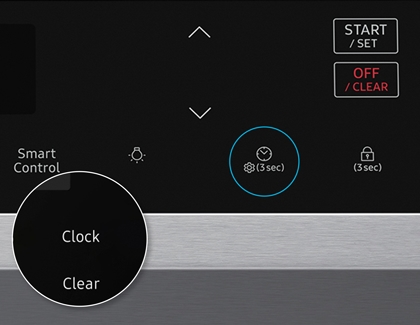
- Find the Settings or Clock button. On touchscreens, this may be a gear icon.
- Select Clock or Set Time.
- Use the + and – buttons or the touchscreen to adjust the hours.
- Press Next or Set to move to the minutes.
- Adjust the minutes in the same way.
- Confirm by pressing OK, Set, or a checkmark icon.
Example For Touchscreen Models
If your model has a full-color screen:
- Tap the Menu or Settings icon.
- Choose Clock or Time.
- A digital clock will appear. Tap the hour and minute to change them.
- Tap Save or OK when finished.
Example For Button-based Models
If your oven has physical buttons:
- Hold the Clock button for 3 seconds until the display blinks.
- Use the Up/Down buttons to change the hour.
- Press Clock again to move to minutes.
- Set the minutes, then press Clock one last time to save.
Tips For Success
- If the panel does not respond, check if the oven is in Demo Mode (used in stores). Exit Demo Mode first.
- Make sure the oven is not running a cooking cycle—you can only set the clock when the oven is idle.
- If the display times out, start over from step one.
Non-obvious Insight
Some ovens will automatically sync time with your Wi-Fi network after you set it manually. But this only works if the oven is connected to the internet. If you notice the time changing suddenly after setup, your oven is syncing with the network time.
Method 2: Setting The Clock Using The Smartthings App
The SmartThings app is a powerful tool for controlling your oven remotely. For many users, it’s the easiest way to set the clock, especially if the control panel is hard to reach or the display is confusing.
Getting Started With The Smartthings App
- Open the SmartThings app on your phone or tablet.
- Make sure your oven is added as a device. If not, tap Add Device and follow the steps.
- Once your oven appears, tap on it to open the device controls.
Step-by-step Clock Setting
- In the oven’s SmartThings page, look for Settings or Device Settings.
- Scroll to find Clock or Set Time.
- Enter the correct hours and minutes using the app interface.
- Tap Save or Apply.
The changes should sync to your oven within a minute.
Troubleshooting
- If the app cannot find your oven, check your Wi-Fi connection.
- Make sure both the oven and your phone are on the same network during setup.
- If the clock setting is greyed out, your oven may need a firmware update—check for updates in the app.
Data Table: Comparison Of Control Panel Vs App Method
Here’s a quick look at the main differences:
| Feature | Oven Control Panel | SmartThings App |
|---|---|---|
| Speed | Fast for manual setup | Fast once app is connected |
| Ease of use | Can be confusing for new users | Simple, visual interface |
| Remote access | No | Yes, set clock from anywhere |
| Requires Wi-Fi | No | Yes |
| Firmware update needed | Rarely | Sometimes |
Method 3: Setting The Clock Via Voice Assistant
Some Samsung Smart Things Ovens work with voice assistants like Amazon Alexa or Google Assistant. While not all models support this, it’s worth trying if your oven is connected.
How To Use Voice Commands
- Make sure your oven is linked to your voice assistant through the SmartThings app.
- Say a command like, “Hey Google, set my oven clock to 7: 30 AM.”
- The assistant will confirm and send the command to your oven.
What To Know
- Voice control for clock setting is still new, and not all ovens support it.
- Sometimes, only basic functions like turning the oven on/off are supported.
- If you get an error, check your oven’s manual or the SmartThings support site.
Experience-based Tip
Even if your oven supports voice commands, you may need to enable extra permissions in the SmartThings app. Many users miss this step, so check the app settings if your command doesn’t work.
Dealing With Daylight Saving Time And Time Zones
Many regions change the clock twice a year for daylight saving time (DST). Some Samsung Smart Things Ovens can adjust automatically, while others need a manual update.
How Automatic Dst Adjustment Works
If your oven is connected to Wi-Fi and synced with the SmartThings app, it can often detect time changes and update the clock automatically. This feature uses the time zone set in your Samsung account or your mobile device.
- If you move to a new time zone or travel with your oven (for RVs or mobile homes), check the time zone setting in the app and update if needed.
- If your oven does not change automatically, follow the manual steps above to update the time.
Table: Dst Adjustment By Oven Model
| Oven Model | Auto DST Adjustment | Manual Update Needed |
|---|---|---|
| Touchscreen (2021+) | Yes | No |
| Button-based (pre-2020) | No | Yes |
| Hybrid models | Sometimes | Check manual |
Non-obvious Insight
If you set the clock using the SmartThings app, your oven will always use the time zone from your mobile device. If your phone’s time is wrong, your oven will be wrong too. Double-check your phone settings if you notice repeated errors.
What To Do If The Clock Won’t Set Or Displays The Wrong Time
Sometimes, even after following all the steps, the clock doesn’t set properly. Here are solutions for the most common problems:
1. Oven Not Responding
- Make sure the oven is plugged in and powered on.
- If the control panel is frozen, unplug the oven for 30 seconds and try again.
- If using the SmartThings app, restart your phone and oven.
2. Time Changes By Itself
- This usually means your oven is syncing with Wi-Fi time.
- If the time zone is wrong, update it in the SmartThings app.
- If you want to keep a manual time, disconnect the oven from Wi-Fi.
3. Panel Buttons Not Working
- Some ovens have a child lock feature. If enabled, unlock it first (usually by holding a button for 3 seconds).
- Wipe the panel with a dry cloth to remove fingerprints or moisture.
4. Smartthings App Can’t Find Oven
- Ensure both devices are on the same Wi-Fi network.
- Update the SmartThings app to the latest version.
- Remove and re-add your oven in the app.
5. Firmware Issues
- Go to the Settings menu in the app and check for firmware updates.
- Updating can solve many bugs, including clock issues.
Practical Example
Maria, a new Samsung oven owner, found her clock kept resetting to the wrong time every morning. After reading the manual, she noticed her oven was syncing with the time zone set in the SmartThings app, which was still set to her old city.
Changing the time zone in her phone fixed the problem instantly.
Credit: www.samsung.com
Advanced Tips For Samsung Smart Things Oven Users
Setting the clock is just the beginning. Here are a few advanced tricks:
- Automatic time sync: If you want your oven to always show the correct time, keep it connected to Wi-Fi and let it sync automatically.
- Multi-oven homes: If you own more than one smart oven, you can set and sync all clocks from the SmartThings app.
- Scheduled cooking: With the clock set, use the delay start feature for overnight baking or busy evenings.
- Notifications: Enable push notifications in the app to get alerts when cooking ends, tied to the correct time.
Data Table: Feature Availability By Oven Model
| Feature | Touchscreen Model | Button Model | Hybrid Model |
|---|---|---|---|
| Set clock via panel | Yes | Yes | Yes |
| Set clock via app | Yes | Yes | Yes |
| Set clock via voice | Yes | No | Sometimes |
| Automatic DST | Yes | No | Sometimes |
| Firmware updates | App & Panel | App only | App & Panel |
Common Mistake To Avoid
Many users think the oven clock is “set and forget. ” In reality, if your Wi-Fi network changes or you move your oven, you must reset the clock or check your settings. Always check the time after a power outage or major update.
Best Practices For Maintaining Accurate Time
Keeping your Samsung Smart Things Oven clock accurate is easy if you follow these rules:
- Keep your oven connected to Wi-Fi whenever possible.
- Update the SmartThings app and oven firmware regularly.
- Double-check time zone settings after moving to a new location.
- Verify the clock after power interruptions.
- Use the app for easiest adjustments—it’s faster and more reliable than the panel for most users.
If you often host parties or cook for events, setting your oven’s clock a few minutes ahead can give you a helpful buffer!
When To Seek Professional Help
Most clock issues can be fixed at home. But if you face these problems, contact Samsung support:
- The clock resets to midnight every time the oven is turned off.
- None of the clock-setting methods work.
- The display is blank or shows error codes.
- Firmware updates fail or cause more problems.
You can reach Samsung’s support through their official website or call their hotline. Sometimes, a technician may need to check your oven in person.
Where To Find More Help
Samsung’s official website has many resources, including manuals, troubleshooting guides, and live chat. For up-to-date support, visit the Samsung Support page.
Online communities can also be helpful. The Samsung SmartThings Community is full of tips from other users. Just remember to share your oven’s model number when asking for help.
Credit: www.samsung.com
Frequently Asked Questions
How Do I Know If My Samsung Oven Supports Clock Setting Via The Smartthings App?
Most Samsung Smart Things Ovens made since 2018 support clock setting through the app. Open the app, select your oven, and look for “Set Time” or “Clock” in the settings. If you don’t see this option, your oven may need a firmware update or may not support this feature.
What Should I Do If The Oven Clock Keeps Resetting After A Power Outage?
If your oven loses the correct time after every power cut, it may not have a memory backup feature. Make sure your oven is connected to Wi-Fi and the SmartThings app. This way, it can automatically restore the correct time after power is restored.
Can I Set The Oven Clock To 24-hour (military) Time?
Yes, many Samsung Smart Things Ovens allow you to switch between 12-hour and 24-hour formats. Go to the settings menu on the oven panel or in the SmartThings app and look for “Time Format” or “Clock Settings. ” Change to your preferred format and save.
Why Is My Oven Clock Always A Few Minutes Off Compared To My Phone Or Wall Clock?
If your oven is not connected to Wi-Fi, you may need to adjust the clock manually. If it is connected and still shows the wrong time, check the time zone setting in the SmartThings app and on your mobile device.
Sometimes, syncing issues can cause small differences.
How Do I Update My Samsung Oven’s Firmware For Better Clock Features?
Open the SmartThings app, select your oven, and go to “Device Settings. ” Look for “Firmware Update” or “Check for Updates. ” Follow the prompts to install any available updates. This can fix bugs and add new features, including better clock control.
Setting the clock on your Samsung Smart Things Oven is a simple task that unlocks many smart features. Whether you prefer using the oven’s panel, your smartphone, or even voice commands, you now have all the tools you need. Keep your oven’s software up to date, double-check your time zone, and enjoy more convenient, reliable cooking every day.
If you run into problems, you’re not alone—help is always available from Samsung’s official support and other home cooks who love smart kitchens.