
Staining kitchen cabinets a darker color is one of the most powerful ways to transform your cooking space without a full remodel. Instead of replacing cabinets, you can get a rich, modern look with just careful preparation and the right products.
But staining isn’t as simple as brushing on a new color. Doing it right means understanding your cabinet’s material, choosing the correct stain, and applying it with patience. Many beginners jump in too fast and end up with blotchy finishes, sticky doors, or colors that don’t last.
This guide walks you through the process step by step, highlighting what really matters—so you end up with cabinets that look like they came from a showroom.
Why Stain Cabinets Darker?
People choose to stain kitchen cabinets a darker color for many reasons. Dark cabinets can make a kitchen look more elegant, warm, and up-to-date. They also tend to hide stains, scratches, and other marks better than light cabinets. If your current cabinets look faded or outdated, staining them darker is a cost-effective way to give your kitchen a fresh look.
However, dark stains also show dust and fingerprints more easily. They can make small kitchens feel tighter if not balanced with light walls or countertops. It’s important to consider your kitchen’s lighting and size before you start.
Understanding Cabinet Materials
Before you stain, you need to know what kind of cabinets you have. Not all materials can be stained the same way, and some may not accept stain at all.
Types Of Cabinet Surfaces
- Solid Wood: The best choice for staining. Stain soaks into the grain and gives a natural look.
- Veneer: Thin layer of real wood on top of a less expensive core. Can be stained, but sanding must be gentle.
- Laminate or Melamine: Plastic-like surface that cannot absorb stain. You can only paint these, not stain.
- Painted Cabinets: Must be stripped to bare wood before staining.
If you’re not sure what you have, look at an unfinished edge inside a door or drawer. If you see wood grain, it’s likely stainable. If it looks like plastic or has a repeating pattern, it’s probably laminate.
How To Test Stainability
Rub a small hidden spot with sandpaper. If wood grain appears and dust forms, your cabinets can likely be stained. If the surface stays smooth and no dust forms, it’s probably laminate or melamine.
Choosing The Right Stain
Not all stains are equal. The type of stain you choose will affect the color, application process, and final look.
Types Of Stain
- Oil-Based Stains: Penetrate deep into the wood and provide a rich color. Dry slower, making blending easier, but strong fumes.
- Water-Based Stains: Dry faster and have less odor. Easier clean-up, but can raise the wood grain, requiring extra sanding.
- Gel Stains: Thicker, sit on top of wood, and work well for vertical surfaces or uneven grain. Good for beginners or difficult woods.
Comparing Stain Types
Here’s a quick side-by-side look:
| Stain Type | Dry Time | Odor | Best For |
|---|---|---|---|
| Oil-Based | 6-24 hours | Strong | Deep color, easy blending |
| Water-Based | 1-2 hours | Low | Quick projects, low odor needs |
| Gel | 8-24 hours | Medium | Vertical surfaces, tricky woods |
Choosing A Stain Color
Darker stains like espresso, walnut, or java are popular. Always test a sample on your actual wood. Stains look different on oak, maple, or cherry. Two coats may be needed for the darkest results.
A common beginner mistake: choosing a color from a brochure and skipping the test. Lighting, wood type, and number of coats all affect the final color.
Tools And Materials Needed
Gather everything before you start. Running out of supplies mid-way can ruin your finish.
- Drop cloths or old sheets to protect floors
- Screwdriver or drill (for removing doors and hardware)
- Masking tape and plastic sheeting
- Rubber gloves and safety goggles
- Cleaner (like TSP degreaser)
- Sandpaper (120, 180, and 220 grit)
- Wood filler for scratches and holes
- Tack cloth
- Brushes (natural bristle for oil-based, synthetic for water-based)
- Lint-free rags or foam applicators
- Stain of your choice
- Wood conditioner (especially for softwoods like pine)
- Topcoat (polyurethane, varnish, or lacquer)
- Paint stir sticks and disposable cups
Pro tip: Buy slightly more stain than you think you need. Darker colors sometimes require extra coats for even coverage.
Preparing The Kitchen And Cabinets
Good preparation is 70% of the work. Stain shows every flaw, so don’t rush this part.
Step 1: Clear And Protect
Remove all items from cabinets and countertops. Lay drop cloths to protect floors and tape off walls, backsplashes, and appliances with plastic sheeting.
Step 2: Remove Doors And Hardware
Using a screwdriver, remove cabinet doors, drawer fronts, and all handles or knobs. Keep hinges and screws together in labeled bags. Number each door and its location with painter’s tape for easy reassembly.
Step 3: Clean Thoroughly
Kitchens are greasy. Use a degreaser like TSP to scrub all cabinet surfaces. Even invisible grease will block stain from soaking in. Rinse with clean water and let dry.
Step 4: Repair And Fill
Inspect cabinets for dents, scratches, or holes. Fill these with wood filler. Let dry, sand smooth, and wipe clean.
Step 5: Sand The Surfaces
This is crucial. Sand all surfaces with 120 or 150 grit paper to remove the old finish and open up the wood grain. For veneer, sand gently to avoid going through the thin layer. Switch to 180 or 220 grit for a smooth finish.
Always sand in the direction of the wood grain.
Wipe off dust with a tack cloth. Repeat sanding if you see shiny spots—this means the old finish isn’t fully removed.
Step 6: Apply Wood Conditioner
Softwoods like pine or cherry blotch easily with dark stains. Apply a pre-stain wood conditioner as per the instructions. Let it soak in before staining.
Staining The Cabinets
Now comes the most rewarding part. Take your time for best results.
Step 1: Stir And Test
Stir the stain well. Pigments settle at the bottom, which can lead to uneven color. Test the stain on a hidden spot or a spare piece of wood.
Step 2: Apply The Stain
Use a brush, foam applicator, or lint-free rag. Apply the stain with the grain, working in manageable sections. Don’t let the stain pool or drip. Wipe away excess with a clean rag after 3-5 minutes (or as directed on the can).
For vertical surfaces, start at the top and work down. This avoids drips and streaks.
Step 3: Allow To Dry
Let the stain dry completely as per the manufacturer’s directions. Humidity and temperature matter. Rushing this step can trap moisture and lead to sticky cabinets.
Step 4: Apply Additional Coats
For a darker color, apply a second coat after the first is fully dry. Repeat the process: brush on, wait, wipe off. Most cabinets need 2-3 coats for a rich, even color.
Step 5: Inspect And Touch Up
Look for lighter areas or missed spots. Touch up as needed. Sometimes, corners and edges need extra attention.
Insider tip: On open-grain woods like oak, stain can collect in deep pores. Wipe these areas more carefully for a consistent finish.
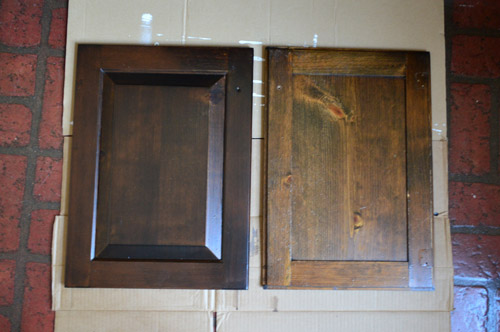
Credit: www.younghouselove.com
Sealing And Protecting The Finish
Dark stain alone is not enough for a durable kitchen finish. Kitchens see a lot of use, so you must seal the wood to protect against water, grease, and scratches.
Step 1: Select A Topcoat
- Water-based polyurethane: Dries fast, low odor, clear finish.
- Oil-based polyurethane: Slightly amber tint, very durable, longer drying time.
- Lacquer: Very smooth but more difficult and best for pros.
Topcoat Comparison
| Topcoat | Dry Time | Durability | Appearance |
|---|---|---|---|
| Water-Based Poly | 2-3 hours | High | Crystal clear |
| Oil-Based Poly | 8-12 hours | Very high | Amber glow |
| Lacquer | 15-30 min | High | Very smooth |
Step 2: Application
Use a high-quality synthetic brush for water-based or a natural bristle for oil-based. Apply thin, even coats. Don’t over-brush; this can cause bubbles. Let each coat dry fully, then lightly sand with 220 grit paper for smoothness.
Apply 2-3 coats for kitchen cabinets. Always wipe off dust before applying the next coat.
Expert tip: The final coat should be the smoothest. Avoid rushing to re-hang doors until the finish is fully cured—this can take several days.
Reinstalling Cabinets And Hardware
When the finish is dry and hard (not just dry to touch), you can put everything back.
- Remove all tape and protective coverings.
- Reattach doors and drawer fronts in the order you labeled them.
- Install hardware and check for smooth opening and closing.
- Clean off any fingerprints with a soft, damp cloth.
If you want a modern look, now is a good time to update knobs or pulls to match your new darker stain.
Common Mistakes To Avoid
Many first-timers run into problems that could have been avoided with a bit of knowledge.
- Skipping sanding: The old finish must be fully removed or stain won’t absorb evenly.
- Not cleaning properly: Even small amounts of grease or dust can ruin the finish.
- Choosing the wrong stain: Some stains don’t work well on certain woods. Always test.
- Rushing drying times: If you apply stain or topcoat too soon, you can get sticky or cloudy finishes.
- Using the wrong topcoat: Kitchens need durable finishes. Craft or furniture topcoats won’t last.
- Ignoring ventilation: Stains and topcoats can produce strong fumes. Always work in a well-ventilated area.
- Forgetting to label doors: It’s easy to mix them up during reinstallation.
How To Fix Uneven Or Blotchy Stain
Sometimes, even with care, you may see uneven spots or blotches.
- Lightly sand the problem area with fine sandpaper.
- Wipe clean, then reapply a thin layer of stain.
- If that doesn’t work, use a gel stain to even out color.
- For severe blotchiness, you may need to strip and start over.
Advanced tip: On woods like pine, always use a pre-stain conditioner, and avoid over-saturating with stain.
Maintaining Dark-stained Cabinets
Dark cabinets need regular maintenance to look their best.
- Wipe spills and splatters quickly to prevent stains.
- Use mild soap and water for cleaning. Avoid harsh cleaners.
- Polish hardware to keep it shiny.
- Touch up scratches with a matching stain marker.
Every year or so, check for worn spots and apply a fresh coat of topcoat if needed. Dark stains can fade in direct sunlight, so consider window coverings or UV-protective films.
When To Call A Professional
DIY staining is rewarding, but not always easy. Consider hiring a pro if:
- Your cabinets are laminate or melamine.
- You have ornate details that are hard to sand.
- You want a flawless, factory-style finish.
- You’re not comfortable with power tools or chemicals.
Professionals can often spray stains and finishes for the smoothest results.
Real-life Example: Staining Oak Cabinets Dark Walnut
Let’s look at a homeowner who transformed their honey oak kitchen into a modern space with a dark walnut stain.
Initial state: 1990s oak cabinets, orange-yellow tone, water stains near the sink.
Steps taken:
- Removed all doors and hardware.
- Used TSP to clean off 20 years of grease.
- Sanded with 120, then 180 grit, vacuumed all dust.
- Applied wood conditioner, then Minwax Dark Walnut oil-based stain.
- Two coats of stain, wiping off excess for even color.
- Three coats of water-based polyurethane.
- Reinstalled with new brushed nickel hardware.
Result: The kitchen looked brand new. The dark color made stainless appliances stand out. The owner saved over $5,000 compared to replacing cabinets.
Cost Comparison: Staining Vs. Replacing Cabinets
Is it really worth the effort? Here’s a quick look at costs:
| Option | Material Cost | Labor Cost | Time Required |
|---|---|---|---|
| DIY Staining | $150–$400 | $0 | 3–5 days |
| Professional Staining | $300–$800 | $800–$2,000 | 2–4 days |
| Cabinet Replacement | $3,000–$10,000+ | $2,000–$5,000 | 1–2 weeks |
As you can see, DIY staining is far more affordable and less disruptive than a full remodel.
:max_bytes(150000):strip_icc()/Urbanology_ProjectHighlandParkPhase2_CostaChristPhotography_8-3458b26e9a33485aa3dc9dd7f9fe6b1f.jpeg)
Credit: www.thespruce.com
Environmental And Health Considerations
Stains and topcoats contain chemicals that can affect indoor air quality.
- Always wear gloves and goggles.
- Use a respirator if working with oil-based products.
- Open windows and use fans for ventilation.
- Choose low-VOC or water-based products if possible, especially if children or pets are present.
For more on safe finishing practices, check out EPA Wood Finishing Guidelines.
Frequently Asked Questions
What If My Cabinets Are Already Painted?
Painted cabinets must be stripped down to bare wood before staining. Chemical strippers or sanding can be used, but this adds time and effort. If the wood underneath is a good quality, you can proceed with staining after full removal of paint.
How Long Does It Take To Stain Kitchen Cabinets Darker?
The whole process usually takes 3–5 days for DIYers, including drying time between coats. The actual work time is less, but patience during drying is key for a durable, smooth finish.
Can I Stain Laminate Cabinets?
No, laminate and melamine surfaces do not absorb stain. You can paint them with special bonding primers and paints, but staining won’t work. If you want a stained look, consider veneer overlays or replacement.
How Do I Choose The Best Stain Color For My Kitchen?
Test several stain samples on your actual wood. Lighting, wood species, and number of coats all affect the final look. Dark stains like espresso, walnut, and java are most popular, but always confirm with a sample.
Is It Necessary To Apply A Topcoat After Staining?
Yes. The topcoat protects your cabinets from moisture, grease, and wear. Skipping this step will result in a finish that fades, stains, or chips easily. Use at least two coats of a durable polyurethane or lacquer designed for kitchens.
Transforming your kitchen cabinets with a darker stain is a project that offers dramatic results for a modest investment. With careful preparation, the right materials, and a patient approach, you can achieve a professional-looking finish that will last for years.
Whether you want to refresh your space or add value to your home, staining cabinets darker is a smart, satisfying choice.

Credit: www.reddit.com