
Water damage on cabinet sides can be a stressful problem, especially in kitchens and bathrooms where moisture is common. Many homeowners notice swelling, discoloration, or soft spots on their cabinets but are unsure how to fix these issues. The good news is, you can often repair water-damaged cabinet sides yourself, saving money and extending the life of your cabinets.
With the right approach, tools, and materials, you can restore your cabinets to a like-new appearance and prevent future damage.
This guide covers everything you need to know about repairing water-damaged cabinet sides. You’ll learn how to assess the damage, what materials to use, the exact steps for repair, and how to protect your cabinets in the future. Even if you’re new to DIY projects, you’ll find tips and insights to help you get professional results.
Understanding Water Damage On Cabinet Sides
Before you start any repairs, it’s important to understand what water damage looks like and why it happens. Cabinet sides are often made from materials like particle board, MDF, plywood, or solid wood. Each reacts differently to water.
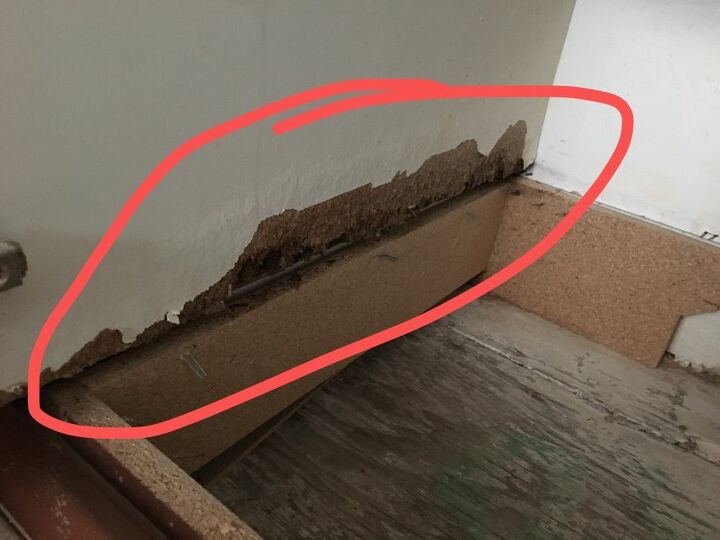
Particle board and MDF swell and crumble when wet. Plywood can delaminate, which means the layers start to peel apart. Solid wood may warp, crack, or discolor. Most often, kitchen and bathroom cabinets use particle board or MDF for their sides because these materials are affordable.
Common signs of water damage include:
- Swelling or bubbling
- Peeling laminate or veneer
- Soft or crumbly areas
- Stains or discoloration
- Musty odors
Water damage is usually caused by leaks from sinks, pipes, spills, or high humidity. Sometimes, water seeps in over months before you notice a problem. Acting quickly can prevent the need for a full cabinet replacement.
Initial Assessment: How Bad Is The Damage?
Not all cabinet damage is the same. Some problems are only on the surface, while others go deep. Take time to inspect your cabinets carefully.
Steps To Assess Water Damage
- Look for visible signs: Check for swelling, peeling, or soft spots. Press gently with your finger. If it feels spongy, the material is weakened.
- Check for mold: Musty smells or black spots can mean mold is present. Mold is a health risk and needs special cleaning.
- Test structural strength: Push lightly on the damaged area. If it holds, surface repair is possible. If it collapses, replacement may be needed.
- Note the cabinet material: Particle board and MDF require different repair methods than solid wood or plywood.
When To Repair Vs. Replace
If the damage is deep or the cabinet is falling apart, replacement is often the best choice. For surface-level swelling, stains, or minor peeling, repair is usually effective. Remember, repairing saves money but only works if the cabinet is still structurally sound.
Gathering Tools And Materials
Having the right tools and materials is key for a smooth repair process. Here’s what you’ll typically need:
- Protective gloves and mask
- Screwdriver (for removing hardware/doors)
- Putty knife or paint scraper
- Utility knife
- Sandpaper (80, 120, 220 grit)
- Wood filler or epoxy putty
- Clamps
- Primer and paint (or matching cabinet finish)
- Contact cement or wood glue
- Replacement laminate or veneer (if needed)
- Rags and cleaning solution
- Sealant (optional, for extra protection)
Some repairs may need special products, such as mold remover, depending on your situation.
Step-by-step Repair Process
Now let’s walk through the process of repairing water-damaged cabinet sides. The steps below cover most common situations, but adapt as needed for your cabinet’s material and damage level.
1. Remove All Contents And Hardware
Clear out the cabinet so you have space to work. Remove shelves, drawers, and anything inside. Take off doors and hardware (handles, hinges) using a screwdriver. This prevents further damage and gives you full access to the sides.
2. Dry The Damaged Area Completely
Water damage can’t be fixed until the area is totally dry. Use a fan, hair dryer, or dehumidifier to speed up drying. If the cabinet is very wet, leave it open for at least 24 hours. Never try to repair wet wood or particle board—it won’t bond properly.
3. Clean And Remove Mold Or Mildew
If you see dark spots or smell must, clean the area with a mix of water and vinegar, or a commercial mold remover. Wear gloves and a mask. Wipe all surfaces and let them dry. Mold can spread, so don’t skip this step.
4. Remove Loose Or Swollen Material
Use a utility knife or putty knife to cut away any soft, crumbling, or swollen sections. For particle board, remove all the weak spots until you reach solid material. If only the surface is damaged, scrape off bubbling laminate or veneer carefully.
Important: Don’t remove more than you need, but don’t leave weak material behind, or your repair won’t last.
5. Sand The Area Smooth
Sand the damaged area and the surrounding surface. Start with coarse sandpaper (80 grit) to remove rough edges, then use finer grits (120, then 220) for a smooth finish. Always sand in the direction of the wood grain if possible.
Sanding helps new filler or veneer stick better. Wipe away all dust with a damp rag.
6. Fill And Patch The Damaged Area
How you fill the damage depends on the size and depth of the problem.
For Small Holes Or Shallow Damage
- Use wood filler or epoxy putty.
- Apply with a putty knife, pressing into gaps.
- Smooth the surface level with the surrounding area.
- Let dry according to the product instructions.
For Large Holes Or Missing Sections
- Cut a piece of wood or MDF to fit the hole.
- Glue the patch in place with wood glue.
- Clamp until dry.
- Cover seams with wood filler and sand smooth.
Pro tip: For a nearly invisible repair, use two thin layers of filler, letting each dry and sanding between layers.
7. Reattach Or Replace Laminate/veneer (if Needed)
If the cabinet sides had laminate or veneer that peeled off, you can re-glue it if it’s in good shape, or replace it if not.
- For re-gluing, use contact cement. Apply to both surfaces, wait until tacky, and press together.
- For replacement, cut new laminate or veneer to size. Dry-fit before gluing. Press firmly and clamp if needed.
- Trim edges with a utility knife for a clean look.
8. Prime And Paint Or Refinish
Prime the patched area with a stain-blocking primer. This stops stains from showing through paint. Let it dry fully.
Paint with a color that matches your cabinets, or use a wood stain if your cabinets have a clear finish. For best results, use two thin coats, sanding lightly between coats.
If your cabinets have a special finish (like high-gloss), use the right type of paint and finish for durability.
9. Seal And Protect
After the paint is dry, you can add a clear sealant for extra protection against future water damage. Polyurethane works well for painted or stained surfaces.
10. Reinstall Hardware And Doors
Once everything is dry and looks good, put the hardware and doors back. Replace any screws that are rusty or damaged.

Credit: www.oldpeg.com
Real-world Example: Repairing A Swollen Cabinet Side
Let’s say you notice the side of your kitchen base cabinet, made from particle board, is swollen and the laminate is peeling from a recent leak.
- First, you dry the area for two days with a fan.
- Next, you remove the peeling laminate and scrape away loose, swollen particle board.
- You sand the area, apply wood filler in two thin layers, and sand again after each.
- You cut a new piece of laminate to size and glue it in place.
- After priming and painting, you add a sealant for moisture protection.
- Finally, you reinstall the hardware.
The repair is invisible, strong, and the cabinet looks new—without a costly replacement.
Common Mistakes To Avoid
Repairing water-damaged cabinets seems simple, but beginners often make mistakes that cause problems later.
- Not drying completely: If the area isn’t fully dry, new damage can form under paint or filler.
- Ignoring hidden mold: Mold can spread and cause health issues if not cleaned.
- Using the wrong filler: Not all fillers work with particle board or MDF. Use products designed for your material.
- Skipping primer: Paint without primer can peel or stain, especially over patched areas.
- Not matching finishes: Mismatched paint or veneer stands out. Take time to match color and texture.
- Overfilling holes: Thick layers of filler can crack. Use thin layers and let each dry.
- Not sealing edges: Water often enters at seams. Seal these areas to stop repeat damage.
Choosing The Right Repair Material
Different cabinet materials need different repair products. Here’s a quick guide for choosing the best one:
| Cabinet Material | Best Filler Type | Best Finish |
|---|---|---|
| Particle Board | Epoxy Putty, Wood Filler | Paint or Laminate |
| MDF | Wood Filler, Epoxy Putty | Paint |
| Plywood | Wood Filler | Paint or Stain |
| Solid Wood | Wood Filler, Wood Patch | Stain or Paint |
Choose fillers and finishes that match your cabinet’s material for best results.
When To Call A Professional
Some situations are too complex or risky for DIY repair:
- Severe mold growth: Large, black patches or health symptoms need professional remediation.
- Major structural damage: If the cabinet side can’t support weight, replacement is safer.
- Repeated leaks: Plumbing leaks should be fixed by a licensed plumber before cabinet repairs.
- High-value cabinets: Antique or very expensive cabinets may need a cabinetmaker for invisible repairs.
Hiring a pro costs more but can prevent bigger problems.
Credit: www.hometalk.com
Preventing Future Water Damage
Repairing your cabinet is only half the job—prevention stops the problem from coming back. Here are steps to protect your cabinets in the future:
- Fix leaks quickly: Check under sinks and around appliances often.
- Seal seams and joints: Use silicone caulk where cabinets meet walls or floors.
- Use waterproof mats: Place under sinks to catch drips.
- Keep humidity low: Use exhaust fans in kitchens and bathrooms.
- Wipe spills right away: Don’t let water sit on surfaces.
- Inspect regularly: Look for swelling, stains, or soft spots every few months.
Many people miss the importance of sealing seams—this is where water sneaks in. Also, remember that cabinet feet and bottoms are common trouble spots.
Cost Comparison: Repair Vs. Replacement
Repairing a cabinet side is usually much cheaper than replacing the whole cabinet. Here’s a comparison:
| Repair Type | DIY Cost | Professional Cost | Replacement Cost |
|---|---|---|---|
| Minor Patch & Paint | $20–$40 | $100–$200 | $250–$800 |
| Major Patch/Panel Replacement | $40–$100 | $200–$400 | $800–$2,000 |
DIY repair can save you hundreds, but always consider your skill level and the cabinet’s value.
Non-obvious Insights For Success
Many guides miss the small details that make repairs last. Here are two insights beginners often overlook:
- Edge Banding Matters: Most water enters at the cabinet’s edge banding (the thin strip on the side). If this is loose, water can seep in even after repairs. Always check and re-glue or replace edge banding as needed.
- Back Panels Are Weak Points: Cabinet sides near the back panel are often missed during repairs. Inspect and seal these areas, as leaks can travel along the back and cause hidden damage.
By focusing on these details, you get a longer-lasting result.
Environmental Impact: Repair Vs. Replace
Repairing your cabinet is not just cheaper—it’s better for the environment. Each year, millions of cabinets go to landfill due to water damage. Most are made from materials that don’t break down easily.
By repairing instead of replacing:
- You reduce waste: Less material ends up in landfill.
- You lower carbon footprint: Manufacturing new cabinets uses energy and resources.
- You save trees: Many cabinets use wood or wood products.
If you do need to replace parts, recycle or reuse what you can.
Matching Paint And Finishes
One common struggle is matching the repaired area to the rest of your cabinet. Here’s how to get a seamless look:
- Bring a sample: Take a removable piece (like a drawer front) to the paint store for color matching.
- Use test patches: Always test your paint or stain on a hidden area first.
- Blend edges: Feather your paint slightly into the surrounding area for a smooth transition.
- Consider touch-up kits: Many cabinet brands sell color-matched kits for small repairs.
A little extra time here makes your repair invisible.
Tools For A Professional Finish
Some tools make repairs easier and give better results:
- Random orbital sander: For fast, smooth sanding.
- Clamps: For holding patches or veneer in place while glue dries.
- Painter’s tape: For masking edges and protecting surfaces.
- Moisture meter: To check if wood is fully dry before repair.
Investing in basic tools means repairs last longer and look better.
Real-world Case Study: Quick Repair Vs. Full Panel Replacement
Imagine two homeowners:
Sam has a small swollen area on his cabinet side. He dries, fills, sands, and paints. The repair takes an afternoon and costs $30. The cabinet looks good for years.
Maria ignores a leak for months. The entire panel is swollen and moldy. She tries to patch, but the damage is too deep. She replaces the whole panel, which costs $250 and takes a full weekend.
Lesson: Early, thorough repair saves time and money.
Step-by-step Summary Checklist
For easy reference, here’s the entire repair process:
- Remove all cabinet contents and hardware.
- Dry the area fully with fans or dehumidifier.
- Clean off mold and disinfect.
- Remove loose, swollen, or weak material.
- Sand edges and surrounding area smooth.
- Fill with wood filler or patch as needed.
- Sand again for a seamless surface.
- Reattach or replace veneer/laminate if needed.
- Prime, paint, or stain to match.
- Seal with a clear coat for protection.
- Reinstall hardware and doors.
Keep this list handy for your next repair.

Credit: www.reddit.com
Useful Resources For Further Learning
If you need more in-depth information on materials or mold removal, the U.S. Environmental Protection Agency offers practical guides on water damage and indoor air quality. Visit EPA Mold Resources for trusted advice.
Frequently Asked Questions
How Do I Know If My Cabinet Side Is Too Damaged To Repair?
If the cabinet side is soft, crumbling, or can’t support weight, it’s usually too damaged for repair. Structural failure, deep mold, or large missing sections often mean replacement is best. Small surface problems can usually be fixed with filler and paint.
What Kind Of Paint Should I Use On Repaired Cabinet Sides?
Use a high-quality, moisture-resistant paint. Semi-gloss or satin finishes are best for kitchens and bathrooms. Always prime first, and use a paint that matches the cabinet’s original color and sheen for best results.
Can I Repair Water-damaged Laminate Cabinets?
Yes. Remove any loose or swollen laminate, repair the base material with filler, and re-glue or replace the laminate. Trim edges neatly, and use contact cement for a strong bond. Laminate repairs are durable if the base is solid.
Is It Safe To Repair Cabinets With Mold?
Small areas can be cleaned and repaired if you use gloves, a mask, and proper cleaning solutions. For large mold problems (over 10 square feet), call a professional. Mold can cause health problems if not handled safely.
How Can I Stop Water Damage From Happening Again?
Fix leaks quickly, seal seams and edges, use waterproof mats under sinks, and keep humidity low. Regularly inspect for new signs of damage. Preventing water entry is the best way to protect your cabinets for the long term.
Repairing water-damaged cabinet sides may take time and effort, but it’s a rewarding project that saves money and reduces waste. With careful attention to detail and the right steps, your cabinets can look and perform like new again.