
Using an Uncrustable Cutter: The Ultimate Guide for Perfect Homemade Sandwiches
Making lunch for kids (or yourself) can feel like a daily challenge, especially if you want something quick, neat, and fun. That’s why Uncrustable sandwiches—those round, sealed, crustless sandwiches—have become so popular. But did you know you can make your own at home with an Uncrustable cutter? With the right tool and a few simple tricks, you can prepare fresh, customizable, and cost-effective sandwiches in minutes.
This guide walks you through everything you need to know about using an Uncrustable cutter. Whether you’re a busy parent, meal prepper, or someone who loves creative snacks, you’ll learn the secrets for perfect results every time. We’ll cover choosing the right cutter, preparing ingredients, step-by-step instructions, cleaning tips, advanced hacks, and more.
By the end, you’ll be making sandwiches that look like they came straight from the store—but taste even better.
What Is An Uncrustable Cutter?
An Uncrustable cutter is a kitchen tool designed to make round, sealed sandwiches without crusts. It usually has two main parts: a round cutter that removes the crust and a sealer that presses the edges together. These tools are inspired by the popular Smucker’s Uncrustables sandwiches, but they let you use your own fresh bread and fillings.
Types Of Uncrustable Cutters
There are several types on the market. Some are simple, while others have extra features:
- Two-piece sets: One piece for cutting, one for sealing.
- All-in-one cutters: Single tool that cuts and seals in one press.
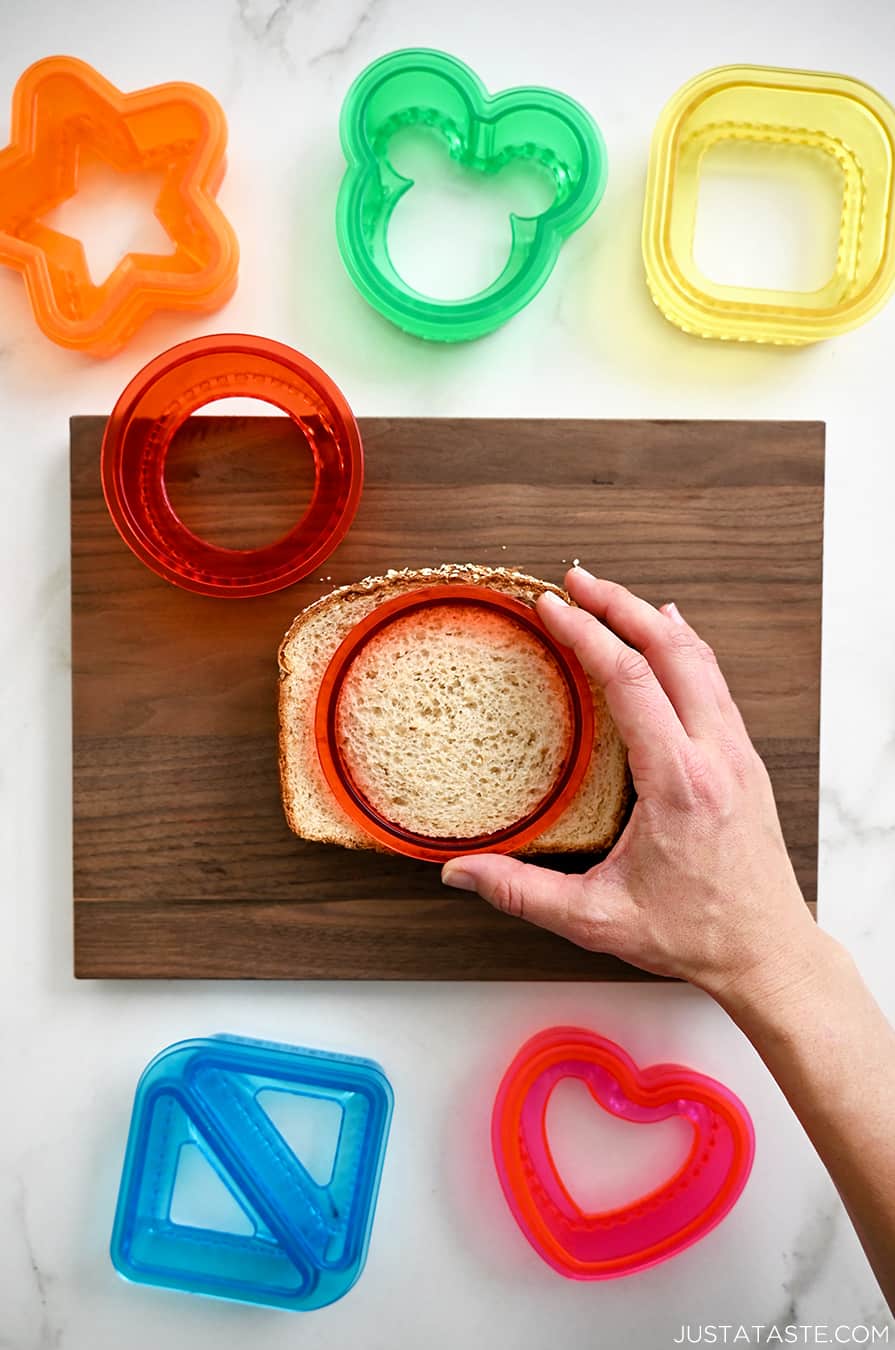
- Shapes and sizes: Classic round, but also hearts, stars, and other fun shapes.
Each type works slightly differently, but the main goal is the same: a neat, sealed sandwich that holds the filling inside.
Why Make Uncrustables At Home?
Store-bought Uncrustables are convenient, but homemade versions offer real advantages:
- Cost savings: Making your own can save 50% or more per sandwich.
- Freshness: Use fresh bread and fillings you trust.
- Customization: Choose any bread, filling, or even add healthy extras.
- Allergy control: Avoid nuts, dairy, or gluten as needed.
- Fun for kids: Let them help choose shapes and fillings.
A homemade Uncrustable can be ready in about two minutes, and you control the ingredients.
Choosing The Right Uncrustable Cutter
Not all cutters are created equal. The right one will make your sandwich-making easier and give better results. Here’s what to consider:
Material And Build Quality
Most cutters are made from plastic or stainless steel. Plastic cutters are lightweight and safe for kids to use, but may not last as long. Stainless steel offers durability and a sharper cut, but can be heavier. Check for BPA-free plastic if you care about food safety.
Size And Shape
Standard cutters make sandwiches about 3. 5 to 4 inches in diameter. If you want bigger or smaller sandwiches, look for cutters with different sizes. Some sets include several shapes—circles, stars, hearts, or animals—making lunch more exciting, especially for kids.
Sealing Effectiveness
A good Uncrustable cutter should seal the sandwich fully, so fillings don’t leak. Read reviews or try a few to find one with a strong, even seal. Some cheaper cutters only press lightly, which can cause sandwiches to open in lunchboxes.
Ease Of Use And Cleaning
Look for cutters with comfortable grips and simple design. Tools that come apart are often easier to clean, and some are dishwasher-safe. Avoid cutters with lots of small crevices, which can trap food.
Price And Value
Cutter sets range from $5 to $20. Usually, mid-priced sets offer the best balance of quality and features. If you plan to use it daily, invest in a sturdy model.
Here’s a comparison of popular Uncrustable cutter types:
| Type | Material | Shapes Available | Average Price | Best For |
|---|---|---|---|---|
| Two-piece plastic set | BPA-free plastic | Circle, star, heart | $7-$12 | Families, kids |
| All-in-one stainless steel | Stainless steel | Circle | $12-$18 | Durability, frequent use |
| Custom shape cutter | Plastic/steel mix | Animals, vehicles, etc. | $10-$15 | Fun shapes, picky eaters |
Preparing Your Ingredients
Success with an Uncrustable cutter starts with choosing the right bread and fillings. Small details here make a big difference.
Choosing The Right Bread
- Soft, fresh sandwich bread works best. Stale or hard bread may crack or not seal well.
- Avoid very airy or thick bread, as it may not compress to seal.
- White and whole wheat both work; experiment with gluten-free or specialty breads if needed.
- Square-shaped bread slices are easier to cut; round or oval loaves may waste more bread.
Picking Your Fillings
Classic Uncrustables use peanut butter and jelly, but options are endless:
- Nut butters: Peanut, almond, sunflower seed butter (for allergies)
- Jams and jellies: Strawberry, grape, raspberry, or your favorite flavor
- Chocolate or hazelnut spreads
- Cream cheese, honey, or marshmallow fluff
- Savory options: Ham, turkey, cheese, hummus, egg salad
The filling should be spreadable, not chunky. Avoid watery ingredients (like tomato slices), which can make the bread soggy.
Prepping Fillings
- If using peanut butter, spread it to the edge to create a moisture barrier and prevent jelly from soaking the bread.
- For chunkier jams, mash them a little or use less.
- For cheese or meats, use thin slices or spreads.
Here’s a quick view of common fillings and how well they seal:
| Filling | Seals Well? | Notes |
|---|---|---|
| Peanut butter & jelly | Yes | Classic, reliable seal |
| Nutella & banana | Yes | Slice banana thin for better seal |
| Ham & cheese | Partial | Use thin slices; avoid oily fillings |
| Egg salad | No | Too wet; may leak |
| Hummus & roasted veggies | Partial | Keep veggies dry; thin layer works best |
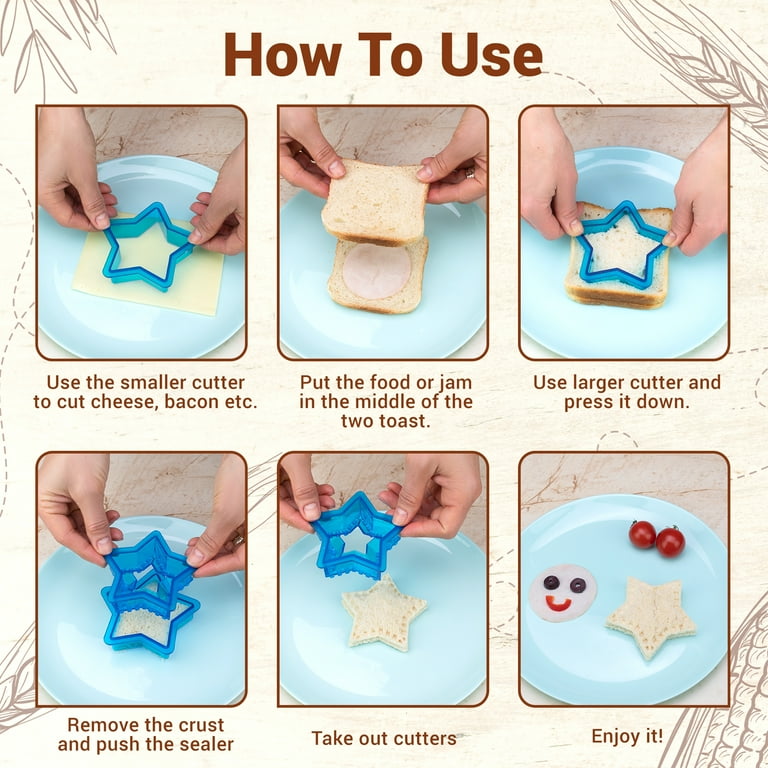
Credit: www.walmart.com
Step-by-step: How To Use An Uncrustable Cutter
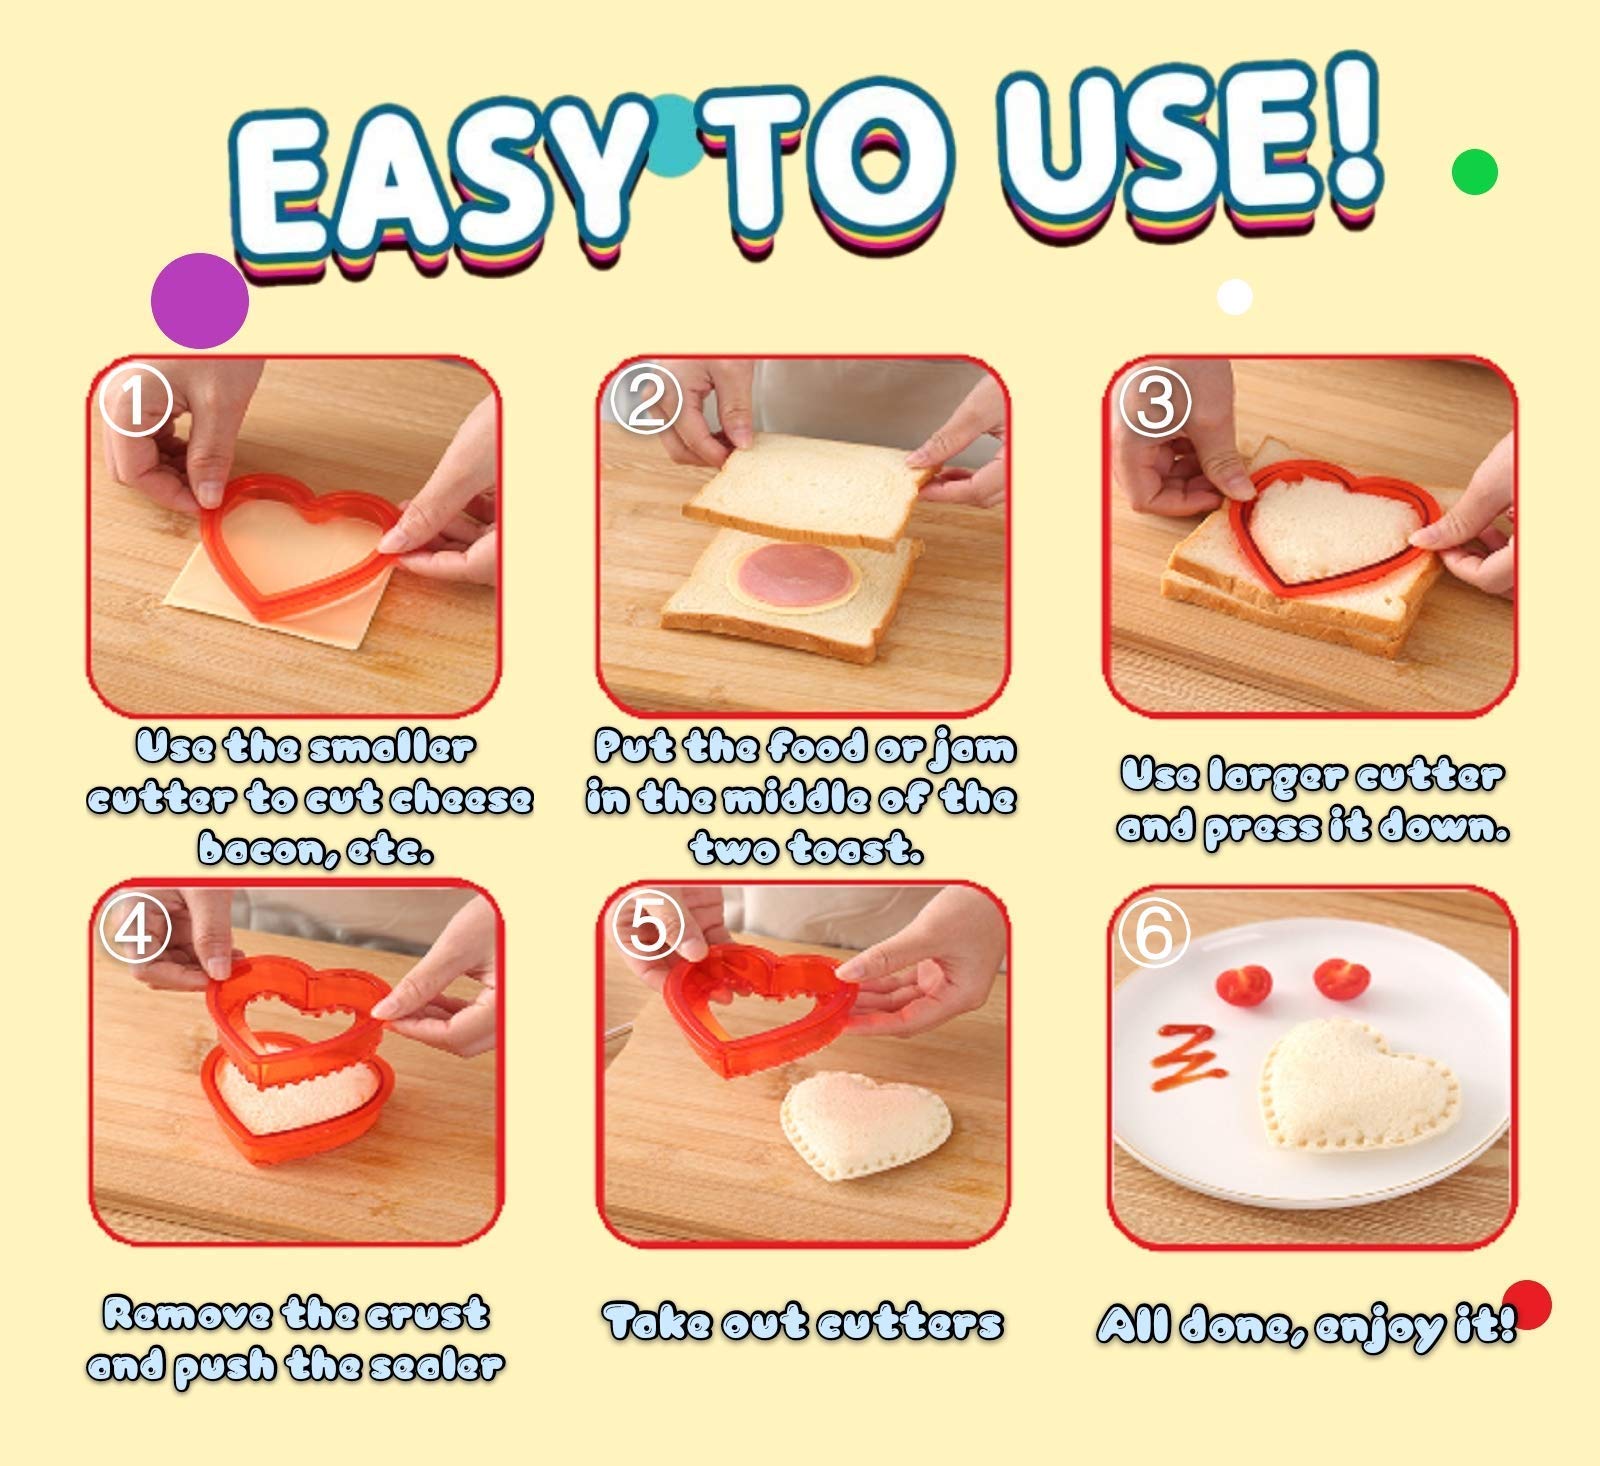
Let’s walk through making a classic round Uncrustable sandwich at home. The process is simple, but a few small tricks make a big difference in the result.
1. Lay Out Your Ingredients And Tools
Gather:
- Two slices of fresh sandwich bread
- Your chosen fillings
- An Uncrustable cutter (cutting ring and sealer)
- A flat, clean work surface
- A small butter knife or spoon
2. Add The Filling
- Place one slice of bread on the surface.
- Spread about 1-1.5 tablespoons of filling (e.g., peanut butter and jelly) in the center of the bread. Keep the filling in a circle, at least ½ inch away from the edge. This space is needed for the seal.
- Place the second slice of bread on top, lining up the edges.
Tip: For best results, spread peanut butter on both slices and jelly in the middle. This helps keep the sandwich from getting soggy.
3. Cut Out The Shape
- Press the round cutter firmly down over the center of the sandwich.
- Wiggle slightly to make a clean cut through both slices.
- Remove the crusts (set aside for croutons, breadcrumbs, or snacks).
4. Seal The Sandwich
- Take the sealer and press it into the cut-out sandwich, pushing down evenly.
- Hold for 3-5 seconds to create a tight seal.
- Lift off the sealer. You should see a neat, crimped edge all around.
5. Check The Seal
- Gently pinch around the edge to check for open spots.
- If any are loose, press again with the sealer.
- Wipe away any excess filling at the edges.
6. Store Or Serve
- Eat right away, or store in an airtight bag or container.
- For meal prep, freeze sandwiches in a single layer, then move to a freezer bag.
Here’s a quick summary:
- Place filling in center.
- Top with second slice.
- Cut out circle.
- Seal edges.
- Store or serve.
Advanced Tips For Better Uncrustables
Even a simple process has a few secrets for best results. Here are some expert tricks:
Use Fresh, Soft Bread
Stale bread cracks and won’t seal. If your bread is a little dry, microwave slices for 5 seconds with a damp towel to soften.
Don’t Overfill
Too much filling will squish out when you seal, making a mess. Start with less—about 1 tablespoon per sandwich—and add more if needed.
Layer Fillings Wisely
If using jelly, always sandwich it between layers of nut butter or spread. This keeps the bread from getting soggy overnight.
Chill Before Freezing
If you plan to freeze sandwiches, chill them in the fridge for 10-15 minutes first. This firms the seal and prevents freezer burn.
Use For More Than Pb&j
Try pizza sandwiches (marinara, cheese, pepperoni), taco fillings, or even dessert sandwiches with chocolate and berries.
Reuse The Crusts
Don’t throw away the bread crusts. Toast them for homemade croutons, blend into breadcrumbs, or make French toast sticks.
Involve The Kids
Let children pick shapes or fillings. This gives them ownership, and they’re more likely to eat their lunch.
Cleaning And Caring For Your Uncrustable Cutter
A well-maintained cutter lasts longer and makes better sandwiches. Here’s how to clean and care for your tool:
Hand-washing
- Rinse off crumbs and filling right after use.
- Use a soft brush for any grooves or crevices.
- Wash with warm, soapy water.
- Rinse and dry thoroughly.
Dishwasher
Many cutters are top-rack dishwasher safe. Check the packaging for instructions. Avoid high-heat drying cycles, which can warp plastic.
Storage
Keep cutters in a dry place. If they come with a storage box, use it to protect the edges and keep pieces together.
Inspect Regularly
Check for cracks, dull edges, or loose parts. Replace the cutter if it’s damaged—it won’t seal well and could harbor bacteria.
Uncrustable Cutter Mistakes To Avoid
Even with a great tool, mistakes can happen. Here are some common errors and how to avoid them:
- Using stale bread: The sandwich won’t seal and may break apart.
- Too much filling: Causes leaking and messy edges.
- Not enough sealing time: Press firmly and hold for a few seconds.
- Chunky fillings: Large pieces can poke through the bread, opening the seal.
- Cutting before adding filling: Always assemble the sandwich before cutting and sealing.
Credit: www.justataste.com
Creative Ways To Use Your Uncrustable Cutter
Uncrustable cutters aren’t just for sandwiches! Try these creative uses:
- Mini pies: Fill with fruit preserves or chocolate and bake until golden.
- Breakfast pockets: Use bread, eggs, and cheese for a quick morning meal.
- Party appetizers: Fill with savory spreads and serve as bite-sized snacks.
- Cookie cutter: Use with cookie dough for fun shapes.
- Holiday treats: Make themed sandwiches for Valentine’s, Halloween, or birthdays.
Freezing And Storing Homemade Uncrustables
One reason store-bought Uncrustables are popular is their freezer-friendliness. Homemade versions can be just as convenient.
How To Freeze
- Place sandwiches in a single layer on a baking sheet.
- Freeze for 1-2 hours until firm.
- Transfer to a freezer bag, removing as much air as possible.
Thawing And Serving
- For lunches, take from the freezer and add to a lunchbox. They’ll thaw by lunchtime.
- For quickest thawing, microwave for 10-15 seconds (remove from plastic bag first).
- Store in the freezer for up to 1 month for best quality.
Storage Tips
- Label bags with the filling and date.
- Don’t refreeze after thawing.
- If you see ice crystals or freezer burn, sandwiches may be dry—use within 2 weeks for best taste.
Comparing Homemade Vs. Store-bought Uncrustables
Many people wonder if it’s worth making Uncrustables at home. Here’s a side-by-side comparison:
| Feature | Homemade | Store-Bought |
|---|---|---|
| Price per sandwich | $0.30 – $0.60 | $0.70 – $1.20 |
| Customization | Unlimited | Limited flavors |
| Freshness | As fresh as you make it | Factory made, frozen |
| Ingredient control | Yes | No |
| Allergy-friendly | Yes | Some options |
| Convenience | 2-3 min to make | Ready to eat |
Most families find the homemade route is cheaper, fresher, and more flexible, with only a small time investment.
Uncrustable Cutter Safety And Kids
Uncrustable cutters are a great way to get kids involved in meal prep. Here’s how to do it safely:
- Supervise young children with metal cutters.
- Start with plastic cutters for little hands.
- Teach kids to keep fingers away from the cutting edge.
- Let them pick fillings and help assemble, but do the cutting and sealing together.
Including children in the process often means they’re more excited to eat their lunch.
Credit: www.amazon.in
Common Questions Beginners Have
Making Uncrustables at home is simple, but beginners often miss a few things:
- Bread thickness matters: Too thick won’t seal; standard sandwich bread is best.
- Sealing takes pressure: Don’t be afraid to press hard.
- Not every filling works: Avoid chunky, wet, or very oily ingredients.
- Crusts don’t have to go to waste: There are many creative uses for leftovers.
- Store properly: Airtight containers or bags keep sandwiches fresh longer.
Where To Buy An Uncrustable Cutter
You can find Uncrustable cutters in most kitchen supply stores, online marketplaces, and even large supermarkets. Popular brands include Savoychef, Pampered Chef, and generic models on Amazon or Walmart.
When shopping, read reviews and look for clear instructions. If you want more details, check out this Wikipedia article about sandwich makers for more background.
Troubleshooting: When Your Uncrustables Don’t Turn Out Perfect
Sometimes, sandwiches split open or fillings leak. Here’s how to fix common problems:
- Cracked edges: Bread too dry or stale. Use fresh, soft bread.
- Weak seal: Didn’t press long enough, or bread too thick.
- Leaking filling: Used too much, or filling spread too close to edge.
- Sandwich falls apart: Used wrong bread or too much filling.
If you run into these issues, adjust your process one step at a time. Most problems are easy to fix with practice.
Real-world Examples: How Families Use Uncrustable Cutters
- Meal prep for school lunches: Make a week’s worth of sandwiches on Sunday; freeze and pack each day.
- Allergy-friendly meals: Use sunflower seed butter and homemade jam for nut-free options.
- Fun parties: Make star-shaped Uncrustables for birthday snacks.
- Quick snacks: Make ham and cheese sandwiches for after-school hunger.
Many parents report that kids who refuse regular sandwiches will happily eat a fun-shaped, sealed Uncrustable.
Frequently Asked Questions
What Kind Of Bread Works Best For Uncrustable Cutters?
Soft, thin-sliced sandwich bread is best. It seals well and doesn’t crack. Avoid thick, artisan, or very crusty bread.
Can I Make Uncrustables Without A Special Cutter?
Yes. Use a drinking glass to cut a circle and then press the edges with a fork. However, a cutter gives a neater, stronger seal.
How Long Do Homemade Uncrustables Last In The Freezer?
For best taste and texture, use within 1 month. They are safe longer but may dry out or develop freezer burn.
Are Uncrustable Cutters Dishwasher Safe?
Many are, but not all. Check your cutter’s packaging. Most plastic models are top-rack safe; stainless steel may need hand washing.
Can I Use An Uncrustable Cutter For Gluten-free Or Specialty Breads?
Yes, but results vary. Gluten-free bread is often more fragile. Use fresh slices and press gently to avoid crumbling.
Making homemade Uncrustables with a cutter isn’t just easy—it’s fun, budget-friendly, and healthier. With the right tool and a few tricks, you can fill your freezer with sandwiches your family loves, all in just a few minutes. Try different shapes, experiment with fillings, and let kids join in.
Before long, you’ll have a new favorite lunchtime routine that’s as simple as cut, fill, and seal.