
Removing an Oatey shower drain cover might seem simple, but it’s often more challenging than people expect. Many homeowners and even some professionals run into stubborn covers, hidden screws, or covers that are stuck due to grime and mineral buildup.
Doing it wrong can damage your shower, the drain, or even lead to expensive repairs. If you want to clean your drain, replace the cover, or need to access the plumbing, learning the right way to remove an Oatey shower drain cover is essential.
This guide will walk you through each step, explain the different types of Oatey drain covers, list the tools you’ll need, and warn you about mistakes to avoid. Whether you’re a DIYer or just want to understand the process before calling a plumber, you’ll find clear answers here.
Let’s dive in and make your shower maintenance easier and safer.
Understanding Oatey Shower Drain Covers
Before you start, it’s important to know what you’re dealing with. Oatey is a leading brand for shower drains and covers, popular for their durability and easy installation. But not all Oatey covers are the same.
Oatey produces several types of shower drain covers:
- Snap-In Covers: These simply snap into place, with no screws.
- Screw-In Covers: Held down with one or two screws.
- Twist-Lock Covers: Require twisting to lock or unlock.
- Decorative Metal Covers: Sometimes custom-shaped or designer models.
Each type needs a slightly different removal technique. Identifying your cover style first will help you avoid damage and frustration.
Why Remove The Drain Cover?
Common reasons include:
- Clearing clogs: Hair and soap scum often block shower drains.
- Routine cleaning: Mold or mineral deposits can form under the cover.
- Replacing the cover: Old covers may rust or look worn.
- Accessing plumbing: For repairs or upgrades.
Trying to pry off a drain cover with the wrong tools or without knowing the attachment method is a common beginner mistake—and one that can easily damage tile or the drain body.
Tools And Materials You Will Need
Gathering the right tools before starting will make the job smoother. Here’s what you’ll typically need for removing an Oatey shower drain cover:
- Flathead screwdriver: For prying or unscrewing.
- Phillips screwdriver: If your cover has cross-head screws.
- Needle-nose pliers: Helpful for gripping and pulling.
- Allen wrench (hex key): Some covers use hex screws.
- Lubricant (like WD-40): For stuck or rusted screws.
- Flashlight: To see screws or clips clearly.
- Work gloves: To protect your hands from sharp edges.
- Plastic putty knife: For prying without scratching surfaces.
- Bucket or container: To hold screws and small parts.
Most Oatey covers use standard screws, but always check before starting. Having the right tool for your specific cover style is one of the easiest ways to avoid damage.
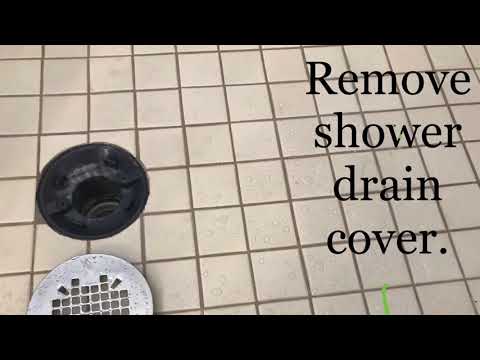
Credit: www.youtube.com
Safety Precautions Before You Start
Even a simple DIY job can lead to injuries or costly mistakes if you aren’t careful. Here are a few must-follow safety tips:
- Wear gloves: Old or corroded covers can have sharp edges.
- Turn off the water: This isn’t always necessary, but if you’ll be doing more than removing the cover, it’s a good idea.
- Keep screws and small parts in a container: Shower drains are easy places to lose things down the pipe.
- Work in good lighting: You’ll need to see small details clearly.
- Be patient: Forcing a stuck cover can break the drain body, which is expensive to fix.
Many beginners forget to protect the shower floor. Place a towel or mat around the drain to prevent scratches from dropped tools or parts.
Identifying Your Oatey Drain Cover Type
Not sure which type you have? Here’s a simple way to identify your Oatey drain cover:
| Cover Type | Attachment Method | Common Locations |
|---|---|---|
| Snap-In | No screws, pops into place | Acrylic/fiberglass showers |
| Screw-In | 1 or 2 screws | Tile or stone floors |
| Twist-Lock | Twist to lock/unlock | Designer drains |
| Decorative Metal | Varies (screws, clips, etc.) | Custom installations |
If you see visible screws, you likely have a screw-in cover. If there are no screws and the cover doesn’t turn, it’s probably snap-in. Some covers have a small slot for a screwdriver, which signals a twist-lock.
Pro tip: Take a photo of your drain and compare it with images on the official Oatey website or product manuals if you’re unsure.

Credit: www.reddit.com
Step-by-step Guide To Removing An Oatey Shower Drain Cover
Now, let’s get into the practical steps for removing each type of Oatey shower drain cover. Read through all the steps before starting, so you know what to expect.
1. Removing A Snap-in Oatey Drain Cover
These are the simplest, but they can get stuck due to soap or mineral buildup.
- Insert a flathead screwdriver gently under the edge of the cover.
- Wiggle the screwdriver to create a small gap. Be careful not to scratch the shower floor.
- If needed, use a plastic putty knife for extra leverage.
- Lift the cover slowly. If it’s stuck, apply a little lubricant and wait a few minutes.
- Once loose, pull the cover out with your hand or pliers.
Non-obvious insight: These covers can become brittle with age. Avoid using too much force, as snapping a cover inside the drain can make removal much harder.
2. Removing A Screw-in Oatey Drain Cover
Most common in tile showers.
- Locate the screws—usually 1 or 2.
- Select the correct screwdriver (flathead or Phillips).
- Carefully unscrew each one, keeping steady pressure so you don’t strip the screw head.
- Place screws in your container right away.
- Gently lift the cover. If it’s stuck, wiggle it back and forth or use a bit of lubricant.
If a screw is rusted, let lubricant soak in and try again after 10-15 minutes. For very stubborn screws, tap lightly with the handle of your screwdriver to break the rust seal.
Non-obvious insight: If screws are severely rusted, it’s better to replace them with stainless steel versions when reinstalling. This prevents future problems.
3. Removing A Twist-lock Oatey Drain Cover
Less common, but popular for decorative drains.
- Look for a small slot or arrow indicating the direction to turn.
- Insert a flathead screwdriver or a coin into the slot.
- Turn the cover counterclockwise (left) to unlock.
- Once unlocked, lift the cover out.
- If the cover is stuck, apply lubricant around the edge and repeat.
Forcing a twist-lock cover can damage the locking tabs. If it doesn’t turn easily, check for mineral buildup and clean around the edges before trying again.
4. Removing A Decorative Metal Oatey Drain Cover
These covers can vary in attachment style. Always inspect carefully.
- Look for set screws, clips, or hidden fasteners.
- Remove any visible screws with the correct tool.
- If there are no screws, gently pry around the edges with a plastic putty knife.
- For covers with clips, press gently until the cover pops free.
If you aren’t sure, consult the product manual or the Oatey website for your specific model. Forcing a decorative cover can cause permanent bending or scuff marks.
What If The Drain Cover Is Stuck?
Sometimes, even after following the right steps, a cover just won’t budge. Here’s what you can do:
- Apply more lubricant: Let it soak for at least 10 minutes.
- Gently tap around the cover: Use the handle of your screwdriver to break up mineral deposits.
- Use two tools: Insert flathead screwdrivers on opposite sides for even pressure.
- Try heat: A hair dryer can sometimes loosen stuck parts, but avoid open flames.
- Check for hidden screws: Look closely for screws covered by grime or soap.
If the cover is still stuck after these steps, it may be time to call a professional. Trying to force it can damage your shower or the drain body, leading to more expensive repairs.
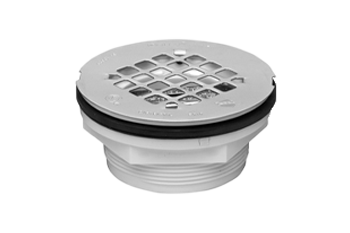
Credit: www.oatey.com
Cleaning And Maintenance Tips After Removing The Cover
Once the cover is off, take the opportunity to clean both the cover and the drain opening. This can prevent future clogs and keep your shower looking its best.
- Remove any hair or debris with needle-nose pliers or a gloved hand.
- Scrub the cover with a brush and mild cleaner. If there’s hard water buildup, use vinegar.
- Clean the drain rim with an old toothbrush.
- Rinse everything well before reattaching the cover.
- Dry all parts to prevent rust.
Pro tip: Regular cleaning every few months will make future cover removal much easier.
Reattaching Or Replacing The Oatey Shower Drain Cover
After you’ve finished cleaning or repairs, you’ll need to put the cover back.
- Make sure the area is dry to prevent rust or mold.
- Line up the cover with the screw holes or locking tabs.
- For screw-in covers, insert screws by hand first, then tighten with a screwdriver.
- For snap-in covers, press firmly until you feel it click into place.
- For twist-lock covers, insert and turn clockwise to lock.
- Test that the cover is secure, but don’t overtighten screws—this can crack the cover or the drain body.
If you’re installing a new cover, double-check the fit. Oatey covers come in several sizes, so measure your drain before buying a replacement.
| Cover Type | Reinstallation Tip | Common Mistake |
|---|---|---|
| Snap-In | Press down evenly on all sides | Forcing if misaligned |
| Screw-In | Hand-thread screws before tightening | Cross-threading screws |
| Twist-Lock | Align tabs before twisting | Turning with too much force |
Common Problems And Solutions
Even with care, a few issues can pop up during the process. Here’s how to handle them:
Stripped Screws
Screw heads that are worn or stripped are a common problem. If your screwdriver just spins, try these steps:
- Use a rubber band between the screwdriver and screw for extra grip.
- Tap the screwdriver gently into the screw head.
- If all else fails, use needle-nose pliers to grip and turn the screw.
Broken Or Cracked Cover
If the cover breaks during removal:
- Remove all loose pieces carefully.
- Clean out any fragments from the drain.
- Measure the drain opening and buy a replacement cover.
- If any part of the cover is stuck inside, use pliers or consult a plumber.
Rusted Or Stuck Screws
Rusted screws can be frustrating. Patience is key.
- Apply a penetrating lubricant and wait at least 10 minutes.
- Gently tap the screw head with a hammer to loosen rust.
- Avoid using too much force, as this can break the screw.
Cover Won’t Fit After Cleaning
Sometimes, after cleaning, the cover seems too tight.
- Check for debris or buildup around the edges.
- Sand down any rough spots gently.
- If the cover is warped, replace it—it won’t seal properly.
When To Call A Professional
Most Oatey drain covers can be removed with basic tools and patience. However, you should consider calling a plumber if:
- The cover is stuck and you risk damaging the shower or tile.
- The screws are severely rusted or broken off.
- You see signs of water damage or mold in the drain area.
- The drain body itself is cracked or loose.
A professional has specialized tools and experience to handle tough jobs without causing damage.
Buying The Right Replacement Oatey Drain Cover
If your goal is to replace the cover, make sure you buy the correct part. Here’s how to choose the right one:
- Measure the diameter of your drain opening—most Oatey covers are 4.25” or 5” in diameter.
- Check the attachment method (snap-in, screw-in, etc. ).
- Match the finish (chrome, brushed nickel, etc.) To your bathroom fixtures.
- Look for Oatey branding on the old cover—this ensures compatibility.
Some homeowners buy covers based only on the look, but size and attachment method are more important. Using the wrong cover can create leaks or make future cleaning harder.
Comparing Oatey Shower Drain Cover Types
It helps to know how Oatey covers compare to other brands and to each other. Here’s a quick comparison:
| Brand | Cover Styles | Ease of Removal | Durability |
|---|---|---|---|
| Oatey | Snap-In, Screw-In, Twist-Lock, Decorative | High (with proper technique) | Excellent |
| Sioux Chief | Screw-In, Snap-In | Moderate | Good |
| Watco | Screw-In, Snap-In | Moderate | Good |
| KOHLER | Decorative, Screw-In | Varies | Excellent |
Oatey covers are known for their strong fit and durability, making them a solid choice for most home showers.
Preventing Future Problems
Once you’ve successfully removed and reattached your Oatey shower drain cover, a few simple steps can keep it working smoothly:
- Clean the cover and drain regularly to prevent buildup.
- Avoid harsh chemicals that can damage metal finishes.
- Check screws for rust during cleaning and replace as needed.
- Use a drain hair catcher to stop clogs before they start.
Regular maintenance is much easier than dealing with a stuck or rusted cover in the future.
Extra Tips For First-time Diyers
If this is your first time working on a shower drain, keep these tips in mind:
- Take photos before you start. This helps you remember the cover orientation and how screws are placed.
- Label screws or small parts if they’re different sizes.
- If you’re unsure about anything, look up your exact Oatey model on the manufacturer’s site or consult a professional.
For more details, you can also visit the Oatey official website for product-specific instructions.
Frequently Asked Questions
What If My Oatey Drain Cover Has No Visible Screws?
If you don’t see screws, it’s likely a snap-in or twist-lock cover. Try gently prying around the edge with a flathead screwdriver or plastic putty knife. If the cover turns, it might be a twist-lock. Avoid forcing the cover, as hidden clips can break easily.
Can I Remove An Oatey Drain Cover Without Any Tools?
It’s possible with some snap-in covers, but most will require at least a flathead screwdriver or pliers. Using your hands alone can be difficult, especially if the cover is old or stuck. Having basic tools on hand will make removal safer and faster.
How Do I Deal With A Broken Screw In The Drain Cover?
If a screw breaks off during removal, use needle-nose pliers to grip and turn out the remaining piece. If it’s flush with the surface, a screw extractor tool may be needed. For deeply stuck or rusted screws, consider calling a professional to avoid damaging the drain body.
Is It Safe To Use Vinegar Or Harsh Cleaners On My Oatey Drain Cover?
Vinegar is generally safe for cleaning mineral deposits, but avoid using bleach or strong acids, especially on decorative finishes. Always rinse thoroughly and dry the cover after cleaning to prevent rust.
Should I Replace My Oatey Drain Cover If It’s Slightly Bent Or Warped?
Yes. A bent or warped cover can leave gaps for debris and water, leading to leaks or clogs. It’s best to replace it with an identical Oatey cover for a proper fit and seal.
Removing an Oatey shower drain cover doesn’t have to be frustrating or risky. With the right tools, a clear understanding of your cover type, and careful technique, you can finish the job in less than an hour. Regular cleaning and maintenance will keep your shower draining smoothly and make future cover removals much easier.
If you run into trouble, don’t hesitate to consult a professional—sometimes, a little expert help can save a lot of time and money.