
Attaching cabinet end panel skins is a process that transforms the look of your kitchen or bathroom cabinets. When you buy cabinets, the sides are often unfinished or made from a different material than the doors. End panel skins—thin decorative panels—solve this problem.
They give your cabinets a seamless, custom look. But many people worry about making mistakes or damaging their cabinets. In this guide, you’ll learn exactly how to attach cabinet end panel skins correctly, even if you’re not a professional. You’ll discover step-by-step instructions, key tools, common mistakes, and expert tips that most beginners miss.
By the end, you’ll feel confident tackling this project and achieving a beautiful finish that matches your doors perfectly.
What Are Cabinet End Panel Skins?
Cabinet end panel skins are thin sheets designed to cover the exposed sides of cabinets. Typically, they’re made from the same material and finish as the cabinet doors—usually MDF, plywood, or veneer. Their main purpose is to hide the raw or mismatched sides of cabinets, especially when the cabinet run ends and the side is visible. These skins are sometimes called appliance panels, decorative panels, or end caps.
End panel skins come in various thicknesses, usually between 1/8-inch and 1/4-inch. Thicker panels may be used for large kitchen islands or as decorative elements, but standard skins are thinner to make installation easier.
Why Are End Panel Skins Important?
- Aesthetic improvement: They give cabinets a unified, finished look, matching the door style and color.
- Protection: Skins protect the cabinet sides from moisture, scratches, and wear.
- Home value: Professionally finished cabinets can boost the overall value and appeal of your kitchen or bathroom.
Tools And Materials You Need
Before starting, gather all necessary materials. Having the right tools ensures a smooth installation and prevents mistakes. Here’s a comprehensive list:
Essential Tools
- Measuring tape: For accurate measurements.
- Pencil: To mark cutting lines.
- Carpenter’s square: Ensures straight lines and precise corners.
- Utility knife or circular saw: For cutting skins to size.
- Level: Helps align skins perfectly.
- Clamps: Hold skins in place while adhesive sets.
- Drill or screwdriver: For attaching with screws if required.
- Putty knife: For spreading adhesive.
Materials
- End panel skins: Pre-finished panels or raw veneer that matches your cabinets.
- Construction adhesive: Strong, cabinet-safe glue (like Liquid Nails or similar).
- Finishing nails or brad nails (optional): For extra holding power.
- Wood filler: To cover nail holes.
- Sandpaper: For smooth edges.
- Caulk or color-matched seam filler: For invisible seams.
Safety Gear
- Safety glasses: Protect your eyes when cutting.
- Dust mask: Especially important when sanding or cutting wood.
Tip: Some manufacturers offer pre-cut panel skins for popular cabinet sizes. These can save time and reduce errors.
Measuring And Planning
Accurate measurement is the foundation for a professional result. Rushing this stage is a common beginner mistake.
Measuring Your Cabinets
- Width and Height: Measure the full exposed side of each cabinet, from the floor (or toe kick) to the top, and from the back wall to the front edge.
- Thickness: Check if your skin should sit flush with the door or overlap slightly. Standard is flush, but modern designs sometimes prefer a tiny reveal.
- Obstructions: Identify outlets, pipes, or trim that might interfere. Mark these positions for cutting.
Planning For Seams And Joints
If your panel is larger than standard skin sizes, you may need to join two pieces. Plan to place seams where they’ll be least visible, such as near the floor or under a counter overhang.
Non-obvious insight: Always measure twice and cut once. It’s easier to trim a slightly oversized panel than replace one cut too small.
Cutting The End Panel Skins
Cutting your skins accurately is vital for a clean look. Even a small error can be noticeable, so take your time.
Steps For Perfect Cuts
- Mark the panel: Use your measurements to mark the cut line with a pencil and carpenter’s square.
- Support the panel: Place it on a stable surface, such as sawhorses or a workbench.
- Cutting method:
- For thin veneer or MDF, a sharp utility knife and several passes can produce a clean edge.
- For thicker panels, a circular saw with a fine-tooth blade works best.
- Sanding: Lightly sand the cut edge with fine-grit sandpaper to remove splinters.
Pro tip: Always cut the finished side facing up. This reduces chipping and keeps the visible surface clean.

Credit: www.woodworkingtalk.com
Preparing The Cabinet Surface
Proper surface preparation ensures a strong bond and prevents future problems.
Cleaning And Prepping
- Clean the side panel: Remove grease, dust, or old adhesive using a damp cloth or mild cleaner.
- Dry completely: Moisture can weaken adhesive.
- Lightly sand: For laminated or glossy surfaces, scuff with 120-grit sandpaper so adhesive sticks better.
- Remove dust: Wipe with a tack cloth.
Overlooked detail: If your cabinets are out of alignment or have bumps, fix these before attaching skins. Skins only hide the surface—they won’t correct crooked cabinets.
Dry Fitting: Test Before You Attach
Before gluing, always perform a dry fit. This step is often skipped, but it’s essential for a tight, seamless result.
How To Dry Fit
- Position the skin: Place it against the cabinet side.
- Check alignment: Make sure the front edge is flush with the cabinet face or door.
- Adjust if needed: Trim any overhang. Check for gaps at the top, bottom, or back.
- Test for obstructions: Ensure cutouts for outlets or trim fit perfectly.
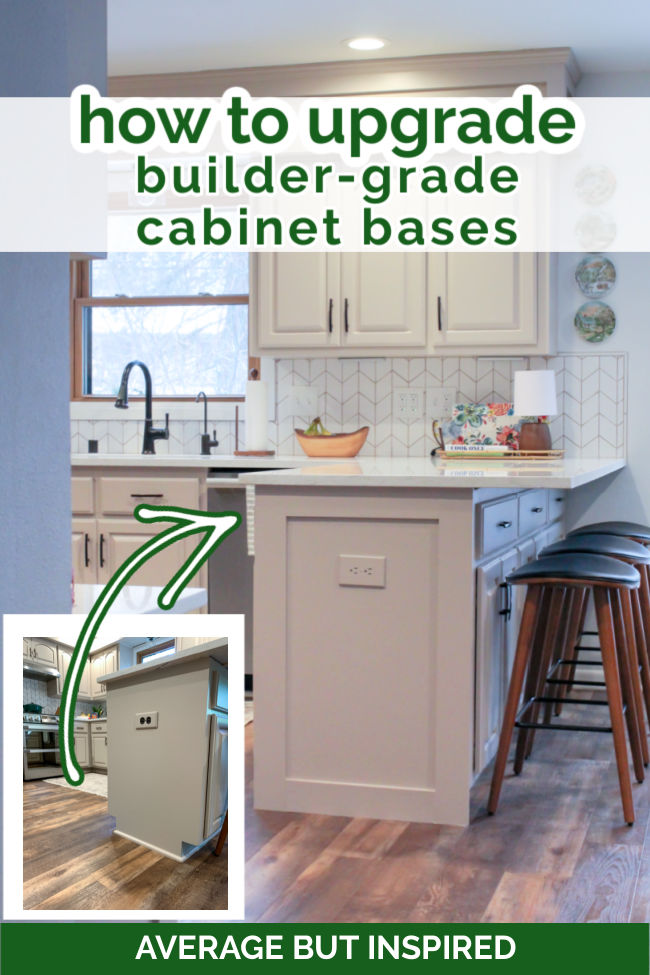
Credit: averageinspired.com
Attaching The End Panel Skins
Now you’re ready for the main event. Here’s how to attach cabinet end panel skins for a flawless finish.
Adhesive Application
- Apply construction adhesive: Use a caulk gun to run a zigzag bead of adhesive over the back of the skin, about 2 inches from each edge.
- Spread adhesive: Use a putty knife to spread evenly, especially near edges and corners.
Positioning The Panel
- Carefully align the panel with the cabinet side, starting at the top.
- Press firmly from top to bottom, ensuring full contact. Use a level to check vertical alignment.
- Clamp in place: Secure the panel with clamps, especially at the edges. If you don’t have clamps, use painter’s tape to hold the panel until the adhesive sets.
Securing With Nails (optional)
If you want extra holding power or the panel is large:
- Use finishing nails or brad nails at the corners and along the edges.
- Space nails about every 12-16 inches.
- Sink nails slightly below the surface with a nail set.
Caution: Don’t use nails without adhesive. Nails alone won’t hold the panel flat over time.
Dealing With Large Or Heavy Panels
For tall pantry cabinets or island panels, you may need a helper. Large panels can flex, so always support the middle during installation.
Insider advice: Remove cabinet doors near the panel before installing. This gives you more space and prevents accidental glue stains on doors.
Finishing Touches
After attaching the panel, a few final steps ensure your project looks professional and lasts for years.
Filling Nail Holes
- Use wood filler that matches your panel’s color.
- Apply with a putty knife, allow to dry, then sand smooth.
Sealing Seams
- Run a thin bead of color-matched caulk or seam filler where the panel meets the cabinet face or wall.
- Smooth with a damp finger or caulk tool for a barely visible joint.
Cleaning Up
- Wipe away any excess adhesive before it dries.
- Clean the panel surface with a soft cloth.

Credit: www.youtube.com
Matching The Finish
Many beginners overlook this. Even if your panel matches the cabinet, lighting or viewing angle can create subtle differences. Here’s how to minimize them:
- Order skins from the same manufacturer as your cabinets, using the same color code.
- If painting, apply primer and two coats of paint, sanding lightly between coats.
- For wood stains, test on a scrap first to ensure a good match.
Uncommon advice: If your cabinets have a special sheen (like semi-gloss or matte), use the same topcoat on the skin for a consistent look.
Common Mistakes To Avoid
Learning from others’ errors can save you time and frustration.
- Skipping surface prep: Adhesive won’t stick to dirty or glossy surfaces.
- Measuring incorrectly: Always check both width and height—walls and floors aren’t always perfectly square.
- Using too little adhesive: Skins may pull away over time.
- Not clamping: Without pressure, the adhesive won’t bond properly.
- Forgetting to match the finish: Even small differences can be obvious in bright kitchens.
When To Use Screws Instead Of Adhesive
Adhesive is the most common method, but sometimes screws are better:
- For large panels over dishwasher ends or refrigerator sides, screws provide extra strength.
- Use short, fine-thread screws through the cabinet interior into the skin.
- Always pre-drill to avoid splitting the panel.
How To Remove Old Or Damaged Skins
Sometimes, you need to replace an old end panel skin. Here’s how:
- Cut any caulk or paint seam with a utility knife.
- Gently pry the panel away from the cabinet using a putty knife. Work slowly to avoid damaging the cabinet.
- Remove old adhesive with a scraper.
- Sand smooth before installing the new skin.
Tip: Removing an old skin may reveal damage or rot. Repair this before attaching a new panel.
Special Cases: Applying Skins To Different Cabinet Types
Not all cabinets are built the same. Here’s how to handle unique situations:
Frameless (european-style) Cabinets
- The side panel is often flush with the door.
- Skins must be cut precisely; even a small overhang is obvious.
- Use extra care with alignment.
Face-frame Cabinets
- The side panel sits inside a front frame.
- Skins may need a small notch at the front to fit around the frame.
- Dry fitting is especially important.
Island And Peninsula Cabinets
- Panels may be extra large or wrap around corners.
- For corners, use wood glue and clamp a small strip (called a corner molding) for a seamless joint.
How End Panel Skins Compare To Other Solutions
Is adding a skin the best way to finish cabinet ends? Compare it to other methods:
| Method | Appearance | Cost | Durability | DIY Difficulty |
|---|---|---|---|---|
| End Panel Skin | Seamless Match | Low-Mid | High | Easy |
| Full Panel Replacement | Best Possible | High | Very High | Hard |
| Paint/Refinish Only | Good if done well | Low | Medium | Easy |
| Molding/Trim | Decorative | Low | Medium | Medium |
How Much Time Does It Take?
Attaching a cabinet end panel skin is usually a quick project, but the exact time depends on your skill and the number of panels.
| Step | Estimated Time (per panel) |
|---|---|
| Measuring & Planning | 20 minutes |
| Cutting | 15-30 minutes |
| Surface Prep | 10 minutes |
| Dry Fitting | 10 minutes |
| Attaching & Finishing | 30-45 minutes |
| Total (per panel) | 1.5–2 hours |
Note: If you’re doing multiple panels, batching steps (like cutting all at once) can save time.
Examples: Real-world Applications
- Kitchen remodel: You replace old oak cabinets with white shaker doors. The sides are still wood grain. Adding matching white end panel skins gives a seamless, modern look.
- Open-plan island: The kitchen island’s end is visible from the living room. A custom end panel skin, painted to match, transforms it into a centerpiece.
- Bathroom vanity: The side of the vanity faces the door. A pre-finished skin resists water and matches the new drawers.
Cost Breakdown
Here’s a typical cost breakdown for a DIY cabinet end panel skin project:
| Item | Estimated Cost (USD) |
|---|---|
| End panel skin (24″x30″) | $20–$50 |
| Adhesive | $5–$10 |
| Finishing nails | $3–$8 |
| Wood filler/caulk | $5–$10 |
| Sandpaper | $2–$5 |
| Total (per panel) | $35–$80 |
Tip: Ordering panels with your cabinets often costs less than custom ordering later.
Troubleshooting: Fixing Problems
Even with careful work, issues can happen. Here’s how to solve them:
- Panel not sticking: Check if the surface was cleaned and sanded. Add more adhesive and clamp overnight.
- Visible seams: Fill with color-matched caulk and smooth carefully.
- Panel warped or bowed: Remove and replace. Store new panels flat before installation.
- Edges chipped: Sand smooth and touch up with paint or stain marker.
If you run into an unusual problem, many cabinet makers offer support. You can also find further technical guides on the Woodworking Network.
Frequently Asked Questions
How Do I Choose The Right Thickness For End Panel Skins?
Most cabinet end panel skins are 1/8-inch to 1/4-inch thick. Thinner panels (1/8″) are easier to work with and less noticeable, but may be less durable. Thicker panels (1/4″) are better for large surfaces or where extra impact resistance is needed. Always check if your cabinet door will still open freely after adding the panel.
Can I Attach End Panel Skins Over Laminate Or Melamine Cabinets?
Yes, but you need to scuff the surface with sandpaper first. Laminate and melamine are smooth and glossy, so adhesive won’t stick well unless the surface is roughed up. Use a quality construction adhesive rated for these materials.
Is It Better To Use Glue Or Nails For Attaching Skins?
Adhesive is best for most panels because it creates a smooth, permanent bond. Nails or brad nails can help hold the panel while the glue sets, especially for large or vertical panels. Don’t rely on nails alone—they won’t hold over time.
Do I Need To Finish Or Paint End Panel Skins?
If you buy pre-finished skins, no extra work is needed. Raw wood or MDF skins must be primed and painted or stained to match your cabinets. Always use the same finish (gloss, semi-gloss, matte) as the doors for a seamless look.
Will Adding Panel Skins Affect My Cabinet Warranty?
Most cabinet warranties allow for end panel modifications, especially if using manufacturer-approved skins. However, always check your cabinet paperwork. If your cabinets are under warranty, using off-brand adhesives or making structural changes could void coverage.
Attaching cabinet end panel skins is a rewarding DIY project that adds value and beauty to your space. With careful preparation, the right tools, and attention to detail, you can achieve a professional result—even if it’s your first time. Take your time, follow each step, and enjoy the satisfaction of a perfectly finished cabinet.