
Taking down an Intex pool metal frame can feel like a big project, especially after a long summer of fun in the water. Maybe the weather is turning cold, or you need to move your pool to a new spot.
Whatever the reason, you want to do it right. If you rush or skip steps, you might damage parts, hurt yourself, or make next year’s setup harder. With the right approach, it’s simple to drain, disassemble, and store your pool safely for the next season.
Many pool owners worry about leaks, rust, or missing pieces when storing a metal frame pool. These are valid concerns, but careful takedown can prevent most problems. In this guide, you’ll learn the full process for taking down an Intex pool metal frame, from draining water to packing up every part.
You’ll also see tips most first-timers miss, and advice for avoiding common mistakes. By the end, you’ll be ready for a smooth, safe, and stress-free pool takedown—so you can look forward to next summer, not dread the setup.
Why Proper Takedown Matters
Taking down your Intex pool metal frame is not just about clearing space in your yard. It’s about protecting your investment. These pools can last many years, but only if you handle them well during takedown and storage.
When you take shortcuts or rush, metal parts may bend, plastic connectors can crack, and liners may develop folds that weaken them. Storing a wet or dirty pool can also lead to mold, mildew, or rust. Proper takedown keeps everything in good shape and saves you money and effort next season.
Many owners also underestimate how much water is left in the pool or forget small parts. Losing even one connector can cause headaches when you try to rebuild. So, attention to detail pays off now and later.
Tools And Supplies You’ll Need
Having the right tools ready will make the process faster and safer. Here’s what you’ll need before you start:
- Garden hose (preferably long enough to reach a safe drain area)
- Submersible pump (optional, but helps drain faster)
- Soft broom or pool brush
- Clean towels or rags
- Non-abrasive cleaner (for liner and frame)
- Buckets (for scooping out last water)
- Rubber gloves
- Screwdrivers or pliers (depending on your pool’s connectors)
- Plastic storage bins or heavy-duty bags
- Permanent marker and labels
- Drying area (clean surface, tarp, or patio)
- Protective goggles (if you have sensitive eyes)
It’s smart to lay out each tool and make sure nothing is missing. Some Intex pools use snap-on connections, while others need tools. Read your manual to check for any special tools specific to your pool model.
Planning And Preparing Your Space
Before draining, think about where the water will go. Most Intex pools hold thousands of gallons. Draining all that water onto your lawn can flood plants, erode soil, or annoy neighbors. Choose a downhill area, a storm drain (if allowed), or spread the water over time.
Look at your weather forecast. Choose a dry, sunny day with little wind. This will help the liner and frame parts dry quickly. Wet parts stored in a garage or shed can develop mold or rust fast.
Clear space in your garage, shed, or basement for storage. Make sure the area is dry and away from sharp objects or pests. If you use a tarp outside for drying, pick a spot with good sun and no trees that drop leaves or sap.
Step-by-step: Draining The Pool
Draining is the first and most important step. Doing it slowly and carefully prevents damage to your yard and pool liner.
Step 1: Turn Off And Remove Accessories
Unplug the filter pump and all electrical equipment. Remove ladders, floats, skimmers, and other accessories. Clean and dry these parts and put them aside. Never drain with the pump running, as it can burn out.
Step 2: Use The Drain Plug
Most Intex metal frame pools have a drain plug on the outside wall. Attach your garden hose firmly to this plug. Run the hose to your chosen drain area. Open the plug slowly and let gravity drain most of the water.
If your yard is flat, water will move slowly. You may need to gently lift one side of the pool as the water gets low.
Step 3: Use A Submersible Pump (optional)
If you want faster draining, or if the last bit of water won’t leave, use a submersible pump. Place it at the lowest point inside the pool. Make sure the power cord stays dry and safe. Watch closely to avoid sucking up dirt or damaging the liner.
Step 4: Remove Remaining Water
A few gallons may still be left after draining. Use buckets, a dustpan, or towels to soak up the last water. Drying the liner completely now prevents mold and mildew later.
Cleaning And Drying The Pool
Once drained, it’s time to clean. Dirt, sunscreen, leaves, and algae often build up during the season. Cleaning now means an easier setup next year.
Clean The Liner
Use a soft broom, pool brush, or a sponge with non-abrasive cleaner. Avoid harsh chemicals that can eat away at the liner. Scrub all surfaces, paying special attention to seams and corners where dirt collects.
Rinse with clean water and use towels or a squeegee to remove as much water as possible.
Clean The Frame
Wipe down every metal frame part with a damp cloth. Dry immediately to prevent rust. Check for any rust spots or chips in the paint and treat them with a rust inhibitor or touch-up paint if needed.
Dry Completely
Lay the liner flat in a sunny spot or over a clean, dry surface. Flip it after a few hours to dry both sides. It’s vital that the liner is 100% dry before folding. Even a little moisture can lead to mold.
Frame pieces also need to be fully dry before storage. Stand them on end or lay them out with space between.
Disassembling The Metal Frame
This step takes patience. Rushing can bend or snap parts. If you have a friend or family member, ask for help, especially with large pools.
Step 1: Remove The Top Rails
Start with the top rails. These usually snap or screw onto vertical supports. Work your way around the pool, removing one at a time. Set each rail aside in a safe place.
Step 2: Remove Vertical Supports
After the top rails, slide out the vertical legs. Some models have pins, clips, or bolts. Keep all hardware together in a labeled bag.
Step 3: Separate The Bottom Rails
Gently pull out the bottom rails from the pool liner’s edge. These may stick if there’s dirt or sand inside. Wiggle them carefully to avoid bending.
Step 4: Inspect All Parts
As you go, check each part for cracks, dents, or rust. Mark any damaged pieces with tape or a label, so you can repair or replace them before next season.
Step 5: Remove The Liner
With the frame gone, the liner is now free. Avoid dragging it over rough ground. Fold it gently, as explained below.
Folding And Packing The Liner
Folding the liner correctly is key for easy storage and a smooth setup next year.
- Lay the liner flat on a clean, dry area.
- Smooth out wrinkles with your hands.
- Fold in halves, then quarters, keeping edges even.
- Continue folding until it’s a manageable size—usually about 2 feet square for medium pools.
- Place in a large plastic bag or bin. If you have silica gel packets, toss a few in to absorb any moisture.
Label the bag with the pool size and model for easy identification.
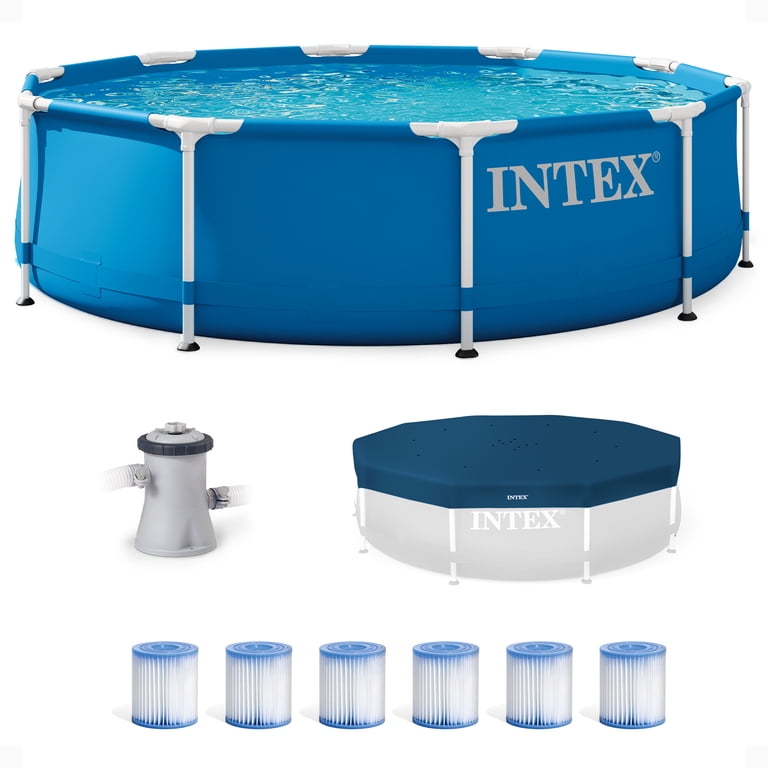
Packing And Storing Frame Parts
Metal parts are tough but can rust or bend if stored carelessly.
- Wrap each rail and leg in a towel or bubble wrap for extra protection.
- Place all hardware (pins, screws, clips) in a labeled, sealable bag.
- Store the frame in a dry place, off the ground if possible.
- Keep all parts together so nothing is lost.
If you have the original box, use it. If not, a strong plastic bin or a large storage bag works well.
Credit: www.walmart.com
Storing Pumps, Filters, And Accessories
Don’t forget the smaller parts and accessories. These also need care before storage.
- Pump and filter: Drain all water, open the housing, and let dry for 24 hours. Store hoses and connections with the main unit.
- Ladders and skimmers: Wash and dry completely. Check for cracks or broken steps.
- Test kits and chemicals: Store in a cool, dry place, away from children and pets. Check expiration dates and discard old chemicals.
Keeping everything together saves hours when you set up next time.
Common Mistakes And How To Avoid Them
Many first-timers make the same errors when taking down their Intex pool metal frame. Here are the big ones, and how to avoid trouble:
- Storing a wet liner: This almost always leads to mold and bad smells. Be patient—let it dry completely.
- Losing small parts: Use labeled bags, and count all pieces before storing.
- Dragging the liner: This can cause tiny holes. Always lift or roll the liner, never drag.
- Rushing disassembly: Forcing stuck parts can bend or break them. If a rail is stuck, spray a little water or gentle lubricant and wiggle it loose.
- Ignoring rust spots: Even small rust can spread over winter. Treat now to prevent bigger problems.
How Long Does Takedown Take?
For most people, taking down an Intex pool metal frame takes 3–5 hours from start to finish, not counting drying time. Larger pools or solo jobs may take longer. Here’s an estimated breakdown:
| Step | Estimated Time |
|---|---|
| Draining Water | 2–4 hours |
| Cleaning Pool | 30–45 minutes |
| Disassembling Frame | 30–60 minutes |
| Drying and Packing | 1–2 hours (depends on weather) |
Patience is key. Rushing only increases the risk of mistakes or injuries.
Comparing Pool Storage Options
Where and how you store your pool matters almost as much as how you take it down. Here are some common storage options:
| Storage Location | Protection from Moisture | Temperature Control | Ease of Access |
|---|---|---|---|
| Garage | Good | Moderate | Easy |
| Basement | Excellent | Good | Moderate |
| Shed | Fair | Poor | Easy |
| Outdoor (covered) | Poor | Poor | Easy |
A dry, indoor spot is best. If you must use a shed or outdoor cover, check for leaks and add moisture absorbers.
What To Do If You Find Damage
Sometimes, you’ll notice damage when taking down your pool. Maybe a frame piece is bent, or the liner has a small tear. Don’t ignore these issues—fixing them now prevents bigger problems later.
- Small holes in liner: Patch with a vinyl repair kit. Clean and dry the area first.
- Bent frame pieces: Gently bend back into shape, or order replacements from Intex.
- Rust spots: Sand gently and apply rust inhibitor. Paint over if possible.
Taking photos of any damage can help when ordering parts or asking for help.
Tips For Next Season’s Easy Setup
How you store your pool now affects how easy next season’s setup will be. Here are two insights many people miss:
- Keep a list: Write down how many frame parts, connectors, and accessories you have. Tape this list to your storage bin.
- Store instructions: Put the assembly manual in the same box or bag with your pool. It’s easy to lose over the winter.
Also, consider buying extra clips or pins now, before you forget which model you own.
Environmental Concerns And Local Rules
Draining a large pool releases a lot of water. Some towns have rules about where you can drain pool water. Always check your local guidelines to avoid fines or harming the environment.
Pool water can contain chlorine or other chemicals. Let the water sit for a couple of days before draining, or use a dechlorinator. Plants and storm drains can be sensitive to pool water.
For more about safe draining, visit the EPA website.
Troubleshooting: Solving Common Problems
Even with the best plan, you might hit a snag. Here are solutions for some common problems:
- Drain plug stuck: Use a little silicone spray or soak with warm water. Never force with pliers.
- Frame pieces won’t come apart: Sand or dirt may be inside. Tap gently with a rubber mallet or rinse with water.
- Liner won’t dry: Use a fan, or move to a sunnier spot. Flip every hour.
- Missing parts: Double-check the yard and under tarps. Order replacements from Intex if needed.
- Mold smell: Wash with a mixture of baking soda and water, then dry in the sun.
Credit: intexcorp.com
Safety Reminders
Taking down a pool is mostly safe, but there are still risks. Here’s how to protect yourself and your family:
- Wear gloves to avoid sharp edges or pinched fingers.
- Lift with your legs, not your back, when moving heavy parts.
- Keep children and pets away from the work area.
- Unplug all electric equipment before draining water.
If you have allergies, use a mask when cleaning or handling old pool water.
Frequently Asked Questions
How Long Does It Take To Take Down An Intex Pool Metal Frame?
Most people need 3–5 hours to fully take down, clean, dry, and pack up a metal frame pool. Larger pools or working alone may take longer, especially if you include drying time.
Can I Leave My Intex Pool Up All Winter?
It’s not recommended unless you live in a very mild climate. Freezing water can damage the liner and frame. Always follow the manufacturer’s advice for your region.
How Do I Store The Pool Liner To Prevent Mold?
Make sure the liner is completely dry before folding. Store in a dry, cool place, and add silica gel packets if possible. Avoid storing in damp basements or outside.
What Should I Do With Leftover Pool Chemicals?
Store pool chemicals in their original containers, in a dry, cool area away from children and pets. Check expiration dates and follow local rules for disposal if you need to get rid of old chemicals.
What If A Part Is Missing Or Broken During Takedown?
Order replacement parts directly from Intex or authorized dealers. Take photos and note the part number to make the process easier.
Taking down your Intex pool metal frame carefully is the best way to protect your investment and ensure a smooth setup next season. With good planning, patience, and attention to detail, you’ll save time, money, and avoid frustration. And when summer returns, you’ll be ready to enjoy clean, safe water all over again.

Credit: www.youtube.com