
When summer arrives, above ground pools become a favorite spot for family fun and relaxation. But if you want your pool area to look beautiful and stay easy to maintain, you need to think about the space around it—not just the pool itself. One of the best ways to upgrade your pool’s appearance and function is by placing river rock around it. River rocks are smooth, rounded stones that add both style and practical benefits, like better drainage and weed control.
Many pool owners wonder how to do this project right. It’s not just about dumping stones around the pool—there’s real planning, measuring, and careful work involved. When done well, a river rock border can keep your pool area looking fresh for years.
If you’re interested in learning how to put river rock around an above ground pool, this guide covers every step, from planning to finishing touches. You’ll discover useful tips, expert advice, and common mistakes to avoid—so you can transform your pool area with confidence.
Why Use River Rock Around An Above Ground Pool?
Adding river rock to your pool area is more than just a style upgrade. There are several reasons why this material is a top choice for homeowners.
- Natural Beauty: River rocks have a smooth surface and come in many colors, giving your pool a clean, elegant look. They blend easily with other landscaping elements.
- Weed Prevention: A thick layer of river rock makes it hard for weeds to grow, so you spend less time pulling unwanted plants.
- Improved Drainage: River rocks let water flow through, preventing muddy patches and reducing the risk of erosion around your pool.
- Protection for Pool Walls: Rocks create a buffer zone, stopping weed trimmers and lawnmowers from hitting and damaging the pool walls.
- Low Maintenance: Unlike mulch or grass, river rocks do not break down or need frequent replacement.
- Pest Control: Rocks are less inviting to bugs and pests compared to organic mulch or soil.
- Slip Resistance: When placed correctly, river rocks can reduce slippery mud around the pool’s edge.
These benefits make river rock a smart investment for any above ground pool owner.
Planning Your River Rock Project
Before you start moving rocks, take time to plan your project. Good planning prevents wasted money and effort.
Measuring Your Pool Area
The first step is to measure how much space you want to cover with river rock. Most people create a border 12-24 inches wide, but you can adjust this based on your yard size and style.
- Measure the diameter (for round pools) or the length and width (for rectangular pools) of your pool.
- Decide how wide you want your rock border to be. For example, a 2-foot border is common.
- Calculate the area using the formula for a ring:
For a round pool:
Area = Π × (outer Radius² – Inner Radius²)
Where inner radius = pool radius, outer radius = pool radius + border width.
- For a rectangular pool, calculate the area of the pool plus border and subtract the pool area.
Measuring accurately helps you buy the right amount of materials.
Choosing The Right Type Of River Rock
Not all river rocks are the same. Size, color, and price can vary.
- Size: Rocks between 1 to 3 inches are a good choice. Smaller rocks can shift underfoot, while larger ones may be harder to spread evenly.
- Color: Choose colors that match your home or yard. Neutral tones like gray or tan are popular.
- Quality: Check for clean, smooth stones—avoid rocks with sharp edges or too much dirt.
Estimating Material Needs
You need more than just rocks. Here’s what you’ll likely need:
- River rock (measured in cubic yards or tons)
- Landscape fabric (to block weeds)
- Plastic, rubber, or metal edging (to hold rocks in place)
- Sand or crushed stone (for leveling, optional)
- Shovels, rakes, and wheelbarrow (for moving materials)
- Gloves and safety glasses
A landscape supplier can help you convert your area measurements into the correct amount of river rock. As a general rule, a 2-inch deep layer covers about 100 square feet per ton of 1-2 inch river rock.
Setting A Budget
River rock projects can range in cost. Here’s a simple comparison:
| Material | Cost per Ton (USD) | Coverage (2″ Deep) | Maintenance |
|---|---|---|---|
| River Rock | $80–$150 | 100 sq ft | Low |
| Mulch | $30–$60 | 100 sq ft | Medium |
| Pebble Gravel | $60–$120 | 100 sq ft | Low |
Remember, river rock costs more at first, but lasts much longer than mulch or bark chips.
Preparing The Pool Area
A strong foundation is key for any landscaping project. Good preparation ensures your river rocks stay neat and effective for years.
Clearing And Cleaning The Ground
- Remove all grass, weeds, and debris around the pool. Use a shovel or sod cutter if needed.
- Check for roots or large stones and remove them. These can make the rock layer uneven.
- Level the soil with a rake. Fill low spots with extra soil or sand so you have a flat surface.
Checking For Drainage Problems
Before you add rocks, make sure water will not collect next to the pool. Poor drainage can cause rust or pool damage.
- After rain, look for puddles or wet spots around the pool.
- If you find any, add soil or sand to raise the area so water drains away from the pool.
Installing Edging
Edging keeps the rocks in place and makes mowing easier. You can use:
- Plastic or rubber edging: Flexible and easy to shape.
- Metal edging: More durable but harder to install.
- Stone or brick edging: Gives a classic look, but needs more time and skill.
Dig a shallow trench (about 2-3 inches deep) around your planned border. Place the edging material firmly in the trench. Check that it forms a smooth, even circle (or rectangle).
Laying Landscape Fabric
Landscape fabric stops weeds from growing up through the rocks. Choose a high-quality, woven fabric for best results.
- Roll the fabric out to cover the whole area.
- Overlap edges by 6 inches to block weeds.
- Cut holes for pool legs or equipment if needed.
- Pin the fabric down with landscape staples every 1-2 feet.
Don’t skip this step—even a thin layer of river rock will let weeds grow if there’s no fabric underneath.
Choosing And Buying River Rock
Now that the area is ready, it’s time to pick your stones. Here’s how to make the right choice.
Types Of River Rock
River rocks come in different sizes, shapes, and colors. Here are the most common types for pool landscaping:
- Pea gravel: Small (1/4 to 1/2 inch), rounded stones. Comfortable to walk on but can scatter easily.
- Medium river rock: 1 to 2 inches, great for borders. Stays in place and looks natural.
- Large river rock: 2 to 5 inches, best for dramatic borders or erosion control.
Where To Buy River Rock
You can find river rock at:
- Local landscaping supply yards (best selection and price)
- Home improvement stores (smaller bags for tiny projects)
- Stone and gravel dealers (may offer delivery for large amounts)
Ask if you can see the rocks before buying—quality and color can vary.
Calculating How Much To Buy
Here’s a quick formula:
- Calculate the area you want to cover (in square feet).
- Multiply by desired depth (in feet; 2 inches = 0.17 feet).
- Divide by 27 (to get cubic yards).
Example: For a 100 sq ft area, 2 inches deep:
100 × 0.17 = 17 Cubic Feet
17 ÷ 27 = 0.63 Cubic Yards
Round up to be safe. Most suppliers sell by the cubic yard or ton.
Delivery Vs. Self-pickup
- Delivery is easier for large projects but costs extra. Make sure the truck can reach your yard.
- Self-pickup saves money if you only need a few bags, but river rock is heavy—one cubic yard weighs over 2,000 pounds.
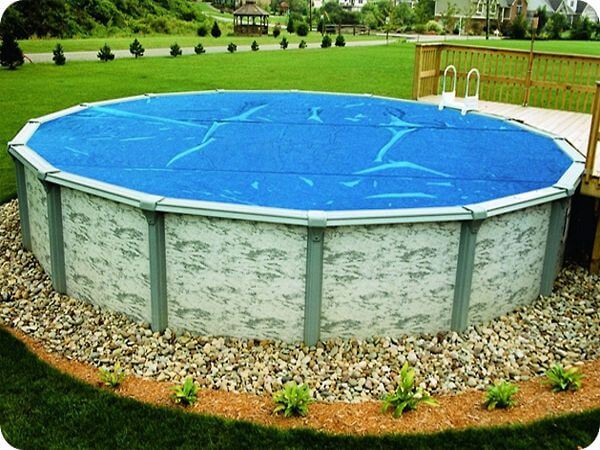
Credit: intheswim.com
Installing River Rock Around Your Pool
You’ve planned, prepped, and bought your rocks. Now it’s time for the main event—installing the river rock.
Spreading The Rocks
- Start at the edge of the pool and work outward.
- Use a shovel and wheelbarrow to move rocks into place.
- Spread evenly with a garden rake, making the layer 2-3 inches thick.
- Keep rocks away from direct contact with the pool wall—leave a 2-3 inch gap if possible. This prevents moisture from staying against the metal or vinyl.
Leveling And Smoothing
- Check for high spots and move rocks as needed to keep the surface even.
- Walk gently on the rocks to help them settle into place.
- Add more rocks where you see thin spots.
Dealing With Pool Legs And Equipment
- Cut the landscape fabric around pool legs.
- Place rocks carefully around equipment to allow easy access for maintenance.
- For above ground pools with exposed supports, use larger stones or decorative edging to cover the area.
Final Touches
- Use a leaf blower or broom to remove dust and small debris from the rock surface.
- Water the rocks with a hose to settle them and bring out their natural color.
- Inspect the border from different angles and adjust as needed for a neat look.
Adding Extra Features For Function And Style
River rock is just the beginning. Here are some ways to take your pool border to the next level.
Combining With Other Materials
Mix river rock with:
- Mulch for plant beds outside the rock border
- Stepping stones to create a path to the pool
- Decorative boulders for a natural look
Adding Plants
Choose pool-friendly plants that won’t drop many leaves or attract bees. Some options:
- Ornamental grasses (like blue fescue)
- Daylilies
- Hostas (for shady spots)
- Lavender (for sunny, dry areas)
Plant outside the rock border for easy maintenance.
Installing Lighting
Low-voltage or solar lights can make your pool area safe and inviting at night. Place lights along the border for a soft glow.
Creating A Sitting Area
If space allows, use larger river rocks or flat stones to form a sitting area or small patio near the pool. Add outdoor chairs and a small table for extra comfort.
Maintenance Tips For River Rock Borders
River rock borders need little care, but regular attention keeps them looking great for years.
- Remove leaves and debris with a rake or leaf blower every few weeks.
- Check for weeds that sneak through the fabric. Pull them as soon as you see them.
- Add more rock every few years if the layer looks thin.
- Inspect edging for damage after storms or mowing.
- Rinse rocks with a hose if they look dirty or dusty.
For stubborn weeds, avoid using strong herbicides near your pool—try boiling water or hand-pulling instead.
Common Mistakes To Avoid
Even simple projects can go wrong. Here are mistakes many beginners make (and how to avoid them):
- Skipping landscape fabric: This almost always leads to lots of weeds. Never skip this step.
- Placing rocks directly against the pool: Moisture can collect here, leading to rust or mold. Always leave a small gap.
- Using rocks that are too small: Pea gravel often shifts and is hard to keep tidy around a pool.
- Not leveling the ground: Uneven ground leads to rocks sliding or looking messy.
- Underestimating the amount of rock needed: Always round up your order to avoid running out mid-project.
- Ignoring drainage: If water can’t flow away, it will collect near the pool and cause problems.
:max_bytes(150000):strip_icc()/thespruce-abovegroundpoollandscaping-Cleardesign1-f390e7dfa5e04e0ab49081b2b3201c15.jpg)
Credit: www.thespruce.com
Real-life Example: River Rock Pool Border Transformation
Let’s look at a real-world scenario. Jane, a homeowner with a 24-foot round above ground pool, wanted to reduce mowing and weed problems. She chose a 2-foot wide river rock border.
- Measured area:
Pool Diameter: 24 Ft
Border Width: 2 Ft
Outer Diameter: 28 Ft
Area to cover = π × (14² – 12²) = 204 sq ft (rounded)
- Materials used:
- 5 tons of 1-2 inch river rock
220 Sq Ft Landscape Fabric
Flexible Plastic Edging (28 Ft)
- Process:
Jane cleared grass, leveled soil, installed edging, and rolled out fabric. She spread the rocks evenly and added a few solar lights. The project took two days.
- Result:
Jane’s pool area now has fewer weeds, no more muddy shoes, and a clean look that matches her backyard. Maintenance dropped to just a few minutes a week.
Cost And Effort: Is River Rock Worth It?
Let’s compare the cost and labor for three common pool border options:
| Border Type | Initial Cost (per 100 sq ft) | Annual Maintenance | Longevity |
|---|---|---|---|
| River Rock | $130–$200 | Very Low | 10+ years |
| Mulch | $50–$80 | Medium (reapply yearly) | 1-2 years |
| Grass | Minimal | High (weekly mowing, trimming) | Ongoing |
While river rock costs more upfront, its durability and low maintenance make it a smart long-term choice.
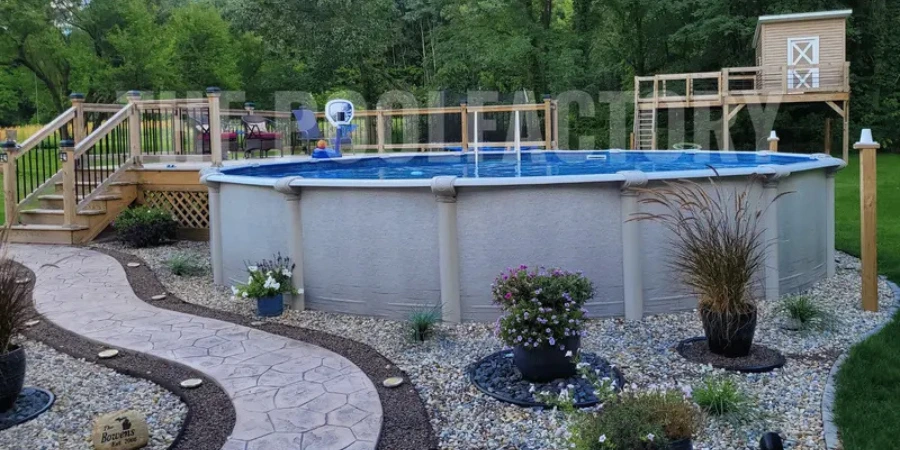
Credit: www.milorganite.com
Two Insights Most Beginners Miss
1. Edging Is Critical For A Tidy Look
Many new DIYers skip edging, thinking the rocks will stay in place. But without edging, rocks spread into the yard, making mowing difficult and leading to a messy border. Even simple plastic edging can make a big difference and save hours of cleanup later.
2. Drainage Must Direct Water Away From The Pool
It’s tempting to make the rock border completely flat, but water can pool against the pool wall and cause problems. Slope the ground slightly away from the pool before adding rocks. This small step can prevent rust, erosion, and costly repairs.
Frequently Asked Questions
How Deep Should The River Rock Layer Be Around My Pool?
A 2 to 3-inch layer is ideal for most pool borders. This is thick enough to block weeds and cover the landscape fabric, but not so deep that it’s hard to walk on or expensive to install. For larger rocks (over 2 inches), you may need a slightly deeper layer.
Can I Use Pea Gravel Instead Of River Rock?
Yes, pea gravel can work for pool borders, especially if you want a softer look or need to walk barefoot. However, it can shift more easily than larger river rocks and may require more frequent leveling. Always use landscape fabric to prevent weeds, and consider mixing pea gravel with medium river rock for stability.
Should I Put Plastic Under The River Rock?
Do not use plain plastic sheeting under river rock—it traps water, causing drainage problems and promoting mold near the pool. Instead, use breathable landscape fabric. This blocks weeds while letting water drain through, protecting your pool and landscape.
How Do I Keep River Rock From Getting Into The Pool?
Install edging around the rock border and leave a small gap between the rocks and the pool wall. Teach children to avoid throwing rocks, and use a pool cover when not swimming. Regularly check the area for stray stones and return them to the border.
Is River Rock Safe For Above Ground Pool Liners And Walls?
Yes, river rock is safe when properly installed. Always leave a 2-3 inch gap between the rocks and the pool wall to prevent moisture buildup. Use smooth, rounded rocks and avoid sharp stones. Proper installation protects your pool liner and keeps your pool looking new.
Transforming your above ground pool area with river rock is a project that pays off in beauty, function, and less maintenance. By following these steps and tips, you’ll enjoy a clean, inviting pool space for many summers to come. For more landscaping ideas and inspiration, check out resources like Wikipedia’s Landscaping guide.