Smart home technology is changing how we interact with everyday appliances, and the SmartThings Stove is a great example. This advanced cooking appliance does more than bake or boil—it connects with your smartphone, can be controlled remotely, and even sends alerts if you leave a burner on. But one simple feature sometimes causes confusion: setting or changing the time. If the stove’s clock is wrong, scheduled cooking, timers, or even your daily routine can get disrupted.
Many people struggle to find clear instructions on how to set the time on a SmartThings Stove. The process can feel confusing, especially if you’re not a native English speaker or if you just bought your first smart appliance. This guide will show you, step by step, how to change the time on a SmartThings Stove.
You’ll learn both the manual way (using the stove’s buttons) and the smart way (using the SmartThings app). We’ll also cover what to do if things don’t work as expected, and share tips to avoid common mistakes. By the end, you’ll have everything you need to confidently manage your stove’s clock—saving time and avoiding kitchen headaches.
Understanding Your Smartthings Stove
Before you change the time, it helps to know what makes the SmartThings Stove unique. These stoves are not just regular appliances; they combine traditional cooking with modern technology.
SmartThings Stoves connect to your Wi-Fi network and the SmartThings mobile app, allowing you to monitor and control them remotely. You can preheat your oven while at the grocery store, check if a burner is on, or get alerts for maintenance. The digital clock is crucial because it syncs scheduled functions—like delayed start or self-cleaning—with your daily routine.
There are several models of SmartThings Stoves, but most share similar clock-setting features. However, the interface can differ slightly depending on the year or model. If you’re unsure which model you have, check the label inside the oven door or consult the manual.
Why Is The Clock Important?
A correct clock setting is not just for convenience. If your stove’s time is wrong:
- Scheduled cooking (like delayed baking) won’t start or end when you want.
- Timers may not match real-world time.
- Some safety features may not work as intended.
- The SmartThings app may show the wrong time for alerts or notifications.
Understanding these basics helps you see why getting the time right is important.
Ways To Change The Time On Smartthings Stove
There are two main ways to change the time on a SmartThings Stove:
- Using the stove’s control panel
- Using the SmartThings mobile app
Let’s explore both methods in detail.
1. Setting The Time Using The Stove’s Control Panel
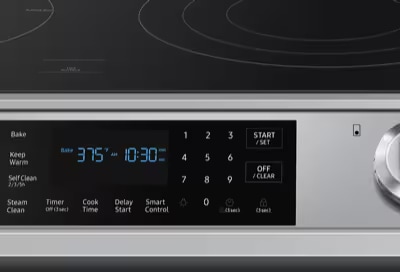
Most SmartThings Stoves have a digital control panel with buttons or a touchscreen. Here’s how to set the time manually:
Step-by-step Manual Setting
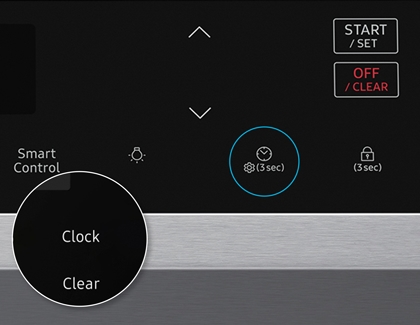
1. Locate The Clock Button:
Find the button labeled Clock or a small clock icon on your stove’s control panel. On some models, you may need to hold down the Settings or Menu button to access time settings.
2. Press And Hold:
Press the Clock button once. If nothing happens, try holding it for three seconds. The numbers on the display should start blinking.
3. Set The Time:
Use the + and – buttons, or arrow keys, to adjust the hour. Press Clock or Start to switch to the minutes field, then adjust as needed.
4. Confirm The Time:
Press Clock, Start, or Enter (depending on your model) to save the time. The blinking will stop and the new time will show.
5. Check The Display:
Make sure the display now shows the correct time. If it goes back to the old time, repeat the steps carefully.
Example
Suppose you want to set your SmartThings Stove to 6:30 PM. You would:
- Press Clock until the hour blinks.
- Tap + or – until you reach 6 (or 18 if using 24-hour format).
- Press Clock again to switch to minutes.
- Set to 30.
- Press Start to save.
Non-obvious Insights
- Many people overlook the need to hold the clock button, not just press it. Some models require a long press to enter clock mode.
- On a few models, you must power off the oven first before changing the time. Check your manual if normal steps don’t work.
2. Changing The Time Using The Smartthings App
If your stove is connected to Wi-Fi and linked to the SmartThings app on your smartphone, you can change the time from your phone. This is especially helpful if the control panel is hard to reach or if you want to set the clock remotely.
Step-by-step App Setting
1. Open The Smartthings App:
Download and open the app on your phone or tablet.
2. Select Your Stove:
In the app’s device list, tap your SmartThings Stove. If you haven’t added it yet, follow the app’s steps to connect your stove.
3. Go To Settings:
Look for the Settings or Device Settings option. This may appear as a gear icon.
4. Find Clock Or Time Setting:
Under device settings, find the Clock or Time option.
5. Set The Time:
Enter the correct time or adjust using the app controls. Some versions allow syncing with your phone’s time automatically.
6. Save Changes:
Tap Save or Apply. The stove should update its clock within a few seconds.
Example
If it’s 7:45 AM, open the app, select your stove, go to clock settings, set 7:45, and tap save. The new time will appear on your stove’s display.
Non-obvious Insights
- If your phone and stove are in different time zones, syncing may cause confusion. Always double-check the time after syncing.
- The app may prompt you for a firmware update before you can change settings. Complete any updates to avoid errors.
Comparing Manual Vs. App Methods
To help you choose the best method, here’s a comparison:
| Feature | Manual (Control Panel) | SmartThings App |
|---|---|---|
| Requires Wi-Fi | No | Yes |
| Can set remotely | No | Yes |
| Easy for all users | Yes (if familiar with buttons) | Yes (if comfortable with apps) |
| Syncs with phone | No | Yes |
| Risk of error | Manual input mistakes | App or Wi-Fi errors |
If you prefer physical buttons and don’t use Wi-Fi, use the manual method. If you like convenience and remote control, the app is the better choice.
Common Problems When Changing The Time
Sometimes things don’t go as planned. Here are some common issues and how to solve them.
The Clock Won’t Change
- Problem: After following the steps, the clock stays the same.
- Solution: Make sure you’re holding the Clock button long enough. Try unplugging the stove for 30 seconds and plugging it back in. If the problem continues, the control panel may need servicing.
Time Resets After Power Outage
- Problem: The clock goes back to 12:00 after a power cut.
- Solution: This is normal for most stoves. Always check and reset the time after any power loss.
App Doesn’t Sync
- Problem: The app says the time is updated, but the stove’s display stays the same.
- Solution: Check your Wi-Fi connection. Reboot your router if needed. Make sure both the stove and phone are on the same network.
Wrong Time Zone
- Problem: The app sets the wrong time, maybe off by an hour.
- Solution: Check the time zone on your phone and in the SmartThings app. Make sure they match your local time.
Buttons Not Responding
- Problem: The control panel doesn’t respond to presses.
- Solution: Lock mode may be on. Look for a Child Lock symbol. If so, disable it (usually by holding a button for three seconds).
Firmware Update Required
- Problem: The app asks for a software update before changing the time.
- Solution: Let the update complete. Most new features, including time sync, require the latest firmware.
Credit: www.samsung.com
Special Clock Features On Smartthings Stoves
Some SmartThings Stove models offer extra clock features that go beyond simple time setting.
24-hour And 12-hour Format
You can choose between 12-hour (AM/PM) and 24-hour (military) time formats. This is useful if you prefer seeing 14:00 instead of 2:00 PM.
To change the format:
- Access Settings on the control panel or app.
- Look for Time Format.
- Select 12H or 24H and confirm.
Automatic Time Sync
Some models can sync time automatically when connected to the internet. This means your stove’s clock always matches your smartphone or home network.
- In the app, enable Auto Sync or Set time automatically.
- Manual changes will not be needed unless you travel to a different time zone.
Daylight Saving Time Adjustment
If your country uses daylight saving time, your stove can adjust automatically if auto-sync is enabled. Otherwise, you’ll need to update the time manually twice a year.
Scheduled Cooking Based On Clock
The stove’s clock allows you to use features like delayed start or scheduled baking. For these to work, your clock must be accurate. Double-check before setting up a scheduled recipe or cleaning cycle.
Timer And Alarm Integration
A correct clock means your kitchen timers and alarms work accurately. If you use the SmartThings app to set kitchen reminders, the stove’s clock will match those.
Advanced Troubleshooting
Some clock problems require more advanced steps. Here’s how to handle tricky cases:
Resetting The Stove
If all else fails, you may need to reset the stove to factory settings.
- Unplug the stove from power for at least 2 minutes.
- Plug it back in.
- Use the clock setting steps above to set the time again.
Software/firmware Update
If your stove is acting strangely, check for a firmware update in the SmartThings app. Updates often fix bugs, including clock issues.
- Open the app, select your stove, go to Device Settings, and check for updates.
- Install if available. The stove may restart.
Contacting Support
If the clock still won’t set, contact Samsung SmartThings support. Have your model number ready. Support may walk you through advanced steps or send a technician.
Tips For A Smooth Clock Setting Experience
1. Read Your Manual:
Every model is a little different. The manual has specific steps and troubleshooting advice.
2. Keep Software Updated:
Old firmware may prevent clock changes or cause errors.
3. Use Consistent Time Zones:
If you travel or move, update your phone and stove time zones to match.
4. Avoid Rushing:
Press buttons slowly and wait for the display to respond.
5. Check For Child Lock:
If nothing works, the control panel may be locked. Look for a lock symbol.
6. Double-check Power:
After power outages, always reset the time.
7. Confirm Changes:
After setting the clock, wait a few minutes to see if the time holds.
8. Test Scheduled Features:
Run a quick timer or delayed start to make sure the clock works with other stove features.
Common Mistakes To Avoid
- Forgetting to Save: After setting the time, some users forget to press Start or Enter to save changes.
- Mixing Up AM and PM: Make sure you select the correct half of the day, especially on 12-hour format models.
- Ignoring Updates: Skipping firmware updates can lead to bugs, including clock errors.
- Setting Time During Cooking: On some models, you can’t change the clock while the oven is running. Wait until the oven is off.
- Not Checking Time Zone: If you move or travel, update your time zone in the app and on the stove.

Credit: www.youtube.com
Case Example: Real User Experience
Let’s look at a real-life example to make things clearer.
Anna just bought a new SmartThings Stove. She set it up and connected it to Wi-Fi. The first week, everything worked, but after a power cut, she noticed the time was wrong. She tried pressing the Clock button, but nothing happened. Anna checked her manual and found she needed to hold the button for three seconds. The display started blinking, and she set the correct time.
Later, Anna traveled to a different city for work. When she used the SmartThings app to preheat her oven, she noticed the stove’s time was off by one hour. The app had synced to her phone’s new time zone, but the stove was still on her home time.
Anna went into the app settings and updated the time zone, solving the problem.
This example shows that:
- It’s important to read the manual carefully.
- Holding a button is sometimes needed.
- Time zone mismatches can cause confusion after travel.
How Smartthings Stove Time Setting Compares To Other Brands
If you’ve used other smart stoves, you might wonder how SmartThings compares. Here’s a simple comparison:
| Brand | Manual Clock Setting | App Setting | Auto Sync |
|---|---|---|---|
| SmartThings | Yes | Yes (SmartThings app) | Yes (on most models) |
| LG ThinQ | Yes | Yes (ThinQ app) | Yes |
| GE Profile | Yes | Yes (SmartHQ app) | Yes (latest models) |
| Whirlpool | Yes | Some models only | No |
SmartThings is among the easiest for clock management, especially if you like using your phone.
Safety And Security When Changing Stove Settings
Changing the time is safe, but there are a few things to consider:
- Do not change settings while cooking: It can be distracting and cause mistakes in recipes.
- Keep children away: Lock the control panel if you have curious kids.
- Check for software updates: Updates not only fix bugs but can improve security.
- Don’t share your Wi-Fi password: Only trusted people should have access to the SmartThings app.
The Role Of The Smartthings App In Kitchen Management
The SmartThings app does more than set the clock. It can help you:
- Get alerts if a burner is left on.
- Schedule oven preheating for busy mornings.
- Track energy usage.
- Connect with other smart devices, like fridges or dishwashers.
Keeping the clock accurate is the first step to unlocking these features.
For more on smart home integration, visit the official SmartThings support site.
Credit: www.samsung.com
Frequently Asked Questions
What Should I Do If The Clock Keeps Resetting After A Power Outage?
After a power outage, most SmartThings Stoves will revert to a default time (like 12:00). This is normal. You need to set the time again using the control panel or app. If the clock resets often without power loss, contact support.
Can I Set The Clock To 24-hour (military) Time?
Yes. Most SmartThings Stove models allow you to choose between 12-hour and 24-hour time formats. You can change this in the settings on the control panel or in the SmartThings app.
Why Is The App Showing A Different Time Than My Stove?
This usually happens if your phone and stove are in different time zones or if syncing failed. Check both time zones and ensure both devices are connected to the same Wi-Fi network.
Do I Need Wi-fi To Set The Time?
No. You can always set the time manually using the control panel, even if your stove is not connected to Wi-Fi. The app method requires Wi-Fi.
How Can I Prevent Kids From Changing The Clock?
Enable the Child Lock feature on your stove’s control panel. This will disable button presses, so children can’t change the time or other settings.
Changing the time on your SmartThings Stove is simple once you know the steps. Whether you prefer using the control panel or the app, keeping the clock accurate ensures your smart kitchen runs smoothly. Take time to read your manual, use the tips above, and don’t hesitate to reach out for support if something feels off.
With the right approach, your SmartThings Stove will always be on time—so you can focus on enjoying great meals and a stress-free kitchen.