
Changing the blade on your Vitamix can seem difficult at first. Many people worry about damaging their blender or hurting themselves. But, with the right steps and some practical tips, you can change the blade safely and keep your Vitamix working at its best.
This guide will walk you through everything you need to know, from understanding why blade changes matter to handling common problems. Whether your blade is dull, broken, or you just want a fresh start, you’ll find clear, simple instructions here.
Why Change A Vitamix Blade?
Over time, the Vitamix blade can become dull, bent, or damaged. This affects how well your blender works. A dull blade means your smoothies won’t be as smooth, and chopping hard foods gets harder. Sometimes, you may see leaks around the blade or hear strange noises. These are signs the blade needs attention. Also, some users want to switch blades to try new recipes, like moving from a wet blade to a dry blade for grinding grains. Knowing when and why to change the blade helps keep your Vitamix in top shape.
A less obvious reason to change the blade is safety. A bent or chipped blade can break off small metal pieces into your food, which is dangerous. Also, if the blade assembly becomes loose over time, it might wobble during blending.
This can stress the motor and make your blender less reliable or even damage it. If you notice food not blending evenly, or if the motor seems to strain, the blade might be the problem. For people who use their Vitamix for business, like making sauces or smoothies for sale, a sharp, undamaged blade is essential for quality and customer safety.
Tools And Materials Needed
Before starting, gather the right tools:
- Replacement Vitamix blade assembly (make sure it matches your container model)
- Retainer nut wrench (Vitamix sells these, but some third-party options work)
- Heavy-duty gloves (to protect your hands)
- Clean towel or cloth
- Mild dish soap and water (for cleaning)
- Small brush (for cleaning hard-to-reach spots)
Do not use regular pliers or metal tools—they can damage the retainer nut or blade assembly. If you’re unsure about your model, check the Vitamix website or your user manual.
Some people try to improvise with tools from their garage, but this often leads to scratched containers or stripped nuts. Invest in the proper wrench; it makes the job much easier and safer. A clean towel is handy for drying parts and making sure you can grip the container without slipping.
Even a minor slip could lead to a cut or dropped part. If you don’t have cut-resistant gloves, use a thick kitchen towel, but always be careful.

Credit: www.reddit.com
Understanding Vitamix Blade Types
Vitamix offers different blade assemblies. Using the wrong type can affect blending results. Here’s a quick comparison:
| Blade Type | Main Use | Container Compatibility |
|---|---|---|
| Wet Blade | Blending, pureeing, smoothies | Standard 64oz, 48oz, 32oz containers |
| Dry Blade | Grinding grains, kneading dough | 32oz dry container only |
| Low Profile Blade | Large batches, improved circulation | Low profile 64oz containers |
Non-obvious insight: Not all containers are made for blade removal. Some newer models (like Ascent Series) have non-removable blades. Always check your specific model before starting.
Another detail: Dry blades are shaped differently. They push ingredients up instead of pulling them down, which is better for grinding. If you try grinding grains with a wet blade, you won’t get good results, and you might damage the blade or container. If you’re not sure which blade you have, compare the shape to pictures on the Vitamix site. The low-profile blade is designed to work with wide containers, moving food efficiently for larger batches.
Safety Tips Before You Begin
Changing a blender blade can be risky if you’re not careful. Here are key safety steps:
- Unplug the blender before removing the container.
- Wear cut-resistant gloves to avoid injury.
- Work on a stable, clean surface.
- Never touch the blade edges directly.
- Do not force parts—if something feels stuck, double-check instructions.
A common beginner mistake is trying to twist off the blade with bare hands. The edges are sharp and can cut deeply. Always use the right tool.
Another overlooked safety step: Make sure children and pets are not nearby while you work. Dropping a blade assembly can be dangerous, and you need to stay focused. If your container is glass or plastic, handle it gently; sudden force can cause cracks. If you feel resistance, stop and check for stuck food or dried residue—forcing it is never the answer.
Step-by-step Guide: How To Change A Vitamix Blade
1. Remove The Container And Clean
Take the container off the blender base. Wash it with warm, soapy water. Dry completely. This prevents food from getting into the blade assembly.
If the container is oily or has sticky residue, use a little vinegar mixed with water for a deeper clean. Drying is very important—any leftover moisture can make it slippery and harder to handle.
2. Examine The Container Bottom
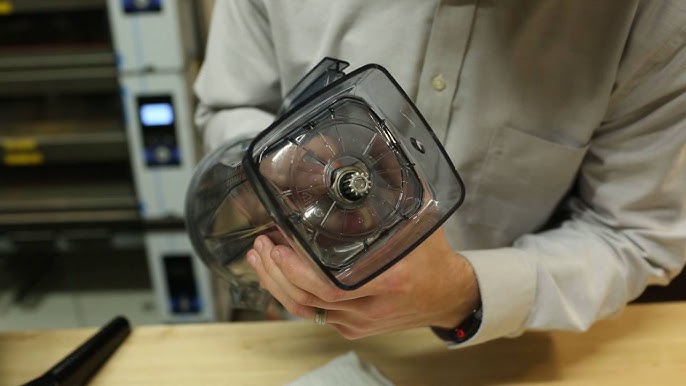
Turn the container upside down. You’ll see a large retainer nut holding the blade in place. This nut is usually round with grooves.
Check for cracks or chips around the nut. Small cracks can become big leaks later. If you spot damage, consider replacing the container as well.
3. Use The Retainer Nut Wrench
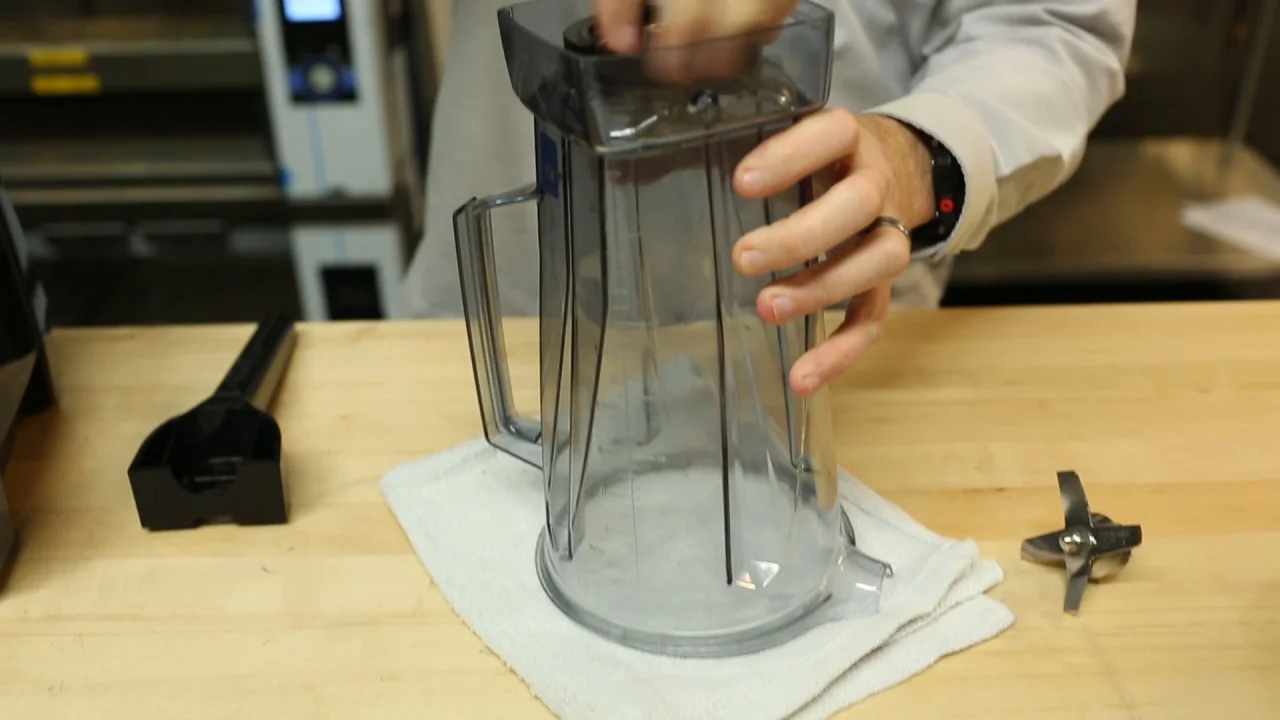
Fit the retainer nut wrench onto the grooves of the retainer nut. Hold the container steady with one hand (wear gloves). Turn the wrench counterclockwise to loosen the nut. It may be tight at first—apply steady pressure.
If the nut doesn’t move, double-check you’re turning the right way. Never use excessive force, as this can crack the container.
It helps to place a towel under the container to prevent slipping. If the nut is very tight, try gently tapping the wrench handle with your palm to help loosen it. Avoid metal hammers, as they can cause cracks.
4. Lift Out The Old Blade Assembly
Once the retainer nut is off, carefully lift the blade assembly out from inside the container. Hold it by the shaft, not the blades.
Inspect the old blade for dullness, rust, or damage. If you see black spots or chips, replacement is a good idea.
Sometimes, food debris can hide damage, so rinse the blade and look carefully. Even a small bend or nick can affect blending performance and safety.
5. Clean The Container Base And Gasket
Use a brush and soap to clean the inside bottom and the area where the blade sits. Also, wipe the gasket (rubber seal). If it’s cracked or worn, replace it with a new one. Leaks often come from a bad gasket, not the blade.
Check for buildup in the groove where the gasket sits. Old food or residue can prevent a good seal, leading to leaks. If you don’t have a new gasket, order one before proceeding.
6. Insert The New Blade Assembly
Place the new blade assembly into the hole at the bottom of the container. Make sure the gasket is in place and sits flat.
The blade should fit snugly without wiggling. If it doesn’t fit smoothly, check for obstructions or misalignment.
7. Secure With The Retainer Nut
Screw the retainer nut back on clockwise. Use the wrench to tighten, but do not over-tighten. The nut should be snug but not forced.
A little resistance is normal. If you need to use a lot of force, stop and check alignment. Over-tightening can warp the container or compress the gasket too much, causing leaks.
8. Final Check
Flip the container upright and test spin the blade with your hand (wear gloves). It should move smoothly. If it wobbles, remove and re-seat the blade.
Listen for grinding or scraping noises. These can mean the blade isn’t seated right or there’s debris stuck underneath.
9. Test With Water
Fill the container with a cup of water and run the blender on low for 30 seconds. Check for leaks around the base. If you see leaks, stop and check the gasket and nut again.
If there’s a slow drip, empty the container, dry everything, and carefully reseat the blade and gasket.
10. Clean Up
Wash the container and blade assembly with warm water and mild soap. Dry before use.
Avoid using harsh cleaners or bleach, which can damage the plastic and gasket. Store your wrench in a safe place for next time.
Troubleshooting Common Problems
Changing the Vitamix blade is usually easy, but issues can happen:
- Retainer nut stuck: Soak the container bottom in warm water for 10 minutes. This can loosen dried food or debris. Never use WD-40 or oil.
- Blade assembly wobbles: The blade may not be seated correctly. Remove and reinsert, making sure the gasket is flat.
- Leak after installation: Check if the gasket is damaged or missing. Always use a new gasket if the old one looks worn.
- Container cracks: Forcing the nut too hard can break the plastic. If the container cracks, stop using it and get a replacement.
- Strange noises: If the blade scrapes or grinds, remove it and check for debris or improper placement.
Non-obvious tip: Sometimes, a new blade may feel stiff. This is normal and usually loosens after a few uses.
Another common issue: If you see fine black particles under the container after blending, it could be from a worn gasket or damaged blade. Stop and inspect all parts before using the blender again.
How Often Should You Change The Vitamix Blade?
Most users do not need to change the blade often. Vitamix blades are made from hardened stainless steel and last for years. Here are signs it’s time to change:
- Blades are visibly dull or bent.
- The blender struggles to blend foods it used to handle easily.
- You see leaks at the blade base.
- There is rust or discoloration on the blade.
- The blade makes grinding noises even after cleaning.
For most home users, blades last 3–5 years. Heavy daily use (like in restaurants) may require yearly changes.
If you use your Vitamix mostly for soft foods, the blade will last longer. Hard foods like ice, nuts, and grains wear blades faster. If you notice your smoothies aren’t as creamy as before, or you see unblended chunks, it’s worth checking the blade.
Some users keep a spare blade on hand, especially if they use the blender for both wet and dry foods.
Should You Change The Blade Yourself Or Use Vitamix Service?
You can change the blade at home if your container allows. But, some models have non-removable blades, and DIY repair may void the warranty. If you’re not confident, consider sending the container to Vitamix Service.
Here’s a simple comparison:
| Option | Pros | Cons |
|---|---|---|
| DIY Replacement | Cheaper, faster, learn new skill | Risk of damaging container, void warranty if done wrong |
| Vitamix Service | Professional, warranty remains valid | Slower, may cost more |
Pro tip: If your Vitamix is still under warranty, reach out to customer support before opening anything. Some repairs are covered for free.
Another detail: If you live far from a service center, factor in shipping time and cost. Some users prefer professional help for peace of mind, especially if they have an expensive or commercial model.
Credit: www.youtube.com
Where To Buy Replacement Vitamix Blades
It’s important to buy genuine Vitamix blades. Counterfeit or third-party blades may not fit well and can damage your blender.
Buy from:
- The official Vitamix website
- Authorized retailers (Amazon, Williams Sonoma, specialty kitchen stores)
- Direct from Vitamix customer service
Never buy used blades or from unknown sellers. Used blades may have hidden cracks or bacteria.
Genuine blades come with a warranty and customer support. If you buy from third-party sellers, check reviews and return policies. Blades are not universal—even if they look similar, small differences in size or thread can cause leaks or poor blending.
Cleaning And Maintenance After Changing The Blade
A clean blade lasts longer and works better. Here’s how to care for your new blade:
- Rinse the container and blade after every use.
- Once a week, do a deep clean: Fill with warm water and a drop of dish soap, blend on high for 60 seconds, then rinse.
- Do not put containers with removable blades in the dishwasher unless the manual says it’s safe.
- Never let food dry on the blade—it gets harder to clean and can cause rust.
- Store the container upside down to drain fully.
Extra insight: Even stainless steel can rust if left wet for days. Always dry your container and blade thoroughly.
For tough stains or smells, blend a mix of water and baking soda. If you see cloudiness on the container, it’s often from minerals in your water, not the blade. Wipe with vinegar to remove it. Avoid using metal brushes, which can scratch the blade or container.
What Not To Do When Changing A Vitamix Blade
Many users make mistakes when changing blades. Here’s what to avoid:
- Don’t use regular pliers or wrenches.
- Don’t try to change the blade on a fixed-blade model.
- Don’t skip cleaning before and after.
- Don’t forget to check the gasket.
- Don’t over-tighten the retainer nut.
Forcing or skipping steps often leads to leaks or damaged containers.
Another mistake: Using a damaged container. Even small cracks can leak or break under pressure. If you notice any damage, replace the container before installing a new blade.
Real-world Example: Changing A Vitamix Blade
Let’s look at a real situation. Maria, a home cook, noticed her Vitamix wasn’t blending frozen fruit as smoothly as before. She checked and saw the blade was dull. She bought a new blade assembly and a retainer nut wrench from the official Vitamix website.
Maria unplugged her blender, wore gloves, and used the wrench to remove the old blade. She cleaned the container well and noticed the gasket was cracked, so she replaced it. After installing the new blade and gasket, she did a water test—no leaks.
Now, her Vitamix blends like new.
Maria’s story shows the importance of safety, cleaning, and using the right tools.
Another example: John, a small café owner, tried to use pliers to remove his blade. He cracked the container and ended up spending more to replace it. He learned the hard way to use only recommended tools and to check instructions first.
Credit: primasupply.com
Vitamix Blade Change: Cost And Time
The cost depends on the blade type and where you buy it. On average:
- Replacement blade assembly: $60–$100 (official Vitamix)
- Retainer nut wrench: $15–$20
The process takes about 15–25 minutes, including cleaning and testing.
If you send the container to Vitamix Service, expect 1–2 weeks turnaround and possible shipping costs.
Consider that using genuine parts may cost more upfront, but it protects your blender and ensures the best performance. If you use your Vitamix often, the investment pays off in smooth, reliable blending.
Comparing Vitamix Blade Replacement With Other Brands
How Does Vitamix Blade Replacement Compare With Other Blender Brands?
| Brand | Blade Removal | DIY Difficulty | Parts Cost |
|---|---|---|---|
| Vitamix | Some models removable | Medium | High ($60–$100) |
| Blendtec | Non-removable | Not possible at home | Very high (whole jar replacement) |
| Ninja | Removable blade assembly | Easy | Low ($20–$40) |
Vitamix is more expensive, but the blades are higher quality and designed for heavy use. Some brands require replacing the entire jar, not just the blade.
A unique point about Vitamix: the company offers strong customer support and replacement parts for many years, which is not always the case with other brands. This long-term support adds value to your investment.
Upgrading: Should You Switch To A Different Blade?
Some users want to try a dry blade for grinding grains or a low-profile blade for bigger batches. Before switching:
- Make sure your container is compatible with the new blade.
- Understand that dry blades are for dry ingredients only (flour, grains).
- Wet blades are best for smoothies, soups, and liquids.
Switching blades can add new options to your kitchen, but never mix blade and container types. A common mistake is using a dry blade in a wet container, which can cause leaks.
If you plan to blend nut butters, spice mixes, or flour regularly, a dry blade and container are a good investment. For families or small businesses, having both blade types increases versatility and keeps each blade in good condition longer.
Reusing And Recycling Old Vitamix Blades
Don’t throw your old blade in the trash. Here’s what you can do:
- Use it as a backup in emergencies (if not damaged).
- Contact Vitamix about recycling programs.
- Some metal recycling centers accept stainless steel blades.
Never reuse a cracked or rusty blade, as it’s unsafe.
You can also get creative—some people use old blades for art projects or garden tools, but only if the edges are made safe. Always handle old blades carefully, even after removal.
When Not To Change The Blade Yourself
If your Vitamix is still under warranty, or you don’t feel comfortable, don’t risk DIY repair. Also, if you have a newer model with a fixed blade, forcing removal will ruin the container. Always check your model’s manual first.
If you’re unsure, contact Vitamix support or check an official resource like the Vitamix FAQ.
Remember, safety and protecting your investment are more important than saving time. If you have doubts, professional help is the best option.
Frequently Asked Questions
How Do I Know If My Vitamix Blade Needs Changing?
Signs include dull blades, leaks at the base, rust, or poor blending performance. If the blender makes grinding noises even after cleaning, the blade may be worn out.
Less obvious signs: If you notice black specks in your food or the blade feels loose when you spin it by hand, it’s time to check for damage.
Can I Use Any Replacement Blade With My Vitamix Container?
No. Only use Vitamix-approved blades designed for your specific container model. Using the wrong blade can cause leaks or damage.
Even blades that fit physically may not blend correctly or could strain the motor.
Is It Safe To Change The Blade Myself?
Yes, but only if your container supports blade removal and you use the right tools. Wear gloves and follow safety steps carefully.
If you’re unsure, watch a video guide from Vitamix or ask a friend with experience to help.
What If My Vitamix Blade Is Stuck And Won’t Come Off?
Soak the container base in warm water for 10 minutes. If it still won’t move, contact Vitamix support instead of forcing it.
Some users try lubricants, but these can damage the plastic or contaminate food—avoid them.
Are Vitamix Blades Dishwasher Safe?
Most containers with removable blades are not dishwasher safe. Always check your user manual. Clean by hand for best results.
If in doubt, hand washing with a soft brush is safest for both the blade and container.
Changing your Vitamix blade can give your blender a new life and improve your kitchen experience. With the right tools and careful attention, you can do it safely and quickly. Always use genuine parts, follow the steps, and enjoy smooth blending every time.