
Creating extra storage or a beautiful design feature above your kitchen cabinets can transform a cluttered or unfinished space into something both practical and stylish. Many kitchens have a gap between the top of the cabinets and the ceiling, and this area is often ignored.
But with some planning, you can build boxes above kitchen cabinets that offer both storage and a chance to show off your creativity.
This guide is here to walk you through the entire process, from planning and measuring to choosing materials, building, and finishing your boxes. You’ll learn not just how to do it, but also how to make smart choices that save time, money, and effort.
Whether you want to hide pipes, store rarely used items, or simply give your kitchen a polished look, building boxes above kitchen cabinets is a project you can tackle with basic tools and patience.
Let’s explore every step, mistake to avoid, and clever trick—so you can turn that wasted space into a highlight of your kitchen.
Why Build Boxes Above Kitchen Cabinets?
The area above kitchen cabinets is often dusty and unused. But why should you consider building boxes there? Here are some real reasons:
- Extra storage: Perfect for holiday dishes, small appliances, or items you don’t use every day.
- Finished look: Boxes make cabinets look custom and built-in, hiding gaps and giving a clean finish.
- Hiding problems: Conceal uneven ceilings, wires, or old pipes.
- Less dusting: Closed boxes stop dust from collecting on top of cabinets.
- Design opportunity: Add crown molding, paint, or wallpaper for a unique touch.
Many homeowners regret leaving this space open, especially in kitchens with high ceilings. Small kitchens benefit the most, but even large spaces look more complete when this area is used wisely.
Planning Your Project
Before you buy supplies or pick up a saw, planning is key. Rushing this step is a common mistake and can lead to wasted money or a poor result.
Measuring Your Space
First, measure the distance from the top of your cabinets to the ceiling. Measure at several points—kitchen ceilings are rarely perfectly level. Write down the smallest and largest measurements.
- Width: Measure the length of each cabinet run. If your cabinets turn a corner, measure each section.
- Depth: Measure how far your cabinets stick out from the wall.
You need these numbers for every section where you want to install boxes.
Deciding Box Height And Depth
Most people build boxes that are the same depth as their cabinets, but you can make them shallower if you want a lighter look. As for height:
- If your ceiling is level, you can make all boxes the same height.
- If not, you may need to vary box height or fill gaps with trim.
Leave at least a small gap for air flow, unless you want a totally closed look.
Sketching A Plan
Draw a simple diagram of your kitchen. Mark where each box will go and note the measurements. Decide if you want one long box above several cabinets, or individual boxes for each section.
Considering Access
Think about how you’ll use these boxes. If you want storage, plan for removable panels or doors. If it’s just decorative, you can build them closed.
Choosing A Style
Your boxes can be simple or fancy. Options include:
- Flat panels for a modern look
- Crown molding for a traditional style
- Glass doors to display items
- Matching cabinet doors for a seamless look
Checking For Obstacles
Look for vents, pipes, or electrical wires above your cabinets. You may need to adjust your box design to work around these.
Tools And Materials Needed
Gathering the right tools and materials before you start saves a lot of frustration. Here’s what you’ll likely need:
Tools
- Tape measure
- Pencil
- Level
- Drill and bits
- Screwdriver
- Saw (circular saw, miter saw, or handsaw)
- Hammer or nail gun
- Clamps
- Stud finder
- Caulk gun
Optional:
- Sander
- Paintbrushes or rollers
- Jigsaw (for cutting around obstacles)
Materials
- Plywood or MDF for box panels (3/4 inch is standard)
- Wood glue
- Wood screws or finishing nails
- Trim or molding (if desired)
- Paint or stain
- Caulk
- Hinges or magnetic catches (if you want doors)
- Handles or knobs (optional)
- Wood filler
Choosing plywood usually gives a stronger, more durable box. MDF is smoother for painting but can swell with moisture—avoid it in humid kitchens.
Building Boxes Above Kitchen Cabinets: Step-by-step
Let’s break the process into simple steps so nothing gets missed.
1. Clear And Clean The Area
Remove everything from the tops of your cabinets. Clean the area well, as dust and grease can stop paint or glue from sticking.
2. Measure Twice, Cut Once
Double-check all measurements. Mark them clearly on your plywood or MDF. If your ceiling is not level, label each piece so you know where it fits.
3. Cut The Box Pieces
Cut panels for:
- Front (visible from the room)
- Top (if you want a closed box)
- Sides (if the box doesn’t run wall-to-wall)
- Bottom (optional—usually not needed if the cabinet top is flat)
- Back (optional—can add strength, but not required)
For most builds, you’ll use a front panel and two sides. If you want boxes for storage, cut tops and bottoms too.
4. Assemble The Boxes
Lay out your pieces on a flat surface. Use wood glue and screws or nails to fasten them together. Clamps help keep things square as the glue dries.
If you’re making several boxes, assemble one first and test it in place. Adjust your design if needed.
5. Test Fit And Adjust
Place the assembled box or panel on top of your cabinets. Check for gaps, fit, and clearance. Trim edges if necessary.
If your ceiling slopes, you may need to shave a bit off the top edge for a perfect fit. A level helps check your work.
6. Secure Boxes To Cabinets Or Wall
For safety, always fasten boxes securely. Use wood screws through the cabinet tops or into wall studs.
- For lightweight decorative panels, nails may be enough.
- For heavy storage boxes, use screws into studs and the tops of cabinets.
Use a stud finder to locate framing behind the wall.
7. Add Doors Or Panels (optional)
If you want storage, attach doors using simple hinges or install removable panels. Magnetic catches can keep doors shut without visible hardware.
8. Install Trim Or Molding
For a finished look, add crown molding or other trim where the box meets the ceiling and cabinets. This hides small gaps and makes your project look professional.
Miter saws make it easier to cut angles for corners.
9. Fill Gaps And Sand
Use caulk for small gaps where the box meets the wall or ceiling. Wood filler can cover screw holes or seams. Sand all surfaces smooth.
10. Paint Or Finish
Prime raw wood or MDF before painting. Use high-quality paint or stain for durability. Two coats are usually best.
Let the boxes dry completely before placing anything inside or decorating.
11. Add Handles Or Knobs (optional)
If you have doors, attach handles for easier access.
12. Decorate And Use
Add baskets, decorative items, or just leave the area clean for a modern look.
Comparing Box Types: Storage Vs. Decorative
Here’s a quick comparison of the two most common box styles you might build:
| Feature | Storage Boxes | Decorative Panels |
|---|---|---|
| Purpose | Extra storage | Hides gaps, adds style |
| Access | Doors or removable panels | Usually fixed, no access |
| Materials Needed | Full box (top, front, sides) | Front panel only (sometimes sides) |
| Cost | Higher (more materials) | Lower |
| Installation | Heavier, needs strong support | Lighter, easier to fit |
| Best For | Small kitchens, extra storage needs | Modern, seamless look |
Common Mistakes And How To Avoid Them
Even simple projects can go wrong if you miss a key detail. Here are mistakes many beginners make, and how to avoid them:
1. Not Checking For Level Ceilings
Kitchens rarely have perfectly level ceilings. If you build a box that’s too tall or too short in spots, you’ll have ugly gaps. Always measure both ends and the middle, and adjust your cuts.
2. Skipping Strong Fastening
Heavy boxes can fall if not secured to studs or cabinet tops. Screws into drywall alone are not strong enough. Use a stud finder and good quality wood screws.
3. Using The Wrong Materials
MDF is cheap and easy to paint but absorbs moisture. In a humid kitchen, choose plywood or seal MDF edges carefully. For painted finishes, prime raw wood or MDF to prevent swelling.
4. Ignoring Access
If you want real storage, plan for doors or removable panels. Many people build sealed boxes and later wish they could use the space inside.
5. Rushing The Finish
Taking time to fill, sand, and paint makes the boxes look built-in. Skipping these steps makes your project look DIY and unfinished.
6. Not Allowing For Expansion
Wood can expand and contract with changes in humidity. Leave a tiny gap at the ceiling or use flexible caulk to prevent cracking.
Costs And Time Involved
Building boxes above kitchen cabinets is usually affordable, especially compared to hiring a carpenter. Costs depend on your material choices and kitchen size.
Average Costs
Here’s a typical cost breakdown for a medium-sized kitchen (about 12 linear feet of cabinets):
| Item | Estimated Cost (USD) |
|---|---|
| Plywood (2-3 sheets) | $60–$120 |
| Wood screws/nails | $10–$20 |
| Crown molding/trim | $20–$60 |
| Paint or stain | $15–$40 |
| Hinges/handles (if needed) | $10–$30 |
| Wood filler, caulk | $5–$15 |
| Total | $120–$285 |
If you already have some tools and paint, your cost will be lower.
Time Commitment
For a basic project:
- Measuring and planning: 1–2 hours
- Cutting and assembly: 2–4 hours
- Painting and drying: 4–6 hours (with drying time in between)
- Installation: 2–3 hours
Most people can finish over a weekend.
Design And Decorative Ideas
Your boxes don’t have to be boring or plain. Here are some ways to make them stand out:
- Add crown molding: This makes the boxes look like part of your cabinets.
- Paint in a contrasting color: Try navy blue or deep green for a modern touch.
- Use wallpaper or textured panels: Add interest with patterns or textures.
- Install glass doors: Show off favorite dishes or collectibles.
- Add lighting: LED strips can highlight the area and make your kitchen feel bigger.
- Decorate with baskets or plants: Use the tops as open shelves if you leave them uncovered.
Some people even use this space to hide speakers or small appliances, keeping countertops clear.
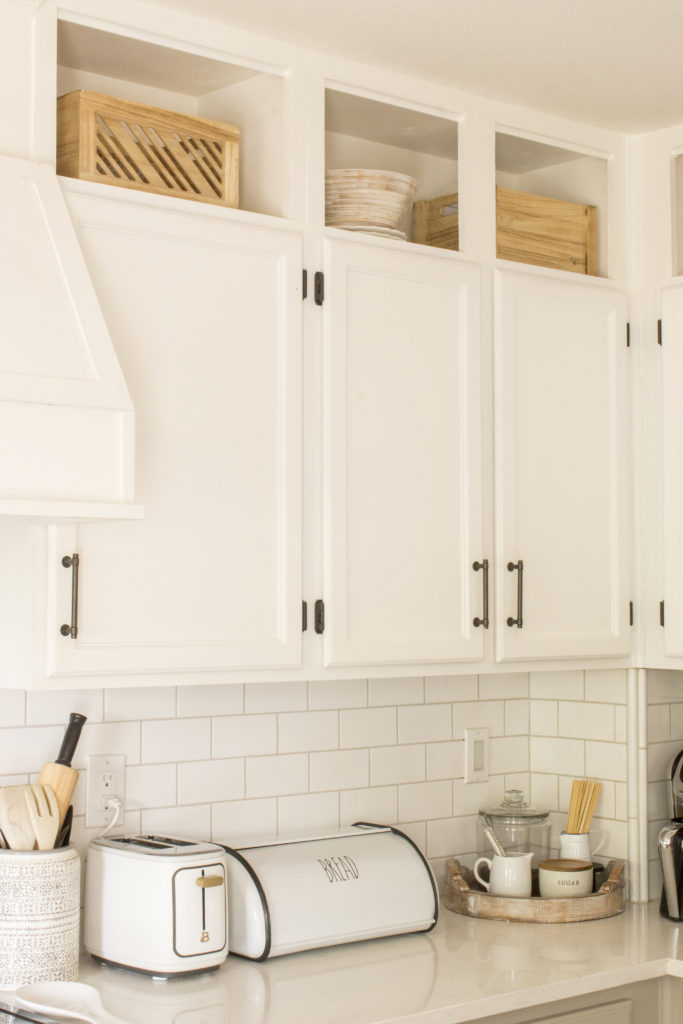
Credit: simplybeautifulbyangela.com
Step-by-step Example: Building A Simple Decorative Panel
Let’s walk through a real-world example—a simple decorative panel to hide the gap above cabinets.
What You’ll Need
- 3/4-inch plywood cut to the length of your cabinet run
- Two end pieces if your cabinets don’t run wall-to-wall
- Wood screws
- Wood glue
- Paint and primer
- Caulk
- Trim (optional)
Steps
- Measure the length and height needed.
- Cut a front panel from plywood. If your cabinets turn a corner, make two panels.
- Cut two end pieces (if there’s space at the ends).
- Glue and screw end pieces to the front panel.
- Prime and paint the panel. Let it dry completely.
- Test fit above your cabinets. Adjust as needed.
- Secure the panel using screws into the cabinet tops or wall studs.
- Add trim or crown molding to cover any gaps.
- Caulk and touch up paint for a seamless look.
This simple project can be done in a day and makes a big difference.
Using The Space: Storage Tips
If you build boxes for storage, make the most of the space inside:
- Store items you use only a few times a year.
- Use labeled baskets or bins for easy access.
- Keep a small step stool nearby for safety.
- Avoid overloading—these boxes are strong, but not meant for heavy items like tools.
A non-obvious tip: use silica gel packs or moisture absorbers if you live in a humid area. This helps protect your items from moisture damage.
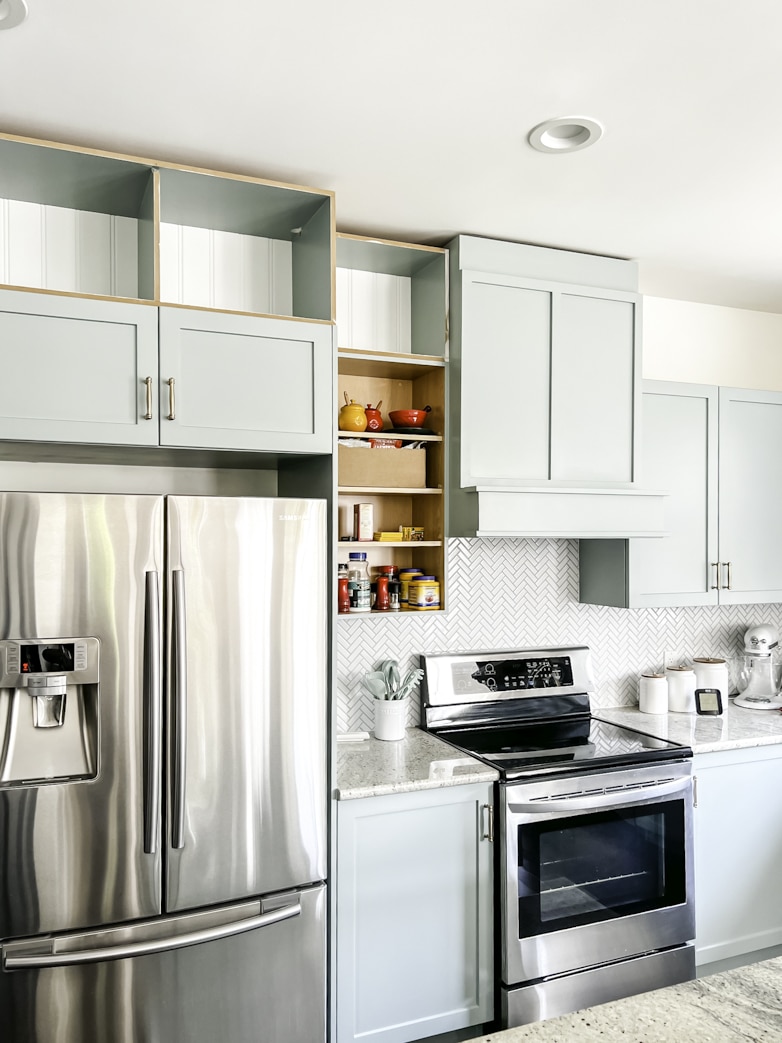
Credit: homewithmarieza.com
When To Hire A Pro
Most DIYers can handle this project, but you may need a professional if:
- Your ceiling is very uneven or sloped.
- You need to move electrical wiring or vents.
- You want a highly detailed finish (complex molding or built-in lighting).
A skilled carpenter can make the boxes look like they’ve always been part of your kitchen.
Maintenance And Cleaning
Boxes above cabinets are low-maintenance, but keep these tips in mind:
- Wipe the surface with a damp cloth every few months.
- If you have doors, clean hinges to prevent squeaking.
- Check for cracks in paint or caulk, especially in older homes.
- If you store food, check for pests or leaks.
A well-built box will last as long as your cabinets.
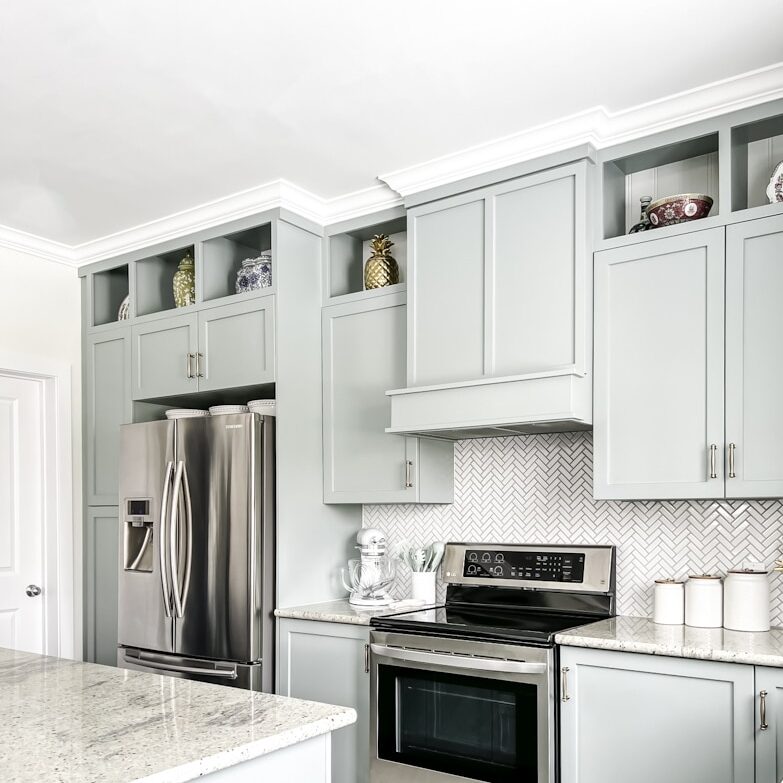
Credit: homewithmarieza.com
Real-world Examples And Inspiration
Many homeowners share their projects online, offering ideas and lessons learned. For more detailed inspiration, you can see examples on Houzz, where different styles and finishes are shown.
Some kitchens use this area for:
- Mini libraries for cookbooks
- Display shelves for pottery
- Hidden speakers or lighting
- Seasonal decor that changes throughout the year
Every kitchen is different, so don’t be afraid to adapt ideas to fit your space.
Frequently Asked Questions
How High Should Boxes Above Kitchen Cabinets Be?
The height depends on your ceiling and the space above your cabinets. Measure the shortest and tallest spots. Most boxes are 12–18 inches high, but always leave a small gap for airflow or trim if your ceiling is uneven.
Can I Use Mdf For Boxes In A Humid Kitchen?
MDF is easy to paint and cut, but it absorbs moisture and can swell. If your kitchen is humid, use plywood or seal all cut edges of MDF with primer and paint. Avoid MDF if you have leaks or poor ventilation.
Are These Boxes Strong Enough To Store Heavy Items?
If built from 3/4-inch plywood and secured into studs or cabinet tops, the boxes can hold light to medium items, like dishes or small appliances. Do not overload with very heavy items—these boxes are not meant to support extreme weight.
How Do I Make The Boxes Look Like Part Of My Cabinets?
Use matching paint or stain, add crown molding, and line up the box fronts with your cabinet doors. Take time to fill gaps and sand smooth before painting. A careful finish makes them look built-in.
What If My Ceiling Isn’t Level?
If your ceiling is uneven, measure at several points and build the boxes to fit the smallest measurement. Use flexible caulk or trim to hide small gaps at the ceiling line. For very uneven ceilings, consider custom-shaped panels.
Building boxes above your kitchen cabinets is a smart way to add storage and style. With careful planning, the right tools, and a little patience, you can upgrade your kitchen and enjoy the results for years to come.