Transforming kitchen cabinets with vinyl paper is an affordable way to update your space without the mess and expense of a full remodel. For many people, the kitchen is the heart of the home, but old cabinets can make it feel outdated or tired. If you want a fast, clean, and budget-friendly facelift, vinyl paper is a practical solution. You do not need special skills or professional tools—just time, patience, and a bit of guidance.
In this article, you’ll learn every step to cover kitchen cabinets with vinyl paper. You’ll find advice on choosing the right vinyl, preparing your cabinets, applying the paper smoothly, and maintaining your new look. If you’ve never tried this before, don’t worry.
This guide will help you avoid common mistakes and get professional-looking results, even if you’re a beginner. By the end, you’ll have the confidence to refresh your cabinets and enjoy a kitchen that feels brand new.
Why Cover Kitchen Cabinets With Vinyl Paper?
Vinyl paper, also called self-adhesive vinyl or contact paper, has become a popular choice for many reasons. It offers a simple way to change the look of your cabinets without replacing them. Here are some key benefits:
- Affordable: Vinyl paper costs much less than new cabinets or even painting.
- Easy to install: You don’t need professional help or special tools.
- Variety of designs: There are hundreds of colors, patterns, and textures, including wood grain, marble, and solid colors.
- Temporary or permanent: You can remove it when you want a change, making it great for renters.
- Durable and water-resistant: Good-quality vinyl resists water, stains, and scratches.
One thing beginners often miss: vinyl paper can even help cover old surface damage, like scratches or faded areas, making cabinets look smooth again. However, it’s important to choose high-quality vinyl for best durability, especially in a kitchen where heat and moisture are common.
Tools And Materials Needed
Before you start, gather all the tools and materials. Having everything ready makes the process easier and helps prevent mistakes.
Essential items:
- Self-adhesive vinyl paper (enough to cover all cabinet surfaces)
- Measuring tape
- Sharp utility knife or craft knife
- Scissors
- Squeegee or credit card (for smoothing bubbles)
- Ruler or straight edge
- Cleaning supplies (mild soap, sponge, water, microfiber cloth)
- Screwdriver (for removing cabinet doors and hardware)
- Pencil or chalk (for marking cut lines)
- Spray bottle (optional, for a water-and-soap solution)
- Masking tape (optional, for holding vinyl in place)
Pro tip: A heat gun or hair dryer can help the vinyl stretch around corners and stick better, especially on tricky edges.
Choosing The Right Vinyl Paper
Not all vinyl is the same. Picking the right type will make your project easier and your results last longer.
Thickness And Quality
Thicker vinyl (0. 2mm or more) is usually stronger, covers imperfections better, and is less likely to tear during installation. Cheaper, thin vinyl can wrinkle or wear out fast, especially in busy kitchens.
Finish And Texture
- Glossy: Reflects light, makes spaces feel larger, but shows fingerprints.
- Matte: Hides smudges and fingerprints, good for high-traffic kitchens.
- Textured: Mimics materials like wood or stone for a more realistic look.
Color And Pattern
Think about your kitchen’s style and size. Light colors can make a small kitchen feel bigger. Patterns like wood grain or marble offer a classic look, while bold colors create a modern vibe.
Adhesive Strength
Some vinyls use a repositionable adhesive, which lets you lift and reapply if you make a mistake. Permanent adhesives are harder to move, but last longer.
Sample First
Order a small sample before buying rolls for the whole kitchen. Test it on a hidden area to check the look, feel, and adhesive strength.
Where To Buy
You can find self-adhesive vinyl online, at home improvement stores, or specialty shops. Prices range from $10 to $50 per roll, depending on size and quality.
Measuring And Planning
Planning is key for a smooth installation and to avoid running out of material. Here’s how to measure:
- Remove cabinet doors and drawers if possible. This makes measuring and applying vinyl easier.
- Measure each surface you want to cover (fronts, sides, edges).
- Write down each measurement and add 1–2 inches extra for trimming and wrapping edges.
- Calculate total vinyl needed. Add 10–15% more to allow for mistakes or pattern matching.
Example
If a cabinet door is 15 inches wide and 24 inches tall, cut a piece of vinyl at least 17 x 26 inches. This extra helps cover the edges neatly.
Beginner insight: Always label your measurements. Mixing up similar-sized doors can lead to wasted vinyl and frustration.
Preparing Cabinets For Vinyl Application
Proper preparation will make the vinyl stick better and last longer. Skipping this step is a common mistake.
Cleaning
Kitchens often have grease and dust. Clean all surfaces with a mild soap and water. For sticky residue, use a degreaser or rubbing alcohol. Dry everything with a microfiber cloth.
Repairing Surfaces
Fill deep scratches or holes with wood filler. Sand rough spots with fine sandpaper, then wipe away dust. Vinyl sticks best to smooth, dry surfaces.
Removing Hardware
Take off handles, knobs, and hinges. Label them in bags so you can put them back easily. If you can’t remove them, work carefully around them.
Removing Doors And Drawers
It’s easier to apply vinyl on flat, horizontal surfaces. Take off doors and lay them on a table. If this isn’t possible, you can work with them in place, but take extra time to avoid wrinkles.
Pro tip: Let cleaned cabinets dry for at least an hour before applying vinyl.
Cutting Vinyl Paper To Size
Cutting vinyl accurately makes the application smoother and gives a professional finish.
- Mark the back of the vinyl using a pencil or chalk with your measurements.
- Use a ruler or straight edge for straight lines.
- Cut with sharp scissors or a utility knife for clean edges. Dull blades can rip the vinyl.
- Label each piece (for example, “top left drawer”) to keep track.
If your vinyl has a pattern, match it carefully across doors for a seamless look.
Beginner insight: Always cut vinyl slightly larger than needed. It’s easier to trim excess than to fix gaps.

Credit: www.domino.com
Applying Vinyl To Cabinet Surfaces
Now comes the main part: sticking the vinyl to your cabinets. Work slowly and carefully for the best results.
Step-by-step Application
- Peel back a few inches of the backing paper from the top edge of your vinyl piece.
- Align the vinyl with the edge of the cabinet. Use masking tape to hold it if needed.
- Press the sticky side down gently, smoothing from the center outward with your hand or squeegee.
- Slowly pull away more backing, a few inches at a time, pressing and smoothing as you go.
- Use a squeegee or credit card to push out air bubbles and wrinkles.
- Trim extra vinyl around the edges with a sharp knife. Fold the excess over the sides for a neat look.
- Use a hair dryer on low heat to help the vinyl stretch around corners or curved edges. Press down firmly.
Repeat for each door, drawer, and exposed cabinet surface.
Common Mistakes To Avoid
- Rushing: Work slowly. Rushing leads to bubbles and crooked lines.
- Not smoothing as you go: Always press from the center out to the edges.
- Not leaving extra vinyl: Without enough overlap, edges can peel up over time.
Wrapping Edges And Corners
Edges and corners are tricky but important for a professional result.
Straight Edges
Fold the vinyl over the edge and press firmly. Use a hair dryer to soften the vinyl if it feels stiff.
Inside Corners
Make a small diagonal cut at the corner to help the vinyl fold neatly. Overlap slightly for full coverage.
Curved Edges
Warm the vinyl with a hair dryer. Gently stretch and smooth it around the curve. Take your time.
Beginner insight: If you make a mistake, lift the vinyl gently and try again. Good vinyl can be repositioned a few times before sticking permanently.
Reinstalling Cabinet Hardware
Once all vinyl is applied and trimmed:
- Poke small holes in the vinyl where screws go using a toothpick or the tip of your knife.
- Reattach handles, knobs, and hinges carefully.
- Hang doors and drawers back in place.
Check that nothing catches or peels. Fix any loose spots with extra adhesive or a bit of heat.
Cleaning And Maintaining Vinyl-covered Cabinets
Your new cabinets are durable, but they still need care to look good for years.
- Wipe with a damp cloth and mild soap as needed.
- Avoid harsh cleaners or scrub brushes that can scratch the vinyl.
- Fix small edges that lift by pressing down with a squeegee or reheating with a hair dryer.
- Keep away from direct heat, such as open flames or toaster ovens, which can damage the adhesive.
Comparing Vinyl Paper To Other Cabinet Covering Options
Here’s how vinyl stacks up against other popular methods:
| Method | Cost | Installation Time | Removability | Durability |
|---|---|---|---|---|
| Vinyl Paper | Low | 1-2 Days | Easy | Good |
| Painting | Medium | 2-4 Days | Hard | Excellent |
| Refacing (New Doors) | High | 1 Week | No | Excellent |
Vinyl paper is the fastest and most reversible option, perfect for renters or anyone wanting a quick update.
Common Problems And How To Fix Them
Even with careful work, you might face some challenges. Here’s how to solve them:
Air Bubbles
Poke a tiny hole with a pin and press the air out. For larger bubbles, lift the vinyl gently and reapply, smoothing as you go.
Wrinkles
Heat with a hair dryer and gently stretch the vinyl smooth.
Peeling Edges
Add a little clear glue under the edge or press with a heated squeegee.
Misaligned Patterns
Lift the vinyl and realign while it’s still fresh. Matching patterns is easier with extra vinyl.
Vinyl Won’t Stick
Double-check that the surface is clean and dry. Grease or dust will keep the adhesive from working.
Beginner insight: Don’t wait to fix problems. The sooner you correct a mistake, the easier it is.
Credit: www.youtube.com
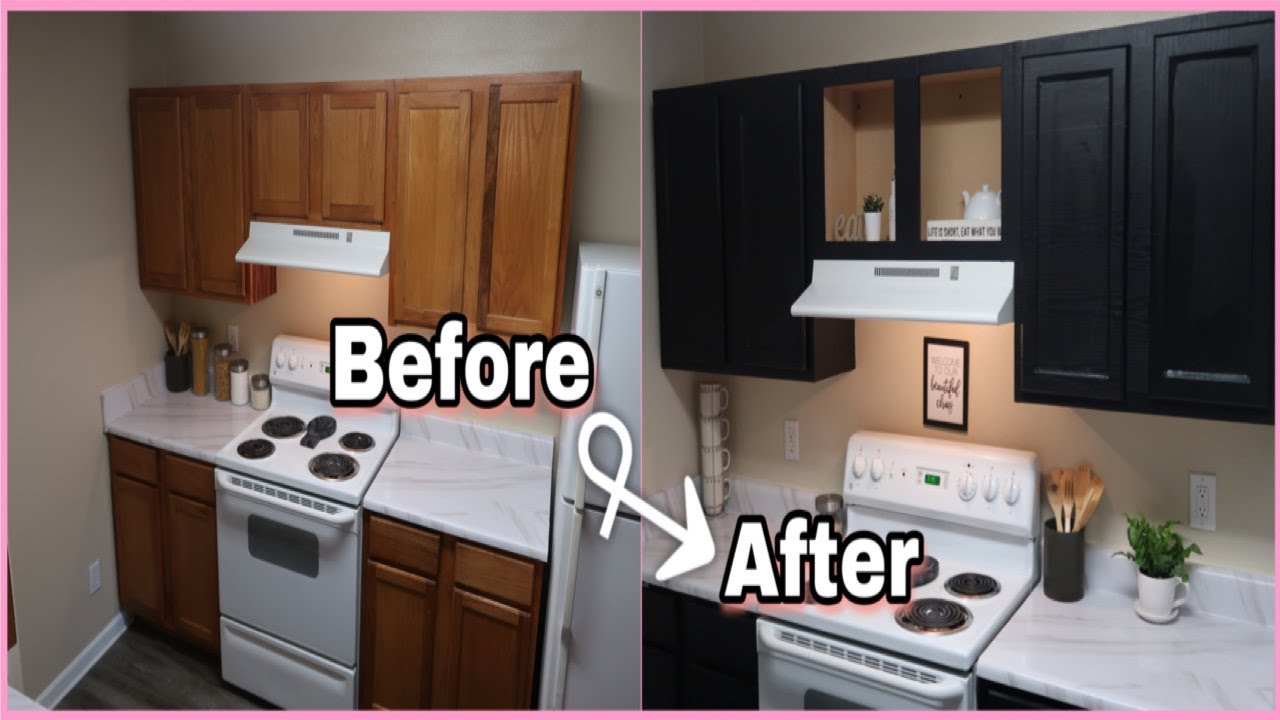
Styles And Design Ideas
Vinyl paper offers more than just a plain cover. You can get creative:
- Wood grain vinyl gives a classic look without the cost of real wood.
- Marble or stone patterns create a high-end feel.
- Bold colors add modern flair or match your kitchen theme.
- Matte black or navy can make old cabinets look sleek and new.
- Mix and match: Use different patterns on upper and lower cabinets.
- Add accents: Cover only the cabinet frames and paint the doors, or vice versa.
For a custom look, use stencils or layer vinyl sheets for borders and inlays.
How Long Does Vinyl Paper Last On Kitchen Cabinets?
Quality vinyl, applied properly, can last 3–5 years or longer. The lifespan depends on:
- Quality of the vinyl
- Level of kitchen use
- Exposure to heat and moisture
- How well you clean and maintain it
High-traffic kitchens may see more wear, but careful cleaning and avoiding sharp objects will keep cabinets looking good.

Credit: www.youtube.com
Environmental Impact And Safety
Vinyl paper is made of plastic, but most modern options are free of toxic chemicals like lead or phthalates. Always check labels for BPA-free or RoHS-compliant products if you have kids or pets.
For a greener choice, look for vinyl made from recycled materials. When removing vinyl, dispose of it with your regular household waste; it’s not usually recyclable.
Cost Breakdown And Budgeting
Let’s see how much it typically costs to cover kitchen cabinets with vinyl paper.
| Item | Estimated Cost | Notes |
|---|---|---|
| Vinyl Paper (rolls) | $30–$100 | Depends on kitchen size and vinyl quality |
| Tools & Supplies | $10–$30 | Most are reusable |
| Total | $40–$130 | DIY, no labor costs |
Compared to painting or refacing, this is a big savings. If you already have tools, your cost can be even lower.
Real-life Example: Transforming A Small Kitchen
Maria, a renter in a city apartment, wanted to update her old cabinets without breaking her lease. She chose wood grain vinyl paper for 10 cabinet doors and 4 drawers. The total cost was $50 for vinyl plus $15 for tools. It took her a weekend to finish.
Maria’s cabinets looked brand new, and she got her full security deposit back when she moved out. Her tip: “Measure twice, cut once, and don’t rush the corners!”
Removing Vinyl Paper In The Future
If you want to change your kitchen again or are moving out, removing vinyl is simple:
- Lift a corner with your fingernail or a plastic scraper.
- Pull slowly and steadily. Most vinyl peels off in one piece.
- Clean leftover adhesive with warm soapy water or rubbing alcohol.
Surfaces under the vinyl are usually undamaged, especially if you cleaned and prepared them before the original application.
When Not To Use Vinyl Paper
Vinyl paper is great for most cabinets, but sometimes it’s not the best choice:
- Cracked or warped surfaces: Vinyl won’t hide major damage.
- Oily or textured finishes: Adhesive may not stick well.
- Cabinets near high heat: The adhesive can soften and peel.
In these cases, painting or refacing might be better long-term solutions.
Tips For A Professional Finish
To get the best look, remember:
- Use a sharp knife for clean cuts.
- Work in good lighting to spot bubbles and wrinkles.
- Match patterns carefully for a seamless design.
- Take breaks if you get frustrated—mistakes happen when you’re tired.
- Invite a friend to help with large pieces or doors.
- Check your work as you go to catch problems early.
Beginner insight: Installing vinyl on a vertical surface is harder than on a table. Practice on a drawer or small door first.
Comparing Popular Vinyl Brands
Here’s a look at some well-known vinyl paper brands:
| Brand | Price per Roll | Thickness | Patterns Available | Removability |
|---|---|---|---|---|
| DC Fix | $15–$30 | 0.2mm | Wide | Easy |
| Con-Tact Paper | $10–$20 | 0.15mm | Moderate | Easy |
| VViViD | $20–$40 | 0.23mm | Wide | Easy |
Always check reviews and order a sample before choosing a brand for your whole kitchen.
Frequently Asked Questions
How Long Does It Take To Cover Kitchen Cabinets With Vinyl Paper?
For a small to medium kitchen, expect to spend about 6 to 10 hours. This includes removing doors, cleaning, cutting vinyl, and applying it. If you work alone, spread the project over a weekend. Larger kitchens may take longer, especially if you are new to DIY projects.
Can I Cover Cabinets Without Removing The Doors?
Yes, you can apply vinyl with doors in place. It’s more challenging, especially when wrapping edges, but possible. Clean and cover surrounding surfaces to avoid damage. Removing doors gives a neater finish and is less stressful, so do this if possible.
Will Vinyl Paper Damage My Cabinets?
Good-quality vinyl paper will not damage cabinets if the surface is clean and smooth before application. When removed, vinyl usually leaves no marks. For old or painted cabinets, test a small spot first. Avoid using on surfaces with peeling paint, as removal could lift loose paint.
How Do I Clean Vinyl-covered Cabinets?
Wipe with a soft cloth and mild dish soap. Avoid abrasive cleaners, bleach, or rough sponges. For sticky spots, use a little diluted vinegar. Always dry with a soft towel to prevent water spots.
Where Can I Learn More About Vinyl Paper Products?
You can find detailed guides and reviews at Wikipedia. This source explains the history, types, and uses of vinyl wraps for home and commercial projects.
Transforming your kitchen with vinyl paper gives you a fresh, modern look in just a weekend. With careful planning and patience, your cabinets can look as good as new—without the cost and hassle of a full renovation.