Keeping your kitchen tools clean is important for both health and performance. If you own an egg cooker, you probably enjoy how it makes breakfast fast and easy. But after a few uses, you might notice build-up, stains, or even a strange smell. Cleaning your egg cooker properly is key to making it last longer and keeping your eggs tasting great.
Many people think cleaning an egg cooker is simple: just rinse and dry. But that’s only a small part of the story. Hard water, eggshells, and protein residue can create stubborn stains. If you don’t clean your cooker the right way, you may end up with bacteria or even damage the device. Neglecting cleaning can also make your eggs taste odd or give them an unpleasant texture, especially if old residue mixes with fresh water and eggs.
Let’s explore how to clean every part of your egg cooker step-by-step. You’ll also learn how to handle tough messes, prevent common problems, and keep your cooker in top shape for years.
Understanding Your Egg Cooker
Before you start cleaning, it’s important to know the main parts of an egg cooker and the materials they’re made of. This helps you avoid mistakes and choose the right cleaning tools. Knowing your cooker’s design also helps you spot areas that are easy to miss, like small corners or slots where water can collect.
Most egg cookers have these main parts:
- Heating plate (usually metal)
- Lid (often plastic or glass)
- Egg tray or rack
- Measuring cup
- Body or base (contains the controls and plug)
Some models also have extra trays for poaching or omelets. Always check your user manual for specific details about your model. For example, some premium models have non-stick coatings or silicone parts that need special care.
Why Cleaning Matters
Egg residue is rich in protein. If left unwashed, it can grow bacteria quickly. Hard water minerals from tap water can also build up, making the cooker look dirty and work less efficiently. Regular cleaning protects your health and keeps the cooker working well.
Over time, even a thin layer of mineral build-up can cause your eggs to cook unevenly, or even stick to the trays, making them harder to remove.
Additionally, if you don’t clean your egg cooker well, the smell of old eggs can linger. This is not just unpleasant—it can mean bacteria are growing in hidden spots. Proper cleaning also helps you spot cracks or damage early, so you can fix or replace parts before they become a problem.
Preparing To Clean Your Egg Cooker
Cleaning is easier if you prepare first. Here’s how to get ready:
- Unplug the cooker and let it cool completely. This is for safety, as even a slightly warm cooker can cause burns.
- Take apart all removable parts: Lid, egg tray, measuring cup, and any extra trays.
- Read the manual. Some parts are dishwasher safe, but others need hand washing. Manuals also tell you if your model has sensitive electronics or coatings.
Gather these basic supplies:
- Mild dish soap
- Soft sponge or cloth
- Small brush or old toothbrush
- White vinegar
- Baking soda (for tough stains)
- Clean towel
If you have a model with silicone or rubber parts, have a toothpick or cotton swab handy to clean tiny gaps. Always use non-abrasive cleaners to protect surfaces.
Cleaning The Removable Parts
The trays, lid, and measuring cup usually come in contact with eggs and water. Here’s how to clean them properly:
Washing By Hand
- Fill your sink or a large bowl with warm, soapy water.
- Place the egg tray, lid, and measuring cup in the water.
- Use a soft sponge to gently remove egg residue. For small holes or corners, use a brush or toothbrush. A toothbrush works well for scrubbing around the pegs or small holes in the tray.
- Rinse all parts with clean water.
- Dry with a clean towel or let air dry.
If you notice any cloudy spots after drying, wipe again with a little vinegar on a cloth, then rinse and dry. This helps remove hard water marks.
Dishwasher Use
Some parts are safe to clean in the dishwasher. Most plastic lids and trays can go on the top rack. But always double-check your manual, because high heat can warp plastic. If your dishwasher has a “gentle” or “eco” cycle, use it to protect thin plastic.
If you have a clear plastic lid, avoid placing it near the heating element. Heat can cause cloudiness or cracks over time.
Dealing With Stubborn Stains
If you see stains from eggs or water, sprinkle a little baking soda on a damp sponge. Gently scrub the stain, then rinse and dry. For really tough spots, soak the part in warm water with a little vinegar for 30 minutes before washing. This is especially helpful for trays with dried egg or mineral rings.
For plastic parts, never use bleach or harsh chemicals, as these can weaken the material. If stains remain, repeat the process instead of scrubbing harder.
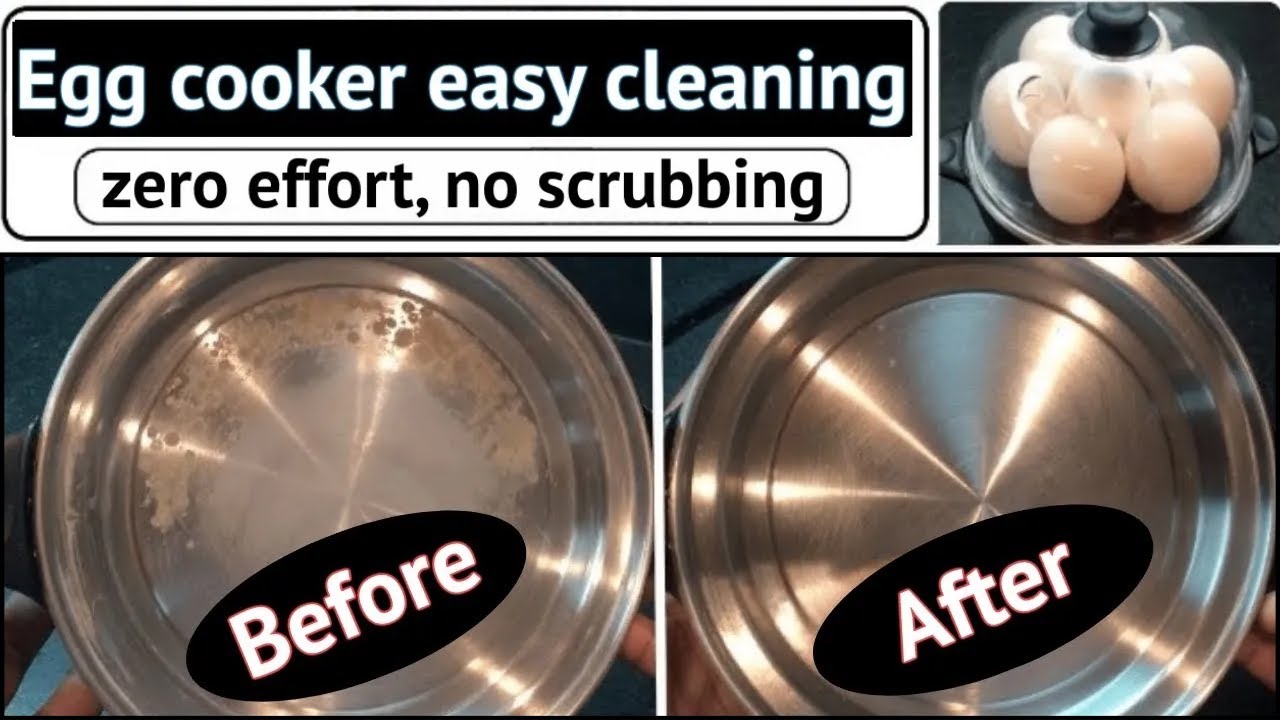
Cleaning The Heating Plate
The heating plate is the heart of your egg cooker. It heats up the water that cooks the eggs. This part often gets the dirtiest, with white chalky marks (from minerals) or brown egg residue. Never put the base in water—this can ruin the machine.
Step-by-step Cleaning
- Wipe away loose egg bits with a damp cloth. If bits are stuck, let a wet cloth sit on top for a few minutes to loosen them.
- For mineral build-up (white spots), pour a small amount of white vinegar (1-2 tablespoons) directly on the plate.
- Let it sit for 5-10 minutes. The acid in vinegar dissolves the minerals.
- Use a soft cloth or sponge to wipe away the loosened stains. Move in small circles for best results.
- Wipe again with a damp cloth to remove any vinegar.
- Dry with a towel.
Never use steel wool or a metal scouring pad. These can scratch the plate, making it harder to clean next time and may also damage the non-stick coating found on some models.
Removing Burnt-on Egg
Sometimes egg cooks onto the plate if it leaks or cracks. For burnt spots:
- Sprinkle baking soda on the damp plate.
- Add a few drops of water to make a paste.
- Let it sit for 10 minutes.
- Use a soft brush or cloth to gently scrub.
- Rinse with a damp cloth, then dry.
For very stubborn burnt bits, you can repeat the process or leave the baking soda paste longer. If the residue still won’t come off, do not try to scrape with a knife—this will scratch the plate.
Cleaning The Body And Controls
The outside of the cooker gets splashes and fingerprints. It’s easy to clean, but you must be careful with the controls and electric parts.
- Unplug the cooker.
- Wipe the outside with a damp cloth and a little dish soap if needed. Focus on areas where water or egg might have splashed.
- Clean around buttons or dials with a small brush or cotton swab. This helps remove grease or dust that can build up around controls.
- Dry with a towel.
Never let water enter the controls or base. This can cause a short circuit. If the cooker has a display or indicator light, wipe gently to avoid scratching.
A tip: after cleaning, check the cord and plug for any moisture or damage before plugging in again.
Descaling Your Egg Cooker
If you use tap water, minerals can build up on the heating plate and inside crevices. This is called scaling. It can slow down heating and shorten the life of your cooker. Descale your egg cooker every 1-2 months, or more often if you see white marks.
How To Descale
- Fill the measuring cup with equal parts white vinegar and water.
- Pour the solution onto the heating plate (to the usual water line).
- Let it sit for 30 minutes.
- Use a soft cloth to wipe off loosened minerals.
- Rinse with a clean, damp cloth.
- Run a cycle with plain water (no eggs) to remove any vinegar smell.
If your area has very hard water, you might need to descale more often—sometimes every two weeks. After descaling, always rinse thoroughly to avoid any vinegar taste in your eggs. If you notice scaling inside cracks or edges, use a cotton swab dipped in vinegar.

Credit: www.youtube.com
Cleaning Different Types Of Egg Cookers
Not all egg cookers are the same. Some have extra features that need special care.
Electric Egg Cookers
These are the most popular. Clean as described above. Watch for extra trays, which may need more attention. Some electric models have non-stick coatings; avoid abrasive sponges on these.
Microwave Egg Cookers
These are made of plastic and go in the microwave. They usually have fewer parts and no metal heating plate. Wash all parts by hand or in the dishwasher. Avoid using abrasive sponges, as plastic can scratch easily. If you notice a plastic smell, let all parts air out after washing.
Stovetop Egg Cookers
Older models may be all metal. Wash with soapy water and a soft cloth. Make sure to dry completely to prevent rust. For stainless steel, a little white vinegar helps remove water spots. For aluminum models, avoid acidic cleaners, as they can pit the metal.
If your stovetop cooker has wood or bakelite handles, wipe with a damp cloth and dry immediately.
Handling Common Problems
Sometimes, you’ll face special cleaning challenges. Here’s how to solve them:
Cloudy Or Smelly Lid
If your egg cooker’s lid looks cloudy or smells bad, soak it in a mix of water and vinegar (1:1) for 15 minutes, then wash as usual. This removes odors and any buildup. For stubborn smells, add a few drops of lemon juice to the soak.
Rust Spots
If you see rust on metal parts, gently scrub with a paste of baking soda and water. Rinse and dry well. Keep the cooker dry when not in use. For deep rust, use a little white vinegar, but rinse right away to avoid damaging the metal.
Sticky Egg Residue
For sticky, dried egg bits, soak the tray or plate in warm soapy water. Don’t scrape hard, as you may damage the surface. If residue remains, repeat the soak instead of using harsh scrubbers.
How Often To Clean Your Egg Cooker
Frequency depends on how often you use it:
- After every use: Clean removable parts and wipe the heating plate.
- Every week: Check for build-up and descale if needed.
- Monthly: Deep clean and descale, especially if you use hard water.
If you notice a smell, discoloration, or your eggs taste strange, do a deep clean right away. If you use your cooker for poached eggs or omelets, which can leave more residue, consider cleaning more often.
Safety Precautions
Cleaning is important, but safety comes first:
- Always unplug before cleaning.
- Never put the electric base in water.
- Don’t use strong chemicals or bleach—these can damage parts and are unsafe for food.
- Dry all parts completely before reassembling.
- Check the cord and plug for damage during cleaning.
If you have children helping with cleaning, supervise closely—they may not realize which parts are electric.

Credit: www.reddit.com
Mistakes To Avoid
Beginners often make these mistakes:
- Using rough scrubbers on the heating plate.
- Forgetting to descale, which leads to slow cooking.
- Washing the base or controls with too much water.
- Not drying parts, which can cause rust or mold.
- Using dishwasher for parts that are not dishwasher safe.
Another common mistake: not checking for cracks or loose parts before cleaning. Always inspect after washing.
To protect your cooker and your eggs, follow the manual and these tips.
Pro Tips For Long-lasting Egg Cookers
- Use distilled water instead of tap water. This reduces mineral build-up and keeps the heating plate shiny.
- Always empty leftover water after cooking. Standing water promotes scaling and bacteria growth.
- Store with the lid off to let moisture escape. This prevents musty odors and mold.
- If you see cracks or damage, replace parts quickly. Most brands sell replacements.
- Once a month, polish stainless steel exteriors with a little vinegar for a bright, clean look.
- Keep a small brush just for your egg cooker. This way, you’re always ready for quick cleaning.
Comparing Egg Cooker Cleaning Needs
Different brands and types need different care. Here is a simple comparison:
| Type | Heating Plate? | Dishwasher Safe Parts | Descaling Needed? |
|---|---|---|---|
| Electric | Yes | Usually trays, lid | Yes, monthly |
| Microwave | No | All | No |
| Stovetop | No | All | Sometimes |
Electric models need the most regular care, especially with hard water. Microwave and stovetop models are simpler, but always check parts for warping or rust.
Egg Cooker Cleaning Frequency Guide
How often should you clean or descale? Here’s a quick guide:
| Usage | Clean After Use | Deep Clean/Descale |
|---|---|---|
| Daily | Yes | Every 2 weeks |
| Weekly | Yes | Monthly |
| Occasional | Yes | Every 2-3 months |
Remember, if your water is hard or you cook eggs with shells that sometimes crack, clean more often to avoid build-up.
Extra Insights Most People Miss
Many people think a quick rinse is enough. But two things are often forgotten:
- Hidden cracks and crevices: Egg cookers sometimes have small spaces where water collects. If not dried, these areas can grow mold or bacteria. Always dry every part, and let the cooker air out with the lid off.
- Water quality matters: Using hard tap water can cause heavy scaling. If you live in an area with hard water, you may need to descale more often, or switch to filtered or distilled water.
Another insight: If your eggs are sticking more than before, it could be a sign that the tray or heating plate needs deeper cleaning. A well-cleaned cooker cooks more evenly and releases eggs easily.
Storing Your Egg Cooker After Cleaning
Proper storage keeps your egg cooker fresh and ready for next use:
- Make sure all parts are fully dry.
- Store with the lid slightly open if possible, to prevent trapped moisture.
- Keep the cooker in a cool, dry place.
- Don’t wrap the cord around hot parts, which can cause wear.
- For small kitchens, nest trays and the measuring cup inside the cooker to save space.
If you use the cooker daily, keep it on the counter but wipe dust off regularly.
Credit: www.youtube.com
When To Replace Parts
Even with good care, parts wear out. Replace the heating plate if it’s deeply scratched or pitted. If the lid cracks, order a new one to avoid accidents. Trays with melted or warped plastic should also be replaced.
Most brands sell spare parts. Check the official website or contact customer support. Using damaged parts can lead to leaks, poor cooking, or even safety hazards.
Eco-friendly Cleaning Tips
If you want to avoid chemicals, vinegar and baking soda are excellent, safe options. They clean well and are safe for food contact.
Use a reusable cloth instead of paper towels. This reduces waste and cleans just as well. For extra cleaning power, use a few drops of lemon juice for a fresh scent and added grease-cutting.
You can also air-dry parts in sunlight. Sunlight naturally kills bacteria and helps remove odors.
Troubleshooting Cleaning Problems
If you’ve cleaned your egg cooker but still see issues, try these solutions:
Persistent Odors
- Run a cycle with water and a slice of lemon.
- Rinse and dry after the cycle.
- Leave the lid off overnight to let air circulate.
White Film On Parts
- Soak in vinegar for 15 minutes, then rinse and dry.
- Repeat as needed, especially if you have hard water.
Water Leaks
- Check that all parts are seated correctly.
- Look for cracks in trays or the lid.
- Replace any worn or misshapen rubber seals.
If you notice leaks despite careful assembly, check for dents or bends in the tray or heating plate.
Egg Cooker Cleaning: Summary Table
Here’s a quick summary for cleaning each part:
| Part | Cleaning Method | How Often |
|---|---|---|
| Heating Plate | Wipe, descale with vinegar | After use, monthly deep clean |
| Egg Tray/Rack | Soap and water | Every use |
| Lid | Soap and water, vinegar for odors | Every use |
| Measuring Cup | Soap and water | Every use |
| Body/Base | Damp cloth only | Weekly |
Frequently Asked Questions
How Do I Remove Brown Stains From The Heating Plate?
Brown stains are usually burnt egg or mineral deposits. Cover the stain with white vinegar and let it sit for 10 minutes. Use a soft sponge or old toothbrush to gently scrub. Rinse with a damp cloth and dry well.
If stains persist, repeat the process or try a baking soda paste for extra cleaning power.
Can I Put All Egg Cooker Parts In The Dishwasher?
Not always. Most plastic trays and lids are top-rack dishwasher safe, but the base and heating plate should never go in. Check your user manual for safe parts. If in doubt, wash by hand to avoid damage.
Why Does My Egg Cooker Smell Bad After Cleaning?
Odors often come from trapped egg residue or moisture. Soak the lid and trays in a mix of vinegar and water, then air dry completely. Run an empty cycle with lemon water if needed. Make sure to leave the lid off after cleaning to help moisture escape.
How Can I Prevent Mineral Build-up?
Use filtered or distilled water instead of tap water. Descale your egg cooker with vinegar every month, especially if you see white spots on the heating plate. Wipe the plate after every use to catch early build-up.
Is It Safe To Use Baking Soda And Vinegar Together?
Yes, it’s safe for cleaning, but use them separately for best results. Baking soda is a gentle abrasive, while vinegar dissolves minerals. Rinse well after using both to avoid any taste or smell.
Keeping your egg cooker clean isn’t just about looks—it’s about safety and performance. With the right methods, your eggs will taste better, and your cooker will last longer. Consistent care means fewer surprises and a better kitchen experience every day. For even more cleaning tips for kitchen appliances, you can read this Good Housekeeping guide. Now, you’re ready to enjoy perfect eggs with zero hassle, every time.