
Every kitchen tells a story. From morning coffee to late-night snacks, your kitchen cabinets work hard every day. But over time, you might notice small chips or peeling paint on their surfaces. Maybe it’s from a swinging bag, a dropped utensil, or just years of opening and closing.
While chipped paint may seem like a small flaw, it can make your entire kitchen look worn out. The good news? You don’t need to hire a professional or spend a fortune to restore your cabinets. With some patience, the right materials, and a step-by-step approach, you can bring your cabinets back to life.
This guide will show you exactly how to fix chipped paint on kitchen cabinets, so your kitchen looks beautiful and well cared for again.
Why Kitchen Cabinet Paint Chips
Before you fix the problem, it’s important to understand why it happens. Paint chipping on kitchen cabinets is very common, but it doesn’t happen by accident. Here are the main reasons:
- Moisture and Steam: Kitchens are full of moisture from cooking, boiling water, and even the dishwasher. Over time, this moisture weakens the paint, especially if the cabinets were not sealed properly.
- Low-Quality Paint or Finish: Not all paints are made for kitchen use. If your cabinets were painted with regular wall paint or low-quality products, they’re more likely to chip.
- Poor Surface Preparation: If grease, dust, or old finish wasn’t cleaned off before painting, new paint won’t stick well.
- Normal Wear and Tear: Handles, corners, and edges are touched the most. These areas naturally wear down faster.
- Temperature Changes: Kitchens can get hot and cold quickly, which causes wood and paint to expand and contract. This leads to cracks and chips.
A less obvious reason many people miss is that using harsh cleaning chemicals can slowly break down the paint. Also, if the cabinet doors are slammed shut often, the impact causes more chips over time. Knowing these causes helps you prevent future damage, not just fix what’s already there.
Tools And Materials You’ll Need
Having the right tools makes the job smoother and your results more professional. Here’s a list of what you’ll need for fixing chipped paint on kitchen cabinets:
- Mild detergent or degreaser
- Warm water
- Soft cloths or rags
- Fine-grit sandpaper (220-320 grit)
- Tack cloth (to pick up dust)
- Putty knife (flexible is best)
- Wood filler or spackling paste
- Primer (stain-blocking, if possible)
- Matching paint (semi-gloss or satin for kitchens)
- Small artist’s brush and foam brush or mini roller
- Painter’s tape
- Drop cloths or newspaper
- Protective gloves
- Mask (if you’re sensitive to dust or fumes)
- Screwdriver (for removing hardware)
Some people skip buying a tack cloth and try using a paper towel instead. But a tack cloth removes dust much better, so don’t overlook this small detail. Also, if you’re not sure what paint color or finish was used before, take a cabinet door or drawer front to a paint store. They can match it for you.
Step 1: Preparation Is Key
A successful repair starts with careful preparation. This step is often rushed, but it’s the foundation for long-lasting results.
- Clear the Area: Move items away from the cabinet. Lay down a drop cloth to catch paint or dust.
- Remove Hardware: Use a screwdriver to take off handles, knobs, or hinges near the chipped area. This protects them and makes painting easier.
- Clean the Surface: Mix a few drops of mild detergent with warm water. Wipe the cabinet with a soft cloth to remove grease and dirt. Pay extra attention to corners and edges.
- Dry Completely: Let the cabinet dry for at least 30 minutes. Moisture left on the surface can ruin paint adhesion.
A professional tip: If your cabinets are extra greasy (especially near the stove), use a degreaser made for kitchen surfaces. Paint won’t stick to even a thin layer of kitchen grease.
Step 2: Sanding The Chipped Area
Sanding helps smooth rough edges around the chip and gives the new paint something to grip.
- Choose the Right Sandpaper: Use fine-grit sandpaper (220-320 grit). Coarse sandpaper can scratch the surrounding paint.
- Sand Gently: Rub the sandpaper over the chipped area and a small border around it. The goal is to feather the edges so the repair blends in. Sand until the edges are smooth to the touch.
- Remove Dust: Wipe the area with a tack cloth. This step is easy to skip, but leftover dust will ruin the finish.
If the chip is deep, don’t try to sand everything flat. It’s better to fill the chip and then sand the filler smooth (see next step).
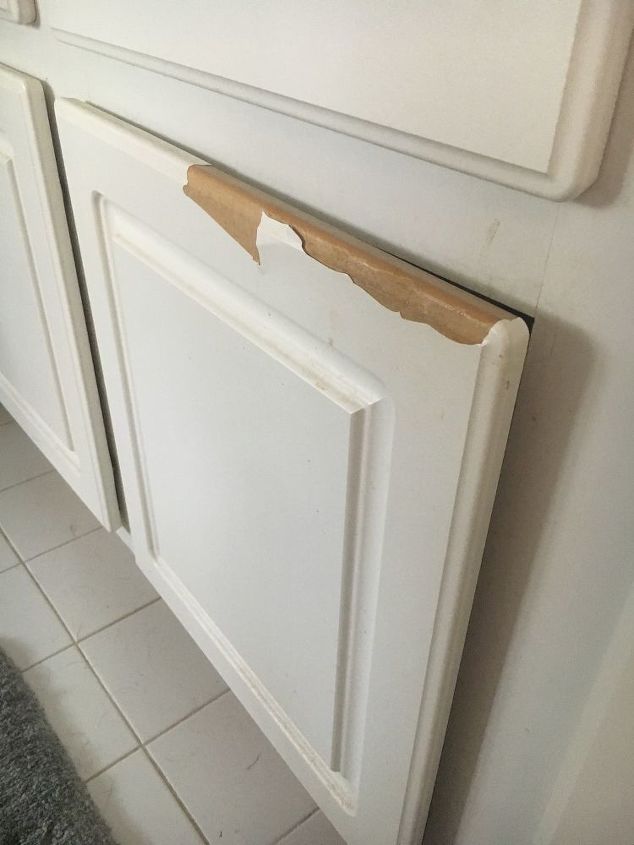
Credit: www.hometalk.com
Step 3: Filling The Chip
Deep chips or gouges need filler so the surface is flat and even. Here’s how:
- Choose Filler: Use a wood filler or spackling paste. Wood filler is stronger for bigger chips.
- Apply with a Putty Knife: Scoop a small amount onto the putty knife. Press it into the chip, slightly overfilling the area. This is important because filler shrinks as it dries.
- Smooth the Surface: Scrape off extra filler with the knife so it’s even with the cabinet. Don’t worry about perfection—sandpaper will help later.
- Let It Dry: Check the label for drying time. Most fillers need 30-60 minutes, but deeper fills may take longer.
A common mistake: Some people use too much filler and don’t smooth it out right away. Lumpy or uneven filler will show through your paint. Always smooth it while wet.
Step 4: Sanding The Filler
Once the filler is dry, sand again to blend the repair into the rest of the cabinet.
- Use Fine Sandpaper: 220-320 grit is perfect.
- Sand Lightly: Move the sandpaper in small circles over the filled area until it’s flat and level with the surrounding paint.
- Wipe Clean: Use a tack cloth to pick up all dust. This is crucial for a smooth paint job.
Check from different angles in bright light. If you see or feel bumps, repeat the filling and sanding steps. Patience here makes your repair invisible later.

Credit: www.exquisitelyunremarkable.com
Step 5: Priming The Repaired Spot
Primer helps paint stick and covers up the repair, so it matches the rest of the cabinet.
- Choose the Right Primer: Use a stain-blocking, bonding primer—especially if your cabinets are wood or stained.
- Tape Around the Area: Use painter’s tape to protect nearby surfaces.
- Apply Thinly: Use a small brush or foam brush to dab primer onto the repaired spot. Feather the edges so it blends with the old paint.
- Let It Dry: Most primers dry in 30-60 minutes.
If you skip primer, the new paint may look dull or peel off quickly. This is a detail that beginners often miss.
Step 6: Painting The Repaired Area
Now comes the most satisfying part—painting. Match your paint to the original color and finish for best results.
- Mix Paint Well: Stir your paint thoroughly to avoid color differences.
- Use a Small Brush: An artist’s brush or foam brush works best for small chips. For larger areas, a mini roller can help.
- Apply Thin Coats: Dab a thin layer of paint over the primed spot. Feather the edges so it blends in.
- Let Each Coat Dry: Wait at least 1-2 hours between coats. Most repairs need 2-3 thin coats for a perfect match.
A practical tip: Paint can look different when wet, so don’t judge the match right away. Let it dry completely before deciding if you need another coat.
Step 7: Blending The New Paint
Even if you use the same paint, the repaired spot can sometimes look a bit different. Here’s how to blend it for a seamless look:
- Feather the Edges: On the final coat, use a dry brush to gently blur the transition between old and new paint.
- Overlap Slightly: Extend the paint a few millimeters beyond the repair.
- Check the Sheen: Kitchen cabinets are usually semi-gloss or satin. If your new paint is shinier or duller, lightly buff the area with a soft cloth after it dries.
If you see a difference in gloss, you can use a clear topcoat spray (matching the original finish) to even it out. This extra step is rarely mentioned but makes a big difference in appearance.
Step 8: Reattaching Hardware And Final Touches
After everything is dry and smooth, you’re almost done.
- Remove Painter’s Tape: Peel it off slowly to avoid pulling up new paint.
- Reinstall Hardware: Screw handles and hinges back in place. If you removed a cabinet door, hang it again.
- Clean Up: Wipe the area with a soft, dry cloth to remove fingerprints.
- Wait Before Heavy Use: Give the repair 24-48 hours to fully harden before cleaning or putting heavy items back.
Don’t rush to clean with strong chemicals right away. Gentle care during the first week helps your repair last longer.
When To Repaint The Entire Cabinet
Sometimes, fixing a chip is not enough. If your cabinets have many chips, large peeling areas, or the color is faded all over, spot repairs won’t look good. Here’s how to decide:
- If more than 15% of the surface is chipped or peeling, a full repaint is better.
- If the paint is cracking or bubbling everywhere, it means the original paint job failed.
- If you want to change the cabinet color or upgrade the look, repainting everything gives the best result.
A full cabinet repaint is a bigger project but can make your kitchen look brand new.
Comparing Diy Repair Vs. Professional Help
Wondering if you should do it yourself or call a pro? Here’s a quick comparison:
| Factor | DIY Repair | Professional Help |
|---|---|---|
| Cost | Low (under $50 for supplies) | High ($200–$500+ for small jobs) |
| Time Needed | 2–4 hours (excluding drying time) | 1–2 hours (they work faster) |
| Skill Level | Beginner to Intermediate | Expert |
| Result Quality | Good (if you follow steps) | Excellent |
| Convenience | Must gather supplies, do the work | Hands-off |
For small chips, DIY is almost always worth it. For major damage, a professional may save you time and frustration.
Common Mistakes To Avoid
Many people try to fix chipped paint but end up making things worse. Here are the most common mistakes—and how to avoid them:
- Skipping Sanding: Paint doesn’t stick well to rough or glossy surfaces.
- Not Cleaning First: Grease or dirt will ruin any repair.
- Using the Wrong Filler: Lightweight spackle is fine for walls but too soft for kitchen cabinets.
- Forgetting Primer: Skipping primer means paint may peel off again soon.
- Rushing Drying Times: Each layer (filler, primer, paint) needs to dry fully.
- Bad Paint Match: Even a slight difference in color or sheen stands out.
- Painting Too Thick: Thick layers drip and look uneven. Thin coats are always better.
A less obvious mistake: Not protecting the rest of your kitchen. Paint splatters can ruin floors or counters, so always use drop cloths and painter’s tape.
How To Prevent Future Chipping
Fixing chips is satisfying, but prevention is even better. Here’s how to keep your kitchen cabinets looking new:
- Use Gentle Cleaners: Avoid strong chemicals and rough scrubbers.
- Close Doors Softly: Install soft-close hinges if possible.
- Wipe Spills Quickly: Moisture can seep into paint cracks and cause chips.
- Add Door Bumpers: Small felt pads can reduce impact when doors close.
- Keep Handles Tight: Loose handles move and scratch the paint.
- Regularly Inspect: Check cabinets every few months for early signs of damage.
An advanced tip is to apply a clear polyurethane topcoat to high-wear areas. This extra layer protects paint from moisture and scratches but is almost invisible.

Credit: www.youtube.com
Matching Paint Like A Pro
Getting an exact paint match is one of the hardest parts of cabinet repair. Even if you have the original paint can, the color may have faded. Here’s how to get the best match:
- Take a Door to the Store: Paint stores have scanners that match colors with high accuracy.
- Ask for a Sample: Buy a small sample jar and test it on a hidden area first.
- Choose the Right Sheen: Most kitchen cabinets are semi-gloss or satin. Flat or high-gloss finishes will stand out.
- Mix Old and New: If your paint is slightly off, mix a small amount of new and old paint together for a closer match.
A surprising tip: Lighting can change how paint looks. Check your match in both daylight and kitchen lighting before painting the main area.
Repairing Different Cabinet Materials
Not all kitchen cabinets are the same. Here’s how to adjust your repair for different materials:
| Cabinet Material | Repair Tips |
|---|---|
| Solid Wood | Use wood filler and sand well. Can handle repeated repairs. |
| MDF (Medium-Density Fiberboard) | Prime carefully—MDF soaks up moisture fast. Avoid water-based fillers if possible. |
| Laminate/Veneer | Use a laminate repair paste or touch-up marker for small chips. Paint may not stick unless sanded and primed well. |
| Thermofoil | Repair with special vinyl adhesives. Paint repairs are tricky—consider professional help if damage is large. |
Some beginners forget that MDF swells easily with water. Always use as little water as possible when cleaning or repairing MDF cabinets.
Cost Breakdown: What You’ll Spend
Fixing chipped paint on kitchen cabinets is affordable, but prices vary depending on what you already have. Here’s a typical cost breakdown:
| Item | Estimated Cost (USD) |
|---|---|
| Sandpaper (pack) | $5–$10 |
| Wood Filler/Spackle | $4–$8 |
| Primer (small can) | $10–$15 |
| Paint (sample jar) | $4–$8 |
| Brushes/Rollers | $5–$10 |
| Painter’s Tape | $3–$6 |
| Total | $31–$57 |
If you need to buy everything, expect to pay $30–$60. Most people have some supplies already, so the actual cost is often lower.
How To Tell If The Repair Worked
After you finish, how do you know if your repair was successful? Here’s what to check:
- Sight: The repaired area is invisible, even in bright light.
- Touch: The surface feels smooth, with no bumps or ridges.
- Durability: No new chips appear after a few weeks of normal use.
- Cleaning: You can gently clean the area without damaging the paint.
If the repair stands up to these tests, you’ve done a great job.
Advanced Tips For A Professional Finish
If you want your repair to look as good as a new cabinet, try these advanced tips:
- Wet Sand Between Coats: Use a slightly damp sanding sponge to smooth primer and paint layers. This creates a flawless finish.
- Use a Mini Roller: For larger repairs, a mini foam roller avoids brush marks.
- Apply a Clear Topcoat: Protect high-use areas with a clear polyurethane or acrylic finish.
- Work in Good Light: Use a bright work light to spot flaws before the final coat.
- Test on a Hidden Area: Practice your technique inside a cabinet door first.
Many people skip wet sanding, but it’s the secret to a perfectly smooth, professional look.
Frequently Asked Questions
What Type Of Paint Is Best For Kitchen Cabinets?
Acrylic latex paint with a semi-gloss or satin finish is ideal for kitchen cabinets. It’s durable, easy to clean, and resists moisture and stains. Oil-based paints are also strong but take longer to dry and have more fumes. Always choose paint labeled for cabinets or trim, not regular wall paint.
How Long Does A Cabinet Paint Repair Last?
If done correctly, a cabinet paint repair can last for several years. The key factors are good surface preparation, using quality materials, and protecting the area from moisture and heavy impacts. Regular cleaning with gentle products helps the repair last longer.
Can I Fix A Chip Without Sanding?
Sanding is very important for a smooth, lasting repair. Skipping sanding often leads to uneven surfaces and poor paint adhesion. If you’re worried about dust, use a sanding sponge and a tack cloth to keep the area clean.
How Do I Match The Cabinet Paint Color?
Take a small door or drawer front to a local paint store for a custom color match. Many stores have scanners that create an exact match. Test the sample on a hidden area before painting the main spot. Try to match both the color and the sheen for the best result.
Where Can I Learn More About Kitchen Cabinet Painting Techniques?
For more detailed information, you can visit Family Handyman, which offers step-by-step guides and tips for all levels of experience.
Fixing chipped paint on your kitchen cabinets doesn’t have to be stressful or expensive. With careful preparation, a little patience, and the right techniques, you can restore your cabinets and keep your kitchen looking fresh for years to come. Pay attention to details, avoid common mistakes, and your cabinets will look as good as new—maybe even better.