
Keeping your gas stove burner caps clean is more important than many people realize. A dirty burner cap not only makes your kitchen look untidy, but it can also affect how your stove works. Burners with grease, food debris, or burnt stains can cause uneven flames, strange smells, and sometimes even damage your stove. If you’ve ever seen yellow flames or heard sputtering from your stove, dirty burner caps could be the reason. Cleaning them the right way doesn’t just help your stove last longer—it also keeps your food tasting better and your kitchen safer.
If you’re worried that cleaning burner caps is difficult or takes too much time, you’re not alone. Many people skip this task or use the wrong methods. But with a few simple steps and the right techniques, anyone can do it.
In this guide, you’ll learn how to clean gas stove burner caps thoroughly, what tools you need, how often to clean, and what mistakes to avoid. You’ll also discover some non-obvious tips that even experienced home cooks sometimes miss.
Understanding Gas Stove Burner Caps
Before you start cleaning, it helps to know what burner caps are and why they matter. The burner cap is the removable disc that sits on top of the burner base. Its job is to spread the gas evenly and protect the burner itself. Burner caps are usually made of cast iron, steel, or sometimes aluminum. They often develop stains, carbon buildup, and burnt-on food because they sit right where the heat is highest.
A clean burner cap helps the gas flow smoothly. If the cap is blocked or covered with grease, the flame won’t be even. Sometimes, the flame might turn yellow instead of blue. This is a sign of incomplete combustion, which can lead to carbon monoxide in your kitchen—a serious safety risk.
Clean burner caps help your stove run efficiently and safely.
Tools And Supplies Needed
Cleaning burner caps doesn’t require expensive equipment, but having the right tools makes the job easier and safer. Here’s a simple list of what you’ll need:
- Soft brush – An old toothbrush or a soft-bristled brush works well for scrubbing.
- Non-abrasive sponge – Avoid steel wool, which can scratch the cap.
- Dishwashing liquid – A strong degreaser is best.
- Baking soda – For tough stains and burnt spots.
- White vinegar – Helps dissolve mineral deposits and grease.
- Warm water – For soaking and rinsing.
- Paper towels or soft cloth – For drying.
- Toothpick or straightened paper clip – For cleaning small holes or crevices.
- Rubber gloves – Protects your hands from grease and cleaners.
Optional items:
- Small bowl or bucket for soaking
- Plastic scraper for hard, stuck-on grime
- Old towel to protect your countertop
Choosing the right cleaning supplies is important. Using harsh chemicals or metal scrubbers can damage the finish of your burner caps, especially if they are enameled or coated. If you’re not sure which type of cap you have, check your stove’s manual or manufacturer’s website.
Preparing Your Gas Stove For Cleaning
Before you remove or clean anything, safety comes first. Gas stoves use flammable fuel, so it’s important to be careful. Here’s what you should do:
- Turn off all burners and make sure they are cool. Never clean a hot burner cap.
- Disconnect the gas supply if possible, or make sure all control knobs are set to “off.”
- Remove grates and burner caps gently. Lift them straight up so you don’t scratch the stove surface.
Place the grates and caps on an old towel near your sink. This keeps your countertop clean and prevents scratching. If your burner caps are stuck, don’t force them. Soak a cloth in warm water and place it over the cap for a few minutes to loosen any grease.
Never spray cleaner directly onto the stove while parts are still attached. This can cause chemicals to enter the gas ports or igniter, which can damage your stove.
Step-by-step Guide: How To Clean Gas Stove Burner Caps
Cleaning burner caps is not a one-size-fits-all process. Depending on how dirty they are, you might need to use different techniques. Follow these steps for best results.
1. Basic Cleaning For Light Dirt
If your burner caps only have minor stains or a thin layer of grease, a simple wash will do.
- Fill a bowl or sink with warm, soapy water.
- Place the burner caps in the water and let them soak for 10–15 minutes. Soaking helps loosen grease and food bits.
- Use a soft brush or non-abrasive sponge to gently scrub the caps. Pay attention to the edges and underside, where grease often hides.
- Rinse with clean water and dry with a soft cloth or paper towel.
- Let the caps air dry completely before putting them back on your stove.
2. Removing Tough Grease And Burnt-on Stains
If you see blackened areas or sticky residue, you’ll need a stronger approach.
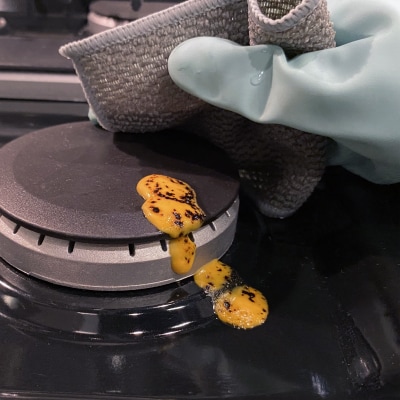
- Sprinkle baking soda generously over the wet burner caps.
- Add a few drops of water to make a paste.
- Let the baking soda paste sit on the stains for 15–30 minutes. This helps break down tough grime.
- Scrub with a soft brush, focusing on burnt spots.
- For stubborn stains, add a little white vinegar to the paste. The fizzing action helps lift residue.
- Rinse thoroughly and dry.
3. Cleaning Mineral Deposits
Sometimes, you’ll see white or gray spots on your burner caps. These are mineral deposits from hard water or spilled liquids. To remove them:
- Soak the caps in a mixture of equal parts white vinegar and water for 20–30 minutes.
- Scrub gently with a brush.
- Rinse and dry thoroughly.
4. Cleaning Small Crevices And Holes
Burner caps often have small holes or grooves. If these are blocked, the flame can become uneven.
- Use a toothpick, straightened paper clip, or a small brush to clear out any debris.
- Never use sharp knives or pins, which can scratch or widen the holes.
5. Dealing With Stubborn, Baked-on Grime
If nothing else works, try this:
- Make a paste with baking soda and a few drops of water.
- Apply the paste to the stains.
- Cover the cap with a damp cloth and let it sit overnight.
- Scrub the next day with a non-abrasive sponge.
- Rinse and dry.
If your caps are still stained after all these steps, it might be time to replace them. Some discoloration is normal with age, but thick layers of burnt material can impact performance.
6. Reassembling And Testing
After cleaning, make sure the burner caps are completely dry. Even a few drops of water can cause trouble. Place each cap back on its correct burner base. Turn on the burners briefly to check for a strong, even blue flame. If you see yellow flames or uneven burning, check that the caps are seated properly and no holes are blocked.
Cleaning Frequency: How Often Should You Clean Burner Caps?
Many people wonder how often they should clean their burner caps. The answer depends on how often you cook and what you cook. Here’s a simple guideline:
- Light cooking (1–2 times a week): Clean caps once a month.
- Daily cooking: Clean every 1–2 weeks.
- Heavy use or lots of oily foods: Check and clean every week.
If you spill food or sauce on the burner, clean the cap as soon as it cools. Don’t let spills dry and bake on, as they become much harder to remove.
Comparison Of Cleaning Methods
Different cleaning methods work for different types of dirt. Here’s a side-by-side look at the most common techniques:
| Method | Best For | Time Needed | Pros | Cons |
|---|---|---|---|---|
| Soapy Water Soak | Light grease, everyday cleaning | 10–15 min | Easy, gentle | Not effective for burnt stains |
| Baking Soda Paste | Stubborn stains, burnt-on food | 30–60 min | Natural, safe | Needs scrubbing |
| Vinegar Soak | Mineral deposits | 20–30 min | Removes water spots | Strong smell |
| Overnight Soak | Very tough grime | 8–12 hours | Works without harsh chemicals | Time-consuming |
Common Mistakes To Avoid
Many people make simple mistakes that can damage their burner caps or make cleaning harder. Here’s what to watch out for:
- Using metal scrubbers – These can scratch the surface, causing rust or uneven flames.
- Not drying caps completely – Moisture can cause rust or damage the burner base.
- Using harsh chemicals – Oven cleaners or strong acids can wear away coating and release fumes.
- Putting wet caps back on the stove – This can lead to popping sounds or poor ignition.
- Forgetting to clean the underside – Grease collects under the cap and can block gas flow.
- Forcing stuck caps – Twisting or prying with tools can crack or bend the cap.
A non-obvious tip: Always check the alignment of the burner cap when replacing it. Even a small misalignment can cause uneven flames or ignition problems.
Advanced Tips For Stubborn Problems
Sometimes, regular cleaning isn’t enough. Here are some advanced techniques to solve the toughest issues:
Removing Heavy Carbon Build-up
If your burner caps have a thick black layer that won’t come off with baking soda or vinegar, try this:
- Place the caps in a small pot with equal parts water and white vinegar.
- Bring the mixture to a gentle boil and let simmer for 10–15 minutes.
- Remove the caps (carefully—they’ll be hot), let them cool, then scrub again with a brush.
This method is especially useful for old stoves or caps that haven’t been cleaned in months.
Using Ammonia (with Caution)
Some people use ammonia for heavy grime. If you try this, always wear gloves and work in a well-ventilated area.
- Place burner caps in a zip-top plastic bag.
- Add about 1/4 cup ammonia, seal, and leave outside overnight.
- Open carefully, rinse thoroughly, and scrub lightly.
Never mix ammonia with bleach or other cleaners—this creates dangerous fumes.
When To Replace Burner Caps
If your caps are warped, cracked, or extremely rusted, cleaning won’t help. Most manufacturers sell replacement caps. Make sure you buy the exact size and shape for your stove model.

Credit: www.reddit.com
How Clean Burner Caps Improve Cooking
A clean burner cap isn’t just about looks. Here’s how it affects your cooking:
- Even flame: Heat spreads more evenly, so your food cooks better.
- Faster boiling: Clean caps allow more gas to flow, so pots heat up faster.
- Better taste: No burnt smells or strange flavors in your food.
- Lower gas use: Efficient burners use less fuel, saving you money.
- Longer stove life: Less wear and tear on parts means fewer repairs.
Small efforts in cleaning can make a big difference in your kitchen results.
Safety Precautions When Cleaning Burner Caps
Working with a gas stove means safety should always come first. Here are important tips:
- Never clean hot burner caps. Wait until they’re completely cool.
- Turn off all burners and gas supply before removing parts.
- Avoid harsh chemicals that create fumes, especially in small kitchens.
- Wear gloves if you have sensitive skin or are using strong cleaners.
- Ventilate your kitchen by opening windows or using a fan.
If you smell gas or see a continuous yellow flame after reassembling your stove, stop and check everything. If problems continue, contact a professional.
Credit: comisub.com
Environmental Impact Of Cleaning Methods
You might wonder if the cleaning products you use affect the environment. Here’s a quick comparison:
| Cleaning Product | Environmental Impact | Safety |
|---|---|---|
| Baking soda | Low, natural | Very safe |
| White vinegar | Low, biodegradable | Safe, mild odor |
| Dish soap (biodegradable) | Low, safe for drains | Very safe |
| Oven cleaner | High, chemical runoff | Hazardous if misused |
| Ammonia | Medium, needs careful disposal | Use with caution |
Choosing natural cleaners like baking soda and vinegar not only keeps your burner caps safe but also reduces harm to the environment.
Troubleshooting: If Your Burner Cap Still Looks Dirty
Sometimes, even after careful cleaning, burner caps still show signs of stains or discoloration. Here’s what to do:
- Black spots: These are usually carbon stains. Try boiling in vinegar and water, then scrubbing with baking soda.
- Rainbow colors: This is heat discoloration, common with stainless steel. It doesn’t affect performance.
- Rust: Light rust can be scrubbed away with baking soda paste. Deep rust may need replacement.
- Greasy feel: Wash again with strong dish soap and hot water, then rinse thoroughly.
If stains don’t come off but the cap is otherwise clean and undamaged, it’s safe to use. Focus on function, not just appearance.
Credit: www.maytag.com
How To Maintain Burner Caps For Longer Life
Regular cleaning is important, but a few habits can help your burner caps last even longer:
- Wipe up spills right away – Don’t let sauces or oils dry on the caps.
- Use burner liners or drip pans to catch messes.
- Avoid cooking on high heat without a pot or pan.
- Check alignment every time you clean or move the caps.
- Store caps dry if you’re not using your stove for a long time.
Small efforts after each cooking session can prevent big cleaning jobs later.
Comparing Different Burner Cap Materials
Not all burner caps are the same. Here’s a look at the most common materials and how they handle cleaning:
| Material | Durability | Cleaning Difficulty | Notes |
|---|---|---|---|
| Cast iron | Very strong | Medium | Can rust if left wet |
| Steel (coated) | Strong | Easy | Avoid abrasives |
| Aluminum | Lightweight | Easy | Scratches easily |
| Brass | Durable | Medium | Can tarnish |
Cast iron caps are the most common and last the longest, but they need careful drying. Coated steel is easy to clean but chips if scrubbed too hard. Knowing your cap material helps you choose the right cleaning method.
Professional Cleaning Vs. Diy
Should you clean your burner caps yourself or hire a professional? For most people, DIY is enough. Professionals may use specialized tools or ultrasonic cleaners, but the results are usually the same if you clean regularly. If your stove is under warranty or you have a high-end model, check the manual before using strong chemicals or tools.
Professional cleaning is best if:
- Caps are heavily rusted or damaged
- You can’t remove burnt stains after several tries
- Gas flow remains uneven after cleaning
For everyone else, regular home cleaning is safe, effective, and much cheaper.
Where To Find More Information
For extra tips, check your stove’s user manual or visit official appliance websites. Many companies provide cleaning guides for specific models. If you want to learn more about safe cleaning products, the EPA Safer Choice program lists products that are safe for you and the environment.
Frequently Asked Questions
How Often Should I Clean My Gas Stove Burner Caps?
For most people, cleaning every 1–2 weeks is enough if you cook daily. If you rarely use your stove, once a month is fine. Clean immediately after spills for best results.
Can I Put Burner Caps In The Dishwasher?
Some burner caps are dishwasher-safe, but many are not. High heat and strong detergents can damage the finish or cause rust. Check your stove’s manual before placing burner caps in the dishwasher.
Why Does My Burner Flame Turn Yellow After Cleaning?
A yellow flame means incomplete combustion. This often happens if the cap is wet, misaligned, or if holes are blocked. Make sure caps are dry, seated correctly, and all holes are clear.
What Should I Do If My Burner Cap Is Stuck?
If a burner cap is stuck, soak a cloth in hot water and lay it over the cap for a few minutes. This softens grease and grime. Never force or pry caps with metal tools, as this can cause damage.
Is It Safe To Use Vinegar Or Baking Soda On All Burner Caps?
Vinegar and baking soda are safe for most burner caps, but avoid them on aluminum or coated surfaces if the manufacturer warns against it. Always rinse well and dry completely.
Keeping your gas stove burner caps clean doesn’t just help your kitchen look good—it makes cooking safer, easier, and more enjoyable. With regular care and the right techniques, you’ll keep your stove running efficiently for years to come.