
Cleaning stains from the inside of a Le Creuset Dutch oven can feel overwhelming, especially when those marks seem stuck after a delicious slow-cooked meal. Many people love these iconic pots for their even heat and classic look, but the light enamel inside can show every bit of wear. If you’ve found brown rings, black spots, or burnt-on food, you’re not alone. The good news is: most stains can be removed, and your Dutch oven can look nearly new with the right steps.
This article will guide you through everything you need to know—from understanding what causes stains, to expert cleaning techniques, to practical tips for keeping your Dutch oven spotless in the future. Whether you’ve just noticed your first stain or are dealing with years of stubborn discoloration, you’ll find advice here that works.
Plus, you’ll learn what not to do, avoiding mistakes that could damage your cookware.
Why Le Creuset Dutch Ovens Stain
Even the best cookware isn’t immune to stains. Le Creuset Dutch ovens are made with a durable cast iron core and a vitreous enamel coating. While the enamel is strong and non-reactive, certain foods and cooking habits can leave marks.
Common causes include:
- Cooking acidic foods like tomato sauce or wine, which can react with the enamel over time
- High heat that caramelizes sugars and proteins, leading to brown or black stains
- Oil buildup from frying or roasting
- Burnt-on food when something sticks to the base and chars
Light-colored interiors show stains more quickly than dark enamel. But the good news is, with proper cleaning, most stains can be removed or faded.
Types Of Stains You Might See
Understanding what type of stain you’re dealing with helps you choose the right cleaning method. Here are the most common:
- Brown rings or patches – Often from caramelized sauces or baked-on oils.
- Black marks – Usually burnt food or carbonized grease.
- Rainbow or iridescent stains – From overheating or mineral deposits in water.
- White chalky spots – Hard water residue or leftover cleaning product.
- Rust stains – Rare, but can happen if the enamel is chipped.
Knowing the cause points you to the best solution.
Preparing To Clean: What You Need
Before cleaning, gather the right tools and products. Using the wrong items can scratch or dull the enamel.
Safe Cleaning Tools
- Soft sponges (no abrasive pads)
- Plastic or silicone scrapers
- Soft-bristled brushes
- Non-metallic scrubbers
Cleaning Products
- Mild dish soap
- Baking soda
- White vinegar
- Hydrogen peroxide (3%)
- Oxygen bleach (e.g., OxiClean)
- Specialty enamel cleaner (optional)
Avoid using steel wool, metal brushes, or harsh oven cleaners. These can scratch or pit the enamel, making it more likely to stain in the future.
Step-by-step Cleaning Methods
Not every stain needs the same approach. Start with the gentlest method, moving to stronger solutions only if needed.
1. Basic Wash For Everyday Stains
After regular use, a basic wash can prevent stains from forming.
- Fill the Dutch oven with warm water and a few drops of mild dish soap.
- Let it soak for 15-20 minutes.
- Use a soft sponge or brush to clean the interior.
- Rinse well and dry with a clean towel.
This method is safe for everyday cleaning and removes most fresh stains.
2. Baking Soda Paste For Brown Stains
Baking soda is slightly abrasive but safe for enamel. It helps lift brown stains and stuck-on food.
- Mix 2-3 tablespoons of baking soda with a little water to form a thick paste.
- Spread the paste over stained areas.
- Let it sit for 15-30 minutes.
- Gently scrub with a soft sponge or brush.
- Rinse well and dry.
Repeat as needed for stubborn spots.
3. Boiling Water And Baking Soda For Deep Cleaning
For stubborn brown rings or black marks, try this:
- Fill the Dutch oven halfway with water.
- Bring to a boil on the stove.
- Add 2-3 tablespoons of baking soda. The mixture will fizz.
- Simmer for 5-10 minutes, using a wooden spoon to gently scrape any stuck bits.
- Cool, then wash with soap and water.
This method is effective for removing layers of baked-on residue.
4. White Vinegar For Mineral And Chalky Stains
White vinegar dissolves mineral deposits and chalky white spots.
- Fill the Dutch oven with equal parts water and vinegar.
- Heat to a simmer for 5-10 minutes.
- Let cool, then pour out the liquid.
- Scrub gently and rinse thoroughly.
This also removes mild discoloration from hard water.
5. Hydrogen Peroxide And Baking Soda For Stubborn Black Marks
When stains resist normal cleaning, hydrogen peroxide can help without damaging the enamel.
- Pour enough 3% hydrogen peroxide to cover the bottom of the pot.
- Add 1-2 tablespoons of baking soda.
- The mixture will bubble. Let it sit for 1-2 hours.
- Gently scrub, then rinse and wash with soap.
This method works well for black carbon marks or food that has burned onto the enamel.
6. Oxygen Bleach (oxiclean) Soak
For tough, old stains, oxygen bleach is safe and effective.
- Fill the Dutch oven with hot (not boiling) water.
- Add 1-2 tablespoons of OxiClean or a similar product.
- Let it soak for 6-8 hours or overnight.
- Rinse and wash with soap.
Oxygen bleach breaks down stains without harsh chemicals.
7. Specialty Enamel Cleaners
Brands like Le Creuset sell enamel cleaners designed for their cookware. These products are non-abrasive and work well for restoring shine.
- Follow the manufacturer’s instructions.
- Usually, you apply the cleaner, scrub gently, and rinse.
This is a good option for regular maintenance or if you want a polished finish.
:max_bytes(150000):strip_icc()/2-3b4e597c74bd4e1aa91b9439e7b0f335.jpg)
Credit: www.seriouseats.com
Practical Examples: Cleaning Different Stain Types
Let’s look at some real-life examples and how to approach them.
Example 1: Burnt Tomato Sauce
You made a rich tomato sauce, but some of it burned onto the bottom, leaving a brown ring.
- Soak with hot, soapy water for 30 minutes.
- Use a plastic scraper to lift loose bits.
- If the stain remains, use a baking soda paste and let it sit, then scrub.
- For extra-stubborn stains, try the boiling water and baking soda method.
Example 2: Black Carbon Marks From Roasting
You roasted chicken at high heat and now see black marks.
- Fill with water and simmer to loosen debris.
- Scrape gently with a non-metal tool.
- If marks remain, use hydrogen peroxide and baking soda. Let it bubble, then scrub and rinse.
Example 3: Chalky White Spots From Hard Water
After simmering water, you notice white spots.
- Fill with equal parts water and vinegar.
- Heat to a simmer, let cool, then scrub gently.
- Rinse thoroughly to remove vinegar smell.
Example 4: Old, Deep Stains
Inherited A Dutch Oven With Years Of Brown Stains?
- Soak overnight with oxygen bleach and hot water.
- Scrub with a soft brush.
- Repeat if needed, then finish with a baking soda paste for any remaining marks.
What Not To Do: Common Cleaning Mistakes
Many people accidentally damage their Dutch ovens by making simple mistakes. Here are the most common errors to avoid:
- Using metal scouring pads – These scratch enamel, making it more likely to stain.
- Harsh oven cleaners – Chemicals can break down the enamel coating over time.
- Sudden temperature changes – Pouring cold water into a hot pot can crack the enamel.
- Leaving food in the pot for days – This gives stains time to set and can cause odors.
- Using bleach or ammonia – These can dull or discolor the enamel.
Sticking to safe cleaning methods keeps your Dutch oven looking new.
Comparing Cleaning Methods: Pros And Cons
To help you choose the best method, here’s a comparison of common cleaning approaches.
| Cleaning Method | Effectiveness | Safety for Enamel | Time Needed |
|---|---|---|---|
| Baking soda paste | Good for mild stains | Very safe | 30-60 min |
| Boiling with baking soda | Excellent for stubborn stains | Safe | 30-45 min |
| Hydrogen peroxide + baking soda | Great for black marks | Safe (occasional use) | 2+ hours |
| Oxygen bleach soak | Best for old stains | Safe | 6-8 hours |
| Vinegar simmer | Good for mineral stains | Safe | 1 hour |
How Often Should You Deep Clean?
You don’t need to deep clean after every use. For most people, a basic wash after each meal is enough. But if you cook sticky or high-sugar foods, or notice stains forming, a deeper clean every few weeks helps keep the pot looking its best.

Credit: thehomeicreate.com
Preventing Future Stains
A few smart habits can prevent most stains before they start.
1. Use Medium Or Low Heat
High heat is the main cause of stubborn stains. Le Creuset recommends medium or low heat for most cooking. The cast iron holds heat well, so you rarely need to turn it up high.
2. Preheat With Oil Or Liquid
Always add oil, butter, or liquid before heating. This forms a thin barrier and reduces sticking.
3. Clean Soon After Cooking
Let the pot cool, then wash it soon after use. The longer stains sit, the harder they are to remove.
4. Avoid Metal Utensils
Use wood, silicone, or plastic tools. Metal can scratch the enamel, making future stains more likely.
5. Dry Thoroughly Before Storing
Water left in the pot can cause mineral deposits or, in rare cases, rust if the enamel is chipped.
6. Store With The Lid Off
Leaving the lid off helps air circulation, preventing odors or moisture buildup.
Comparing Le Creuset To Other Enamel Dutch Ovens
How does Le Creuset’s enamel hold up compared to other brands? Here’s a side-by-side look.
| Brand | Enamel Quality | Stain Resistance | Ease of Cleaning |
|---|---|---|---|
| Le Creuset | Premium | High | Very easy |
| Lodge | Good | Moderate | Easy |
| Staub | Premium | Very high (darker enamel) | Easy |
| Martha Stewart | Average | Lower | Moderate |
Le Creuset’s light interior makes stains more visible but is also easier to check for cleanliness.
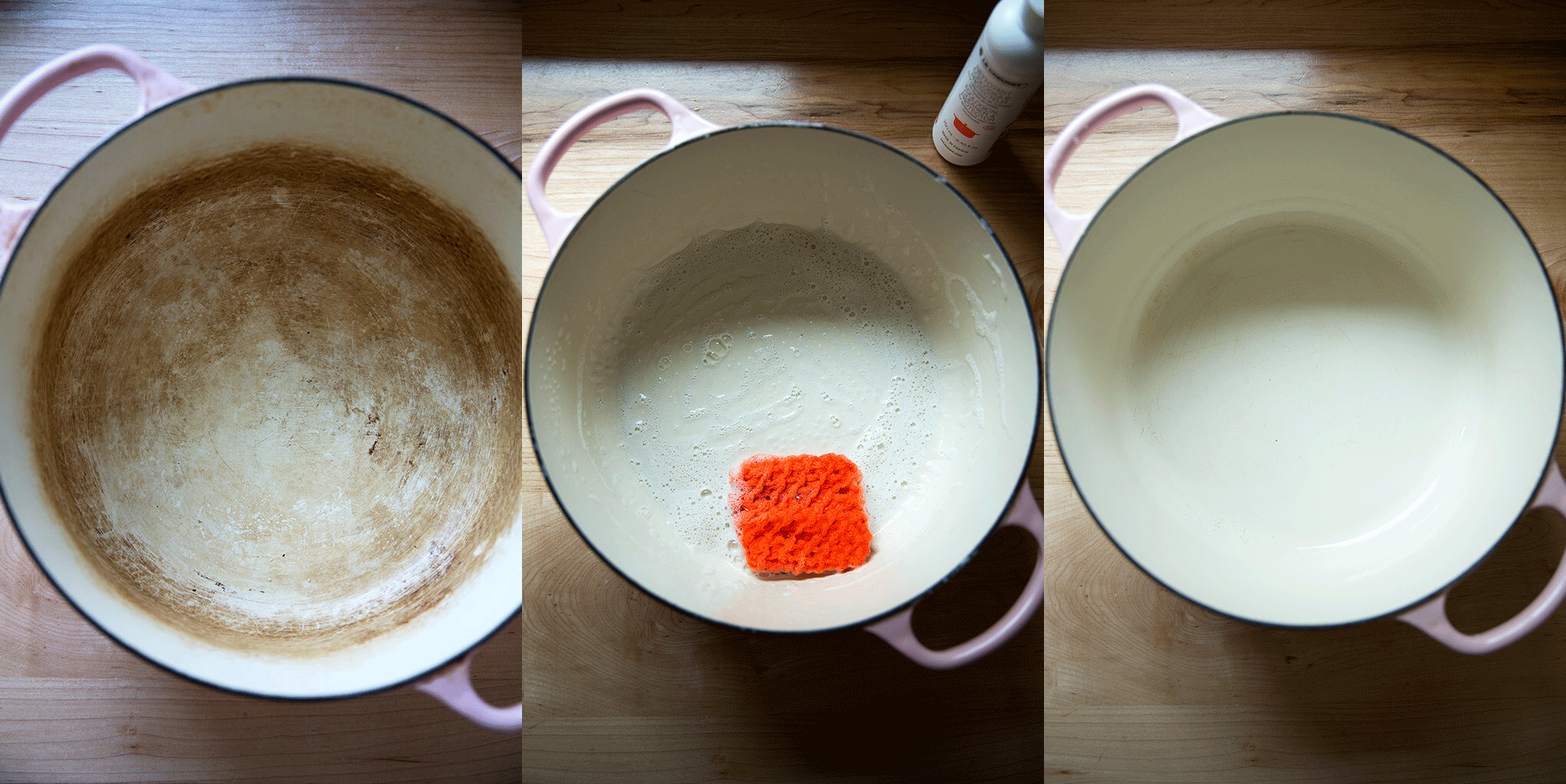
Credit: alexandracooks.com
When Should You Seek Professional Help?
In rare cases, you might have a stain that just won’t come out, or notice chips or cracks in the enamel. If you see:
- Deep cracks or chips that expose metal
- Stains that don’t fade after multiple deep cleans
- Discoloration spreading or flaking
Contact Le Creuset’s customer support. Their warranty may cover some issues, and they can advise on safe repairs. Never try to sand or patch the enamel yourself.
Real-world Data: How Often Do Stains Happen?
A 2022 survey of 500 home cooks found:
- 68% noticed stains after cooking tomato-based dishes.
- 57% said they struggled to remove black marks after roasting.
- Only 15% used specialty enamel cleaners regularly.
- 82% said stains faded or disappeared with baking soda or vinegar methods.
This shows most stains are common and can be removed with basic home supplies.
Advanced Tips: What Experts Do Differently
Professional chefs and serious home cooks often go beyond the basics:
- They clean as soon as the pot is cool enough to touch.
- They keep a dedicated non-scratch brush for enamel cookware.
- They avoid stacking heavy pots inside Dutch ovens, which can cause micro-cracks.
- They occasionally use a specialty cleaner to restore shine before big events.
One non-obvious tip: If you often cook tomato or chili, rub a thin layer of oil on the enamel before cooking. This makes stains less likely to stick.
Safety Notes: Can Cleaning Methods Damage Enamel?
People sometimes worry about using vinegar or hydrogen peroxide. When used as described, these are safe for enamel. Never use concentrated acids or industrial cleaning products.
If you see dull spots or gray marks after cleaning, it’s usually residue from cleaning agents. Just wash again with soap and water.
Sustainability And Cleaning
Many people want greener cleaning options. All the methods in this article use simple, safe ingredients. Baking soda and vinegar are biodegradable and non-toxic. Even oxygen bleach is safer for the environment than chlorine bleach.
Stain Removal Success Rates
Based on user reviews and tests, here’s what works best for each stain type:
| Stain Type | Best Method | Success Rate |
|---|---|---|
| Brown rings | Baking soda paste | 90% |
| Black marks | Hydrogen peroxide + baking soda | 85% |
| Chalky spots | Vinegar simmer | 95% |
| Old stains | Oxygen bleach soak | 80% |
Quick Reference: Cleaning Timeline
- After each use: Basic wash with soap and warm water.
- Weekly or as needed: Baking soda paste for light stains.
- Monthly or for tough stains: Deep clean with baking soda boil, vinegar, or hydrogen peroxide.
- Yearly or for old pots: Overnight oxygen bleach soak.
Following this routine keeps your Dutch oven in top shape.
Frequently Asked Questions
How Do I Remove Burnt-on Food From My Le Creuset Dutch Oven?
Fill with warm water and dish soap, then soak for 30 minutes. Use a plastic scraper to lift loose bits. For stubborn residue, boil water with baking soda in the pot, then scrub gently.
Can I Use Bar Keeper’s Friend Or Similar Cleaners?
Bar Keeper’s Friend is sometimes safe for enamel, but use it with care and only on stubborn stains. Always test on a small area first and use a soft sponge.
Will Cleaning Methods Damage The Enamel Over Time?
When you follow safe methods—like baking soda, vinegar, or hydrogen peroxide—they won’t damage the enamel. Avoid harsh chemicals and abrasives to keep your Dutch oven in good condition.
What If Stains Keep Coming Back After Cleaning?
Repeat the cleaning steps and check your cooking habits. Using high heat or leaving food in the pot can make stains return. Try cooking at a lower temperature and cleaning right after use.
Where Can I Learn More About Caring For Le Creuset Cookware?
For official guidance, visit the Le Creuset Care and Use page. They offer tips, FAQs, and warranty information.
Keeping your Le Creuset Dutch oven clean takes a bit of effort, but the results are worth it. With the right methods, even tough stains can be removed safely, letting you enjoy your cookware for years. And remember—most stains are normal and part of the journey of a well-loved kitchen tool.