
Cutting a hole in a stainless steel sink sounds intimidating, especially if you’re doing it for the first time. Maybe you want to add a soap dispenser, install a water filter, or fit a new tap. Whatever your goal, the process requires careful planning and the right tools.
But with some guidance, you can make a clean, safe cut without damaging your sink or the surrounding area.
Many people worry about scratching the surface, making a crooked hole, or even ruining the entire sink. And yes, stainless steel is a tough material, so mistakes are hard to hide. But don’t let that stop you. With the right steps, a steady hand, and a little patience, you can get a professional-looking result.
This guide will walk you through every detail, from choosing tools to post-cut clean-up. Along the way, you’ll learn how to avoid common errors and why small things—like the type of drill bit you use or the way you mark your hole—can make a big difference.
Why People Cut Holes In Stainless Steel Sinks
Stainless steel sinks are common in kitchens and laundry rooms. But sometimes, the standard design isn’t enough for your needs. Here are a few reasons people cut new holes:
- Installing a new tap: Many modern faucets need extra holes, especially if they have pull-out sprays or separate handles.
- Adding soap dispensers: Built-in dispensers save counter space and look tidy.
- Water filter taps: These often need their own dedicated hole.
- Air gap for dishwasher: Some building codes require this safety feature.
- Sprayer attachments: Not all sinks come with a spot for these.
No matter the reason, the process is similar. But the size and placement of the hole may vary. It’s important to measure and plan carefully before making any cuts.
Understanding Stainless Steel Sinks
Before you start, know what you’re working with. Stainless steel is popular because it’s rust-resistant and durable. But it’s also slippery and hard, which makes cutting a challenge.
Sink Thickness And Grades
Sinks come in different thicknesses, measured in gauges. Thinner sinks (like 22-gauge) are lighter and easier to cut, but they can flex or dent. Thicker sinks (like 16- or 18-gauge) are sturdier but harder to drill.
Stainless steel grades also matter. Most kitchen sinks use grade 304, which is food-safe and resists corrosion. Some cheap sinks use lower grades, which may be softer but are also more likely to stain or rust.
Hidden Supports And Double Walls
Many sinks have hidden supports underneath or a double-wall design. These can make cutting more difficult. If you drill into a support, you may need special tools or a change in your plan.
Tip: Check under the sink first. Look for reinforcing bars, insulation, or extra layers. Mark their positions to avoid surprises.
Tools And Materials You’ll Need
Having the right tools makes all the difference. Here’s a list of what you’ll need for a safe, clean cut:
- Drill: A standard electric drill is best. Cordless drills are fine if they’re strong enough.
- Hole saw: Choose one made for metal, in the correct diameter for your fitting.
- Pilot drill bit: Often comes with the hole saw. Should be sharp and suitable for metal.
- Lubricating oil: Reduces heat and keeps your tool cutting smoothly.
- Center punch: Helps mark the drilling spot and keeps the bit from slipping.
- Masking tape: Protects the sink and helps you mark the hole.
- Safety glasses: Protect your eyes from metal shards.
- Gloves: For hand safety and grip.
- File or deburring tool: Smooths sharp edges after cutting.
- Vacuum or magnet: For cleaning up metal shavings.
For larger holes, a step drill bit (or “unibit”) can be useful, especially in thinner sinks. If you don’t have a hole saw, a jigsaw with a metal-cutting blade can work, but this is harder to control and not recommended for beginners.
Planning Your Cut
Rushing is the fastest way to make a mistake. Good planning leads to a clean, precise hole.
Choosing The Right Location
Think about what’s under the sink. Pipes, supports, and even the cabinet can affect where you put your hole. For a soap dispenser, you want it near the faucet but not in the way of handles. For a water filter, make sure it’s reachable.
Non-obvious insight: Many beginners forget to check for clearance above and below the sink. Test-fit your faucet or dispenser before drilling to ensure it fits.
Measuring And Marking
Use a ruler or tape measure for accuracy. If your fitting comes with a template, tape it in place and double-check the location.
- Mark the center of the hole with a pencil or marker.
- Place masking tape over the spot to prevent the drill bit from slipping.
- Mark again on top of the tape.
Pro tip: For round holes, always mark the center—not the edge.
Checking For Supports And Layers
Look underneath to see if you’ll hit any reinforcement. If there’s a double wall, you may need to drill through both layers. Plan for this and make sure your hole saw is deep enough.
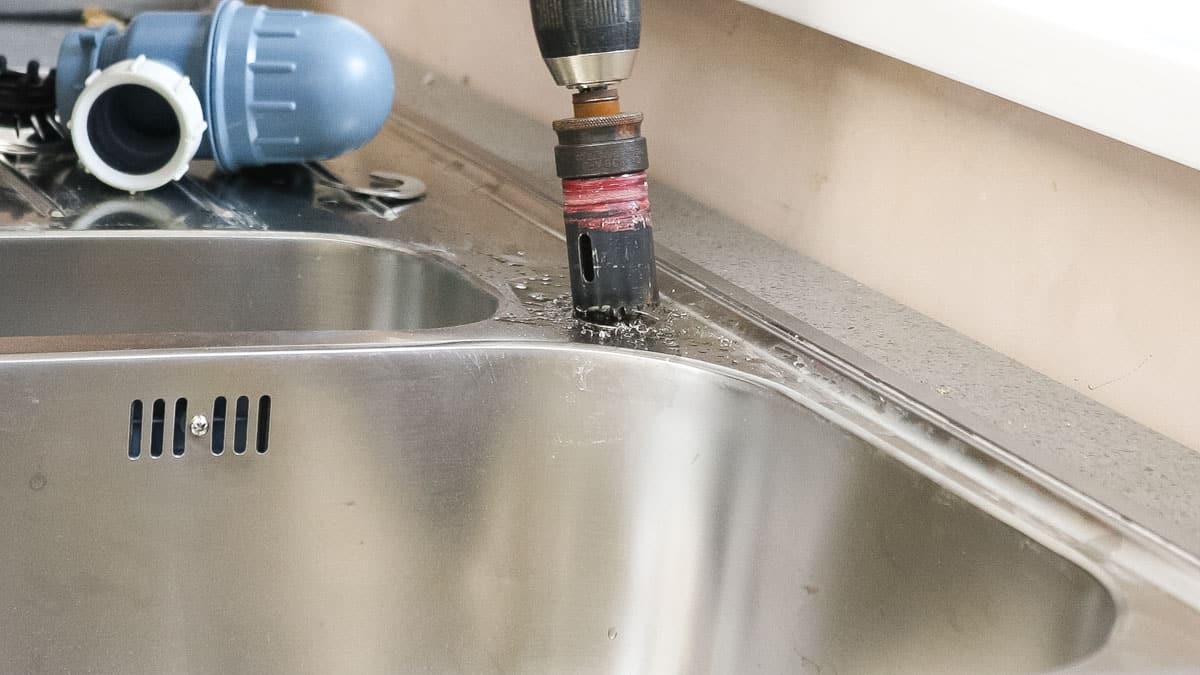
Credit: thecarpentersdaughter.co.uk
Comparing Common Tools For Cutting Holes
Let’s compare the main options for cutting holes in a stainless steel sink. Each tool has pros and cons.
| Tool | Best For | Pros | Cons |
|---|---|---|---|
| Hole saw | Most faucet & dispenser holes | Fast, clean, precise | Can get hot; needs steady hand |
| Step drill bit | Thin sinks, small/medium holes | Easy to control; good for enlarging | Not for thick steel; limited max size |
| Jigsaw (metal blade) | Irregular shapes or big holes | Flexible; cuts any shape | Hard to control; risk of scratches |
| Knockout punch | Perfect circles in thin sinks | Very clean edges | Expensive; needs starter hole |
Step-by-step Guide: How To Cut A Hole In A Stainless Steel Sink
Now, let’s go through the process from start to finish.
1. Prepare Your Work Area
Clear out everything under the sink. Lay down an old towel or cardboard to catch metal shavings. Gather all your tools.
2. Mark The Hole
- Use a tape measure to find the ideal spot.
- Cover the area with masking tape.
- Mark the center with a pencil.
- Double-check measurements—mistakes here are hard to fix.
3. Punch A Starter Dent
Hold the center punch on your mark. Tap it gently with a hammer to create a small dent. This keeps the drill bit from wandering.
4. Drill A Pilot Hole
Fit your drill with a small bit (about 1/8 inch or 3 mm). Drill straight down into the center punch dent. Go slow and steady. Stainless steel heats up fast, so don’t rush.
Tip: Add a drop of lubricating oil to the bit before drilling. This keeps the bit cool and prolongs its life.
5. Attach The Hole Saw
Once you have a pilot hole, switch to the hole saw. Make sure it’s the right diameter for your fitting. Common sizes are:
- 1-1/4 inches (32 mm) for soap dispensers
- 1-3/8 inches (35 mm) for many faucets
- 1-1/2 inches (38 mm) for larger fittings
6. Drill The Main Hole
- Add more oil to the area.
- Hold the drill steady, both hands on the tool.
- Start slow, letting the saw bite into the steel.
- Increase speed gradually, but don’t force it.
- Pause every few seconds to let the bit cool and wipe away shavings.
If you feel the drill binding or hear squealing, stop. Too much heat can ruin the bit or warp the steel.
7. Remove The Cutout
When you’re through, the disk of steel (the cutout) may stay in the saw. Remove it carefully—edges are sharp. If it’s stuck, tap gently with a screwdriver.
8. Smooth The Edges
Use a metal file or deburring tool to smooth the sharp edge around the hole. This prevents cuts and helps fittings seal tightly.
9. Clean Up
Vacuum or wipe away all metal shavings, both above and below the sink. Leftover bits can scratch the sink or clog drains.
Non-obvious insight: Even tiny shavings can rust if they’re not stainless steel. Clean up completely to avoid future stains.
10. Test-fit Your Fitting
Before final installation, test-fit your faucet, dispenser, or other part. Make sure it sits flush and the hole is big enough. If needed, use a step bit to slightly enlarge the hole.

Credit: www.youtube.com
Safety Tips For Cutting Stainless Steel
Stainless steel is hard, and cutting it can send metal shards flying. Here are some tips to stay safe:
- Always wear safety glasses to protect your eyes.
- Gloves help, but don’t wear loose-fitting ones that could get caught.
- Go slow—rushing increases heat, which can burn you or damage tools.
- Keep the area well-ventilated, especially if using lubricants.
- Never use excessive force. If the tool is stuck, stop and check.
Dealing With Common Problems
Even with careful planning, things can go wrong. Here’s how to handle the most common issues:
The Drill Bit Slips
This usually happens if you skip the center punch. Always make a starter dent. If the bit slides, stop, re-tape, and try again.
The Hole Saw Binds Or Overheats
Take breaks, use oil, and don’t force the tool. If the saw is dull, replace it. For thick sinks, let the tool do the work—pushing harder won’t help.
The Hole Is Crooked Or Off-center
Double-check measurements before drilling. If you’ve started off-center, stop and adjust if possible. For small errors, you may be able to widen the hole slightly with a step bit.
The Edges Are Jagged
A metal file or deburring tool will smooth most rough edges. For serious mistakes, an escutcheon plate (a metal cover) can hide small flaws.
You Hit A Reinforcement
If you hit a double wall or support, you may need a longer drill bit or a different tool (like a step bit or jigsaw). Don’t force the tool—reassess and plan.
Real-world Example
Let’s say you want to add a drinking water filter tap to your kitchen sink. The instructions say you need a 1-1/4 inch (32 mm) hole.
- Clear out the area under the sink.
- Check for pipes, supports, and insulation. Make sure there’s room for the tap and its nut.
- Mark the spot, tape over it, and punch a starter dent.
- Drill a pilot hole and then use a 1-1/4 inch hole saw.
- Add oil, drill slow, and pause to cool.
- Remove the cutout, file the edges, vacuum shavings.
- Test-fit the tap before final assembly.
Mistake to avoid: Some people drill too close to the edge, and the nut won’t fit underneath. Always check clearance before starting.
Comparing Stainless Steel Sink Gauges
Sink thickness can change how you cut. Here’s a comparison of common gauges:
| Gauge | Thickness (inches) | Ease of Cutting | Common Problems |
|---|---|---|---|
| 16 | 0.0625 | Hard | Slow cutting, more heat |
| 18 | 0.0500 | Medium | Some flex, easier than 16 |
| 20 | 0.0375 | Easy | Can dent or flex |
| 22 | 0.0313 | Very easy | Prone to bending |
After The Cut: Finishing And Installing
Once the hole is cut, the hard work is almost done. But a few finishing steps will make your project look professional.
Cleaning The Sink
Wipe the area with a damp cloth to remove lubricant and shavings. For extra shine, use a stainless steel cleaner.
Protecting The Edges
If you’re installing a fitting with a gasket, make sure the edge is smooth. This prevents leaks and makes a tight seal. Some people add a bead of silicone under the fitting for extra protection.
Installing The Fitting
Follow the manufacturer’s instructions. Most taps and dispensers use a rubber gasket above and a nut below. Tighten by hand, then finish with a wrench. Don’t over-tighten—this can warp thin sinks.
Checking For Leaks
Once installed, run water and check for leaks. If you see drips, tighten the nut a little more or add more sealant.
Mistakes Beginners Often Make (and How To Avoid Them)
- Skipping the center punch: This leads to wandering drill bits.
- Not using lubricant: Causes overheating and dulls bits quickly.
- Forcing the drill: Patience is key—let the tool do the work.
- Neglecting clean-up: Metal shavings can cause future rust spots.
- Drilling too close to the sink edge: Leave enough room for the fitting and nut underneath.
- Measuring once instead of twice: Double-check everything before drilling.
- Not test-fitting the hardware: Saves you from finding out the hole is the wrong size after cutting.

Credit: www.reddit.com
Advanced Tips For A Perfect Hole
- If you want an ultra-clean cut, use a knockout punch. These are expensive but give the best edge.
- For large holes, drill several small holes around the perimeter, then use a jigsaw to cut between them.
- If the sink is scratched during cutting, use a fine abrasive pad to blend the marks.
- Always keep tools sharp. Dull bits and saws cause jagged holes and require more force.
When To Call A Professional
Cutting a hole in a stainless steel sink is a common DIY project, but sometimes it’s best to call a plumber or installer. If your sink is very thick, has a complicated structure, or you don’t have the right tools, a pro can do the job quickly and safely.
Some manufacturers void the warranty if you cut the sink yourself—check before starting.
Environmental And Health Considerations
Stainless steel shavings can be sharp and may cause injury if left behind. Dispose of all waste properly. Avoid breathing in metal dust—cut in a well-ventilated area and wear a mask if needed.
Lubricating oils can stain sinks or harm the finish. Clean thoroughly after cutting. Use plant-based or food-safe lubricants if you’re concerned about kitchen safety.
Learning More
If you’re interested in more details about working with stainless steel, the Wikipedia page on stainless steel offers in-depth information about grades, properties, and uses.
Frequently Asked Questions
What Size Hole Do I Need For A Kitchen Faucet?
Most kitchen faucets need a 1-3/8 inch (35 mm) diameter hole. Always check the manufacturer’s instructions before cutting. Some faucets or accessories, like soap dispensers, may need a different size.
Can I Use A Regular Wood Hole Saw On Stainless Steel?
No, you need a bi-metal or carbide-tipped hole saw designed for metal. Wood hole saws will quickly dull and may not cut at all. Using the wrong tool can damage both the saw and your sink.
How Do I Stop The Drill Bit From Slipping On Stainless Steel?
Use masking tape on the sink, mark the spot, and make a small dent with a center punch before drilling. This helps keep the bit steady and ensures an accurate hole.
Is It Safe To Drill Into All Types Of Stainless Steel Sinks?
Most standard kitchen sinks can be drilled if you use the right tools and methods. However, some sinks have hidden supports, double walls, or extra-thick steel. Always check underneath first and, if unsure, consult the manufacturer.
What If I Make The Hole Too Big?
If the hole is slightly too big, use a larger rubber gasket or an escutcheon plate to cover gaps. For much bigger mistakes, a professional may be needed to repair or replace the sink.
Cutting a hole in a stainless steel sink isn’t a job to rush, but with careful steps and the right tools, you can get a perfect result. Remember to measure twice, cut once, and always prioritize safety. With patience and attention to detail, your new faucet or dispenser will look like it was part of the sink from the start.