
Many people dream of having a kitchen where everything is easy to reach and organize. But old kitchen cabinets often have deep shelves that become a place for lost pans, forgotten food, and frustration. The good news? Installing sliding drawers in kitchen cabinets can completely change how you use your space. You’ll find items faster, stop bending and stretching, and make your kitchen work for you. Even better, you don’t need to be a professional carpenter to do this upgrade yourself.
This guide will walk you through every step to install sliding drawers in kitchen cabinets, from choosing the right type to the final screw. You’ll learn not just the “how,” but also the “why,” including practical tips, common mistakes, and expert advice that most beginners overlook.
Let’s turn your cabinets from cluttered to convenient—one slide at a time.
Why Add Sliding Drawers To Your Kitchen Cabinets?
Sliding drawers, also called pull-out shelves, are one of the smartest upgrades for any kitchen. Here’s why so many homeowners are making the switch:
- Easy Access: No more reaching into dark cabinet corners.
- Better Organization: Keep pots, pans, and food sorted and visible.
- Space Saver: Use every inch, even in deep or narrow cabinets.
- More Comfortable: Less bending, stooping, or kneeling.
- Adds Value: Modern, accessible kitchens are a selling point.
Most people don’t realize that sliding drawers can also help you spot expired food or rarely used items before they go bad. Plus, they make cleaning much easier since you can pull out the whole shelf.
Types Of Sliding Drawers For Kitchen Cabinets
Before you start, it’s important to know your options. There are several types of sliding drawers, each with its own features.
| Type | Main Features | Best For |
|---|---|---|
| Wire Pull-Outs | Open design, easy to clean, lightweight | Pantries, snack storage |
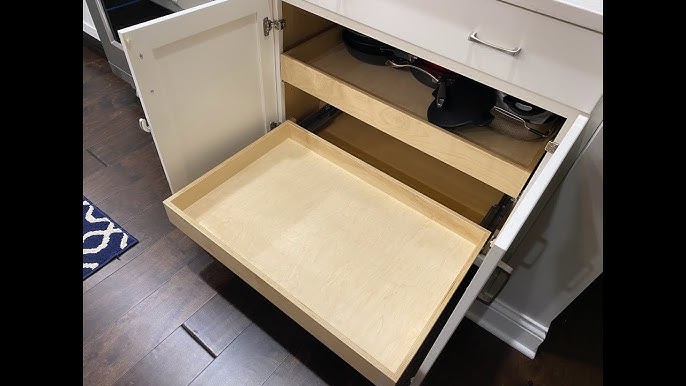
| Wooden Drawers | Solid, high weight capacity, matches wood cabinets | Pots, pans, heavy items |
| Metal Frame Drawers | Strong, smooth sliding, modern look | Utensils, cookware, deep cabinets |
| Plastic Pull-Outs | Lightweight, affordable, easy to clean | Cleaning supplies, light pantry goods |
| Custom-Built Drawers | Tailored fit, any material, higher cost | Odd-shaped cabinets, unique needs |
Non-obvious tip: Wire and plastic drawers are often more forgiving if your cabinet isn’t perfectly square. Wooden and metal drawers may need more precise measuring.
Credit: www.youtube.com
Choosing The Right Sliding Drawer System
Not every drawer fits every cabinet. Here’s how to pick the right system for your kitchen:
- Measure Your Cabinet: Height, width, and depth matter. Always measure the *inside* of the cabinet, not the door.
- Check for Obstacles: Look for hinges, pipes, or shelf supports that could get in the way.
- Weight Capacity: Consider what you want to store. Heavy pots need strong slides and materials.
- Slide Type: Full-extension slides let the drawer come all the way out. Half-extension is cheaper, but you lose access to the back.
- Mounting Style: Bottom-mount slides sit under the drawer and are more hidden. Side-mount are visible but often easier to install.
- DIY Kits vs. Custom: Kits are faster and easier, but custom drawers maximize every inch of space.
Beginner mistake: Many people buy drawers that are too wide and don’t leave enough room for the slides. Always subtract at least 1 inch from your cabinet width for the slides.
Tools And Materials Needed
Gather these items before you start to avoid frustration in the middle of your project:
- Sliding drawer kit (the drawer, slides, and mounting hardware)
- Drill with bits and screwdriver attachments
- Measuring tape
- Level (small torpedo levels work well)
- Pencil
- Screws (usually come with the kit)
- Screwdriver (manual or powered)
- Wood shims (to level the drawer if your cabinet floor isn’t flat)
- Safety glasses
- Vacuum or brush (for cleanup)
Pro tip: Keep a small container for screws and hardware. Losing a screw under the cabinet is more common than you think!
Preparing The Cabinets
Start with a clean, empty cabinet for the best results. Remove everything from the cabinet and take out existing shelves if needed. If your shelves are fixed and not removable, you may need to cut them out with a saw.
Check the inside for water damage, loose panels, or other repairs. Wipe down all surfaces. A clean, smooth area helps your slides work properly and makes installation easier.
Important: If your cabinet has a center support rail, you may need to remove or modify it. Some sliding drawer kits include spacers for this situation.
Measuring And Marking For Installation
Precision is key to smooth sliding drawers. Here’s how to get it right:
- Measure the Inside Width: Measure at the front, middle, and back. Use the smallest measurement.
- Measure Depth: From the back wall to the inside of the door (with the door closed).
- Measure Height: Make sure there’s enough space for the drawer and slides.
- Mark the Mounting Points: Use a pencil and level to draw lines where the slides will attach. For most bottom-mount slides, these go 1/8 to 1/4 inch above the cabinet floor.
| Measurement | Where to Take It | Why It Matters |
|---|---|---|
| Width | Front, middle, back of inside | Cabinets are often not perfectly square |
| Depth | From back wall to closed door | Drawers must not hit the door |
| Height | Clear space between shelf/floor and top | Drawer needs enough space to move |
Extra insight: If you want multiple drawers, plan their spacing now. Leave at least 2 inches between each drawer for easy access.
Assembling The Sliding Drawer
Most kits come with the drawer in pieces. Assemble on a flat surface, following the manufacturer’s instructions closely. Common steps include:
- Attach sides to the front and back panels.
- Secure the bottom panel (slide-in or screw-on, depending on kit).
- Add any handles or rails.
Warning: Don’t overtighten screws, especially in plastic or particle board. This can crack the material.
Installing The Drawer Slides
The slides are what make your drawer glide smoothly. Here’s how to install them correctly:
- Separate the Slides: Most slides come in two pieces—one for the cabinet, one for the drawer. Slide them apart.
- Attach Cabinet Member: Align with your pencil marks. Use a level to keep them straight. Secure with screws.
- Attach Drawer Member: Mount the other half of the slide to the bottom or side of the drawer.
- Check Alignment: Both sides must be exactly level and parallel for smooth operation.
Beginner mistake: Many first-timers install one slide higher than the other. Always double-check with your level before drilling.
Fitting The Drawer Into The Cabinet
With slides installed, carefully insert the drawer into the cabinet. You may need to angle the drawer slightly to engage the slides. Push gently until you hear a “click” or feel resistance, which means the slides have locked together.
Test the movement several times. The drawer should glide smoothly, not stick or wobble. If it doesn’t, remove and check for:
- Uneven slide height
- Screws blocking the path
- Slides not fully engaged
Non-obvious tip: If your drawer rubs on the cabinet floor, add thin wood shims under the slides to raise it slightly.
Securing And Testing The Drawer
Once you’re happy with the fit, secure any final screws. Some kits have “locking tabs” or extra holes for added strength. Tighten all screws, but don’t overtighten—this can warp the slides.
Pull the drawer out fully and push it back in several times. Load it with a few items and test again. Heavy loads can show problems that an empty drawer hides.

Credit: hanashappyhome.com
Installing Multiple Sliding Drawers
If you want more than one drawer in a cabinet, repeat the steps above for each level. Plan the spacing so that each drawer can open fully without hitting the one above or below.
Practical example: For base cabinets, many people install one deep drawer at the bottom for pots, and a shallow drawer above for lids or utensils.
Pro tip: Start with the bottom drawer and work up. This keeps your measurements and installation accurate.
Adjusting For Cabinet Doors And Hinges
Some cabinet doors have large hinges or thick frames that stick into the opening. You may need to adjust your drawer size or use spacer blocks to move the slide away from the side.
- If your drawer hits the door, try moving the slide inwards with a shim.
- For inset doors, measure from the inside frame, not the front edge.
Beginner mistake: Not accounting for hinges, which can block the drawer or scrape off paint.
Final Checks And Troubleshooting
Before loading up your new drawers, do a final check:
- Make sure all screws are tight
- Slides are fully engaged
- Drawers open and close smoothly, even when loaded
If you notice sticking or uneven movement:
- Check for screw heads blocking the slide
- Make sure slides are perfectly parallel
- Look for shims or debris under the slides
Extra insight: Humidity and temperature changes can make wooden drawers swell or shrink. Leave a little extra space on each side if you live in a humid climate.
Organizing With Sliding Drawers
Now comes the fun part—organizing your kitchen! Here are a few ways to get the most from your new sliding drawers:
- Group by Use: Put pots near the stove, baking tools near the oven, snacks low for kids.
- Use Bins: Small bins inside drawers keep items from rolling around.
- Label Shelves: Especially for deep or pantry drawers.
- Store Heavy on Bottom: Place heavy items in lower drawers for safety.
- Adjust as Needed: Sliding drawers make it easy to change your setup.
Expert tip: Don’t overload one drawer with all your heavy pots or pans. Spread weight across several drawers to keep slides working smoothly.
Cost And Time Involved
Installing sliding drawers yourself is much cheaper than hiring a pro. Here’s a rough breakdown:
- DIY kit: $30–$90 per drawer, depending on size and material
- Custom drawers: $100–$250 per drawer
- Tools: Most people already have the basics
Most installations take 1 to 2 hours per drawer for a first-timer. It goes faster once you’ve done one or two.
Safety Tips
While installing sliding drawers is a safe DIY project, keep these safety tips in mind:
- Wear safety glasses when drilling or cutting.
- Use a drill stop or tape on bits to avoid drilling through the cabinet wall.
- Lift heavy drawers carefully to avoid injury.
- Keep small parts away from children and pets.
:no_upscale()/cdn.vox-cdn.com/uploads/chorus_asset/file/19497307/kitchen_shelf_8.jpg)
Credit: vadania.com
When To Call A Professional
Some situations need expert help:
- Very old cabinets with weak frames
- Custom shapes or super-heavy drawers
- If you’re not comfortable with power tools
A pro can also build and install custom drawers for a perfect fit. But for most kitchens, a careful DIYer can get great results with kits.
Maintenance Tips For Sliding Drawers
Sliding drawers last for years with a little care:
- Clean slides every few months with a dry cloth.
- Lubricate metal slides with a silicone spray if they get noisy.
- Check screws once a year and tighten as needed.
- Wipe up spills quickly to prevent swelling or rust.
Non-obvious tip: If you notice sticking, don’t add oil or grease to ball-bearing slides—this can attract dust and make it worse.
Comparing Sliding Drawer Systems
If you’re still deciding which type is best, here’s a quick comparison:
| Feature | Wire Pull-Outs | Wooden Drawers | Metal Frame |
|---|---|---|---|
| Cost | Low | Medium–High | Medium |
| Weight Limit | Medium | High | High |
| Ease of Cleaning | Excellent | Good | Good |
| Looks | Basic | Matches wood cabinets | Modern |
| DIY Friendly | Very | Some skill needed | Moderate |
Mistakes To Avoid When Installing Sliding Drawers
Even careful DIYers can make mistakes. Here are the most common:
- Wrong Measurements: Always measure the inside of the cabinet, and check multiple points.
- Not Leaving Room for Slides: Subtract the width of both slides from your drawer size.
- Ignoring Obstacles: Watch for hinges, pipes, or fixed shelves.
- Installing Slides Unevenly: Use a level every time.
- Using the Wrong Screws: Use those provided or recommended for your kit.
- Overloading Drawers: Stay within the weight limit to avoid damage.
- Skipping Final Checks: Test with real items before finishing up.
Expert insight: Many first-timers skip reading the manufacturer’s instructions, thinking all slides are the same. Each brand has small differences—always double-check before you drill.
Upgrading Old Cabinets: Special Considerations
Older cabinets can be tricky. Watch out for:
- Narrow Openings: Some old cabinets have small doors, so measure carefully.
- Weak Floors: Add a support block if the cabinet floor is thin.
- Uneven Surfaces: Shims can level slides and drawers.
- Paint or Finish: Drill pilot holes to avoid splitting old wood.
If you’re not sure, practice on a less visible cabinet first.
Environmental Impact And Sustainability
Sliding drawers can actually help you waste less food and supplies. With everything visible and easy to reach, you’ll use what you have before buying more. If you want a greener option, look for FSC-certified wood or recycled materials for your drawers.
Where To Buy Sliding Drawers
You can find sliding drawer kits at most home improvement stores or online. Popular options include:
- Home Depot and Lowe’s for major brands
- Amazon for variety and reviews
- Specialty kitchen stores for custom sizes
Read reviews and compare return policies before buying. If possible, check the drawer in person for sturdiness and smooth sliding.
For more info on cabinet hardware, the Wikipedia Cabinetry page has a helpful overview.
Frequently Asked Questions
How Hard Is It To Install Sliding Drawers In Kitchen Cabinets?
For most people, installing sliding drawers is a moderate DIY project. If you can use a drill and measure carefully, you can do it. The hardest part is getting the slides perfectly level and parallel. With patience and the right tools, even beginners can get professional-looking results.
Can I Install Sliding Drawers In Any Cabinet?
Most standard cabinets can be upgraded with sliding drawers. However, very narrow, curved, or corner cabinets may need custom solutions. Always measure your cabinet’s inside dimensions and look for obstacles like hinges or pipes before buying a kit.
What Is The Best Type Of Sliding Drawer For Heavy Pots And Pans?
Wooden or metal frame drawers with heavy-duty slides are best for heavy items. Look for kits rated for at least 75–100 pounds. Avoid plastic or lightweight wire drawers for very heavy cookware.
How Do I Clean And Maintain Sliding Drawers?
Wipe down the drawers and slides every few months. For metal slides, use a dry cloth or a silicone spray if they get noisy. Avoid oil or grease, which can attract dust. Check all screws yearly and tighten if needed.
Can I Add Sliding Drawers To Old Kitchen Cabinets?
Yes, but older cabinets may need extra care. Watch for weak floors, uneven surfaces, and narrow openings. Use shims to level slides and drill pilot holes to avoid splitting old wood. When in doubt, consult a professional or try a test installation in a less visible cabinet first.
Upgrading your kitchen with sliding drawers is one of the most rewarding and practical DIY projects you can do. With careful planning, patience, and these tips, you’ll enjoy a more organized and efficient kitchen for years to come.