
When you walk into a kitchen, your eyes usually go to clean countertops, shiny appliances, or maybe a nice window. But sometimes, there’s one thing that stands out in a bad way—the exposed side of a refrigerator. Maybe your fridge is not built into the cabinets, or maybe your kitchen layout leaves one side visible. It can look unfinished, collect dust, or clash with your décor. If you’ve ever felt annoyed by this, you’re not alone. Many people want to make their kitchen look polished, but they don’t know how to deal with that awkward fridge side.
Hiding the exposed side of a refrigerator is not just about looks. It can also protect your fridge, make cleaning easier, and even improve safety. The right solution depends on your kitchen, budget, and style. Some fixes are quick and cheap, others need more time or skill, but all are worth considering if you want a kitchen you love.
Let’s dive deep into all the smart, creative, and practical ways to hide the exposed side of your fridge. Whether you rent, own, have a small space, or want a designer look, you’ll find what you need here.
Why The Exposed Side Of A Refrigerator Matters
Many people ignore the side of the refrigerator. However, this small detail can change the feel of your kitchen more than you think.
- Visual Clutter: Most fridges are not designed to look nice from the side. You might see wiring, a dull gray or black metal, or even sticky fingerprints.
- Mismatch with Cabinets: Fridges rarely match your cabinets or wall color, making them stand out.
- Dust and Grime: The side of the fridge often collects dust, grime, or even spills that are hard to clean.
- Safety: A sharp metal edge at kid-level can be dangerous.
A well-finished kitchen looks good from every angle, and hiding the refrigerator side is a professional touch. It adds value if you ever sell or rent your home.
Quick And Easy Ways To Hide The Exposed Side
Not everyone wants to spend days on a project. Here are some fast and simple fixes that can make a big difference without much effort.
1. Removable Wallpaper Or Contact Paper
Contact paper is sticky-backed plastic available in hundreds of patterns—wood, marble, solid colors, or even stainless steel look. Just clean the side of your fridge, measure, cut, and stick. Removable wallpaper works similarly but is thicker and easier to reposition.
Pros:
- Cheap and easy to install
- No tools needed
- Removable (good for renters)
- Many designs
Cons:
- May peel in hot kitchens
- Needs smooth surface for best results
Pro Tip: Overlap slightly at the edges so you don’t see the fridge color underneath.
2. Magnetic Panels
If your refrigerator is magnetic, you can use magnetic sheets or panels. These can be custom printed with photos, patterns, or even a chalkboard finish.
Pros:
- No glue or tape
- Easy to swap out for a new look
Cons:
- Not all fridges are magnetic
- Slightly more expensive than contact paper
3. Hanging A Curtain Or Fabric Panel
A simple tension rod with a curtain or decorative fabric can hide the entire side. Choose a material that matches your kitchen or adds a fun accent.
Pros:
- Easy to install and remove
- Adds softness to the room
Cons:
- May look less “built-in”
- Needs washing if it gets dirty
4. Decorative Wall Decals
Wall decals are peel-and-stick designs that won’t damage surfaces. You can use them to add art, patterns, or even fake wood grain to the fridge side.
Pros:
- No tools required
- Tons of design choices
Cons:
- Works best on smooth surfaces
- Not as durable as panels
5. Paint The Side
Some people don’t mind a little DIY. Use appliance epoxy paint or regular wall paint (with a good primer) to match the side of the fridge to your cabinets or wall.
Pros:
- Inexpensive
- Custom color match
Cons:
- Permanent (not for renters)
- Needs good prep and ventilation
Extra Insight: Appliance paint is made to stick to metal and resist scratches, while regular paint will peel if you skip primer.

Credit: www.youtube.com
Semi-permanent Solutions For A More Built-in Look
If you own your home or want something more solid, these options create a finished, custom look. They take a bit more work but can transform your kitchen.
1. Build A Cabinet Panel
One of the most popular solutions is to install a cabinet panel on the exposed side. This is a piece of wood or MDF (medium-density fiberboard) painted or finished to match your cabinets.
How to do it:
- Measure the height and depth of your fridge
- Cut a panel to size, finish it to match your cabinets
- Secure it to the wall or floor, not to the fridge (to allow airflow)
Advantages:
- Looks professional
- Can be painted any color
Downsides:
- Needs basic carpentry tools and skills
- Takes time to match exact cabinet finish
2. Sliding Or Folding Screen
A folding screen or sliding panel gives you flexibility. You can buy a wooden or fabric folding screen and place it beside the fridge, or install a sliding track on the ceiling.
Why it works:
- Easy to move for cleaning
- Can be decorative or plain
Limitations:
- Needs space to fold or slide
- Not as seamless as a built-in panel
3. Add A Narrow Shelving Unit
If you have even 6-12 inches between the fridge and wall, a slim shelving unit can both hide the side and add storage. Many people use these for spices, cookbooks, or cleaning supplies.
Step-by-step:
- Measure the space
- Buy or build a shelf unit to fit
- Paint or finish to match your kitchen
Why this is great: You get extra storage, and the shelves cover the fridge side.
Beginner Mistake: Not leaving enough room for the fridge to breathe. Always check the manufacturer’s instructions for clearance.
4. Install A Pegboard Or Slatwall
A pegboard or slatwall is a tool storage board with holes or grooves. It can be painted any color and used to hang utensils, baskets, or even plants.
Benefits:
- Functional and decorative
- Easy to change arrangement
Possible issue: Not all pegboards are heat-resistant; avoid placing paper items near the fridge motor area.
5. Use Beadboard Or Shiplap Paneling
For a farmhouse or classic look, beadboard or shiplap panels are a great choice. These wooden panels add texture and can be painted to match your kitchen.
How to install:
- Measure and cut panels to size
- Secure to wall or an L-shaped frame beside the fridge
Tip: Use waterproof paint if your fridge is near the sink.
Creative And Decorative Approaches
Want your kitchen to stand out? These ideas let you turn the fridge side into a feature—not just something to hide.
1. Chalkboard Paint
Painting the fridge side with chalkboard paint creates a spot for notes, grocery lists, or kid’s drawings. This is especially popular in family homes.
Why it works:
- Fun and useful
- Easy to update messages
Drawback: Chalk dust may fall on the floor, so sweep regularly.
2. Corkboard Or Bulletin Board
Attach a corkboard panel for recipes, reminders, or kids’ artwork. You can buy rolls or sheets of cork at hardware stores.
Installation:
- Cut cork to size
- Use double-sided tape or small screws to attach (never screw into the fridge itself)
3. Living Wall Or Plant Display
Hang magnetic planters or a slim wall-mounted plant rack. Herbs, succulents, or trailing vines can thrive with kitchen light.
Benefits:
- Adds greenery and freshness
- Makes use of vertical space
Important: Choose plants that like the warmth and humidity of a kitchen, and don’t block fridge vents.
4. Custom Art Or Photo Gallery
Turn the side of your fridge into a mini art gallery. Use magnetic frames, stick-on photo holders, or a row of small hooks for art.
Why it’s unique: Personalizes your kitchen and makes the fridge a conversation piece.
5. Decorative Tiling
If you want a bold look, consider peel-and-stick tiles. They come in many styles, from subway tile to Moroccan patterns.
Pros:
- Waterproof and easy to clean
- Adds a designer touch
Cons: Tiles must be installed on a clean, flat surface for best results.

Credit: www.youtube.com
Advanced Solutions For A Seamless Kitchen
For those who want a truly built-in refrigerator look, these are the solutions used by designers and contractors. They take more work and money but give you the most polished result.
1. Floor-to-ceiling Cabinet Enclosure
Build a full-height cabinet around the fridge. This usually involves custom cabinetry, matching panels, and sometimes a top cabinet for extra storage.
How it’s done:
- Build a cabinet box around the fridge, leaving proper airflow space
- Finish with matching cabinet doors and trim
Why it’s the best: Completely hides the fridge sides and blends with kitchen design.
Data: According to kitchen design studies, homes with built-in appliances can increase resale value by up to 10%.
2. Custom End Panels
Order or make a custom end panel from your cabinet supplier. This panel is designed to match your kitchen exactly and is installed beside the fridge.
Advantages:
- Perfect color and style match
- Durable and long-lasting
Disadvantages: More expensive than DIY panels.
3. Integrated Appliance Panels
Some high-end refrigerators let you install integrated panels that match your cabinets on the doors and sides. This makes the fridge almost disappear.
What to know:
- Only works with certain models
- Usually requires professional installation
4. Moving The Refrigerator Location
If your kitchen layout allows, moving the fridge so its side is against a wall or inside a pantry can solve the problem completely. This is a bigger project, but it can free up space and improve flow.
Consider: Plumbing, electrical, and venting must be moved, which can be costly.
5. Install A Full-length Pantry Or Storage Cabinet
If you have space, adding a tall pantry cabinet next to the fridge hides the side and gives you tons of storage.
Step-by-step:
- Measure the fridge height and depth
- Choose a cabinet that matches your kitchen
- Secure it to the wall beside the fridge
Beginner mistake: Not allowing enough space for the fridge door to open fully. Always check hinge clearance.
Comparison: Popular Solutions Side By Side
To help you compare the main options, here is a table with features, cost, and difficulty:
| Solution | Cost | Skill Needed | Removable? | Looks |
|---|---|---|---|---|
| Contact Paper | Low | Beginner | Yes | Good |
| Magnetic Panel | Medium | Beginner | Yes | Good |
| Cabinet Panel | Medium-High | Intermediate | No | Excellent |
| Shelving Unit | Medium | Beginner | Yes | Very Good |
| Built-in Cabinet | High | Professional | No | Seamless |
What To Consider Before Choosing A Solution
Every kitchen and home is different. Before you start, think about these important factors:
Space And Clearance
Fridges need space around them for air to flow. Blocking vents can make your fridge overheat and break. Always check the manufacturer’s clearance recommendations (often 1-2 inches on sides and back).
Budget
Some fixes cost less than $20; others may run into hundreds or thousands. Be realistic about your budget before you start.
Renter Vs. Owner
Renters should stick to non-permanent solutions like contact paper, magnetic panels, or curtains. Owners can invest in built-in panels or cabinets.
Kitchen Style
Try to match your solution to your kitchen design. For example, beadboard panels work in farmhouse kitchens, while glossy panels fit modern spaces.
Cleaning
Choose surfaces that are easy to wipe down. The fridge side can attract grease, fingerprints, and spills.
Safety
Don’t use sharp-edged panels or anything that kids could pull down. If you use fabric, keep it away from heat sources.
Mistakes To Avoid When Hiding A Refrigerator Side
Many people make these common errors when trying to hide their fridge:
- Blocking Air Vents: Fridges need airflow. Don’t push anything tight against the vents.
- Using Flammable Materials: Never use paper, fabric, or untreated wood near heat sources.
- Not Matching Cabinet Height: A panel that is too short or tall will stand out.
- Skipping Surface Prep: If you paint or stick anything on, clean and dry the surface first.
- Using the Wrong Adhesive: Some tapes or glues can damage the fridge finish or peel in humidity.
Expert Insight: Before making holes or using screws, check your fridge warranty. Some brands may void your warranty if you damage the case.
Real-life Examples
Example 1:
Sarah, a renter in a small apartment, used black contact paper to cover her fridge side, matching her cabinets. She added a row of magnetic spice tins for both style and storage. The whole project cost under $25 and took less than an hour.
Example 2:
Mike and Lisa, homeowners, wanted a seamless look for their kitchen remodel. They installed a custom cabinet panel and a slim pull-out spice rack beside the fridge. It cost about $400 and took a weekend but added resale value and storage.
Example 3:
A family with young kids painted their fridge side with chalkboard paint. Now, grocery lists and kids’ drawings fill the space, making the kitchen feel warm and inviting.
Step-by-step Guide: Diy Cabinet Panel
Want to try a cabinet panel? Here’s a simple guide:
- Measure: Find the height and depth of your fridge.
- Choose Material: Plywood, MDF, or pre-finished cabinet panel.
- Cut to Size: Ask for a straight cut at the hardware store if you don’t have tools.
- Finish: Paint or stain to match your cabinets.
- Install: Use L-brackets to attach the panel to the wall or floor beside the fridge. Never screw into the fridge.
- Seal Edges: Use caulk or trim for a finished look.
Pro Tip: If you’re worried about airflow, leave a small gap at the back and top.
Estimated Costs And Lifespan
Here’s a quick look at the cost and how long each method usually lasts:
| Method | Cost (USD) | Expected Lifespan | Best for |
|---|---|---|---|
| Contact Paper | $10–$30 | 1–3 years | Renters, quick fix |
| Cabinet Panel | $50–$200 | 10+ years | Homeowners, long-term |
| Chalkboard Paint | $20–$50 | 5+ years | Families, creative |
| Shelving Unit | $40–$150 | 5–10 years | Extra storage |
| Built-in Enclosure | $500–$2000+ | 20+ years | High-end kitchens |
Bonus Tips For A Professional Finish
- Use Trim or Molding: Adding a thin piece of trim where the panel meets the wall or floor hides gaps.
- Under-Cabinet Lighting: If you install a tall panel, consider LED strip lights to brighten up the space.
- Match Sheen: Make sure your paint or finish matches the shine (matte, satin, gloss) of your cabinets.
- Regular Cleaning: Even the best panel can get greasy—wipe it down monthly.
- Test Before You Commit: Try temporary fixes first to see what look you like.
When To Call A Pro
If you want a cabinet enclosure or need to move electrical or plumbing, it’s best to hire a professional. Poor installation can lead to fridge damage or even void your warranty.
Pro Insight: Always check local building codes. Some areas require a certain amount of clearance or venting for major appliances.
Environmental Impact And Sustainability
Some materials are more eco-friendly than others. Choose FSC-certified wood or recycled materials when possible. Magnetic panels and contact paper are easy to remove, creating less waste if you move or remodel.
Where To Find Materials And Inspiration
Most hardware stores carry everything you need for these projects. For inspiration, browse home improvement sites or visit kitchen showrooms. You can also find more ideas and safety advice at the official ENERGY STAR Refrigerators page.
Frequently Asked Questions
Can I Push My Fridge Closer To The Wall To Hide The Side?
It’s not safe to push your fridge tight against the wall. Most fridges need space (1–2 inches) on the sides and back for air to flow. Without space, your fridge can overheat and break.
Is It Safe To Paint The Side Of A Refrigerator?
Yes, if you use appliance epoxy paint and follow safety instructions. Make sure the surface is clean and dry. Never use regular wall paint without a primer, or the paint will peel.
What’s The Cheapest Way To Hide The Exposed Side Of A Fridge?
Contact paper or removable wallpaper are the cheapest options. Both cost under $30, are easy to install, and can be removed without damage.
Can I Install Shelves Or A Cabinet Directly On My Fridge?
No. Shelves or cabinets should be installed beside the fridge, not attached to it. Drilling into the fridge can damage it, break the seal, or void your warranty.
What’s The Best Solution For Renters?
Removable options like contact paper, magnetic panels, or a curtain on a tension rod are best for renters. They can be removed without damage when you move out.
Finishing the exposed side of your refrigerator might seem like a small detail, but it can make your kitchen look polished and well-designed. Whether you want a quick fix or a custom look, there’s a solution for every budget and skill level.
Choose the method that fits your space, and you’ll enjoy a more beautiful, functional kitchen every day.
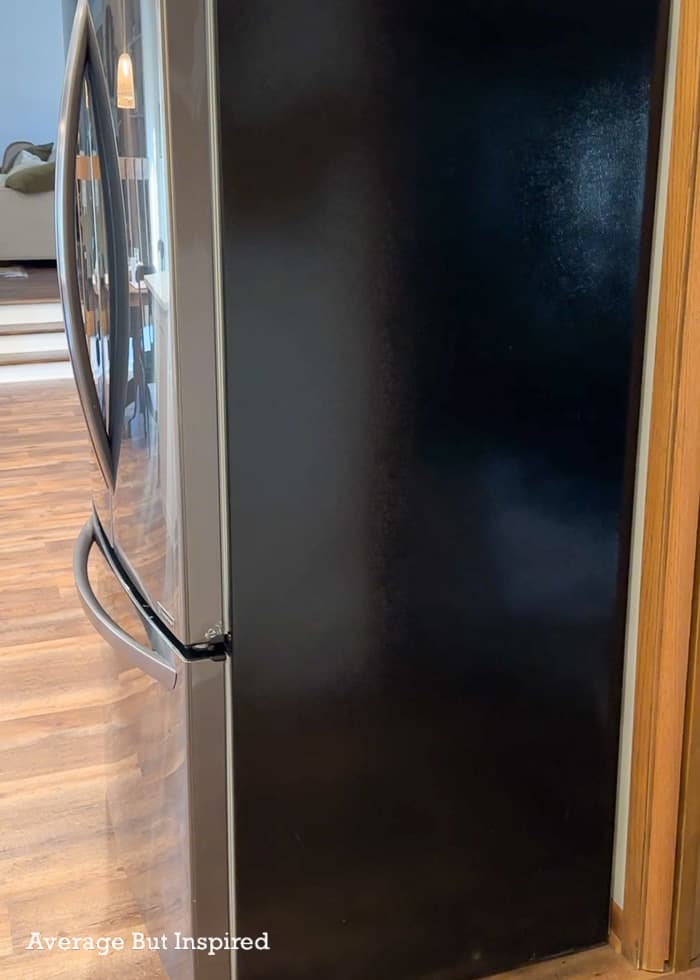
Credit: averageinspired.com