
Redoing oak cabinets can completely change the look of your kitchen, bathroom, or any space with built-in cabinetry. Many homes have oak cabinets because they’re durable and classic. But over time, the golden or orange tones can feel dated. The good news? You don’t need to tear them out or spend a fortune on replacements. With careful planning and the right methods, you can refresh oak cabinets for a modern, beautiful result.
This guide will walk you through every step, from deciding what kind of makeover you want, to tools and materials, and all the way through finishing touches. Whether you want a simple update or a dramatic transformation, you’ll find practical tips, expert insights, and advice to avoid common mistakes.
If you’ve ever felt overwhelmed by the process, don’t worry—redoing oak cabinets is a big project, but it’s absolutely doable. Let’s dive into the details to help you make choices you’ll love for years.
Understanding Your Oak Cabinets
Before starting, it’s important to look closely at your cabinets. Oak is a hardwood with a prominent grain pattern, which means its texture often shows through paint and stain. Understanding your cabinet’s current condition will help you plan the best way to redo them.
Check for:
- Surface damage: Scratches, dents, or water spots may need repair.
- Finish type: Are your cabinets stained, varnished, or painted?
- Hardware style: Old handles and knobs can date the look.
Not all oak cabinets are the same. Some have raised panels, others are flat. The finish and age matter, too. If your cabinets have a heavy varnish or lacquer, extra prep is required. If you see signs of warping or rot, you might need repairs before starting the cosmetic work.
Choosing Your Desired Look
Start by deciding how you want your oak cabinets to look. There are several popular options, and each requires a different approach.
Painting
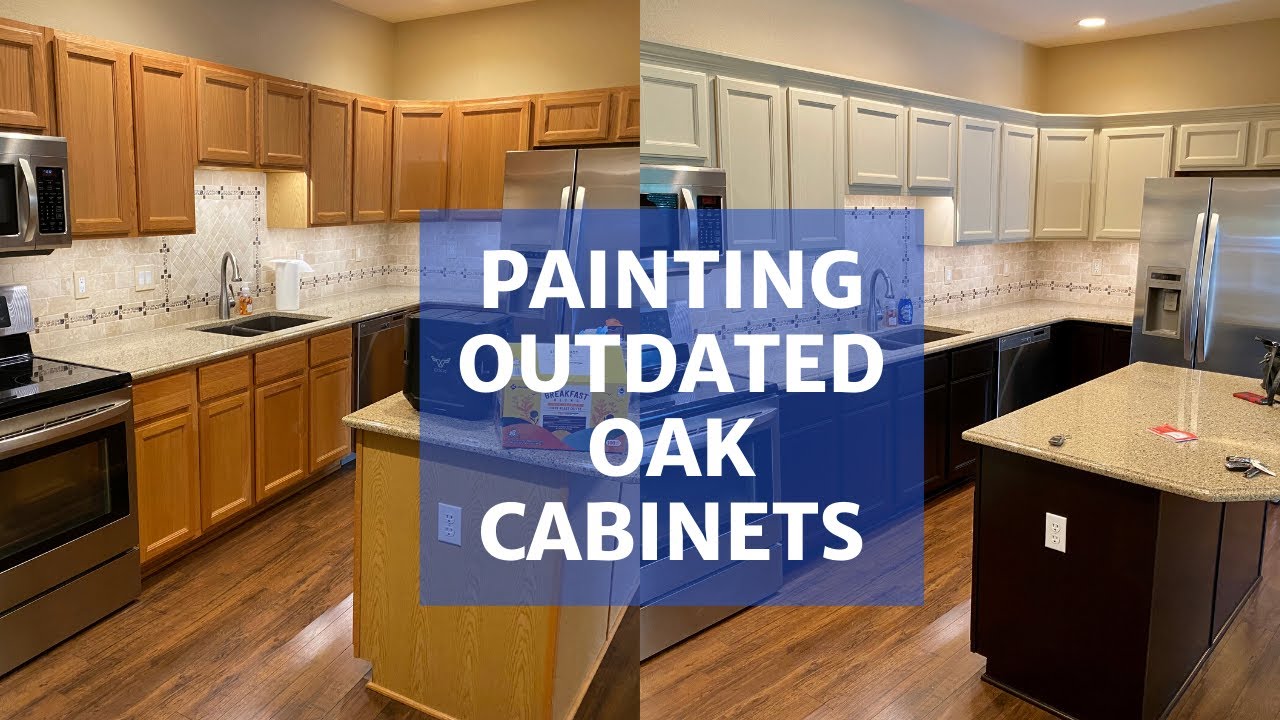
Painting is the most dramatic change. It covers the grain and color, giving a clean, modern finish. Popular colors include white, gray, and navy blue. Dark colors can add elegance, while light shades make a kitchen feel bigger.
Staining
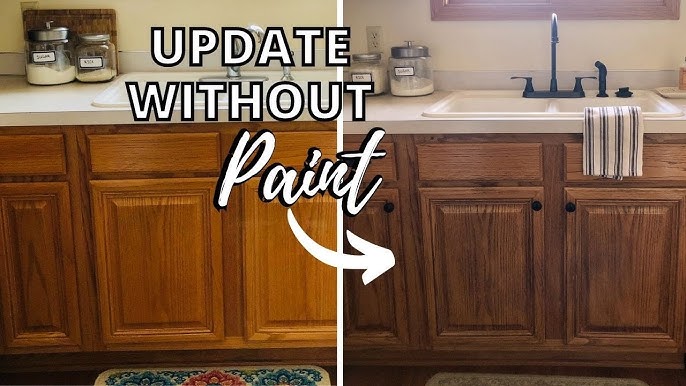
Staining keeps the wood grain visible but changes the color. You can go darker for a rich, classic look or lighter for a modern twist. Many people use gel stain for better control and even coverage.
Whitewashing
Whitewashing, or liming, gives oak a soft, rustic appearance. The grain shows through a milky layer, making it perfect for farmhouse or coastal styles.
Two-tone Cabinets
Some homeowners choose a two-tone look—painting upper cabinets one color and lowers another. This adds visual interest and can help balance the room.
Keeping Natural Oak
If you like the grain and just want a fresher look, a clear coat or new polyurethane can renew the wood’s beauty.
Non-obvious insight: The choice of finish can affect how much maintenance your cabinets need. For example, painted cabinets may show chips but are easy to touch up, while stained cabinets hide scratches better but can be harder to repair.
Gathering Tools And Materials
Every project needs the right tools. Here’s a list of what you’ll likely need:
- Screwdriver or drill (for removing doors and hardware)
- Cleaner/degreaser
- Sandpaper (80, 120, and 220 grit)
- Wood filler (if needed for repairs)
- Painter’s tape
- Drop cloths
- High-quality brushes and rollers
- Foam sanding block
- Tack cloth
- Primer (if painting)
- Paint, stain, or whitewash
- Topcoat (polyurethane or polycrylic)
- New hardware (optional)
Having everything ready before you start saves time and frustration. Make sure you have proper ventilation and consider wearing a mask when sanding or using strong chemicals.
Practical tip: Don’t skimp on brushes or rollers. Cheap ones can leave marks and bristles in your finish.
Prepping Your Cabinets
Preparation is key for a professional-looking result. Skipping steps here leads to peeling paint, rough surfaces, or stain that doesn’t stick.
- Remove doors and hardware: Label the doors and hardware as you go, so you know where each piece belongs.
- Clean all surfaces: Grease and grime stop paint and stain from sticking. Use a degreaser and scrub well, especially near handles.
- Fill holes and repair damage: Use wood filler for scratches, dents, or old handle holes if changing hardware. Let it dry completely.
- Sand surfaces: Start with 80 or 120 grit for old finishes, then smooth with 220 grit. Sanding opens the wood grain for better adhesion. Always sand in the direction of the grain.
- Remove dust: Use a vacuum and tack cloth to pick up all dust. Even small particles can ruin your finish.
- Tape edges and cover countertops/floors: Painter’s tape keeps paint lines clean and protects your kitchen.
Non-obvious insight: Even if you plan to use “no-sand” paint or primer, a light sanding greatly improves durability, especially on oak.

Credit: averageinspired.com
Painting Oak Cabinets
Painting can completely change the style of your cabinets. The process is straightforward but requires attention to detail for best results.
Step 1: Priming
Oak has a strong grain and can cause “bleed-through,” where tannins stain the paint. Use a high-quality primer—preferably a stain-blocking type.
- Apply a thin, even coat of primer.
- Let it dry fully (follow manufacturer’s instructions).
- Sand lightly with 220-grit sandpaper after priming for a smooth base.
Step 2: Painting
Choose a cabinet-grade paint—these are more durable and washable. You can use latex or alkyd paint, but oil-based paints are less common now due to fumes and cleanup.
- Apply paint in thin layers with a brush or roller.
- Allow each coat to dry before adding the next.
- Two coats are usually needed, sometimes three for full coverage.
Step 3: Finishing
For kitchens and bathrooms, a protective topcoat helps prevent stains and chipping. Polycrylic is popular because it doesn’t yellow over time.
- Let paint cure for at least 24 hours before applying topcoat.
- Two coats of topcoat are best for durability.
Painted Vs. Stained: Durability Comparison
Here’s a look at how painted and stained finishes compare for oak cabinets:
| Feature | Painted Cabinets | Stained Cabinets |
|---|---|---|
| Appearance | Smooth, hides grain | Shows wood grain |
| Durability | May chip but easy to touch up | Resists scratches, harder to repair |
| Maintenance | Wipe clean, touch up chips | Wipe clean, stain may fade |
| Style | Modern, versatile | Traditional, natural |
Staining Oak Cabinets
Staining is a great way to change the color but keep the character of oak. It highlights the natural grain and can be customized with different shades.
Step 1: Removing Old Finish
Strip or sand off old varnish and stain. This step is essential—new stain won’t penetrate well if the old finish remains.
- Use a chemical stripper for thick varnish, or sand thoroughly.
- Clean off all residue before applying new stain.
Step 2: Applying Stain
- Stir stain well before use.
- Apply with a brush or cloth, moving with the grain.
- Wipe off excess with a clean rag. The longer you leave the stain, the darker the color.
- Let dry completely between coats if a deeper shade is desired.
Step 3: Sealing
Stain alone doesn’t protect wood. Seal with two coats of polyurethane or polycrylic for moisture and scratch resistance.
Pro tip: Oak’s open grain can absorb stain unevenly. Use a pre-stain wood conditioner for a more even look, especially with lighter stains.
Whitewashing Or Liming Oak Cabinets
Whitewashing softens the look of oak, letting the grain show through a pale finish. This style works well in country, farmhouse, or beach-inspired homes.
How To Whitewash
- Mix water and white latex paint (about 1: 1 ratio).
- Brush the mixture onto sanded cabinets.
- Quickly wipe off with a lint-free cloth, leaving some paint in the grain.
- Repeat for a heavier effect, or sand lightly for a worn look.
- Seal with a clear, matte topcoat.
Common mistake: Don’t skip the sealer, as whitewashed finishes can stain easily without protection.
Updating Hardware For A Modern Look
Sometimes, simply changing cabinet hardware gives your oak cabinets a modern edge. Choose handles and knobs that match your new color or stain.
- Brushed nickel or matte black for a contemporary feel
- Brass or gold for warmth and vintage style
- Sleek bar pulls for a minimalist look
Make sure new hardware fits the existing holes, or be prepared to fill and drill new ones.
Refacing Vs. Refinishing Oak Cabinets
If your cabinet doors are very dated or damaged, you might consider refacing instead of just refinishing.
What Is Refacing?
Refacing means replacing the cabinet doors and drawer fronts, but keeping the existing boxes. The frames are covered with a matching veneer. This is more expensive than painting or staining, but much cheaper than a full replacement.
When To Reface
- If you want a new door style (like shaker or slab)
- If doors are damaged but boxes are solid
- If you want a truly modern look
Cost comparison:
| Method | Average Cost (per linear foot) | Time Required | Skill Level |
|---|---|---|---|
| Painting | $3 – $10 | 2-5 days | DIY |
| Staining | $4 – $12 | 3-6 days | DIY |
| Refacing | $80 – $150 | 3-7 days | Professional/Skilled DIY |
Steps To Refinish Oak Cabinets For Beginners
If you’re new to DIY projects, here’s a simple roadmap to follow. Each step can take a few hours, but patience is key for a quality result.
- Plan your look: Collect inspiration photos and decide on paint, stain, or whitewash.
- Gather materials: Buy everything you need before starting.
- Label and remove doors: Use painter’s tape and a marker.
- Clean and prep: Degrease, sand, and fill holes.
- Prime or condition: Primer for paint, conditioner for stain.
- Apply finish: Paint, stain, or whitewash as chosen.
- Seal: Use a durable topcoat.
- Reinstall hardware: Add new or cleaned handles and hinges.
- Rehang doors and drawers: Allow all coats to cure fully before heavy use.
Example: A homeowner with little experience redid their 20-year-old oak kitchen in four weekends, spending about $200 on supplies and hardware. The result looked professional and lasted for years.
Common Mistakes And How To Avoid Them
Redoing oak cabinets isn’t complicated, but there are pitfalls that can ruin the result.
- Skipping prep: Poor cleaning and sanding lead to peeling paint.
- Using the wrong primer: Oak needs a stain-blocking primer to prevent yellowing.
- Rushing dry times: Each coat must dry fully for a hard, durable finish.
- Not labeling doors: It’s surprisingly easy to mix up which door goes where.
- Applying thick coats: Thin, even layers are less likely to drip or sag.
- Ignoring ventilation: Paint fumes build up fast—open windows and use fans.
Practical tip: Test your paint or stain on the back of a door before doing the whole set. This helps you see the final color and texture.
Cleaning And Maintenance After Redoing
Once your cabinets look new, keeping them clean is important.
- Wipe spills quickly to avoid stains.
- Use a soft, damp cloth for routine cleaning.
- Avoid harsh chemicals or abrasive pads.
- For painted cabinets, touch up chips with leftover paint.
- For stained cabinets, apply a fresh coat of polyurethane every few years.
Non-obvious insight: The area near the stove and sink wears fastest. Check these spots regularly for signs of damage.
Real-life Transformations: Before And After
Many homeowners are amazed at the difference a cabinet redo makes. Here are a few examples:
- A 1990s kitchen with orange oak became bright and modern with white paint and black handles.
- A builder-grade bathroom got a spa-like feel with dark gel stain and brushed nickel pulls.
- An open-plan kitchen used two-tone cabinets—navy blue lowers and white uppers—for a custom look.
Fact: According to Remodeling Magazine, a minor kitchen remodel (which includes cabinet refinishing) can return up to 72% of its cost when selling your home.
Tips For A Professional Finish
Small details make a big difference in your final results.
- Remove all doors and drawers for easier access.
- Use a high-density foam roller for smooth finishes.
- Sand lightly between every coat (primer, paint, or stain).
- Let everything cure for at least three days before heavy use.
- Store removed hardware in labeled bags.
Non-obvious insight: Temperature and humidity affect drying times. Work in a well-ventilated area, and avoid very humid or cold days.
Credit: www.youtube.com
When To Hire A Pro
DIY is rewarding, but sometimes professional help is best.
- If your cabinets have water damage or structural issues
- If you want to reface instead of refinish
- If you need a flawless, showroom-quality finish
Professionals use spray equipment for perfectly smooth paint and can complete the job faster, but at a higher cost.
Sustainability And Cost Savings
Refinishing oak cabinets is eco-friendly. You reuse what you have, keeping old cabinets out of landfills. It’s also cost-effective:
- DIY painting costs about $200–$400 for a standard kitchen.
- Refacing runs $3,000–$7,000.
- Full replacement can exceed $15,000.
You save resources and money while adding value to your home.
If you want more tips on sustainable home improvement, check resources like EPA Green Homes.
Trends And Inspiration For 2024
Cabinet styles change over time. Here’s what’s popular now:
- Matte finishes: Less shine, more subtle elegance.
- Two-tone kitchens: Dark lowers, light uppers.
- Open shelving: Removing some upper cabinets for shelves.
- Hidden handles: Integrated pulls for a sleek look.
- Soft, natural stains: Light oak and gray washes.
Pro tip: Don’t be afraid to add your personality. A bold color on an island or unique hardware can make your kitchen one-of-a-kind.
Frequently Asked Questions
How Long Does It Take To Redo Oak Cabinets?
Most DIYers need 4–7 days to complete the project, depending on drying times and kitchen size. Plan for extra time if you’re new to painting or staining.
Can I Paint Over Oak Cabinets Without Sanding?
It’s possible with special bonding primers, but light sanding is always recommended for best adhesion and durability. Skipping this step increases the risk of peeling.
What Paint Is Best For Oak Cabinets?
Choose a cabinet-grade acrylic or alkyd paint with a semi-gloss or satin finish. These paints resist stains, clean easily, and hold up to daily use.
How Do I Make The Oak Grain Less Visible When Painting?
Use a grain filler before priming and painting. Apply with a putty knife, let dry, and sand smooth. This step helps create a glassy finish.
Is It Worth Refinishing Old Oak Cabinets?
Yes—refinishing is much cheaper than replacing, adds value to your home, and lets you customize your space. If your cabinets are solid, refinishing makes sense.
Giving your oak cabinets a new life is a project that pays off in beauty, satisfaction, and home value. With patience, good tools, and the right method, you’ll be surprised how professional the results look—and how much you love your “new” kitchen or bath.
Credit: www.youtube.com