
Peeling kitchen cabinets can make your whole kitchen look old and tired, even if everything else is in good shape. But the good news is, repainting peeling cabinets is not only possible—it’s a project you can do yourself with some time and the right steps.
Many people think a fresh coat of paint will fix everything. In reality, cabinets need careful preparation before you even open a paint can. If you rush or skip steps, the paint will peel again, and all your hard work will be wasted.
This guide will walk you through every step, from understanding why cabinet paint peels to finishing your project with results that last. You’ll learn what products to use, how to avoid common mistakes, and how to get a professional look without spending a fortune.
Even if you’ve never done a big DIY project before, you’ll find clear instructions and practical tips you won’t find on most paint cans or quick online videos. Along the way, you’ll discover small tricks that professionals use and the real reasons why some DIY jobs fail while others last for years.
Why Kitchen Cabinet Paint Peels
Before you start, it’s important to know why paint peels on kitchen cabinets. Understanding the cause helps you fix the problem for good—not just cover it up.
- Moisture: Kitchens are full of steam, spills, and humidity. If cabinets aren’t sealed properly or if water gets in, paint can bubble and peel. For example, cabinets near dishwashers or sinks often see more peeling because of splashes or condensation.
- Poor Preparation: Cabinets that were not cleaned, sanded, or primed before painting are likely to peel quickly. Many older kitchens have layers of grease that normal cleaners can’t remove.
- Wrong Paint Type: Not all paints stick to wood or laminate. If the wrong paint is used, it will not bond well and can peel. For instance, wall paint is designed for drywall, not furniture.
- Age and Wear: Over time, daily use and cleaning wear down paint layers. Opening and closing doors puts stress on edges and corners, which makes peeling start there first.
- Grease and Dirt: Cooking creates greasy air. If cabinets are painted while greasy, paint won’t stick. Even invisible grease can keep paint from bonding.
Most peeling starts near sinks, stoves, or handles—places that get the most use and moisture. If you see peeling in these areas, you’re not alone. Many kitchens develop this problem within a few years of painting.
It’s also common to see peeling along the bottom edges of doors or drawer fronts, where water drips and collects. Sometimes, using harsh cleaners can break down paint, too. Knowing where and why paint fails helps you pay extra attention during prep, so your new paint will last longer.
Tools And Materials You’ll Need
Using the right tools and materials will make your project smoother and help the new paint last. The quality of your tools will show in the final result—a good brush or roller can make the difference between a smooth, professional look and a streaky, uneven finish.
Essential Tools
- Screwdriver (for removing doors and hardware)
- Putty knife or paint scraper
- Sandpaper (80, 120, 220 grit)
- Sanding block or electric sander (optional but speeds up large jobs)
- Painter’s tape
- Microfiber cloths
- Paint tray and liners
- 2–3 high-quality paintbrushes (angled and flat)
- 4–6 inch foam roller
- Vacuum or tack cloth
Having a sanding block helps you keep even pressure, so you don’t create dips in the wood. An electric sander is useful for big kitchens or if you have a lot of old paint to remove.
Materials
- Wood filler or spackling compound
- Degreaser or TSP (trisodium phosphate) cleaner
- Stain-blocking primer (oil-based or shellac-based recommended)
- High-quality cabinet paint (acrylic or alkyd enamel)
- Drop cloths or plastic sheeting
- Disposable gloves and safety goggles
- New cabinet hardware (optional)
- Paint stirrers
Look for primers and paints labeled as “bonding” or “cabinet” formulas. These are designed for the slick surfaces found in many kitchens.
Pro Tip
If your cabinets are laminate (not real wood), check the paint and primer labels to be sure they’re made for smooth surfaces. Some products are designed for wood only. Laminate can be tricky—if you use the wrong primer, paint may peel in sheets.
Also, buy more sandpaper than you think you need. It clogs quickly with old paint and grease. Having fresh sheets ready will save frustration.

Credit: www.reddit.com
Step-by-step Guide To Repainting Peeling Kitchen Cabinets
Repainting cabinets is not hard, but it does take patience. Here’s a clear, step-by-step process:
1. Remove Cabinet Doors And Hardware
Take off all doors, drawers, and hardware (handles, knobs, hinges). Label each door and its matching location with painter’s tape so you can put everything back in the right place. This small step saves big headaches later.
A simple way is to number each door and its opening. Place hardware like screws and hinges in labeled bags. This way, you won’t get stuck with extra pieces or doors that don’t fit.
2. Protect Your Space
Lay down drop cloths or plastic to protect counters and floors. Tape off walls, appliances, and backsplashes. Painting is messy—protecting your space will save time cleaning up.
Open a window or use a fan for ventilation. Paint and primer fumes can be strong, especially in small kitchens. Cover anything you don’t want to get dusty or splattered.
3. Clean All Surfaces Thoroughly
Grease and dirt are invisible enemies. Clean cabinets with a degreaser or TSP. Scrub every surface, especially near the stove and sink. Rinse with clean water and let dry fully.
Non-obvious insight: Even if cabinets look clean, any missed grease spot can ruin the paint job. Run your hand over the surface—if it feels slick, it’s still greasy.
For tough grease, use a scouring pad with the cleaner. Pay special attention to corners, under handles, and along edges. Let the cabinets dry completely—moisture left on the surface can stop primer from bonding.
4. Scrape Off Peeling Paint
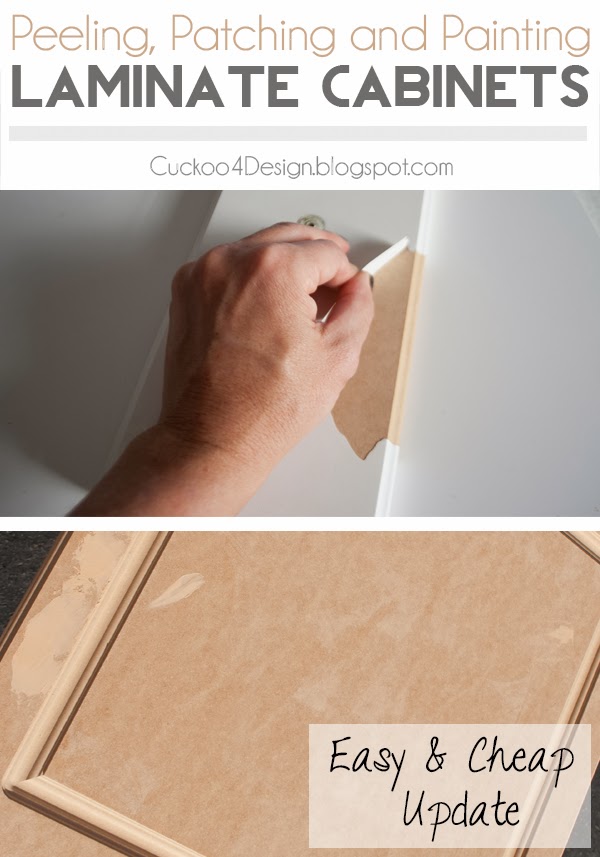
Use a putty knife or scraper to remove all loose, flaking, or bubbling paint. Don’t just sand over these spots—get rid of any paint that comes off easily. This gives you a solid base.
Work slowly and carefully—forcing the blade can gouge the wood. If you find thick layers of old paint, a heat gun can soften it, but always keep the tool moving to avoid burns.
5. Sand All Surfaces
Sand every inch of the cabinets, starting with 80-grit on peeling or rough areas, then 120-grit, and finally 220-grit for a smooth finish. Wipe away dust with a vacuum or tack cloth.
Why Sanding Matters
Many people skip sanding, but it’s critical. Sanding creates tiny scratches that help primer and paint stick. If you skip or rush this step, new paint will peel.
Use a sanding sponge for grooves and detailed areas. Always sand in the direction of the wood grain—this helps the finish look more natural. If you’re working with laminate, be gentle; you just want to dull the gloss, not sand through the surface.
6. Fill Holes And Repair Damage
Check for dents, deep scratches, or holes left by peeling paint. Fill these with wood filler or spackle. Let dry, then sand smooth. Repeat if needed for a flat surface.
Extra tip: Hold a light at an angle to spot rough patches. Smoothness here makes a big difference to the final look.
Fillers shrink as they dry, so you may need more than one pass. For deep damage, use a high-quality wood filler and let it dry overnight before sanding.
7. Clean Again
After sanding and repairs, wipe everything down with a damp cloth or tack cloth. Even small dust particles can ruin the finish.
Vacuum inside corners and along edges. Dust hides in cracks and comes out after you paint—making bumps in your finish.
8. Prime The Cabinets
Apply a stain-blocking primer (oil-based or shellac-based works best on old, stained, or damaged cabinets). Use a brush for corners and a foam roller for flat surfaces. Let dry according to the label instructions.
For best results, apply primer in thin, even coats. Don’t overload your brush or roller—runs and drips are hard to fix later.
Choosing The Right Primer
Not all primers are equal. Here’s a quick comparison:
| Primer Type | Best For | Drying Time | Odor |
|---|---|---|---|
| Oil-based | Stained or damaged wood | 4-8 hours | Strong |
| Shellac-based | Serious stains, knots, or odors | 1 hour | Very strong |
| Water-based | Light stains, clean wood | 1-2 hours | Low |
Shellac and oil-based primers block stains and odors best but smell more. Always paint in a ventilated area.
Non-obvious insight: If you see yellow or brown stains “bleeding” through the primer, add a second coat. This is common with old cabinets.
9. Sand Lightly Again
Once primer is dry, sand lightly with 220-grit sandpaper. This removes small bumps or brush marks. Clean up dust before the next step.
This step is quick but important. A smooth primer layer makes your finish coats look better. Don’t sand too hard—just enough to make the surface feel silky.
10. Apply Cabinet Paint
Stir paint well. Use a high-quality enamel paint made for cabinets. Start with a brush for corners and details, then roll larger flat areas. Apply thin, even coats. Two or three coats give the best results. Let each coat dry fully before adding the next.
If you see drips or runs, smooth them with your brush right away. Always paint in the same direction for a consistent finish.
| Paint Type | Finish | Durability | Best For |
|---|---|---|---|
| Acrylic enamel | Satin, semi-gloss | High | Wood or laminate |
| Alkyd enamel | Semi-gloss, gloss | Very high | High-use kitchens |
| Chalk paint | Matte | Medium (needs topcoat) | Decorative effects |
Straight-to-the-point tip: Do not use wall paint. It won’t last in the kitchen.
If you want extra durability, ask your paint store for “urethane-fortified” enamel. It costs more but stands up to heavy use and cleaning.
11. Let Paint Cure
Drying and curing are different. Paint may feel dry in a few hours, but it takes 7–14 days to fully harden (cure). Avoid heavy use until then.
Keep doors and drawers slightly open for a day or two to avoid sticking. If you must use your kitchen, be gentle—avoid slamming or scrubbing until the paint is fully cured.
12. Reinstall Doors And Hardware
Once paint is fully dry, reattach all doors, drawers, and hardware. If you want a new look, consider replacing handles and knobs.
Polish hardware before reinstalling, or add bumpers to reduce noise and protect your finish.
Common Mistakes To Avoid
Even careful DIYers make mistakes that lead to peeling or poor results. Here are the most common:
- Skipping Cleaning: Paint won’t stick to greasy surfaces.
- Not Removing Peeling Paint: Painting over loose areas leads to new peeling.
- Rushing Sanding: Smooth paint needs a rough surface to grip.
- Skipping Primer: Primer helps paint bond and blocks stains.
- Thick Paint Coats: Thick layers dry slowly and can peel. Thin coats are better.
- Not Letting Paint Cure: Using cabinets too soon can cause fingerprints or smudges.
- Ignoring Humidity: Painting in high humidity or cold can cause problems.
- Using the Wrong Paint: Only use paints made for cabinets or trim.
- Not Labeling Doors: Mixing up doors and hardware makes reinstalling harder.
- Forgetting to Ventilate: Paint fumes are strong—open windows and use fans.
Another common mistake: not reading paint or primer instructions. Each product is a little different—always check the recommended drying times.

Credit: www.rethunkjunkbylaura.com
How To Choose The Right Paint And Primer
The paint and primer you choose will decide how long your new finish lasts. Here’s what matters:
Primer
- Stain-blocking ability: Stops old stains from bleeding through.
- Bonding power: Especially important for glossy or laminate surfaces.
- Dry time: Some primers dry fast, others take hours.
Paint
- Durability: Kitchen cabinets need tough paint. Enamel is best.
- Finish: Semi-gloss or satin is easiest to clean. Matte shows more dirt.
- Color: Light colors brighten a kitchen, but dark colors can hide stains.
Here’s a fast comparison:
| Feature | Enamel Paint | Wall Paint |
|---|---|---|
| Scrub-resistance | High | Low |
| Stain-resistance | High | Medium |
| Durability | High | Low |
| Recommended for Cabinets | Yes | No |
Non-obvious insight: Some “cabinet paints” are actually just repackaged wall paints—check for “enamel” or “trim and door” on the label.
Ask for sample boards at your local paint store. Test colors and finishes at home under your kitchen lighting before committing.
How Long The Project Takes
You can repaint a small kitchen in a weekend, but drying and curing add time. Here’s a typical timeline:
- Prep and cleaning: 2–4 hours
- Removing peeling paint and sanding: 3–5 hours
- Priming: 1–2 hours (plus drying time)
- Painting: 2–4 hours per coat (2–3 coats needed)
- Drying between coats: 4–24 hours (depends on paint)
- Reinstalling hardware: 1–2 hours
Total hands-on time: About 15–20 hours
Total project time (including drying): 3–5 days
Remember, patience leads to better results.
For large kitchens or if you work alone, expect the project to take a full week from start to finish. If you have only a few hours each day, break the job into sections—do the uppers one weekend, lowers the next.
How To Get A Professional-looking Finish
Everyone wants their cabinets to look smooth and even, not streaky or bumpy. Here’s how to get that factory finish:
- Use a foam roller for flat areas—this gives a smoother look than a brush.
- Brush in long, even strokes in the direction of the wood grain.
- Feather out paint edges to avoid lines.
- Sand lightly between coats with 220-grit sandpaper.
- Clean off all dust before each coat.
- Let paint dry fully before adding the next layer.
Advanced tip: For a glass-like finish, some pros spray paint using a paint sprayer. If you try this, practice on cardboard first.
Another pro trick: Remove cabinet doors and paint them flat, on a table. Gravity helps the paint level out, so you get fewer drips and runs. You can even set up a drying rack with nails or screws so both sides dry evenly.
Cost Of Repainting Peeling Cabinets
Repainting cabinets yourself is much cheaper than replacing them. Here’s what you might spend:
- Primer: $20–$40 per gallon
- Paint: $30–$70 per gallon
- Sandpaper, filler, cleaning supplies: $20–$30
- Brushes and rollers: $15–$40
- Drop cloths, tape, gloves: $10–$25
Estimated total: $100–$200 for a medium kitchen
If you hire a pro, the same job could cost $1,200–$7,000, depending on kitchen size and location.
If you need to buy or rent special tools (like a sprayer or electric sander), add $30–$50 more. Buying new hardware is optional but can update your look for $50–$150 more.
Credit: cuckoo4design.com
When To Replace Instead Of Repaint
Repainting is a great fix for most kitchens, but sometimes it’s better to replace cabinets. Here are signs it’s time for new ones:
- Cabinets are warped, swollen, or water-damaged.
- Doors or frames are broken or missing.
- Hinges or structural parts are loose or unsafe.
- Peeling is extreme and paint won’t stick, even after prep.
If your cabinets are solid, repainting will give years of new life. If not, consider replacing or refacing them.
You can also “reface” cabinets—replace doors and drawer fronts but keep the boxes. This costs less than full replacement but gives a brand new look.
How To Care For Newly Painted Cabinets
Once your cabinets look fresh, keep them that way:
- Wait at least 7 days before heavy cleaning or scrubbing.
- Wipe spills quickly to avoid stains or water damage.
- Clean with a soft, damp cloth—avoid harsh cleaners or scouring pads.
- Touch up chips right away with leftover paint.
Pro insight: Use felt pads on doors and drawers to prevent chips from slamming.
Don’t hang wet towels or cloths on cabinet doors. Moisture can soften paint and cause peeling, especially in the first month.
For sticky spots, use a mild soap and water. Avoid magic erasers or abrasives—they can dull the finish.
Frequently Asked Questions
How Do I Know If My Cabinets Are Real Wood Or Laminate?
Check the edges and grain. Real wood has a natural grain pattern, while laminate feels very smooth and often has a repeating pattern. Look at the back or inside of a door—laminate will often look like plastic. If you’re not sure, try sanding a hidden spot. Wood creates dust, while laminate peels or creates small flakes.
A second way: tap the surface with your fingernail. Wood sounds solid, while laminate sounds a bit hollow.
Can I Paint Over Cabinets That Were Previously Painted?
Yes, you can, but only if you prep properly. Remove all peeling paint, sand the surfaces, clean well, and use a bonding primer. If the old paint is in good shape and not glossy, you may only need light sanding.
If you find multiple layers of old paint, remove as much as possible. Too many layers can make doors stick or chip easily.
What Type Of Paint Finish Is Best For Kitchen Cabinets?
Semi-gloss and satin finishes are best. They’re easy to clean, resist stains, and don’t show fingerprints as much as glossy finishes. Avoid matte finishes—they look nice but are harder to keep clean in a kitchen.
If you want a modern look, satin is a good balance between shine and easy cleaning.
Do I Need To Seal Painted Cabinets With A Topcoat?
If you use a high-quality enamel paint, a separate topcoat is not necessary. Some decorative paints (like chalk paint) need a clear sealer for durability. Always check the paint label for recommendations.
If you notice paint looking dull or sticky after a few months, a water-based polyurethane can add protection.
Is It Safe To Repaint Cabinets Myself?
Yes, but take basic safety steps. Work in a well-ventilated area, wear gloves and goggles, and avoid breathing dust or fumes. If you use oil-based or shellac primers, open windows and use fans. For more on paint safety, see the EPA guide.
Wear a dust mask while sanding. Some old paints may contain lead—if your house is very old, test before sanding.
Giving your kitchen cabinets a new look is a smart way to refresh your whole home. With the right prep, good products, and some patience, your cabinets can look great—and stay that way for years. If you follow each step carefully, you’ll avoid the most common repainting problems and enjoy results that last.