
Removing a mosaic tile backsplash can feel like a big project, but with the right approach, it’s manageable for most homeowners. Maybe you want a new style, or your old tiles are chipped and stained. Either way, understanding every part of the process is the key to a successful result.
If you rush or skip steps, you might damage your walls, injure yourself, or add hours of extra work. This guide will take you through every step—from preparation to cleaning up the last bit of grout dust—so you can remove your mosaic tile backsplash confidently and safely.
Why Remove A Mosaic Tile Backsplash?
People decide to remove their mosaic tile backsplash for many reasons. Old tiles can become cracked or discolored, or you may simply want to update your kitchen’s look. Sometimes, water damage behind the tiles means you must remove them to fix the wall. Removing a backsplash is also necessary before installing a new one, as new tiles won’t stick well to old surfaces.
Mosaic tiles are especially tricky because they are often small and set with strong adhesive. Each small tile can break, fly off, or pull away drywall. That’s why knowing how to remove them properly saves time and protects your home.
Tools And Materials Needed
Gathering the right tools before you start makes the job smoother and faster. Here’s what you’ll need:
- Safety goggles – To protect your eyes from flying tile chips
- Dust mask – So you don’t breathe in tile dust or grout particles
- Work gloves – For hand protection from sharp edges
- Drop cloths or plastic sheeting – To cover countertops, appliances, and floors
- Painter’s tape – Secures your protective coverings in place
- Putty knife or scraper – To pry tiles from the wall
- Hammer or rubber mallet – For gentle tapping behind tiles
- Utility knife – Cuts caulk and grout lines cleanly
- Chisel – For stubborn or thick areas of adhesive
- Bucket and sponge – For cleaning as you go
- Pry bar – Helpful for large sections or thick backing
- Vacuum or broom – To clean up debris
Choosing the right tools reduces frustration and lowers the risk of damaging your wall.
Preparing The Workspace
Preparation is often the most overlooked part of removing a backsplash, but it makes a huge difference. Here’s how to get ready:
Clear The Area
Remove everything from your countertops—appliances, utensils, containers, and anything that might get dusty or damaged. If possible, move any nearby furniture out of the way.
Protect Surfaces
Lay down drop cloths or plastic sheeting over your counters, sink, and floor. Secure them with painter’s tape so they won’t move around. This keeps grout, tile chips, and dust from spreading.
Shut Off Power
If your backsplash has electrical outlets or switches, turn off the power at the circuit breaker. This prevents shocks if you accidentally hit a wire.
Remove Outlet Covers
Use a screwdriver to remove any outlet or switch covers on the backsplash. Place the covers and screws in a safe spot for reinstallation.
Score The Caulk
Run your utility knife along the edges where the backsplash meets the countertop, cabinets, or walls. This cuts the caulk and helps prevent tearing drywall or paint.
Assessing Your Backsplash Structure
Not all mosaic backsplashes are installed the same way. Before you start prying, check how your tiles are attached. Here’s what to look for:
- Direct-to-drywall installation: Tiles are glued right to the wall. This is most common.
- Mounted on cement board: Sometimes, a layer of cement board or a similar backing is used. This is tougher and heavier.
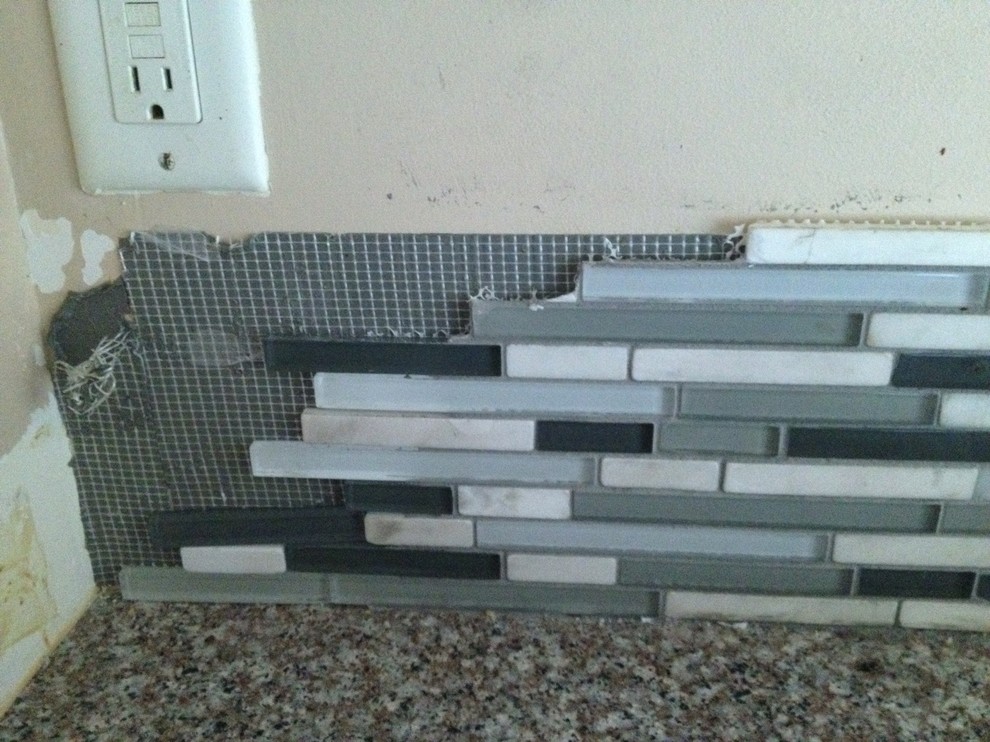
- Mesh-backed mosaics: Small tiles often come on a mesh sheet. The mesh is glued to the wall, so removal can be messy.
Tap on the tiles. If the sound is hollow, there may be a backer board. A solid thud usually means tiles are stuck directly to the wall.

Credit: www.youtube.com
Removing The Mosaic Tile Backsplash: Step-by-step
Now the real work begins. Each step below covers the safest and most effective way to remove mosaic tile backsplash.
1. Score The Grout Lines
Use your utility knife to cut along the grout lines around the edge of your backsplash. This helps separate the tiles from the wall and makes removal easier.
2. Start At An Edge Or Corner
Find a loose tile or a spot at the edge. Slip your putty knife or scraper under the tile at a shallow angle. Gently tap the handle with your hammer or mallet to loosen it. Take care not to gouge the wall.
3. Pry Off The Tiles
Once the first tile comes free, work your way along the edge. Slide the putty knife or chisel under each tile, gently prying and tapping. For stubborn tiles, wiggle the tool back and forth to break the adhesive bond. If the tiles are mesh-backed, you may be able to pull off several at once.
4. Remove Stubborn Tiles
Some tiles won’t come off easily. For these, use your chisel and hammer. Place the chisel’s tip under the tile and tap gently. Never use too much force—this can damage the drywall or cement board behind.
5. Take Off Mesh Or Backer Board (if Present)
If your tiles are installed on a mesh sheet or backer board, you might need to remove the whole layer. Use a pry bar to pull the board away from the studs, working carefully to avoid breaking the wall.
6. Scrape Off Old Adhesive
After the tiles are gone, you’ll see glue or thinset on the wall. Use your putty knife or a wide scraper to remove as much as possible. For stubborn spots, try a chisel. Work slowly to avoid gouging the wall.
7. Clean Up Grout And Residue
Some grout will stick to the wall after you remove the tiles. Wet a sponge and scrub gently. For thick grout, scrape with your knife. If you have a lot of residue, a solution of warm water and vinegar can help soften it.
8. Inspect For Damage
Look for holes, torn drywall paper, or gouges. These will need repair before you install a new backsplash or paint.
9. Remove Debris And Dust
Vacuum or sweep up all tile pieces, dust, and debris. Clean the area thoroughly so you have a fresh surface to work with.
Special Considerations For Different Wall Types
The surface behind your mosaic backsplash affects removal. Here’s what to watch for:
Drywall
Drywall is soft and easy to damage. Use gentle pressure and always keep your scraper flat against the wall. If the drywall paper tears, you’ll need to repair it before new tiles can be installed.
Cement Board
Cement board is tougher and less likely to tear, but it’s heavier. If the tiles were glued to cement board, you can use more force. However, large holes or crumbling areas will also need patching.
Plaster Walls
Older homes sometimes have plaster walls, which are harder and more brittle. Chips can break off easily. Use a gentle touch and consider using a putty knife instead of a chisel.
Handling Tough Adhesives And Thinset
Some installers use very strong adhesives or thick layers of thinset mortar. This can make removal slow and frustrating. Here are tips for these situations:
- Soften adhesive with warm water and a sponge. Let it sit for 10–15 minutes before scraping.
- If water doesn’t help, use a citrus-based adhesive remover (read product instructions carefully).
- For cement-based thinset, a multi-tool with a scraper blade speeds up the process.
- Avoid using heat guns or torches; these can damage the wall and release fumes.
What To Do If You Damage The Wall
It’s common to damage the wall a bit during removal, especially if you’re new to the process. Here’s how to fix common problems:
- Small holes: Patch with spackling compound, let dry, then sand smooth.
- Torn drywall paper: Use a sealer or primer on the exposed paper to prevent bubbling. After it dries, patch with joint compound.
- Large holes: Cut out the damaged section, attach a drywall patch, and smooth with joint compound.
Wait until repairs are fully dry before installing a new backsplash or painting.
Comparing Removal Methods
Different methods and tools can make the job easier or harder. Here’s a quick comparison to help you choose:
| Method | Speed | Wall Damage Risk | Best For |
|---|---|---|---|
| Putty Knife & Hammer | Moderate | Low (if careful) | Small mosaics, drywall |
| Chisel & Mallet | Fast | Medium | Thick adhesive, cement board |
| Oscillating Multi-Tool | Very Fast | High (if inexperienced) | Large areas, tough adhesives |
| Pry Bar | Slow | Low | Backer board removal |
Choosing the right method for your wall and tile type makes removal more efficient and reduces the risk of unnecessary repairs.
How Long Does It Take?
The time needed to remove a mosaic tile backsplash depends on several factors:
- Size of the area: A small kitchen may take 2–4 hours; a large wall can take all day.
- Tile size and adhesive: Tiny mosaics glued with strong adhesive take much longer than large tiles with weak glue.
- Wall condition: If the wall is old or uneven, removal is slower and more careful.
Here’s a typical time estimate:
| Backsplash Size | Estimated Time |
|---|---|
| 10 sq. ft. | 2–3 hours |
| 20 sq. ft. | 3–6 hours |
| 30+ sq. ft. | 6+ hours |
If you’re working alone and learning as you go, always plan for extra time.
Disposal Of Old Mosaic Tiles
Don’t overlook what to do with the old tiles and debris. Most home waste services allow small amounts of tile in regular trash, but check your local rules. Here’s what you can do:
- Collect sharp pieces in a sturdy box or bucket. Tape it closed before placing in the trash.
- For large projects, rent a small dumpster or take debris to a construction waste center.
- Some cities recycle clean ceramic or glass tiles—search local recycling options.
- Never dump adhesive or grout down the drain; it can clog pipes and harm the environment.
Proper disposal keeps your home safe and helps the environment.
Tips For Safe And Efficient Removal
Here are some practical tips and two insights that even many DIYers miss:
- Work slowly and in small sections. Rushing often leads to broken tiles and holes in the wall. Give yourself time to adjust your method as needed.
- Change your tool angle often. If the tile resists, change the angle of your scraper or chisel instead of increasing force. This reduces the risk of wall damage.
- Keep a vacuum handy and clean up as you go. Dust and debris can hide problem spots or sharp pieces.
- Check for hidden outlets and pipes. Sometimes, wires or plumbing may be behind the tiles, especially in older homes.
- Don’t reuse old adhesive. Even if it looks okay, it won’t hold new tiles securely.
A common mistake is trying to remove too many tiles at once or using too much force. Another is skipping wall repairs, which leads to problems with new tile installation.
What To Do After Tile Removal
Once the backsplash is off, you’re not quite finished. Here are the final steps:
Inspect And Repair The Wall
Look for damaged areas, holes, or leftover adhesive. Repair and smooth the surface with joint compound. Sand when dry for a flat finish.
Clean Thoroughly
Wipe down the entire area with a damp sponge to remove dust. Let the wall dry fully before painting or installing new tiles.
Prime And Paint (optional)
If you plan to paint instead of adding new tile, use a quality primer first. This seals the wall and gives a smooth base for paint.
Plan Your Next Steps
Whether you’ll install a new backsplash, paint, or leave the wall bare, make sure it’s clean, dry, and repaired.
Cost Factors For Diy Vs. Hiring A Professional
Removing a mosaic tile backsplash yourself can save money, but it’s not free. Here’s a comparison:
| Option | Cost Estimate | Pros | Cons |
|---|---|---|---|
| DIY | $30–$100 (tools & supplies) | Low cost, flexible timing, sense of accomplishment | Time-consuming, risk of wall damage |
| Professional | $200–$600 (labor only) | Fast, less mess, expert repairs | Higher cost, scheduling required |
If your wall is in poor condition or you have a large area, hiring a professional may be worth the extra cost.

Credit: www.reddit.com
When To Call A Professional
While many homeowners can remove a mosaic backsplash themselves, some situations call for expert help:
- Severe water damage behind the tiles
- Black mold or mildew present
- Electrical outlets or plumbing close to the surface
- Walls made of delicate plaster or historic materials
A professional can remove the backsplash safely and repair the wall to avoid future problems.
How To Protect Your New Backsplash
Once you’ve removed the old backsplash and repaired the wall, you may want to install new tiles. To keep your new backsplash looking great:
- Use a sealant on grout lines to prevent stains.
- Wipe spills quickly and avoid harsh cleaners.
- Install a backsplash with waterproof adhesive in kitchens and bathrooms.
Proper installation and care will keep your new backsplash looking fresh for years.
Frequently Asked Questions
What Is The Easiest Way To Remove Mosaic Tile Backsplash?
The easiest way is to start at an edge with a putty knife and gently pry tiles off. If the adhesive is soft, you may be able to remove several tiles at once. For tougher spots, use a chisel and hammer. Always work slowly and protect the wall behind.
Credit: www.houzz.com
Can I Remove Mosaic Tiles Without Damaging The Drywall?
Yes, if you use the right tools and go slowly. Keep your scraper flat against the wall and avoid using too much force. Small repairs are common, but large damage can be avoided with patience.
Should I Remove The Old Adhesive After Taking Off The Tiles?
Yes. Removing old adhesive gives you a flat, clean surface for new tiles or paint. Any leftover adhesive can cause new tiles to sit unevenly or fall off.
How Can I Tell If There’s Water Damage Behind My Backsplash?
Look for signs like soft drywall, mold, or a musty smell. If tiles fall off easily or the wall feels spongy, there may be water damage. In this case, remove tiles carefully and repair the wall before installing anything new.
Can I Install New Tiles Directly Over Old Mosaic Tiles?
It’s not recommended. New tiles won’t stick well to old surfaces, and the result may look uneven. Always remove the old backsplash and clean the wall first for the best result.
If you want to learn more about tile removal techniques and wall repairs, you can visit the Home Depot’s DIY project guide for additional tips and visuals.
Removing a mosaic tile backsplash is a project you can tackle with the right tools, preparation, and patience. When you follow each step carefully, you’ll avoid common mistakes and end up with a clean, fresh surface—ready for whatever style comes next in your kitchen or bathroom.