
Building a custom space for your refrigerator is a smart way to make your kitchen look modern, clean, and organized. Many homeowners want a built-in refrigerator cabinet because it gives a professional look and saves space. However, making one yourself can be a big project, especially if you are new to woodworking or home renovation. If you plan and follow the right steps, you can achieve a high-quality result without paying a contractor. In this guide, you will learn everything you need to know about making a built-in refrigerator cabinet, from planning to finishing.
Why Choose A Built-in Refrigerator Cabinet?
A standard refrigerator can look out of place in a kitchen full of cabinets. It often sticks out, collects dust on the sides, and can break the clean lines of your design. A built-in refrigerator cabinet solves these problems by creating a custom enclosure. This not only improves how your kitchen looks but also helps you organize the space.
Some benefits include:
- Seamless appearance: The refrigerator blends with other cabinets.
- Maximized space: Cabinets above and around the fridge offer extra storage.
- Easier cleaning: No gaps for dust and crumbs to collect.
- Higher home value: Custom cabinetry is attractive to buyers.
But not every kitchen is the same, and not every fridge will fit easily. That’s why planning is so important.
Planning Your Built-in Refrigerator Cabinet
A successful project starts with careful planning. There are many things to consider before you begin, such as size, layout, tools, and costs.
Measuring Your Refrigerator
The most important step is to measure your refrigerator accurately. Use a tape measure and write down the following:
- Width
- Depth
- Height
- Door swing clearance
Leave at least 1 inch (2. 5 cm) of space on each side and top of the fridge for air circulation. Not enough space can cause the fridge to overheat and use more energy.
Example Measurement
Suppose your fridge is:
- Width: 36 inches (91.4 cm)
- Depth: 30 inches (76.2 cm)
- Height: 70 inches (177.8 cm)
Add 1–2 inches on each side and top to find your cabinet’s interior dimensions.
Choosing The Right Location
The fridge should be near your main kitchen work area. Avoid placing it next to the oven or in direct sunlight, as this makes the fridge work harder. Make sure there is space for the doors to open fully.
Planning For Power And Water
If your refrigerator has an ice maker or water dispenser, you’ll need a water line. Check that your electrical outlet is in the right spot and not blocked by the new cabinet.
Deciding On Storage
Think about adding cabinets above the fridge or on the sides. These can hold less-used kitchen items or pantry goods.
Sketching Your Design
Draw your plan on paper or use free online tools. Include all the measurements and mark where the fridge, outlets, and water line go.
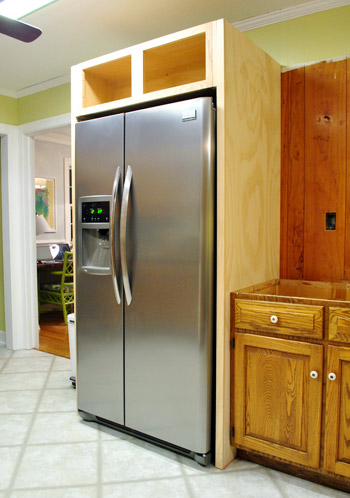
Credit: www.younghouselove.com
Tools And Materials You Will Need
Gathering the right tools and materials before you start makes the process smoother. Here’s what most DIYers will need:
Tools:
- Tape measure
- Level
- Stud finder
- Circular saw or table saw
- Drill and drill bits
- Screwdriver
- Hammer
- Clamps
- Pry bar (for removing old trim)
- Square
- Sander or sandpaper
Materials:
- Plywood or MDF sheets (3/4 inch thick is best for cabinets)
- 2×4 lumber (for framing)
- Wood screws
- Wood glue
- Cabinet paint or finish
- Cabinet handles or pulls
- Trim molding
You may also need shims, brackets, and primer depending on your kitchen.
Tools Comparison
Here is a simple comparison of saw types you may use:
| Saw Type | Best For | Pros | Cons |
|---|---|---|---|
| Circular Saw | Straight cuts | Portable, affordable | Harder to cut curves |
| Table Saw | Many straight cuts | Accurate, fast | Heavy, takes space |
If you don’t own some of these tools, you can rent them from most hardware stores.
Step-by-step Instructions For Building A Built-in Refrigerator Cabinet
This section will guide you through each stage, from removing old trim to installing the final cabinet doors.
1. Prepare The Area
Start by clearing the area around your fridge. Remove the refrigerator and unplug it. Take out any shelves or cabinets that are in the way. Use a stud finder to mark where the wall studs are—these will support your new cabinet.
Sweep and clean the floor to avoid dust while you work.
2. Frame The Refrigerator Opening
You need a strong frame to hold the new cabinet. Use 2×4 lumber to build the frame. The frame should match the size you planned, with extra space on each side for ventilation.
- Cut two vertical studs for each side.
- Attach top and bottom plates (horizontal pieces).
- Secure the frame to the wall studs using wood screws.
Check with a level to make sure everything is straight. An uneven frame will make the cabinet look crooked later.
3. Add Side And Top Panels
After the frame is secure, measure and cut your plywood or MDF panels. Attach these panels to the frame using wood glue and screws. The panels should cover the sides and the top of the refrigerator space.
Sand all edges smooth to avoid splinters.
4. Build And Install The Upper Cabinet
Many built-in refrigerator cabinets include a storage area above the fridge. Measure this space and build a simple box with plywood and wood screws.
- Attach the box to the top panel and the wall.
- Use shims if needed to make it level.
- Add a cabinet door, or leave it open for easy access.
5. Install Side Cabinets (optional)
If you want extra storage, you can add narrow cabinets on each side of the fridge. These are great for baking sheets or pantry items. Build boxes that fit the space, and attach them to the frame and wall.
Pro Tip: Make sure the doors of these cabinets can open fully without hitting the fridge.
6. Add Trim And Molding
Trim gives your built-in cabinet a finished look. Use wood molding to cover any gaps between the new cabinet and your wall or ceiling.
- Cut the trim to size with a miter saw for clean corners.
- Nail the trim in place, then fill any holes with wood putty.
7. Sand And Paint
Sand all surfaces with fine-grit sandpaper. Wipe away dust before you paint. Use a high-quality cabinet paint for a smooth finish. If you prefer, you can stain the wood instead.
Apply at least two coats, letting each coat dry fully.
8. Install Hardware
Once the paint is dry, attach handles or pulls to the cabinet doors. Use a template for even placement.
9. Move The Refrigerator Back
Plug in your fridge and carefully slide it into the new cabinet. Check that there is enough space for air circulation and that the doors open fully.
10. Final Check
Double-check your work:
- Are all screws tight?
- Are the cabinets level?
- Is there enough ventilation?
- Do all doors open and close smoothly?
Fix any small problems now before you start using the new cabinet.
Important Safety And Design Tips
Building a built-in refrigerator cabinet is not just about looks. Safety and function are just as important.
Leave Room For Ventilation
Fridges need air to work properly. Never build the cabinet too tight around the fridge. At least 1 inch on the sides and top is needed. Check your fridge’s manual for exact requirements.
Use Moisture-resistant Materials
Kitchens can be humid. Use plywood or MDF with a water-resistant coating. Avoid cheap particle board, which can swell if it gets wet.
Secure The Frame To Wall Studs
A heavy fridge and cabinet can cause damage if not supported correctly. Always attach your frame to the wall studs, not just drywall.
Plan For Future Repairs
Leave access to the water line, power outlet, and the back of the fridge. You may need to pull out the fridge for cleaning or repairs.
Cabinet Height Comparison
Here’s a quick look at how cabinet height affects storage:
| Cabinet Height Above Fridge | Best For | Storage Space | Ease of Access |
|---|---|---|---|
| 12 inches (30 cm) | Small kitchens | Limited | Easy |
| 18 inches (45 cm) | Standard kitchens | Good | Moderate |
| 24 inches (60 cm) | Large kitchens | Excellent | Harder |
Choose a cabinet height that matches your needs and how often you use the space above your fridge.
Common Mistakes And How To Avoid Them
Many first-time builders make the same errors. Here are some to watch out for:
- Not leaving enough ventilation space. This can shorten your fridge’s life.
- Incorrect measurements. Always measure twice before you cut.
- Poor support for the cabinet. Use wall studs for strength.
- Painting before final sanding. Paint shows every flaw, so sand well.
- Doors that hit the fridge. Check door swing before installing.
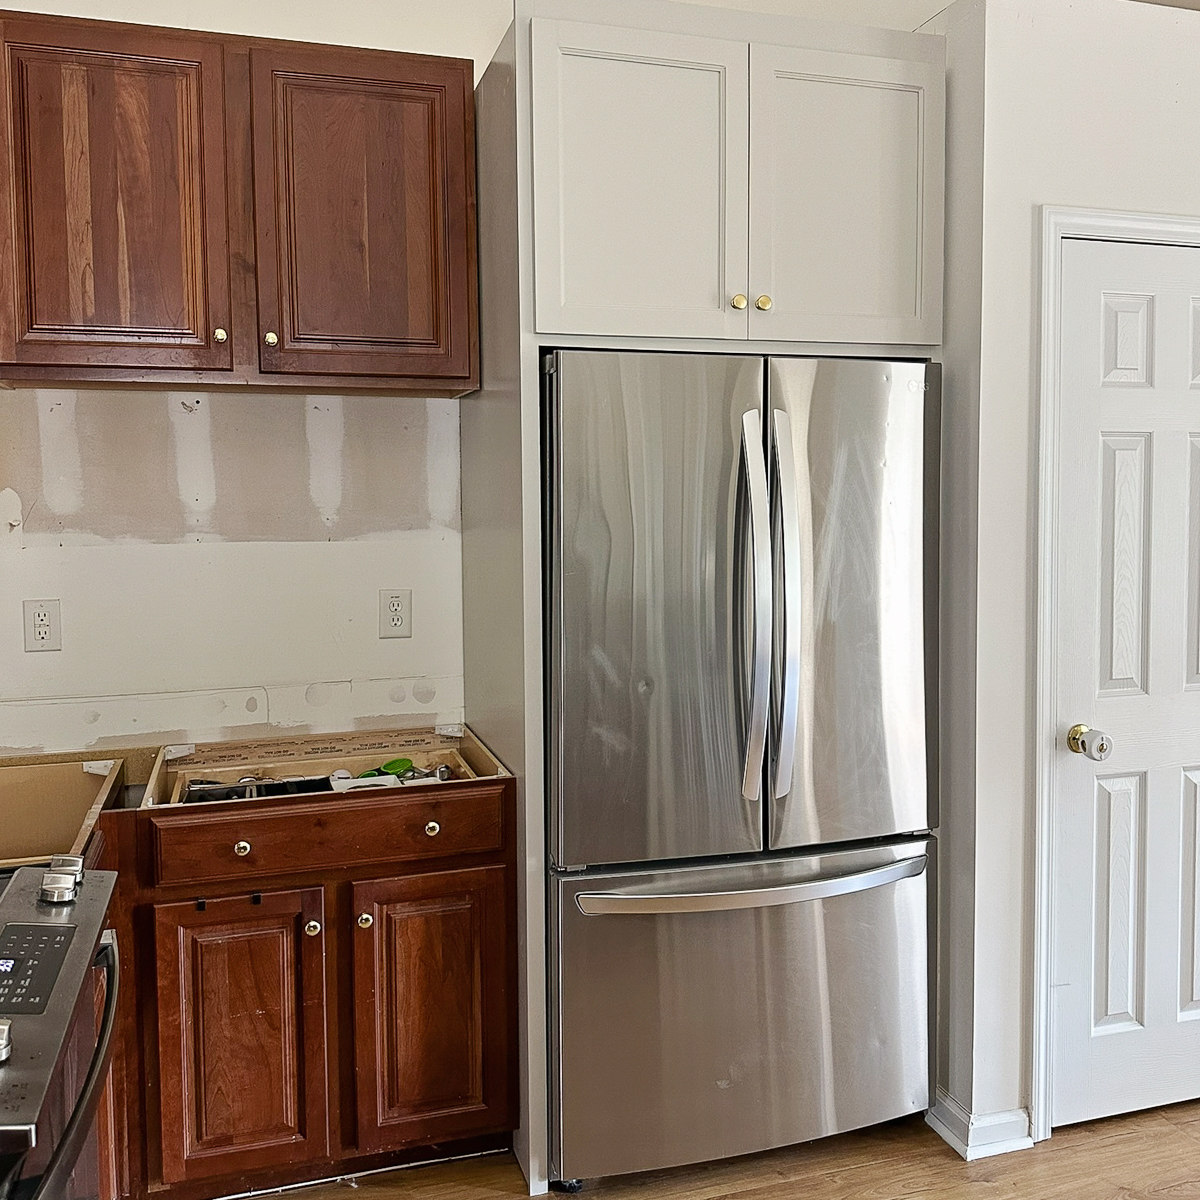
Credit: angelamariemade.com
Real-world Example: A Diyer’s Experience
Let’s look at how one homeowner, Anna, built her own refrigerator cabinet.
Anna had a side-by-side refrigerator that stuck out from her cabinets. She measured her fridge, added 1. 5 inches for airflow, and used 3/4-inch plywood for the panels. Anna built a frame with 2x4s, attached it to the wall studs, and covered it with panels.
She added a 15-inch cabinet above the fridge for baking pans and painted everything to match her kitchen.
Her biggest challenge was cutting the panels straight. She solved this by clamping a guide to her circular saw. The project took her two weekends, and now her kitchen looks much more professional.
Insight: Anna almost forgot to check if her fridge could slide out for repairs. She left a 2-inch gap at the top and was glad she did—her fridge needed service a month later.
Upgrading Your Built-in Cabinet
If you want to go further, there are ways to make your cabinet even more useful:
- Add built-in lighting: An LED strip above the fridge makes it easy to see.
- Use soft-close hinges: These prevent slamming doors.
- Install pull-out shelves: Great for the cabinets above the fridge.
- Paint with washable finishes: Easier to keep clean.
You can also match the cabinet doors to the rest of your kitchen for a unified look.
Cost Breakdown And Budgeting
How much does it cost to build a built-in refrigerator cabinet? Costs can vary, but here is a rough estimate:
- Plywood/MDF: $80–$200
- 2×4 lumber: $20–$50
- Paint and primer: $30–$60
- Hardware (handles, screws): $20–$50
- Trim and molding: $15–$40
Total: $165–$400, depending on the size and materials.
Hiring a professional could cost $1,000 or more, so doing it yourself saves a lot.
When To Call A Professional
Some jobs are best left to experts. If you need to move plumbing or electrical lines, or if your walls are not straight, call a licensed contractor. This is especially important if you live in an older house.
For custom cabinet doors, you can order them from a cabinet shop and install them yourself.
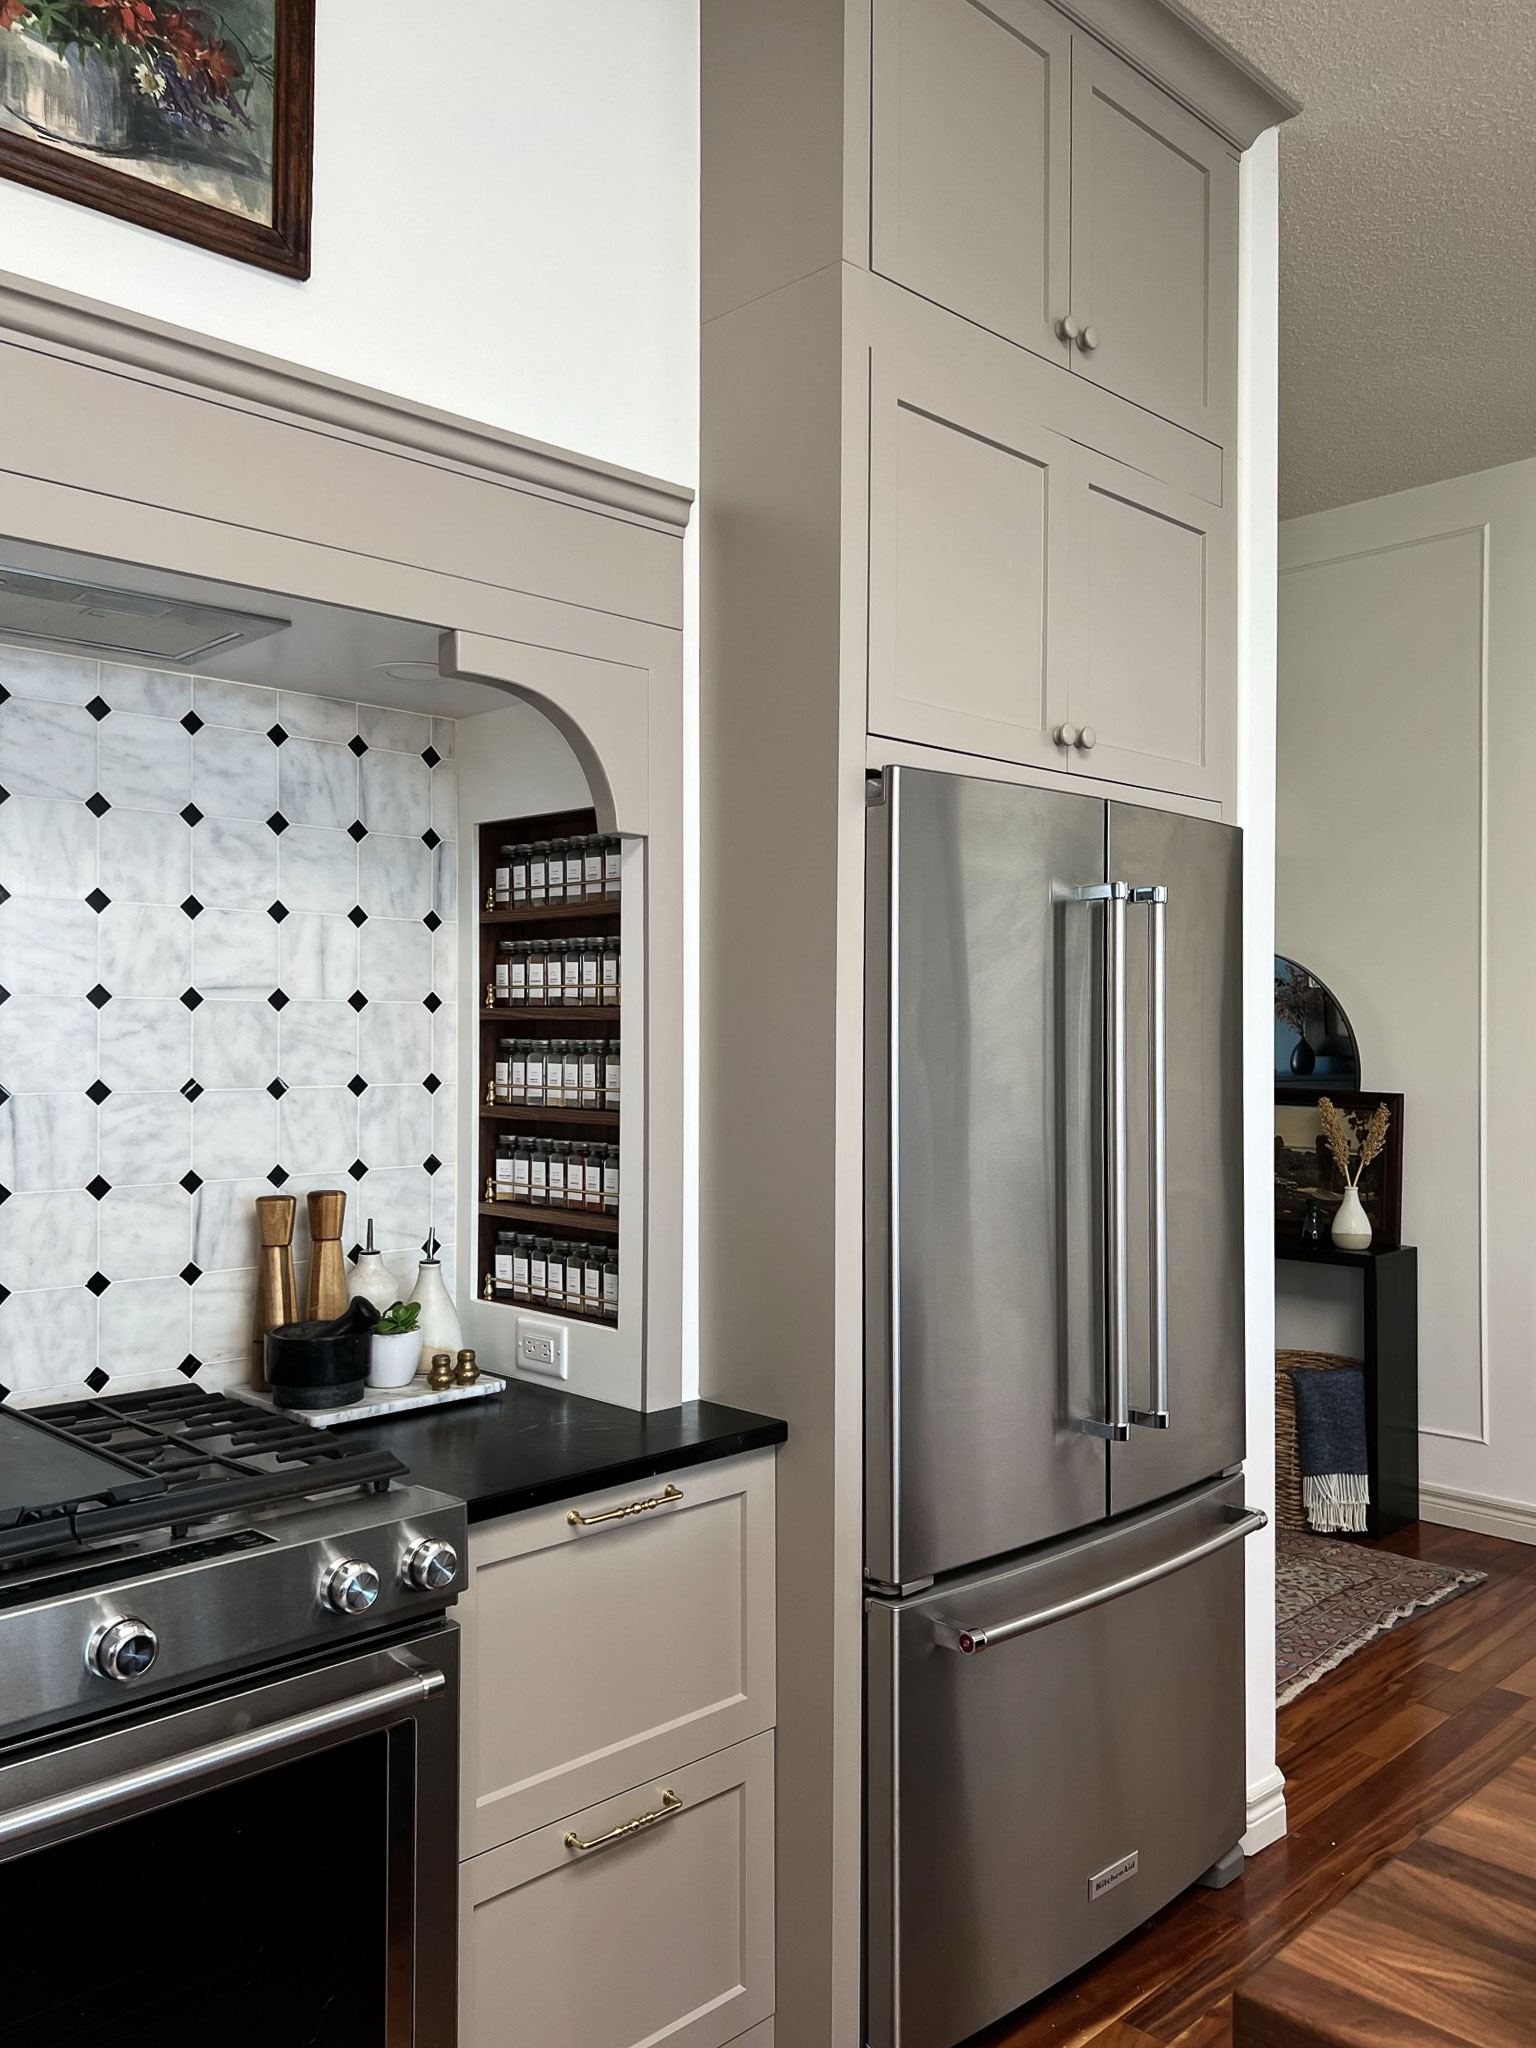
Credit: erinzubotdesign.com
Environmental Considerations
Using quality, long-lasting materials reduces waste. If possible, choose wood from sustainable sources. Paints with low VOCs (volatile organic compounds) are better for indoor air. Recycle any leftover wood or metal from the project.
Maintenance Tips For Your Built-in Refrigerator Cabinet
To keep your new cabinet looking good:
- Wipe surfaces regularly with a damp cloth.
- Check for moisture leaks around the water line.
- Clean dust from behind and on top of the fridge every 6 months.
- Tighten any loose screws in the cabinet or trim.
A well-built cabinet can last as long as your kitchen.
Non-obvious Insights For Beginners
Many people forget these two important details:
- Test-fit your fridge before final assembly. Slide the fridge in after the frame is up but before adding trim or painting. This lets you check for problems early.
- Plan for future fridge upgrades. If you might buy a bigger fridge later, leave extra space. Standard fridges are getting larger each year.
Inspiration: Different Styles For Built-in Refrigerator Cabinets
Your cabinet can be as simple or fancy as you want. Here are some ideas:
- Modern: Flat panels, hidden handles, matte paint.
- Traditional: Raised panels, crown molding, wood stain.
- Farmhouse: Open shelves above, beadboard panels, warm colors.
Pick a style that matches your kitchen.
Comparing Built-in Vs. Freestanding Refrigerators
It helps to know why built-in cabinets are popular. Here’s a quick comparison:
| Feature | Built-In Cabinet | Freestanding Fridge |
|---|---|---|
| Appearance | Seamless, custom look | Sticks out, less unified |
| Space Use | Maximized storage | Wasted side space |
| Cleaning | Easy, few gaps | Hard-to-reach sides |
| Cost | More upfront | Lower cost |
If you value a clean look and extra storage, a built-in cabinet is a great choice.
Frequently Asked Questions
How Much Space Should I Leave Around My Refrigerator For Ventilation?
Most experts recommend at least 1 inch (2. 5 cm) on all sides and the top. Check your refrigerator’s manual, as some models may require more. Proper airflow keeps the fridge running efficiently and prevents overheating.
Can I Build A Cabinet Around Any Refrigerator?
You can build a cabinet around most standard refrigerators, but it’s important to check the door swing, depth, and ventilation requirements. Some fridges, like French door or counter-depth models, are easier to fit into built-in spaces.
What Materials Are Best For A Built-in Refrigerator Cabinet?
Use 3/4-inch plywood or MDF for strength and durability. Avoid particle board, as it can swell if it gets wet. Choose paints or finishes made for kitchens, as they are more resistant to moisture and stains.
How Long Does It Take To Build A Built-in Refrigerator Cabinet?
For most DIYers, the project takes two to three days. This includes time for measuring, cutting, assembling, painting, and letting paint dry. If you add side cabinets or complex trim, it may take longer.
Where Can I Find More Information On Kitchen Cabinetry Standards?
A good resource for kitchen cabinet dimensions and standards is the Wikipedia Kitchen Cabinet page. It offers guidance on cabinet sizes, materials, and installation tips.
Building a built-in refrigerator cabinet is a rewarding project that can transform your kitchen. With careful planning and attention to detail, you can create a custom look and make the most of your space. Take your time, measure carefully, and enjoy your new kitchen upgrade!