
Raising a well pump is one of those jobs that can seem intimidating at first. The thought of pulling a heavy piece of equipment out of a deep, narrow hole in the ground stops many homeowners in their tracks. But if your water pressure drops, your pump cycles strangely, or you suspect a problem down below, you may need to lift the pump out for inspection or repair.
Learning how to raise a well pump safely is a practical skill, especially if you live in a rural area or rely on your own well for water.
This guide will walk you through the process step by step. You’ll learn about the tools you need, what to expect, common mistakes, and how to avoid accidents. Even if you’ve never worked with a well pump before, you’ll find clear explanations, simple language, and helpful tips.
By the end, you’ll have a complete understanding of how to tackle this job — or, when it might be smarter to call a professional.
Understanding Your Well Pump System
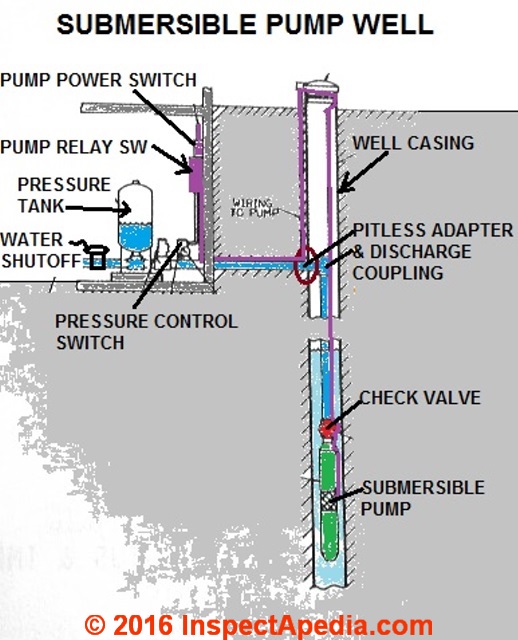
Before you even touch a tool, it’s important to know what kind of system you have. Most homes use either a submersible pump (installed deep in the well) or a jet pump (mounted above ground). If you need to “raise” the pump, you almost always have a submersible type.
Submersible pumps are located below the water line, sometimes 100 feet or more. They’re attached to a long section of pipe and electrical wiring. The pump pushes water up to your home, and everything is hidden from sight.
A jet pump, on the other hand, sits above ground and draws water up with suction. These are easier to access, but for most modern wells, you’ll be dealing with a submersible pump.
Why does this matter? The process for raising a jet pump is simple — you just disconnect and lift it. With a submersible pump, you must carefully pull the entire pipe, pump, and wiring out of the well.
Key parts you’ll see:
- Well cap or seal
- Drop pipe (brings water up)
- Electrical cable
- Safety rope or cable (sometimes)
- Pitless adapter (connects the well pipe to your home’s plumbing underground)
Understanding these parts helps you stay safe and avoid damage.
Reasons You May Need To Raise A Well Pump
There are several situations where raising the pump is necessary:
- Loss of Water: If your faucet suddenly runs dry, the pump may have failed.
- Low Water Pressure: A clogged intake or broken pump can reduce flow.
- Electrical Problems: Shorts or damaged wires may need repair.
- Strange Noises: Grinding or rattling sounds can mean mechanical trouble.
- Routine Maintenance: Sometimes pumps are raised for inspection, cleaning, or replacement.
Knowing why you need to raise the pump helps you plan and avoid unnecessary work.
Credit: inspectapedia.com
Safety Precautions Before You Start
Raising a well pump is not a job to rush. Water, electricity, and deep holes are a risky mix. Here are key safety steps:
- Turn Off Power: Always shut off the breaker to the well pump before touching anything.
- Wear Gloves: Pipes and wires can be dirty, rough, or sharp.
- Use Eye Protection: Dirt, rust, or debris may fall as you work.
- Have a Partner: Pumps can be heavy and awkward. Two people make the job safer.
- Check the Weather: Wet ground or rain increases slip risks.
- Know When to Stop: If something feels stuck or unsafe, don’t force it. Call a professional.
Pro insight: Many beginners forget to check for underground power lines or pipes before digging near the well. Always know what’s below.
Tools And Equipment You’ll Need
Having the right tools makes the job smoother and safer. Here’s what you’ll likely need:
- Pipe wrenches (at least two, large size)
- Channel-lock pliers
- Screwdrivers (flathead and Phillips)
- Rope or lifting device (strong enough for the pump’s weight)
- Socket set
- Electrical tape
- Work gloves
- Flashlight
- Well cap removal tool (sometimes just a wrench, but some caps need special tools)
- Tarp or clean surface (to lay out pipes and pump)
- Pipe clamps or vise grips (to hold pipe sections if needed)
- Ohm meter or multimeter (to check electrical continuity)
Advanced tip: Some wells have a pitless adapter. You may need a special puller tool for this. Check your well’s design before starting.
Step-by-step Guide To Raising A Well Pump
Now, let’s break down the process. Take your time with each step. If you’re unsure, stop and double-check.
1. Shut Off Power And Water Supply
Locate your electrical breaker panel and turn off the switch that powers the well pump. Test at the well to make sure there’s no power. This prevents electric shock.
Next, shut off the water supply to your house if possible. This stops any sudden surges or spills when you disconnect pipes.
2. Remove The Well Cap Or Seal
Most wellheads are covered by a metal or plastic cap. You’ll see bolts or screws holding it down. Use the right tool to remove these — don’t force or strip them.
Lift the cap carefully. You may see spiders, insects, or dirt. Wear gloves and brush away debris. Set the cap aside on a clean surface.
Extra tip: Take a picture of how everything looks before you start. It helps during reassembly.
3. Disconnect Electrical Wiring
Look for a junction box or wire connectors at the wellhead. Carefully disconnect the wires, noting which color goes where. Wrap the ends with electrical tape for safety.
If you see a control box, open it and disconnect the wires there. Keep wires clean and out of the dirt.
4. Release The Pitless Adapter (if Present)
Many modern wells use a pitless adapter. This device connects the pipe from your pump to the pipe that goes to your house, all below the frost line.
To release it:
- Use a pipe or T-handle tool to hook the adapter.
- Twist gently to unlock.
- Lift straight up until the drop pipe is free.
Not all wells have this. If yours does not, the pipe may come out as one piece.
5. Attach A Lifting Rope Or Tool
The drop pipe and pump can weigh 100 pounds (45 kg) or more, especially if it’s deep or full of water. Attach a strong rope, lifting tool, or pipe clamp to the pipe.
Never stand directly over the well opening while lifting. Always keep your hands clear of pinch points.
6. Start Lifting The Pump
With your helper ready, slowly and steadily pull up the pipe. The pipe may be in sections, typically 10–20 feet each.
As you lift:
- Lay each pipe section on a clean tarp.
- Check for leaks, rust, or damage.
- Make sure not to kink or damage the electrical wire.
If the pipe is stuck, rock it gently — do not force or twist hard.
7. Disconnect Pipe Sections As You Go
Most drop pipes use threaded connections. As each section comes up, use your wrenches to unscrew the pipe and remove it.
Be careful: water may spill from the pipe. Keep the area clear and organized.
Continue lifting and disconnecting until you reach the pump at the end.
8. Remove The Pump From The Well
The pump will be attached to the last section of pipe, with wires and possibly a safety rope.
Lift the pump straight up and out. Place it on the tarp. Inspect it for damage, debris, or broken parts.
Insider tip: The pump may be covered in black iron bacteria slime, sand, or silt. This is common, but wear gloves and wash hands after handling.
9. Inspect And Service As Needed
Now that the pump is out, you can check for problems. Look for:
- Cracks in the housing
- Burn marks or melted wires
- Clogged intake screens
- Broken or missing parts
Use your multimeter to check electrical continuity if you suspect a wiring problem.
If the pump is damaged, you may need to replace it. If it looks good, you can clean it and reinstall.
10. Reinstallation (if Needed)
To put the pump back:
- Attach the pump to the drop pipe.
- Lower it gently back into the well, reconnecting pipe sections as you go.
- Make sure wires do not twist or snag.
- Reseat the pitless adapter if you have one.
- Reconnect wiring, matching colors as before.
- Replace the well cap securely.
- Turn on power and test the system.
Take your time — dropping a pump into the well can mean hours of extra work.
Real-world Example: Lifting A 100-foot Deep Pump
Imagine a well that’s 100 feet (30 meters) deep, with a four-inch casing. The homeowner notices low water pressure and suspects a failing pump.
With a helper, they:
- Shut off power and remove the cap.
- Disconnect wires and unhook the pitless adapter.
- Attach a heavy-duty rope.
- Pull up the first 20-foot pipe section, inspect, and lay it down.
- Repeat for four more sections.
- Remove the pump, covered in silt.
- Clean the screen, test the wires, and reinstall.
- The process takes about 3 hours.
Unexpected insight: Sometimes, the problem is not the pump, but a broken wire or stuck check valve. Always check these before buying a new pump.

Credit: lakelandwaterpumpco.com
Common Mistakes To Avoid
Even experienced DIYers can run into trouble. Here are frequent mistakes:
- Forgetting to Turn Off Power: This can cause serious shock or burns.
- Dropping Tools or Parts into the Well: Use a tool tether or wrist strap.
- Forcing Stuck Pipes: This can break the pipe or pitless adapter.
- Damaging Electrical Wires: Kinks or cuts can mean rewiring the entire well.
- Not Labeling Wires or Parts: Take photos or notes to remember how everything fits.
- Trying to Lift Alone: Pumps are heavy and awkward. Always have help.
Pro tip: Lay out all tools and parts before you start. Organization saves time and reduces stress.
How To Know When To Call A Professional
Not all well pump jobs are DIY-friendly. Here’s when to call for help:
- The pump is extremely deep (over 150 feet).
- The drop pipe is stuck and will not move.
- You see electrical arcing or melted wires.
- The well opening is smaller than the pump size.
- You are not comfortable with electrical or plumbing work.
A licensed well contractor has special tools and experience. They can often solve problems in less time and with less risk.

Credit: islandwellservice.ca
Comparing Well Pump Types: Submersible Vs Jet Pump
Understanding your system type helps you know what to expect. Here’s a comparison:
| Feature | Submersible Pump | Jet Pump |
|---|---|---|
| Location | Inside the well, below water | Above ground, outside the well |
| Depth range | Up to 400 feet | Up to 25-50 feet |
| Noise | Very quiet | Louder, vibrates |
| Ease of service | Harder (must raise pump) | Easier (above ground) |
| Common in | Modern deep wells | Older or shallow wells |
Non-obvious tip: Some old jet pumps can be converted to submersible types for better pressure and reliability.
Essential Data: Weight And Depth
Before starting, it’s smart to estimate how heavy your system will be. Here’s a quick data table for a typical 1 HP submersible pump system:
| Well Depth | Pipe Material | Approx. Total Weight |
|---|---|---|
| 50 feet | PVC | 40–60 lbs (18–27 kg) |
| 100 feet | PVC | 80–100 lbs (36–45 kg) |
| 100 feet | Galvanized steel | 120–180 lbs (54–82 kg) |
| 200 feet | PVC | 140–180 lbs (64–82 kg) |
Remember, old pipes may have extra weight from rust or buildup.
Troubleshooting Problems After Raising The Pump
Sometimes, raising and reinstalling the pump does not fix your issue. Here’s how to troubleshoot:
- No water: Check for power at the pump, prime the system, and make sure the foot valve is not stuck.
- Low pressure: Inspect for leaks in the pipe, clogged screens, or damaged impellers.
- Short cycling: This can mean a bad pressure switch or tank, not a pump problem.
- Air in water: Look for leaks above the water line or damaged pipes.
If you’re stuck, consult your well’s manual or call a pro.
Maintenance Tips To Prevent Future Problems
A little maintenance goes a long way:
- Test your water pressure every few months.
- Listen for strange noises from the well area.
- Check your electrical system annually for corrosion or damage.
- Keep the well cap sealed to prevent bugs and debris.
- Flush the system if you see sediment or rust in your water.
Hidden insight: Many well failures start with a loose cap or small leak. Regular checks can save you from big repairs.
Environmental And Legal Considerations
In some areas, there are rules about working on wells:
- You may need a permit to open the well.
- Local codes may require a licensed contractor for deep wells.
- Be careful not to contaminate the well with dirt, tools, or chemicals.
- Always dispose of old pumps or pipes properly.
For more information, check your local health or water authority, or visit official sources like the EPA Private Wells page.
When Raising A Pump Is Not The Solution
Not all water problems mean you must raise the pump. Consider these situations:
- Well runs dry: The water table may have dropped. Lowering the pump or drilling deeper may help.
- Pressure tank failure: This can cause pressure loss, but the pump is fine.
- Broken pipes above ground: Always check visible plumbing before tackling the well.
Unexpected insight: Sometimes, a power surge or lightning strike can damage the control box, not the pump. Test all components before pulling the pump.
The Value Of Professional Service
If you decide the job is too big, don’t hesitate to call an expert. Professionals have:
- Hoists and trucks for heavy lifting
- Video cameras for deep well inspection
- Experience with stubborn or old parts
They can often diagnose problems without pulling the pump, saving you time and money.
Frequently Asked Questions
How Deep Can A Submersible Well Pump Be Installed?
Most submersible pumps are installed between 50 and 400 feet deep. The exact depth depends on your well’s water level and system design. Deeper wells require stronger pumps and more pipe.
What Is A Pitless Adapter, And Why Does It Matter?
A pitless adapter is a fitting that lets water pipes exit the well below the frost line, preventing freezing. It allows you to disconnect and lift the pump without digging up pipes. Not all wells have one, but it makes maintenance much easier.
Can I Raise The Well Pump By Myself?
Raising a pump is possible alone for shallow wells (less than 50 feet and light pipe), but it’s much safer and easier with help. For deep or heavy systems, always have a partner or call a professional.
What If I Drop My Pump Or Tools Down The Well?
If something falls into the well, do not reach in or climb down. Use a strong magnet or retrieval tool if possible. For dropped pumps or major objects, call a well contractor who has the right equipment.
How Often Should A Well Pump Be Inspected Or Raised?
You don’t need to raise your pump unless you have a problem. Routine checks can be done above ground. Most pumps last 10–15 years, but annual water pressure and electrical checks help catch issues early.
Raising a well pump is a demanding task, but with the right knowledge and preparation, it’s possible for determined homeowners. Stay safe, take your time, and know your limits. When in doubt, a professional is just a call away. Proper care of your well ensures clean water for years to come.