
Sealing around a septic outlet pipe may not sound exciting, but it’s one of the most important jobs you can do to protect your home and environment. If you get it right, you prevent leaks, keep groundwater clean, and avoid expensive repairs.
If you get it wrong, you could face foul smells, water damage, and even health risks. Many homeowners and even some contractors overlook small details, but these can lead to big problems later. This guide explains everything you need to know about how to seal around a septic outlet pipe—step by step, with practical advice, examples, and solutions to common mistakes.
Why Proper Sealing Matters
Some people think a little gap is harmless. But a poorly sealed septic outlet pipe can cause many issues:
- Leaks: Wastewater can escape, polluting the soil and groundwater.
- Root Intrusion: Tree roots can find small gaps, eventually cracking pipes.
- Odors: Gaps let gases escape, causing unpleasant smells near your home.
- Soil Erosion: Water leaking out can wash away soil, damaging your yard and the tank structure.
- Legal Issues: Many local codes require proper sealing. Failing an inspection could mean fines or forced repairs.
A well-sealed pipe keeps your septic system running for years with fewer headaches.
How Septic Outlet Pipes Work
The septic outlet pipe is the line that carries treated liquid (effluent) from the septic tank to the drainfield. It usually passes through a concrete or plastic wall, where a watertight seal is critical. If you’re not familiar with the system, imagine a bathtub with a plug—if the plug doesn’t seal tightly, water leaks out.
There are two main points where sealing is needed:
- Tank Wall Penetration: Where the pipe exits the tank.
- Pipe Joints: Where sections of pipe connect, especially near the tank.
Both points are vulnerable to leaks if not sealed properly.
Tools And Materials You’ll Need
Before starting, gather everything. Using the wrong material is a common mistake and can ruin the job.
- Rubber pipe boots (gaskets) or flexible couplings (for new tanks/pipes)
- Hydraulic cement or non-shrink grout (for concrete tanks)
- Polyurethane sealant (for plastic tanks)
- PVC primer and cement (for PVC pipe joints)
- Gloves and safety glasses
- Wire brush and cleaning rags
- Caulking gun (for sealant)
- Utility knife
- Measuring tape
Sometimes, you’ll need expanding foam (for large gaps in non-pressurized areas) and pipe insulation if the pipe is exposed.
Comparison Of Sealing Materials
Here’s how the most common sealing materials stack up for use around a septic outlet pipe:
| Material | Best For | Waterproof | Flexibility | Longevity |
|---|---|---|---|---|
| Hydraulic Cement | Concrete tanks | Excellent | Low | 20+ years |
| Polyurethane Sealant | Plastic tanks | Excellent | High | 10–20 years |
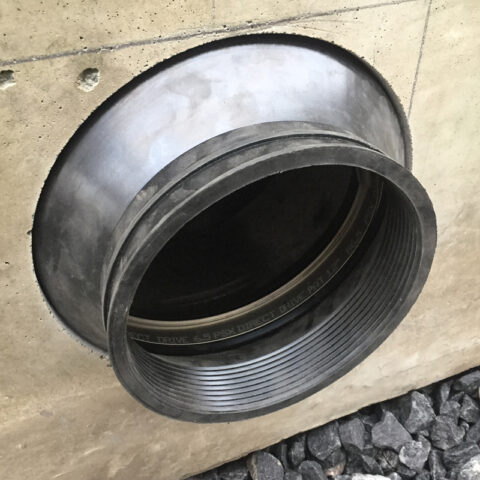
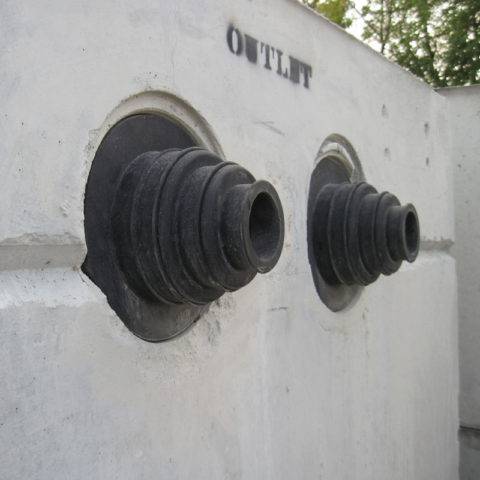
| Rubber Pipe Boot | Any tank type | Good | High | 15–25 years |
| Expanding Foam | Temporary fixes | Fair | Medium | 2–5 years |
Non-obvious insight: Hydraulic cement is very strong but may crack if the tank or pipe shifts, especially in areas with freeze-thaw cycles. Polyurethane stays flexible but is less tough against physical impact.
Step-by-step: How To Seal Around Septic Outlet Pipe
1. Inspect The Pipe And Tank
Before doing any work, check:
- Is the pipe PVC, ABS, or cast iron?
- Is the tank concrete, fiberglass, or plastic?
- Are there visible cracks or signs of leaks (wet spots, roots, stains)?
Tip: Use a flashlight and mirror to look for hidden gaps.
2. Clean The Area
Dirt, grease, or roots will ruin your seal. Clean both the pipe and the area around the opening. Use a wire brush for concrete, and a rag for plastic. Remove old sealant if present.
Common mistake: Sealing over old, loose material. Always remove it first.
3. Select The Right Sealant
- For concrete tanks, use hydraulic cement or non-shrink grout for large gaps, and polyurethane sealant for small cracks.
- For plastic tanks, use polyurethane sealant or a rubber boot.
- For new installations, use a rubber pipe boot for best flexibility.
If you’re unsure, check the manufacturer’s recommendations for your tank and pipe type.
4. Apply The Seal
For Hydraulic Cement (concrete Tanks):
- Mix the cement according to the package.
- Press it into the gap between pipe and tank wall, filling completely.
- Smooth with a putty knife.
- Allow to cure (usually 15–60 minutes).
For Polyurethane Sealant (plastic Tanks):
- Cut the nozzle at a 45-degree angle.
- Apply a continuous bead around the pipe where it meets the tank.
- Press in with a gloved finger.
- Allow to cure (see label, usually 24 hours).
For Rubber Pipe Boots:
- Slip the boot over the pipe.
- Center the boot in the hole.
- Tighten the clamps or bolts (as per instructions).
- Check for a snug, even fit.
For Expanding Foam (temporary Fix):
- Shake the can well.
- Insert the straw deep into the gap.
- Fill the gap about 70% (foam expands).
- Trim excess after it cures.
Pro tip: For large, irregular gaps, use backer rod (foam rope) before applying sealant. This saves sealant and improves flexibility.
5. Check For Leaks
After curing, pour a few gallons of water down the pipe or tank outlet. Check outside for any signs of moisture or seepage.
Non-obvious insight: Wait at least 24–48 hours after sealing before heavy system use. Early use can break weak seals.
6. Backfill Carefully
Once the seal is dry, backfill the trench with soil. Use the original soil if possible, and tamp gently. Avoid large rocks, which can crack the pipe or seal.
Common mistake: Backfilling with gravel or sharp debris, which can puncture plastic tanks or boots.
Special Cases And Troubleshooting
Sealing In Wet Conditions
If water is leaking out while you work, use hydraulic cement—it sets quickly and can even cure underwater. Polyurethane sealants won’t bond well to wet surfaces.
Dealing With Large Gaps Or Irregular Holes
For gaps over 1 inch, first stuff backer rod or foam rope into the space, then seal over with cement or polyurethane. For very large holes, you may need to patch the tank wall with new mortar before sealing.
Root Intrusion
If you find roots, cut them out completely. Consider using a root barrier around the tank. Sealing over roots will only cause leaks later.
Pipe Movement
If your outlet pipe moves or shifts (common in areas with soft soil or frost), use a flexible boot or coupling. Rigid seals like cement can crack if the pipe moves.
Cracked Tanks Or Pipes
If you find a crack longer than 4 inches, call a professional. Small hairline cracks can be sealed, but larger ones may mean the tank or pipe needs repair or replacement.
Safety Precautions
Working around a septic tank can be dangerous. Here’s what to remember:
- Always wear gloves and eye protection.
- Never enter a septic tank—dangerous gases can be fatal.
- Work in pairs if possible. If you drop something or feel dizzy, get help immediately.
- Keep children and pets away from the work area.
- If you smell strong gas, stop and call a professional.
Diy Vs Professional Help
Many homeowners can seal small gaps themselves. However, call a professional if:
- The tank is leaking heavily.
- There are large cracks or structural damage.
- The job requires entering the tank.
- You are unsure about the materials or process.
A professional will have special tools (like pipe lasers and inspection cameras) to check for hidden problems.
Understanding Local Codes And Permits
Many areas have strict rules for septic work. Some require permits even for minor repairs. Always check with your local health department or building authority before starting. Not following code can lead to fines or forced removal.
Fact: In the United States, septic system codes can vary by county. For example, some places require only NSF-approved sealants.
Credit: www.press-seal.com
Signs Your Seal Is Failing
Watch for these warning signs:
- Wet spots or standing water near the tank
- Lush grass growing above the outlet pipe (extra nutrients from leaks)
- Sewage odor around the tank
- Water in the tank stays high even after use
- Roots or soil inside the tank
If you see any of these, inspect the seal and repair as needed.
How To Maintain The Seal
A good seal can last 10–25 years, but only with proper care:
- Check the outlet area every year for signs of leaks.
- Avoid planting trees or shrubs near the tank or pipes.
- Don’t drive heavy vehicles over the tank or pipes.
- If you see cracks in the soil or tank, repair them quickly.
Maintenance tip: Take photos after sealing so you can compare in future inspections.
Cost Considerations
Sealing around a septic outlet pipe is usually inexpensive. Here’s a rough comparison:
| Material/Method | DIY Cost (USD) | Pro Cost (USD) | Expected Lifespan |
|---|---|---|---|
| Hydraulic Cement | $15–$30 | $150–$300 | 20+ years |
| Polyurethane Sealant | $20–$40 | $175–$350 | 10–20 years |
| Rubber Boot | $25–$60 | $200–$400 | 15–25 years |
| Full Pipe Replacement | $100–$300 | $500–$2000 | 25+ years |
Non-obvious insight: Labor is the biggest cost if you call a professional. Doing it yourself saves money, but only if you follow the right steps.
How To Choose The Right Seal For Your Situation
Ask yourself these questions:
- Is your tank concrete or plastic?
- How big is the gap you need to seal?
- Is the area wet or dry?
- Does the pipe move or is it fixed solidly?
If you have a concrete tank and a small, dry gap, hydraulic cement is usually best. For plastic tanks or flexible pipes, use a rubber boot or polyurethane sealant. If the pipe moves, always choose a flexible seal.
Credit: www.press-seal.com
Example: Sealing An Old Concrete Tank
Imagine you discover a leak around the outlet pipe of an old concrete septic tank. Here’s what to do:
- Dig out the soil around the pipe and clean the area.
- Remove old, loose mortar.
- Mix hydraulic cement and press it firmly into the gap.
- Smooth the surface and allow to cure.
- Once dry, backfill with soil, tamping gently.
Tip: If you notice the pipe is loose or moves, switch to a rubber boot instead.
Example: Sealing A Modern Plastic Tank
Suppose your plastic tank’s outlet pipe is leaking. Here’s your solution:
- Clean the pipe and tank thoroughly.
- Dry the area completely.
- Apply a thick bead of polyurethane sealant around the joint.
- Press in with a gloved finger for a smooth finish.
- Let cure before backfilling.
If the hole is too large, fit a rubber pipe boot for a more reliable seal.

Credit: www.youtube.com
Comparing Sealing Methods
Let’s compare the three main options for most homeowners:
| Method | Best For | DIY Friendly | Repair Time | Durability |
|---|---|---|---|---|
| Hydraulic Cement | Concrete tanks, small gaps | Yes | 1–2 hours | Excellent |
| Polyurethane Sealant | Plastic tanks, flexible pipes | Yes | 1–2 hours + cure | Good |
| Rubber Boot | Moving pipes, large gaps | Moderate | 2–3 hours | Excellent |
Real-world example: A homeowner in Minnesota used hydraulic cement for a concrete tank in spring. By winter, frost caused the tank to shift and the seal cracked. After switching to a rubber boot, the problem was solved for good.
When To Inspect And Reseal
Inspect your septic outlet pipe seal at these times:
- When you pump out the tank (usually every 3–5 years)
- If you notice wet spots or smells
- After any earthquake or major ground movement
- If you do landscaping near the tank
Don’t wait for a leak to start—proactive checks can prevent costly repairs.
Environmental Impact
A leaking septic outlet doesn’t just hurt your wallet—it can pollute local water supplies. In the US, failing septic systems are a leading cause of groundwater contamination, affecting 168,000 miles of rivers and streams each year (EPA data). Proper sealing protects the environment and your community.
If you want to learn more about septic system safety and regulations, the United States Environmental Protection Agency is an excellent resource.
Frequently Asked Questions
How Often Should I Check The Seal Around My Septic Outlet Pipe?
It’s best to check the seal at least once a year, and always after heavy rain, earthquakes, or landscaping work near the tank. Regular checks can prevent small leaks from becoming big problems.
Can I Use Regular Silicone Caulk To Seal Around A Septic Outlet Pipe?
No, regular silicone caulk is not recommended. It doesn’t bond well to wet or dirty surfaces and can break down in harsh septic conditions. Use hydraulic cement, polyurethane sealant, or a rubber pipe boot for best results.
What If The Gap Around My Outlet Pipe Is Very Large?
For large gaps, use backer rod (foam rope) to fill most of the space, then seal over with hydraulic cement or polyurethane. For very large or irregular holes, you may need to patch the tank wall before sealing.
Is It Safe To Seal A Septic Pipe While The System Is In Use?
It’s better to do the work when the system is not in heavy use. Avoid flushing toilets or running lots of water for 24–48 hours after sealing to allow the material to set fully.
Do I Need A Permit To Seal My Septic Outlet Pipe?
Local rules vary. In some areas, any septic repair requires a permit. Always check with your local health department or building authority before starting any work.
Sealing around a septic outlet pipe is a job that pays off for years. With the right materials, careful work, and regular checks, you’ll enjoy a safer, cleaner home and protect your property value. Take your time, follow the steps, and don’t hesitate to call a professional if you’re unsure.
Proper sealing is your first line of defense against costly septic system failures.