Caulking is a small but important skill in home improvement. It keeps water out, fills gaps, and makes surfaces look clean. But many people struggle to get a smooth, even finish. Some try fancy tools, but for many, the best tool is already on your hand—your finger.
Knowing how to smooth caulk with your finger can save you time and frustration. It also gives you more control over the final look. This simple method works in kitchens, bathrooms, and even outdoors.
But there’s more to it than just dragging your finger across a bead of caulk. The right technique makes the difference between a professional look and a messy job. This guide will walk you through every step, from preparing the area to cleaning up afterward.
You’ll learn what materials to use, how to avoid common mistakes, and practical tips that even experienced DIYers might not know. Whether you’re caulking your bathtub, window, or baseboard, these steps will help you get a smooth, long-lasting seal.
Why Finger Smoothing Works So Well
Many people wonder why using your finger is often better than using a caulking tool. The answer is control and flexibility. Your finger can adjust pressure as you move along the bead, helping you reach corners and curves that tools might miss.
Your body heat also softens the caulk slightly, making it easier to spread and smooth.
Some professionals still use their finger, especially for tricky spots. Also, finger smoothing lets you feel the bead and catch mistakes right away. For most home projects, this method is not only simple but also effective.
When Should You Use Your Finger To Smooth Caulk?
Not every caulking job is the same. Knowing when finger smoothing is the best choice is key:
- Short runs or small gaps: Perfect for windows, bathtubs, and trim.
- Odd shapes or corners: Your finger fits where tools can’t.
- Latex or acrylic caulk: These types clean off skin easily.
- When you want more control: For visible areas where neatness matters.
However, avoid finger smoothing for high-temperature or strong chemical caulks. Always check the label. If you have sensitive skin or allergies, wear a glove.
Credit: www.homedepot.com
Tools And Materials You’ll Need
Having the right materials ready makes the job easier and less stressful. Here’s a list of what you’ll need for a smooth caulk bead using your finger:
- Caulk (latex, acrylic, or silicone)
- Caulk gun (if using tubes)
- Painter’s tape
- Sharp utility knife or scissors
- A bowl of water
- Mild dish soap
- Paper towels or rags
- Latex or nitrile glove (optional)
- Spray bottle (for soapy water)
Some people skip the tape, but it’s one of the secrets to a professional look. The soapy water helps prevent the caulk from sticking to your skin, giving a cleaner finish.
Preparing The Surface
Proper preparation is often missed, but it’s critical for lasting results. Here’s what you should do:
- Clean the area: Remove old caulk, dirt, and dust. Use a caulk remover tool or a razor scraper for old caulk. Wipe with rubbing alcohol if needed.
- Dry the surface: Caulk sticks best to dry surfaces. Moisture can cause mold or poor adhesion.
- Apply painter’s tape: Place tape on both sides of the gap, as close to the joint as possible. This creates sharp edges and protects surrounding surfaces.
- Cut the caulk tube tip: Cut at a 45-degree angle, matching the width of the gap (usually 1/8″ to 1/4″). Start small—you can always cut more if needed.
A well-prepared surface is essential for a clean bead and a strong seal.
Choosing The Right Caulk
Not all caulks are the same. The main types are:
- Latex caulk: Easy to clean, paintable, best for dry indoor areas.
- Acrylic caulk: Similar to latex, but often a bit more flexible.
- Silicone caulk: Waterproof and flexible, great for bathrooms and kitchens, but hard to paint.
Here’s a quick comparison to help you choose:
| Type | Best For | Paintable | Cleanup |
|---|---|---|---|
| Latex | Trim, baseboards, dry areas | Yes | Soap & water |
| Acrylic | Windows, doors, general use | Yes | Soap & water |
| Silicone | Showers, tubs, sinks | No | Mineral spirits |
If you want a paintable finish, choose latex or acrylic. For water-prone areas, silicone is better. Some caulks are hybrid—read the label for details.
How To Apply Caulk Properly
Before you smooth with your finger, you need to lay down the caulk. Here’s how to do it right:
- Load the caulk tube into the gun. Press the release lever and pull back the plunger.
- Cut the nozzle at a 45-degree angle. Make the hole a bit smaller than the gap.
- Puncture the seal inside the nozzle (many tubes have a foil seal).
- Test the flow on a piece of scrap material.
- Apply steady pressure and move the gun smoothly along the gap.
- Release the trigger before lifting the gun to avoid extra caulk blobs.
For best results, keep the angle and speed consistent. Try to lay a continuous bead without stopping.
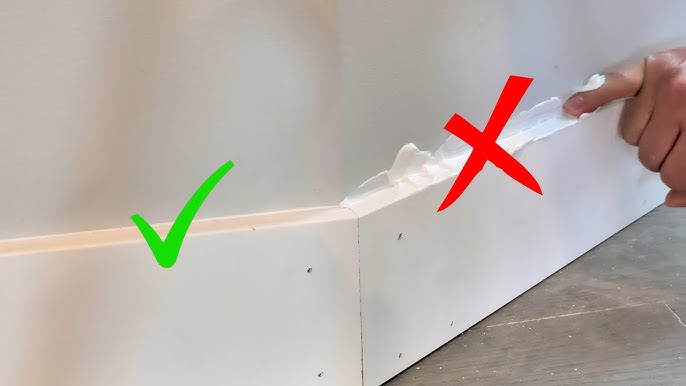
The Art Of Smoothing Caulk With Your Finger
Now comes the important part—smoothing the caulk. Follow these steps for a clean finish:
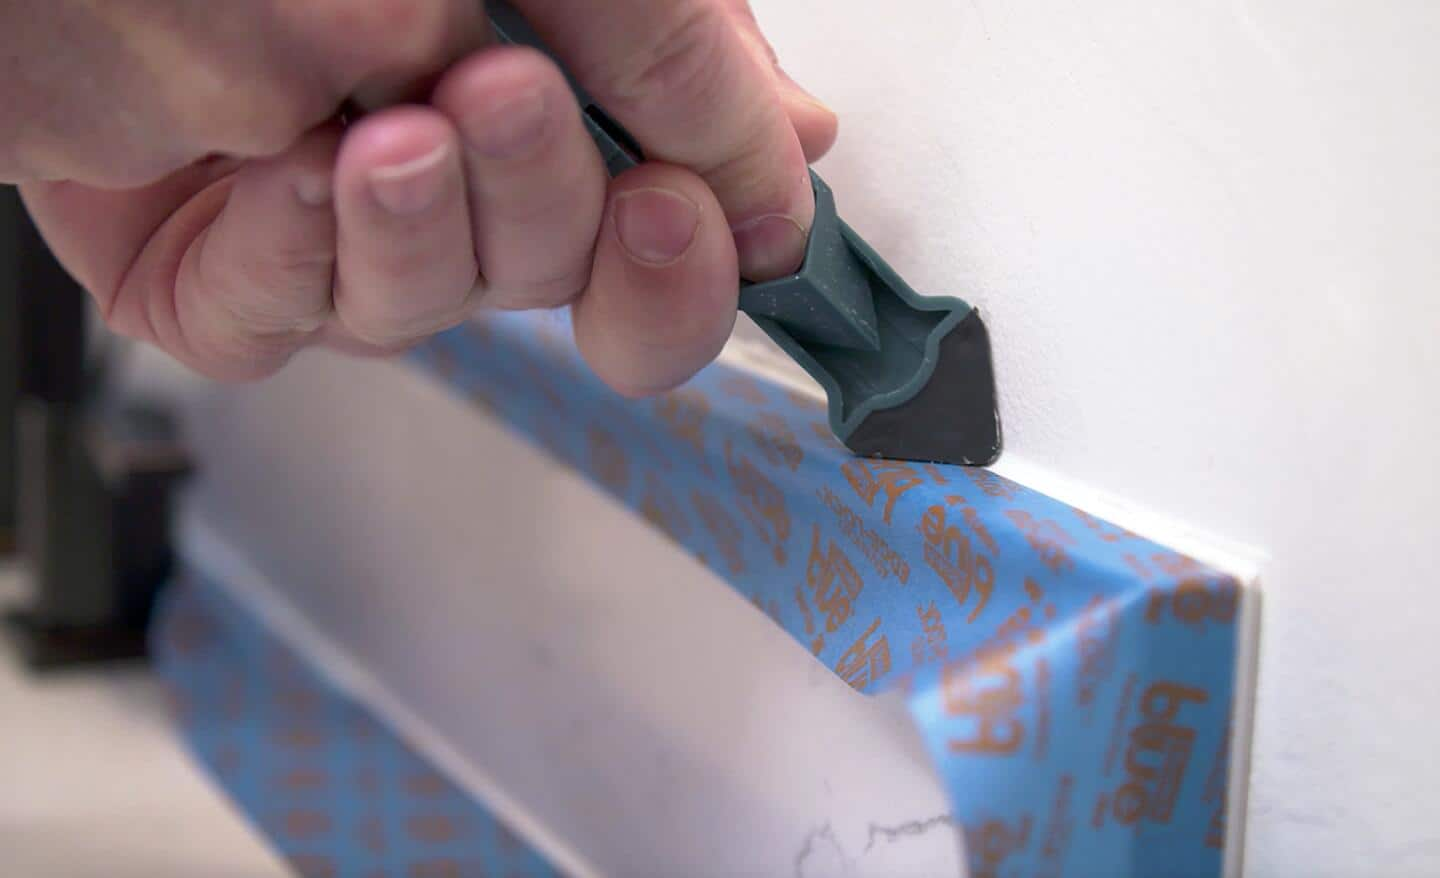
1. Wet Your Finger
Dip your index finger in a bowl of water with a drop or two of dish soap. Some people use a spray bottle to mist the caulk or their finger. The soapy water acts as a release agent, preventing caulk from sticking to your skin.
2. Position Your Hand
Hold your hand so your finger points straight at the bead. This gives you better control and a steady motion.
3. Start At One End
Place your wet finger at one end of the caulk bead. Apply gentle but firm pressure.
4. Smooth The Bead
In one steady motion, drag your finger along the bead. Try not to stop or lift your finger. The goal is a smooth, even line.
- If you see gaps or bubbles, go back over them immediately.
- If excess caulk builds up, wipe your finger with a paper towel, re-wet, and continue.
5. Clean Up Edges
After smoothing, remove the painter’s tape while the caulk is still wet. Pull the tape away at a sharp angle for clean lines. Wipe any stray caulk with a damp rag.
6. Final Touches
Let the caulk cure as directed on the package. Avoid touching or getting it wet during this time. Most caulk cures in 24 hours, but some silicone types need up to 48 hours.
Pro Tips For A Perfect Finish
Even experienced DIYers miss some tricks. Here are advanced tips for getting the best results:
- Use a light touch: Too much pressure removes too much caulk.
- Work in sections: Don’t lay too much caulk at once. It dries fast.
- Check the bead from different angles: Light can hide flaws.
- Keep your finger clean: Wipe off buildup often.
- Practice on scrap material: If you’re new, test your technique first.
One insight many beginners miss: the temperature of the room affects caulk flow. Warmer temperatures make caulk easier to smooth but can also make it dry faster. Work in moderate conditions for best results.
Common Mistakes And How To Avoid Them
Many caulking jobs fail because of preventable errors. Here’s what to watch for:
- Skipping surface prep: Dirty or wet surfaces cause poor adhesion.
- Cutting the nozzle too large: This leads to messy, oversized beads.
- Applying too much caulk: Excess caulk oozes out and wastes material.
- Using dry finger: Caulk sticks and drags, ruining the finish.
- Waiting too long to smooth: Caulk forms a skin quickly—smooth right away.
- Forgetting to remove tape early: If the caulk sets, tape can pull it off unevenly.
- Touching before cured: This leaves fingerprints or dents.
A non-obvious tip: If you’re caulking in a humid bathroom, use a fan or open a window. High humidity slows curing and can cause the caulk to slump.
When Not To Use Your Bare Finger
While finger smoothing is popular, it’s not always safe or suitable. Here’s when you should use a glove or tool instead:
- Strong chemical caulks (like some silicones) can irritate skin.
- If you have cuts or sensitive skin, a glove is safer.
- For caulk that won’t clean off easily, gloves save time.
Latex or nitrile gloves are best. Avoid loose rubber gloves—they make it hard to control the bead.
Cleaning Up After Caulking
A neat job includes good cleanup. Here’s how to finish up:
- Wipe away excess caulk with a damp rag before it dries.
- Clean caulk gun and tools with soap and water (for latex/acrylic) or mineral spirits (for silicone).
- Wash your hands thoroughly, especially if you worked bare-handed.
- Dispose of used towels and tape properly.
If caulk gets on a surface, scrape gently with a plastic scraper once it dries.
Comparing Finger Smoothing To Caulking Tools
Is finger smoothing always best? Here’s a look at both methods:
| Method | Pros | Cons |
|---|---|---|
| Finger Smoothing | High control, fits corners, no extra cost | Can irritate skin, less suitable for large jobs |
| Caulking Tool | Consistent shape, clean hands, good for long runs | Harder in tight spots, extra cost, learning curve |
For most small home jobs, the finger method wins for flexibility and ease. Tools are useful for long, straight runs or when working with tough materials.
Timing: How Long Does Caulk Take To Dry?
Drying time, or curing, depends on the caulk type:
| Caulk Type | Skin Over Time | Full Cure Time |
|---|---|---|
| Latex/Acrylic | 30-60 minutes | 24 hours |
| Silicone | 20-30 minutes | 24-48 hours |
Do not paint or expose caulk to water until it’s fully cured. Humidity and temperature can speed up or slow down the process.
Safety And Skin Protection
Using your finger is common, but safety matters:
- Wear gloves if you have allergies or cuts.
- Wash hands right after finishing.
- Avoid touching your face during the job.
- Ventilate the area if you’re using strong-smelling caulk.
Most latex and acrylic caulks are low-risk, but silicone and specialty caulks can irritate skin or eyes. Always read the product label.
Advanced Techniques For A Flawless Finish
If you want a truly professional look, try these advanced tips:
- Double tape method: Place two strips of tape for an ultra-sharp line. Remove the tape as soon as you finish smoothing.
- Custom smoothing tools: A plastic spoon or old credit card can help in tricky spots.
- Backer rod for wide gaps: For gaps over 1/4″, insert a foam backer rod before caulking. This saves caulk and prevents cracking.
- Use a light mist of soapy water on silicone caulk before smoothing. This prevents sticking and gives a glassy finish.
A little practice with these techniques can make your caulking look like a pro did it.
How To Fix Mistakes
Even with the best technique, mistakes happen. Here’s how to fix them:
- If the caulk is still wet: Wipe off with a damp rag and reapply.
- If it’s slightly set: Scrape gently with a plastic tool, then touch up.
- If fully cured: Cut away the bad section with a razor, clean, and recaulk.
Don’t try to caulk over old, cracked, or dirty caulk. The new bead won’t stick well.
Credit: www.youtube.com
How Often Should You Re-caulk?
The lifespan of caulk depends on the type and location:
- Bathroom caulk: Replace every 5 years, or sooner if mold appears.
- Window caulk: Every 5-10 years.
- Exterior caulk: Check yearly; repair cracks quickly.
Regular checks prevent water damage and mold growth. If you see peeling, cracking, or black spots, it’s time to recaulk.
Case Example: Caulking A Bathtub
Let’s walk through a real-life example. Imagine you’re resealing the edge of a bathtub:
- Remove old caulk with a razor scraper.
- Clean the area with rubbing alcohol, dry thoroughly.
- Apply painter’s tape to the tub and wall edges.
- Load the caulk gun with a bathroom-grade silicone caulk.
- Cut the tip for a small bead.
- Run a steady bead of caulk along the seam.
- Wet your finger with soapy water.
- Smooth the bead in one pass, wipe excess off your finger.
- Remove tape right away.
- Let cure for 24-48 hours before using the tub.
Following these steps avoids leaks and gives a clean, mold-resistant seal.
Credit: www.paintaccess.com.au
Where You Can Learn More
If you want to see a video or get more technical details about caulking, check out Wikipedia’s caulking page. It covers the science behind different types of caulk and their uses.
Frequently Asked Questions
What Is The Best Type Of Caulk For Finger Smoothing?
Latex and acrylic caulk are easiest to smooth with your finger because they clean off skin with soap and water. Silicone works too, but it’s harder to clean and can irritate skin. Always check the label for skin safety.
Should I Always Use Painter’s Tape When Caulking?
Painter’s tape helps create sharp, clean lines and protects surfaces. It is highly recommended for beginners and for visible areas. Some pros skip tape with practice, but tape almost always gives a neater result.
Can I Use My Finger On Silicone Caulk?
Yes, you can, but it’s best to wear a glove and wet your finger with soapy water. Silicone can irritate skin and is harder to clean off. It also dries faster, so work quickly.
How Do I Remove Dried Caulk From My Skin?
If caulk dries on your skin, rub gently with warm soapy water or use a little mineral spirits (for silicone). Avoid harsh scrubbing. Latex caulk usually peels off after a few washes.
Why Does My Caulk Look Uneven After Smoothing?
Uneven caulk can result from too much or too little pressure, moving your finger too fast, or not enough caulk in the gap. Practice helps, and using painter’s tape can hide small flaws.
A smooth caulk line isn’t just about looks—it protects your home from water, pests, and drafts. With a little patience and practice, you can master the art of smoothing caulk with your finger and get professional results every time.