Keeping your kitchen knives sharp is more than a matter of convenience. A dull knife makes cooking slow and risky. Sharp blades cut food easily, giving you better control and safety. But what if you don’t have a sharpening stone?
Many people think a stone is the only way to sharpen a knife, but that’s not true. You can still get a sharp edge using simple items from your home or workshop. This article explains, step by step, how to sharpen a knife without a stone, using common tools and methods that actually work.
You’ll learn practical tips, what to avoid, and how to keep your knives sharp for longer. Whether you’re a student with basic kitchen tools, a camper in the wild, or just someone who wants a quick fix, this guide will help you.
Let’s explore the best ways to get your knife back in shape — no stone required.
Why Sharp Knives Matter
A sharp knife is not just for chefs. It is a key tool for anyone who cooks, camps, or does DIY work. When your knife is sharp, you need less force to cut food. This means fewer accidents because the blade doesn’t slip.
Dull knives squash and tear, which can make food taste and look worse. In fact, studies show that most kitchen injuries happen with dull knives, not sharp ones.
Sharp knives also make tasks faster. They help you slice vegetables thinly or cut meat smoothly. For outdoor users, a sharp knife is important for making fire sticks, carving, or preparing food. Learning to sharpen your knife, even without a stone, will save you time and make all your jobs easier.
Understanding Knife Sharpening Basics
Before you use any sharpening method, it helps to know what sharpening really means. A knife is sharp when the edge is thin and even. Over time, the edge folds or gets tiny dents. Sharpening is about removing a little metal to form a new edge.
There are two main actions when sharpening:
- Honing: This means realigning the edge. It doesn’t remove much metal but makes the blade straight.
- Sharpening: This removes metal to create a new edge.
Some tools are better for honing, some for sharpening, and some do both. The goal is to get a clean, smooth edge that can cut paper or slice tomatoes with little pressure.
Common Tools For Sharpening Without A Stone
You might be surprised at how many household items can sharpen a knife. Here are some tools you can use instead of a traditional sharpening stone:
- Ceramic mug or plate
- Sandpaper
- Nail file (emery board)
- Leather belt
- Car window edge
- Another knife (the spine)
- Brick or concrete
- Rod or steel (honing rod)
- Carborundum stone
- Manual sharpener
- File
- Sandpaper block
- Scissors sharpener
- Rocks from nature
- Sharpening rod
- Metal ruler or flat metal
- Sandstone
- Cardboard
- Sandpaper glued to wood
- Automotive sharpening tools
Some of these are for emergencies, while others give a more polished edge. Let’s explore how to use each method in detail.
Method 1: Sharpening With A Ceramic Mug Or Plate
The bottom of a ceramic mug or plate is slightly rough. This acts like a sharpening stone because it’s made from hard ceramic.
Steps:
- Flip the mug or plate upside down.
- Find the rough, unglazed ring at the bottom.
- Hold the knife at a 15–20 degree angle against the edge.
- Draw the blade across the ceramic, starting at the heel and moving to the tip.
- Repeat 10–15 times on one side, then switch sides.
- Wipe the blade clean after sharpening.
Tip: This method works best for kitchen knives and pocket knives. Avoid using pressure, as ceramic is hard and can chip thin blades.
Insight: Beginners often press too hard. Light, steady strokes sharpen better and keep the edge even.
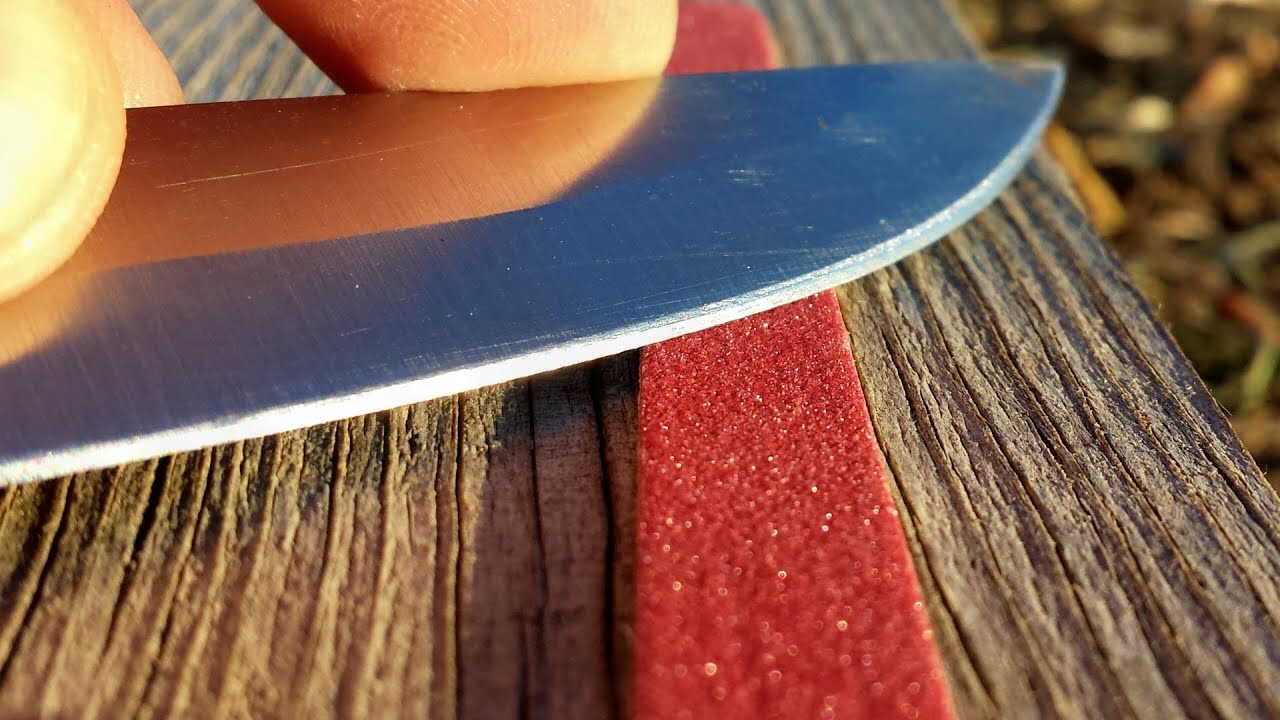
Method 2: Using Sandpaper
Sandpaper is easy to find and comes in many grit sizes. For sharpening, medium (400–600 grit) and fine (1000–2000 grit) work best.
Steps:
- Place sandpaper on a flat surface, like a table or cutting board.
- Hold the knife at a 15–20 degree angle.
- Draw the blade across the sandpaper, edge first, from heel to tip.
- Repeat 10–20 times, then switch sides.
- For a finer edge, use a higher-grit sandpaper after the first round.
Tip: You can tape the sandpaper to a wooden block for a firmer base.
Non-obvious insight: Using sandpaper with a small amount of water reduces heat and makes the process smoother.
Method 3: Nail File (emery Board)
Nail files are made from fine abrasive material, perfect for small knives or quick touch-ups.
Steps:
- Hold the nail file steady on a table.
- Place the knife at the correct angle (about 20 degrees).
- Slide the blade along the file, moving from the heel to the tip.
- Do 10–15 strokes per side.
- Check sharpness and repeat if needed.
Example: Many campers use nail files for quick field repairs on folding knives.
Mistake to avoid: Don’t use glass or metal nail files—they’re too smooth and won’t sharpen.
Method 4: Leather Belt
A leather belt is not only for keeping your pants up. The rough side can “strop” or polish a knife edge, removing small burrs and making the edge razor-sharp.
Steps:
- Find a thick, plain leather belt (no stitching or decoration).
- Place the belt on a table with the rough side up.
- Hold the knife at a 10–15 degree angle, edge facing away from you.
- Drag the blade backwards (not cutting into the leather) from heel to tip.
- Repeat 10–20 times per side.
Tip: You can add polishing compound to the belt for an extra fine edge.
Non-obvious insight: Stropping with a leather belt should always be the final step, not the main sharpening method.
Method 5: Car Window Edge
The top edge of a car window is made from hard glass. It’s useful for quick sharpening.
Steps:
- Lower the window halfway.
- Hold the knife at a 15–20 degree angle against the edge.
- Draw the blade along the glass, heel to tip.
- Repeat on both sides.
Warning: Only use this method in emergencies. Glass is hard and can remove too much metal if you press hard.
Example: Many outdoorsmen use this trick when camping or hiking.

Credit: www.redlabelabrasives.com
Method 6: Sharpening With Another Knife
A strong, blunt knife can act as a sharpening “steel” for another blade.
Steps:
- Hold the dull knife in your non-dominant hand, spine up.
- Place the knife you want to sharpen at a 20-degree angle against the spine.
- Draw the blade down the spine from heel to tip, as if slicing off a thin layer.
- Repeat on both sides.
Tip: The sharpening effect is limited. This method hones the edge but does not remove much metal.
Non-obvious insight: Always use the spine (thick, dull side) of the other knife, never the edge.
Method 7: Brick Or Concrete
A clean brick or smooth piece of concrete can substitute for a sharpening stone.
Steps:
- Find a flat, smooth brick or concrete surface.
- Wet the surface to reduce heat and friction.
- Hold the knife at a 15–20 degree angle.
- Draw the blade across the brick, edge first, from heel to tip.
- Repeat on both sides.
Warning: This method is rough. It works best for heavy-duty knives like machetes or old kitchen knives.
Comparison:
| Method | Edge Quality | Best For | Risk of Damage |
|---|---|---|---|
| Ceramic Mug | Medium | Kitchen knives, pocket knives | Low |
| Sandpaper | Fine to Medium | All-purpose knives | Low |
| Brick/Concrete | Coarse | Outdoor, tough knives | High |
Method 8: Honing Rod Or Steel
Many kitchens have a honing rod (sometimes called a sharpening steel). This tool doesn’t remove much metal but straightens the edge.
Steps:
- Hold the rod vertically, tip on a towel or board.
- Place the knife at a 20-degree angle against the rod.
- Draw the blade down and across the rod, from heel to tip.
- Repeat on the other side.
- Do 5–10 strokes per side.
Tip: Use this method often to keep knives sharp between real sharpenings.
Mistake to avoid: Don’t press hard; a light touch works best.
Method 9: Carborundum Stone
If you have a carborundum stone (a kind of abrasive stone, not a traditional “whetstone”), it works well for sharpening.
Steps:
- Wet the stone with water.
- Place the knife at a 15–20 degree angle.
- Draw the blade across the stone, edge first.
- Repeat on both sides.
Non-obvious insight: Carborundum stones are very hard; rinse them often to remove metal shavings.
Method 10: Manual Knife Sharpener
Manual sharpeners have slots with abrasive wheels. They’re common in homes and easy to use.
Steps:
- Place the sharpener on a stable surface.
- Insert the knife into the coarse slot.
- Pull the knife through 3–5 times.
- Use the fine slot for a polished edge.
Example: Great for busy kitchens where speed matters.
Warning: Not all manual sharpeners fit large or thick knives.
Method 11: File
A metal file is common in toolboxes. It can sharpen knives if used carefully.
Steps:
- Clamp the file to a table.
- Hold the knife at a 20-degree angle.
- Draw the blade along the file, edge first.
- Repeat on both sides.
Tip: Use a fine file for a smoother edge.
Non-obvious insight: Files can leave a rough edge; finish with leather or sandpaper for best results.
Method 12: Sandpaper Block
If you need a more stable sharpening surface, wrap sandpaper around a wooden block.
Steps:
- Cut a piece of wood (about 6 inches long).
- Wrap sandpaper tightly around it.
- Use as you would a sharpening stone.
Example: Many woodworkers use this trick to sharpen chisels and knives.
Method 13: Scissors Sharpener
Some kitchen scissors sharpeners can also sharpen knife blades in an emergency.
Steps:
- Place the knife in the sharpener slot.
- Pull through gently a few times.
- Check the edge often.
Warning: Not all models work with knives—test gently.
Method 14: Rocks From Nature
If you’re outdoors, a flat, hard rock can sharpen a knife.
Steps:
- Find a smooth rock (granite or quartz is best).
- Wet the surface.
- Draw the blade across at a 20-degree angle.
Tip: Test on a small area to avoid damaging your blade.
Method 15: Sharpening Rod
A sharpening rod (made of ceramic or diamond) is portable and works fast.
Steps:
- Hold the rod steady.
- Stroke the blade down and across, alternating sides.
Comparison:
| Tool | Sharpening Speed | Edge Finish | Portability |
|---|---|---|---|
| Leather Belt | Slow | Polished | High |
| Sharpening Rod | Fast | Fine | High |
| Sandpaper Block | Medium | Fine | Medium |
Method 16: Metal Ruler Or Flat Metal
A sturdy metal ruler or flat piece of steel can help hone a dull edge.
Steps:
- Hold the ruler steady.
- Draw the knife edge along the ruler at a 20-degree angle.
- Repeat on both sides.
Tip: This hones the edge but does not replace real sharpening.
Method 17: Sandstone
Sandstone is a natural abrasive, found in many places.
Steps:
- Wet the sandstone.
- Use it as you would a sharpening stone.
- Draw the blade across at a 15–20 degree angle.
Non-obvious insight: Sandstone works best for coarse sharpening. Use leather or sandpaper after for a fine finish.
Method 18: Cardboard
Believe it or not, thick cardboard can polish or strop a knife’s edge.
Steps:
- Lay cardboard flat.
- Drag the knife backwards (not cutting) along the cardboard.
- Repeat 10–20 times per side.
Tip: This is a finishing step, not for dull blades.
Method 19: Sandpaper Glued To Wood
This method combines the stability of a block with the fine finish of sandpaper.
Steps:
- Glue fine sandpaper (1000–2000 grit) to a flat piece of wood.
- Let it dry completely.
- Use as a sharpening stone.
Example: Many knife enthusiasts use this DIY method for a polished edge.
Credit: www.youtube.com
Method 20: Automotive Sharpening Tools
In a workshop, automotive sharpening stones or even a fine carborundum block can sharpen knives.
Steps:
- Clean the tool to remove oil or dirt.
- Wet with water.
- Draw the blade at a 15–20 degree angle, edge first.
Tip: Automotive stones are very coarse. Always finish with a finer method.
Comparison:
| Method | Availability | Edge Quality | Best Use Case |
|---|---|---|---|
| Automotive Stone | Workshop | Coarse | Repairing damaged blades |
| Ceramic Mug | Home | Medium | Kitchen maintenance |
| Leather Belt | Everywhere | Fine polish | Finishing step |
Key Factors For Success
Sharpening without a stone takes patience and practice. Here are some key points to remember:
- Angle matters: Most knives are sharpened at 15–20 degrees. Keeping the angle steady is more important than the tool you use.
- Use both sides: Always sharpen both sides of the blade to keep the edge centered and strong.
- Clean and dry: Always clean and dry your knife after sharpening. Metal dust can rust or dull the edge.
- Test sharpness safely: Slice a piece of paper or a tomato. If the knife glides through, it’s sharp enough.
Non-obvious insight: Many beginners sharpen only the tip or heel. Make sure to sharpen the full length of the blade for best results.
Mistakes To Avoid
Even simple sharpening methods can go wrong. Here are mistakes to avoid:
- Pressing too hard: This can remove too much metal or damage the blade.
- Using the wrong angle: Too steep makes a weak edge, too flat won’t sharpen.
- Skipping finishing steps: Stropping or polishing removes tiny burrs and gives a smooth edge.
- Using dirty tools: Dirt or grit can scratch the blade or make the edge uneven.
When To Sharpen
You don’t need to sharpen your knife every day. Here are signs it’s time:
- The knife can’t slice a tomato easily.
- It slips off onions or carrots.
- It tears food instead of slicing cleanly.
For most home cooks, sharpening every 2–3 months is enough. For outdoor knives, check sharpness before each trip.
Keeping Knives Sharp Longer
Sharpening is only half the battle. To keep knives sharp:
- Cut on soft surfaces (wood, plastic). Glass or stone cutting boards dull knives quickly.
- Wash by hand; dishwashers can bang knives and dull the edge.
- Store knives in a block or on a magnetic strip.
- Use a honing rod regularly.
Tip: Never use a knife to open cans or cut metal. This ruins the edge.
Advanced Tips For Experienced Users
If you want a razor-sharp edge, try these advanced tricks:
- Use progressively finer grits of sandpaper (start at 400, finish at 2000).
- Strop with a leather belt and a little green polishing compound.
- For pocket knives, try sharpening in small circles for a more even edge.
Non-obvious insight: Wrapping sandpaper around a dowel lets you sharpen curved blades (like fillet knives) more evenly.
When To Seek Professional Sharpening
Some knives are valuable or have complex edges (like Japanese chef’s knives). For these, consider a professional sharpening service once a year. They use special machines and keep the original blade shape.
You can find professional services at kitchen stores or through online mail-in services. For more details, check the Knife Sharpening Wikipedia page for guidance.
Frequently Asked Questions
How Do I Know If My Knife Is Sharp Enough?
Test by slicing through a piece of paper or a tomato. If the knife cuts smoothly with little pressure, it’s sharp. If it snags or tears, it needs more sharpening.
Can I Ruin My Knife By Sharpening Without A Stone?
If you use the wrong angle, press too hard, or use very rough surfaces, you can damage the edge. Always go slowly and use gentle, even strokes.
Is It Safe To Use A Brick Or Concrete To Sharpen My Knife?
It’s safe for tough, outdoor knives but not for fine kitchen knives. Concrete is very abrasive and can remove a lot of metal quickly.
How Often Should I Sharpen My Knives?
For home cooks, every 2–3 months is enough. If you use your knife daily, check sharpness more often. Honing with a rod every week keeps the edge in good shape.
What’s The Best Emergency Sharpening Method?
If you’re at home, use a ceramic mug or sandpaper. Outdoors, a flat rock or the edge of a car window works. Remember to finish with a strop (leather belt or cardboard) for the best edge.
—
Keeping your knives sharp doesn’t require special stones or fancy equipment. With the right method and care, you can maintain a sharp edge using things you already have. Start with simple tools like a ceramic mug or sandpaper, and practice your technique.
Over time, you’ll sharpen faster and get better results, making every cooking or outdoor task safer and more enjoyable.
Credit: www.redlabelabrasives.com