Building a waterfall wall for your pool can turn a simple backyard into a relaxing oasis. The sound of running water creates a peaceful mood, while the sight of a waterfall adds a touch of luxury and style. But creating this kind of feature is more than just stacking rocks and connecting a pump.
It’s a project that requires planning, the right materials, and solid construction steps to make sure your pool waterfall is beautiful, safe, and long-lasting. Many beginners start with excitement but miss important details, leading to leaks, noisy pumps, or maintenance headaches.
In this guide, you’ll learn step-by-step how to build a pool waterfall wall, from the first design ideas to the final touches, including tips that even many DIY enthusiasts overlook.
Understanding Pool Waterfall Walls
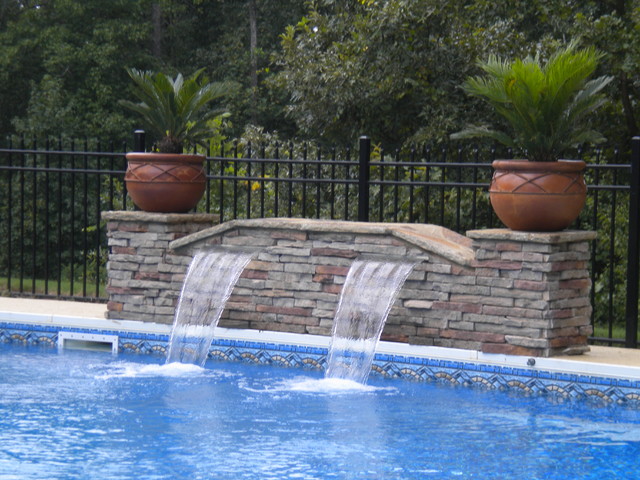
A pool waterfall wall is a structure built beside or inside a swimming pool, where water flows over the top and falls down, creating a visual and sound effect. These features are popular in both residential and commercial pools because they add value, beauty, and a sense of calm.
There are different styles to choose from:
- Sheer descent waterfalls: Water falls in a thin, smooth sheet.
- Rock waterfalls: Mimic natural cascades with stacked stones.
- Blade waterfalls: Water exits through a slim opening, like a blade.
- Custom walls: Combine lighting, planters, or special materials.
The main parts of a pool waterfall wall are the wall structure, waterproofing layer, plumbing (pipes and pump), the water delivery system (like a spillway or lip), and finishing materials such as tiles or stone. Knowing these basics helps you plan a waterfall that fits your space, budget, and style.
Planning Your Pool Waterfall Wall
Before you buy materials or start digging, planning is key. A well-planned waterfall will fit your pool, be easy to maintain, and avoid common problems.
Design Considerations
Think about these points before you start:
- Location: Choose a spot where the waterfall will be visible and accessible, but not in the way of pool traffic.
- Size and Scale: Match the size of the waterfall to your pool. A large wall might overwhelm a small pool, while a tiny feature may disappear in a big space.
- Style: Decide if you want a modern look (smooth tiles, straight lines) or a natural style (rocks, plants).
- Sound Level: The height and width of the fall affect the sound. Higher drops are louder, while shorter ones are softer.
- Lighting: Underwater or wall lights can make the waterfall look dramatic at night.
Budgeting
Building a pool waterfall wall can cost anywhere from $1,500 to over $10,000, depending on materials and complexity. Consider:
- Material costs: Concrete, stone, tile, pump, pipes, waterproofing.
- Labor: DIY saves money, but pro help may be needed for electrical or plumbing.
- Ongoing costs: Electricity for the pump and maintenance.
Permits And Safety
Check with your local building authority. Some areas need permits for pool modifications. Make sure your design follows safety rules, such as secure electrical wiring and non-slip surfaces.
Non-obvious insight: Many people forget to check if their pool’s filter and pump can handle the extra load from a waterfall. If your equipment is too weak, the waterfall may barely trickle or could damage your system.

Credit: www.youtube.com
Choosing Materials And Equipment
Picking the right materials is essential for durability and appearance. The main components are the wall structure, waterproofing, finishes, and the water circulation system.
Wall Structure Materials
- Concrete blocks or poured concrete: Strong and long-lasting. Good for large or complex shapes.
- Precast stone panels: Easier to install, less heavy than full stone.
- Natural stone: Best for a natural look, but heavier and more expensive.
- Brick: Can work, but needs waterproofing.
Waterproofing
A waterfall wall must be sealed to keep water inside and prevent leaks. Use:
- Waterproofing membrane: Roll-on or paint-on products designed for pools.
- Waterproof mortar: For joints between stones or tiles.
- Sealants: For edges and seams.
Finishing Materials
- Tiles: Modern, easy to clean, many designs.
- Natural stone: Rustic and blends with landscaping.
- Pebble or glass mosaic: Colorful, for custom designs.
- Stacked stone veneer: Lightweight, stylish.
Plumbing And Equipment
- Pump: Needs to be strong enough to move water up the wall and over the fall. Check the flow rate (gallons per minute/liter per hour).
- Piping: PVC pipes are common. Use the right size to avoid loss of water pressure.
- Spillway/lip: The piece where water flows out. Can be stainless steel, acrylic, or built from stone.
- Valves: For controlling flow and turning the waterfall on/off.
- Filter: Keeps water clean. May need to upgrade if your pool system is small.
Comparison: Wall Finish Options
Here’s a quick comparison of popular finishing choices:
| Material | Look | Maintenance | Cost |
|---|---|---|---|
| Tile | Sleek, modern | Low | $$ |
| Natural stone | Rustic, natural | Medium | $$$ |
| Stacked veneer | Stylish, lightweight | Low | $$ |
| Pebble mosaic | Custom, colorful | Medium | $$$ |
Equipment Sizing
A common error is underestimating the pump size. Measure the width of your waterfall (in feet/meters) and the height water must be lifted (“head height”). As a general rule, you need 1,000 gallons per hour (GPH) for every 12 inches (30 cm) of waterfall width.
Example: For a 3-foot-wide waterfall, you need at least a 3,000 GPH pump if the water is lifted 3 feet high.
Preparing The Site
A strong foundation is essential for a pool waterfall wall. Start with a clean, stable base.
Marking And Measuring
- Use chalk or spray paint to mark the wall’s footprint beside or inside the pool.
- Double-check measurements to match the design.
- Mark space for plumbing lines and electrical wiring.
Excavation
- Dig down to solid soil if building beside the pool. Remove any loose dirt or roots.
- The depth depends on your wall height, but usually 12-18 inches (30-45 cm) for a small to medium wall.
- For walls integrated inside the pool, you may need to lower the pool water and work with a pro.
Laying The Foundation
- Pour a concrete footing. Make it wider than the wall for stability.
- Common size: 6-8 inches (15-20 cm) thick, at least 6 inches (15 cm) wider than the wall.
- Let it cure (dry and harden) according to instructions—usually 2-3 days.
Non-obvious insight: Adding rebar (steel rods) inside the concrete footing greatly increases strength and prevents cracking, especially on soft soil.
Credit: www.monogramcustombuilders.com
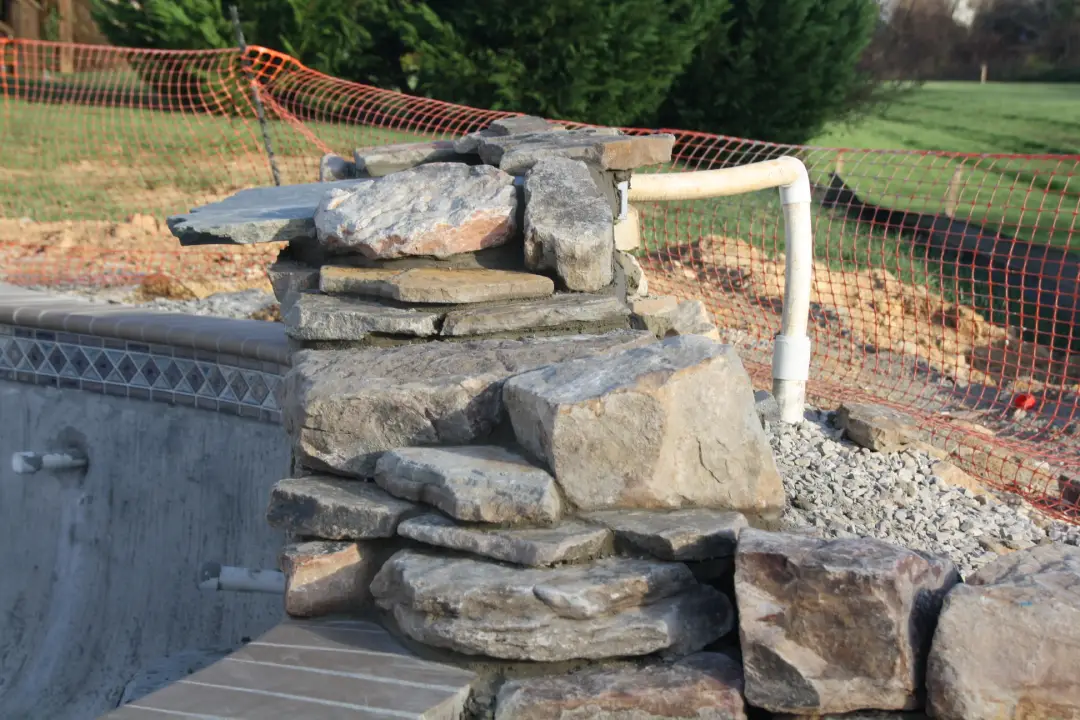
Building The Wall Structure
With the foundation ready, it’s time to build the main body of the waterfall wall.
Constructing The Wall
- Lay the first row of blocks or stone. Check for level.
- Stack rows using mortar or concrete adhesive. Stagger joints for strength.
- Leave spaces for plumbing pipes and electrical lines.
- Build to the designed height. Most waterfall walls are 2 to 4 feet high.
- Add rebar vertically every 2-3 feet (60-90 cm) for extra stability.
Creating The Spillway
- The spillway is where water flows out. Use a pre-made spillway for a smooth, “sheet” effect or build a stone overhang for a natural look.
- Make sure it is level. Even a slight tilt can make water flow unevenly.
- Secure it tightly with mortar or screws.
Plumbing Installation
- Dry-fit (test-fit without glue) all pipes before final assembly.
- Run pipes from the pool pump (or dedicated pump) up through the wall to the spillway.
- Install valves to control water flow.
- Use PVC glue to seal connections. Allow to dry fully before using.
Waterproofing
- Apply a waterproofing membrane over the back and top of the wall, especially anywhere water will flow.
- Seal all joints and corners.
- Let the waterproofing cure as recommended.
Pro tip: Test the waterproofing with a garden hose before adding finishes. Leaks are much easier to fix now than later.
Adding The Finishing Materials
Now comes the stage where your waterfall wall starts to look impressive.
Tile Or Stone Installation
- Start at the bottom and work up.
- Press tiles or stones into mortar. Use spacers for even gaps.
- Cut tiles as needed for neat edges.
- Let the mortar set (usually 24 hours).
Grouting And Sealing
- Fill gaps with waterproof grout.
- Wipe excess grout off tiles before it dries.
- Once dry, seal all surfaces with a water-resistant sealer.
Installing Lighting (optional)
- Place LED strip lights under the spillway or in the wall for dramatic effects.
- Use waterproof, pool-rated fixtures only.
- Hire a licensed electrician for any wiring.
Landscaping Around The Wall
- Add plants, pebbles, or mulch for a natural look.
- Make sure any plants are not too close to the water to avoid leaves in the pool.
Credit: www.troublefreepool.com
Connecting The Waterfall To The Pool System
A waterfall can be powered by your pool’s main pump or a separate dedicated pump.
Integrating With Pool Pump
- If using the main pump, add a “T” fitting to split water flow to the waterfall.
- Install a valve to control how much water goes to the waterfall versus the pool.
- This method works well for small waterfalls but may reduce pool circulation.
Using A Separate Pump
- Best for larger or high-flow waterfalls.
- Connect the pump to a pool return line or a separate intake.
- Make sure the pump is rated for continuous outdoor use.
Electrical Considerations
- All electrical connections must be GFCI-protected (ground fault circuit interrupter).
- Use waterproof outdoor cables.
- Always follow local codes—hire a pro if unsure.
Testing The System
- Fill the pipes with water and run the pump.
- Check for leaks at all joints and around the spillway.
- Adjust flow with the valves to get the desired effect.
Waterfall Maintenance Tips
A pool waterfall wall is low-maintenance if built well, but regular care keeps it running beautifully.
Cleaning
- Brush tiles or stone weekly to prevent algae.
- Remove leaves or debris from the spillway.
- Clean lighting lenses gently.
Winterizing
- In cold climates, drain water from the waterfall pipes before freezing weather.
- Cover the spillway to keep out snow and ice.
- Some pumps can be removed and stored indoors.
Pump And Filter Care
- Check the pump basket and filter every month.
- Clean or replace as needed to avoid clogs.
- Listen for strange noises—these often signal a problem.
Sealing And Resealing
- Reapply stone or tile sealer every 1-2 years.
- Inspect waterproofing for cracks and touch up as needed.
Common Problems And Fixes
- Water doesn’t flow evenly: Clean the spillway edge, adjust the pump, or check for blockages.
- Leaks: Turn off the system and inspect all joints and behind the wall.
- Noise: Large drops make louder splashing. Add rocks or adjust flow to soften.
Cost Breakdown And Project Timeline
Understanding costs and time helps you plan better and avoid surprises.
Cost Breakdown Example
| Item | Estimated Cost (USD) |
|---|---|
| Concrete, blocks, or stone | $600–$2,500 |
| Waterproofing materials | $100–$300 |
| Tiles or veneer | $400–$1,200 |
| Pump and plumbing | $300–$1,200 |
| Lighting (optional) | $100–$600 |
| Labor (if hired) | $1,000–$3,000 |
Many homeowners keep costs down by doing the work themselves, but expert help may be worth it for plumbing or electrical.
Project Timeline
- Planning and Design: 1–2 weeks (including permit approval if needed)
- Site Preparation and Foundation: 2–4 days
- Building Wall Structure: 3–5 days
- Plumbing and Waterproofing: 2–3 days
- Finishing and Detailing: 2–4 days
- Curing and Testing: 2–3 days
Most projects take 2 to 4 weeks from start to finish, depending on weather and complexity.
Advanced Tips For A Stunning Waterfall Wall
To make your waterfall truly special, consider these advanced ideas:
- Add color-changing LED lights for evening ambiance.
- Include planters in the wall design for a living wall effect.
- Use a variable-speed pump for adjustable water flow.
- Integrate a fire feature above or beside the waterfall for a dramatic contrast.
- Install a sound-dampening mat under the wall to reduce vibration noise.
- Design for easy cleaning—leave access panels for plumbing.
- Blend with your landscaping by using local stones or matching pool tiles.
- Plan for kids’ safety—avoid sharp edges and slippery surfaces.
Professional tip: Test your chosen materials in water before building. Some stones can leach minerals, causing stains or cloudy water.
Real-life Examples
- Modern blade waterfall: A homeowner used a 36-inch stainless steel spillway, blue glass tile, and white LED lighting. The project cost $4,500 and took three weeks to complete.
- Natural rock waterfall: A family built a 5-foot-wide wall with stacked slate, integrated planters, and a hidden pump. The sound was gentle, and maintenance was simple, costing $7,000.
- Budget DIY waterfall: Using concrete blocks and leftover pool tile, a simple 2-foot waterfall was built for under $2,000.
Each project had different challenges—noise control, pump sizing, or waterproofing. But all improved the pool’s look and value.
Frequently Asked Questions
How Much Does It Cost To Build A Pool Waterfall Wall?
The cost varies widely based on size, materials, and labor. Most homeowners spend between $2,000 and $8,000. DIY projects are at the lower end, while larger or custom designs with lighting and special finishes can exceed $10,000.
Can I Add A Waterfall Wall To An Existing Pool?
Yes, you can add a waterfall to most pools. Check if your pool’s structure and pump can handle the extra water flow. You may need to upgrade your pump or plumbing. Always check for permits and follow local building codes.
How Do I Choose The Right Pump For My Waterfall?
Measure your waterfall’s width and the height water needs to be lifted. A good rule: 1,000 GPH for every foot (30 cm) of width. Choose a pump rated for outdoor or pool use, and always check the manufacturer’s specs.
What Maintenance Does A Pool Waterfall Wall Need?
Regular tasks include brushing tiles or stone, cleaning the spillway, checking the pump and filter, and sealing surfaces every 1-2 years. In cold climates, drain and cover the waterfall in winter to prevent freeze damage.
Where Can I Find More Design Ideas Or Technical Info?
You can explore more inspiration and technical tips on official pool and landscaping sites like the Houzz Pool Waterfall Wall Gallery.
Building a pool waterfall wall is a big project, but the results are worth it. With good planning, quality materials, and careful construction, you can enjoy the soothing sounds and beautiful look of your own backyard retreat for years to come.