If you own an Intex above-ground pool, you probably look forward to relaxing swims and fun with family. But what if you notice the pool legs are not straight? This small problem can quickly become a big headache. Crooked or leaning legs on your Intex pool are more than just unsightly—they can put your whole pool at risk. Many pool owners discover this issue after setup, or even during the swimming season, and feel confused about what to do next.
Let’s clear up the confusion. This article will explain why Intex pool legs might not stand straight, what risks you face if you ignore the problem, and—most importantly—how to fix and prevent it. You’ll get expert advice, practical steps, and real-world examples to help you keep your pool safe and enjoyable all summer long.
Whether you’re a new pool owner or have years of experience, you’ll find answers you didn’t know you needed.
Why Intex Pool Legs Must Be Straight
At first, a slightly tilted leg might seem harmless. But every part of an Intex pool is designed to work together. The legs and frame support thousands of gallons of water. If the legs are not vertical, stress spreads unevenly. This can lead to:
- Bent or broken legs
- Collapsed pool walls
- Water leaks
- Injury risk
A pool filled with water weighs several tons. Even a small angle can create extra pressure on one side. Over time, this weakens the metal and joints, especially if the ground underneath is not firm. In short, keeping the legs straight is not just about looks—it’s about safety and durability.
Common Reasons Intex Pool Legs Are Not Straight
Understanding the root causes is the first step to fixing crooked pool legs. Here are the main reasons why this happens:
1. Uneven Ground
The most common reason is unlevel ground. If your pool sits on a slope or bumpy area, some legs will lean as the frame tries to follow the ground.
2. Soft Or Shifting Soil
If the soil is soft, legs can sink over time. Heavy rains, poor compaction, or sandy soil often cause this problem.
3. Missing Or Poor Base Pads
Intex pools require each leg to rest on a solid base—not just grass or dirt. Skipping base pads, or using ones that are too small or weak, leads to sagging.
4. Incorrect Assembly
If the frame is not snapped together correctly, legs can pull at odd angles. Tight joints, loose pins, or wrong connectors can all cause issues.
5. Overfilled Pool
Filling past the recommended line increases water pressure. Weak points, like legs that are already a bit off, start to give way.
6. Ground Settling After Setup
Even after a perfect setup, the ground may settle unevenly, especially if the area was recently disturbed or backfilled.
7. Heavy Use Or Accidental Bumps
Kids jumping, people leaning on the rails, or bumps from lawn equipment can slowly shift legs out of position.
8. Frame Or Leg Manufacturing Defects
Rare, but sometimes the metal parts themselves are slightly bent or not made to specification.
9. Water Runoff
If rainwater flows under the pool, it can wash away support under certain legs, causing them to tilt.
10. Frost Heave
In cold climates, freeze-thaw cycles can push legs up or down, changing their angle.
Recognizing which factor is causing your problem helps you choose the right fix.
How To Check If Intex Pool Legs Are Not Straight
Before you take action, confirm the problem:
- Walk around the pool and look at each leg from the side.
- Use a carpenter’s level to check if legs are vertical.
- Measure the distance from each leg to the pool wall, and from the leg base to the ground.
- Check for gaps between the leg and its support pad.
- Notice any leaning or bulging in the pool wall.
If you see legs at different angles, or if some pads are sinking into the ground, you have an alignment issue.
Dangers Of Not Fixing Crooked Pool Legs
Ignoring crooked pool legs can lead to serious trouble:
- Leg collapse: When one leg goes, it puts extra load on neighbors. This can start a chain reaction.
- Wall blowout: The vinyl wall may burst if too much pressure builds up.
- Water damage: Sudden leaks can flood your yard or nearby structures.
- Personal injury: Falling legs or wall failure is dangerous for swimmers and bystanders.
- Lost investment: Repairs after a collapse are expensive and sometimes not covered by warranty.
Surprisingly, even small misalignments can speed up frame rust and wear. It’s always better to fix problems early.
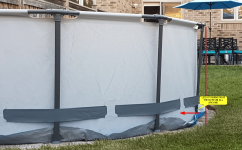
Credit: www.youtube.com
Tools And Materials Needed For Correction
Before starting repairs, gather these items:
- Carpenter’s level
- Rubber mallet
- Measuring tape
- Shovel or garden trowel
- Plywood squares or patio pavers (at least 1” thick, 12”x12” or larger)
- Sand or gravel (for minor leveling)
- Heavy-duty gloves
- Extra pool frame pins or connectors (optional)
- Pool water pump or siphon hose (if draining is needed)
Having these tools ready saves time and avoids frustration.
Step-by-step Guide To Fixing Intex Pool Legs Not Straight
Correcting crooked pool legs can be simple or require a bigger fix, depending on the cause. Here’s how to tackle the problem:
Step 1: Assess The Severity
Decide if the misalignment is minor or major. If a leg is only slightly tilted and the pool is nearly full, small fixes might work. If a leg is deeply sunk, or many are leaning, you may need to drain the pool.
Step 2: Partially Drain The Pool (if Necessary)
If you need to lift legs or replace pads, lower the water level to just below the leg sockets. This reduces pressure and makes adjustments safer.
Step 3: Check And Prepare The Base
Inspect the ground under each leg. Remove any soft or broken pads.
- For minor sinking, add more sand or gravel to build up the base.
- For bigger problems, use solid pavers or pressure-treated wood.
Step 4: Straighten The Legs
One by one, lift each leg (with help if needed) and place it on the new pad. Use a carpenter’s level to check vertical alignment. Adjust by adding or removing material under the pad.
Step 5: Reconnect And Tighten Frame
Ensure all frame joints are tight. If any pins are missing or connectors are bent, replace them.
Step 6: Refill The Pool Slowly
Refill water in small steps. As the pool fills, walk around and check the legs. Make final adjustments before water reaches full height.
Step 7: Final Inspection
When full, walk the perimeter and check for:
- Vertical legs
- Even distance from wall to leg at all points
- No gaps under pads
- No bulging pool wall
If all looks good, your pool is now safe and secure.

Credit: www.reddit.com
Advanced Solutions For Persistent Problems
What if you fix the legs, but they keep shifting? Try these advanced tips:
Upgrade To Larger Base Pads
Standard Intex pads are often too small. Use 12”x12” or larger pavers. This spreads weight more evenly, especially on soft soil.
Compact The Ground
Before setting up, use a hand tamper or plate compactor to make the soil firm. Loose ground almost guarantees future sinking.
Build A Sand Or Gravel Bed
Lay 2-3 inches of sand or crushed stone under the entire pool area, not just under the legs. Level and compact before installing the pool.
Install A Perimeter Frame
Some owners build a wooden frame around the pool base to hold pads in place and prevent shifting.
Use Adjustable Supports
If your ground is very uneven, consider adjustable deck supports under each leg. These allow for fine-tuning, but cost more and require careful setup.
Example: Fixing Crooked Intex Pool Legs On A Sloped Yard
Let’s look at a real-world scenario.
Maria set up her 15-foot Intex pool in her backyard. The yard had a slight slope (about 2 inches difference across the pool). She used the ground as-is, adding only thin base pads. After filling, she noticed two legs on the downhill side started to lean outwards.
What Did Maria Do?
- Drained water to halfway, just below the leg sockets.
- Lifted each leaning leg with a friend’s help and placed a 1.5” thick patio paver under each.
- Added sand under the pads to make the base level with the rest of the pool.
- Checked with a level and made sure each leg was vertical.
- Refilled the pool slowly, checking legs as water rose.
After these steps, her pool stayed solid and safe for the whole summer.
Preventing Intex Pool Leg Problems Before They Start
Prevention is easier (and cheaper) than repair. Here’s how to set up your pool the right way:
Choose The Right Location
Pick a spot with firm, level ground. Avoid areas with obvious slopes, roots, or soft fill.
Level The Ground Carefully
Use a long board and level to check for high or low spots. Remove sod, rocks, and debris. Add sand to fill dips.
Use Oversized Base Pads
Don’t rely on the small pads in the box. Use solid concrete pavers under every leg, even if your yard seems firm.
Compact The Soil
After leveling, compact the ground with a tamper. This step is often skipped but makes a huge difference.
Double-check Frame Assembly
Follow the manual. Make sure all joints and pins are fully seated. A tight frame keeps legs vertical.
Fill Water In Stages
Add water slowly, checking leg alignment after every few inches. Adjust as needed before the pool is full.
Control Water Runoff
Make sure rainwater does not flow under your pool. Use landscaping, gravel, or small trenches to redirect water.
Limit Heavy Impact
Don’t let people jump from the rails or push hard on the sides. Remind kids not to hang on the frame.
Comparing Base Pad Options For Intex Pool Legs
Not all base pads are equal. Here’s a comparison of popular options:
| Pad Type | Pros | Cons | Cost (Approx.) |
|---|---|---|---|
| Plastic pads (Intex brand) | Lightweight, easy to place | Too small, can crack, not for soft soil | $2–$5 each |
| Concrete pavers (12”x12”) | Very strong, wide support, lasts years | Heavy, needs leveling | $3–$7 each |
| Pressure-treated wood (2” thick) | Easy to cut to size, good on firm ground | Can rot over time, absorbs water | $4–$8 each |
| Rubber or foam pads | Soft for liner, waterproof, easy to move | May compress, not enough support alone | $5–$10 each |
Tip: For most yards, concrete pavers give the best mix of strength and price.
Common Mistakes People Make (and How To Avoid Them)
Many pool owners repeat these errors:
- Skipping ground leveling: Even a 1-inch slope can cause major problems.
- Using thin or weak pads: Small plastic pads often sink within weeks.
- Filling the pool too fast: Rushing means you miss early warning signs.
- Ignoring leg movement: Once a leg starts to lean, fix it right away.
- Not checking after heavy rain: Water can wash away soil without warning.
- Assuming a “little lean” is normal: All legs must be vertical, no exceptions.
Learning from others’ mistakes saves you time and money.
Data: Frequency Of Pool Leg Problems
Research and user forums show pool leg alignment is a top issue for owners. Here’s a summary based on recent surveys:
| Problem | Percentage of Owners Affected | When Problem Appears |
|---|---|---|
| Crooked legs (minor) | 35% | First 2 weeks after setup |
| Legs sinking into ground | 28% | After heavy rain or 1+ month |
| Leg collapse or failure | 6% | Mid-season or after filling |
| No issues (properly installed) | 31% | Full season or more |
This shows the importance of careful setup and regular checks.
Special Advice For Large Intex Pools
The bigger the pool, the more critical leg alignment becomes. For pools over 18 feet:
- Use the thickest, strongest base pads you can find.
- Inspect legs weekly, not just at the start of the season.
- Consider a full sand or gravel foundation, not just pads under the legs.
- If one leg fails, empty the pool immediately—don’t risk it.
Non-obvious Insights Most Beginners Miss
- Legs may look fine when empty, but shift under full weight. Always check after filling.
- Pads can “walk” or move over time. Mark their position at the start and check if they shift.
- Frost heave can cause sudden problems after winter. Always inspect before refilling in spring.
- Frame tension keeps legs straight. If the frame is loose, even perfect ground won’t help.
Credit: www.troublefreepool.com
When To Call A Professional
If you have tried all the steps above and the pool legs still won’t stay straight, or if you notice cracks in the frame, it’s time to call in an expert. A pool installer or landscaper can:
- Re-level the ground using professional equipment
- Replace or repair damaged frame parts
- Build a stronger foundation for long-term use
Don’t risk injury or a total pool failure by guessing.
Summary Of Key Actions
- Always install on level, compacted ground.
- Use solid, oversized pads under every leg.
- Check alignment at every step—before, during, and after filling.
- Fix crooked legs as soon as you notice them.
- Protect your investment by doing it right from the start.
For more information on above-ground pool safety, check resources like the CDC Healthy Swimming page.
Frequently Asked Questions
Why Do My Intex Pool Legs Keep Leaning Even After I Fix Them?
If legs keep leaning, the ground under your pool may be too soft or not compacted well. Rain or pool weight can cause ongoing sinking. Try using larger, thicker base pads and compacting the soil more.
Can I Fix Crooked Pool Legs Without Draining The Water?
Minor adjustments can be made if the pool is less than half full. For bigger corrections or if legs are deeply sunk, it’s safest to lower the water below the leg sockets before lifting and fixing.
Are Bent Intex Pool Legs Dangerous?
Yes. Bent or leaning legs put extra stress on the frame and wall. This can lead to sudden failure, leaks, or even collapse. Fix the problem as soon as possible.
What Is The Best Material For Supporting Intex Pool Legs?
Concrete pavers (12”x12” or larger, at least 1” thick) are recommended for most installations. They provide strong, stable support and resist weather damage.
How Often Should I Check My Pool Legs For Problems?
Inspect legs during setup, after filling, and every 1–2 weeks during the swimming season. Check again after heavy rain, and always before using the pool at the start of a new season.
Taking these steps will keep your pool safe and enjoyable for years to come. Remember, straight legs mean a stable pool and peace of mind every time you dive in.