Sublimating a tumbler in a regular oven is a creative way to personalize drinkware, whether for gifts, business, or your own enjoyment. Many people think you need special equipment to sublimate, but you can get beautiful results at home with a standard oven and the right materials.
This process lets you transfer custom designs onto tumblers that look professional and last for years. If you’ve ever wanted to start making personalized tumblers but were unsure about equipment, this complete guide will walk you through every step—clearly, safely, and with tips you won’t find everywhere.
What Is Sublimation?
Before you begin, it helps to understand what sublimation means. Sublimation is a process where a solid dye turns into a gas without becoming liquid. The dye bonds with the special coating on certain materials, like sublimation tumblers, creating a permanent, vibrant design. Unlike stickers or vinyl, sublimation becomes part of the tumbler’s surface. This means the image won’t peel, crack, or fade easily, even with daily use.
Why Sublimate Tumblers In A Regular Oven?
Many crafters and small business owners want to create custom tumblers but don’t have a sublimation oven or mug press. Regular ovens are found in almost every home and can be used for sublimation with proper safety steps. Here’s why using a regular oven might be the right choice for you:
- Cost-effective: No need to buy expensive equipment at first.
- Accessible: Most people already own a standard oven.
- Great for beginners: Learn the basics before investing in specialized tools.
However, you must dedicate the oven only for crafting, not for food, because the sublimation process releases fumes that are not safe for cooking afterward.
What You Need To Start Sublimating Tumblers
To get excellent results, you’ll need the right materials and tools. Here’s a detailed look at what you need and why each item matters.
Essential Supplies
1. Sublimation Tumbler
Only use tumblers designed for sublimation, which have a special polymer coating. Regular stainless steel, glass, or plastic tumblers will not work.
2. Sublimation Paper
This special paper holds sublimation ink and releases it when heated. Do not use regular printer paper.
3. Sublimation Ink
Must be used with compatible printers (typically EcoTank or Sawgrass printers). Normal inkjet or laser ink will not work.
4. Sublimation Printer
Converts digital designs into prints ready for the transfer process. Popular models include Epson EcoTank converted for sublimation or Sawgrass printers.
5. Heat-resistant Tape
Holds your design tightly to the tumbler. Regular tape will melt or leave residue.
6. Shrink Wrap Or Silicone Sleeve
Ensures even pressure around the tumbler so the design transfers smoothly. Shrink wrap is heated with a heat gun.
7. Heat-resistant Gloves
Protect your hands when handling hot tumblers.
8. Oven Thermometer
Most ovens are not accurate. Place this inside to monitor the real temperature.
9. Heat Gun (if Using Shrink Wrap)
Quickly shrinks the wrap around your tumbler.
10. Scissors And Ruler
For cutting your design to the right size.
11. Protective Surface
Use parchment paper or a non-stick mat to catch any ink or residue during baking.
Optional But Helpful
- Lint Roller: Removes dust and fibers that can cause spots on your design.
- Masking Tape: For extra security on edges.
- Blow Dryer: Sometimes helps with shrink wrap but less effective than a heat gun.
- Respirator Mask: If you’re sensitive to fumes.
Comparison: Sublimation Tumbler Vs. Regular Tumbler
To clarify why you need a sublimation-ready tumbler, see this comparison:
| Feature | Sublimation Tumbler | Regular Tumbler |
|---|---|---|
| Coating | Polymer (sublimation-ready) | None |
| Ink Bonding | Permanent | Will not bond |
| Image Quality | Sharp, vibrant | Blurry or no transfer |
| Durability | Dishwasher safe, long-lasting | Not possible |
Safety First: Important Precautions
Sublimation is safe with preparation, but there are real risks if you skip safety steps.
- Never use a food oven for crafts: After sublimating, the oven absorbs chemicals. Keep a dedicated oven for crafting.
- Work in a ventilated area: Open windows or use fans to move fumes outside.
- Wear heat-resistant gloves: Tumblers get extremely hot—over 350°F (177°C).
- Keep children and pets away: The process involves heat and chemicals.
A tip many beginners miss: even after cooling, the tumbler may have residue. Clean it with mild soap before use.

Credit: joyclubvip.com
Step-by-step Guide: How To Sublimate A Tumbler In A Regular Oven
Let’s walk through the entire process, from preparing your design to cooling your finished tumbler. These steps cover everything a beginner needs, plus tips experienced crafters use for better results.
1. Design Your Artwork
Start by creating or downloading your design. Use graphic software like Canva, Photoshop, or free tools like GIMP. Remember, the design will wrap around the tumbler, so size matters.
- Measure your tumbler: Most 20oz tumblers are about 9.3 x 8.2 inches for full wraps, but always measure yours.
- Mirror your image: Before printing, flip it horizontally. This is essential because the design will be reversed during transfer.
- Use high-resolution images: Aim for at least 300 dpi for sharp results.
Non-obvious tip: Avoid placing text or important details near the seam, as alignment may be tricky.
2. Print Your Sublimation Transfer
- Load sublimation paper into your printer.
- Check settings: Use “Best Quality” and “Photo” paper type if your printer allows.
- Print your mirrored design.
- Let ink dry: Wait a few minutes before touching or taping to avoid smudges.
Some beginners skip the drying step, which can cause blurred designs.
3. Prepare The Tumbler Surface
- Clean the tumbler: Use a lint-free cloth and rubbing alcohol to remove oils and dust.
- Check for spots: Even tiny fibers can show as white dots in your finished design.
- Dry thoroughly: Moisture affects the transfer.
Using a lint roller is a pro tip that prevents specks in your final image.
4. Attach The Design To The Tumbler
- Cut your printed design: Trim to fit, leaving a small overlap at the seam.
- Wrap the design: Place the image against the tumbler, lining up edges.
- Tape securely: Use heat-resistant tape along the seam and top/bottom edges.
- Check for wrinkles: The paper must be flat for even transfer.
5. Apply Shrink Wrap Or Silicone Sleeve
- Slide the tumbler into the shrink wrap or silicone sleeve.
- Use a heat gun: Evenly heat all sides until the wrap fits tightly with no air pockets.
Silicone sleeves can be reused, but shrink wrap gives tighter pressure for beginners.
6. Preheat Your Oven
- Set oven to 375°F (190°C).
- Place an oven thermometer inside: Ovens can be inaccurate by 20-30 degrees.
- Wait until the oven is stable: Let it heat for at least 10-15 minutes.
Never use a toaster oven—they heat unevenly and can damage your tumbler.
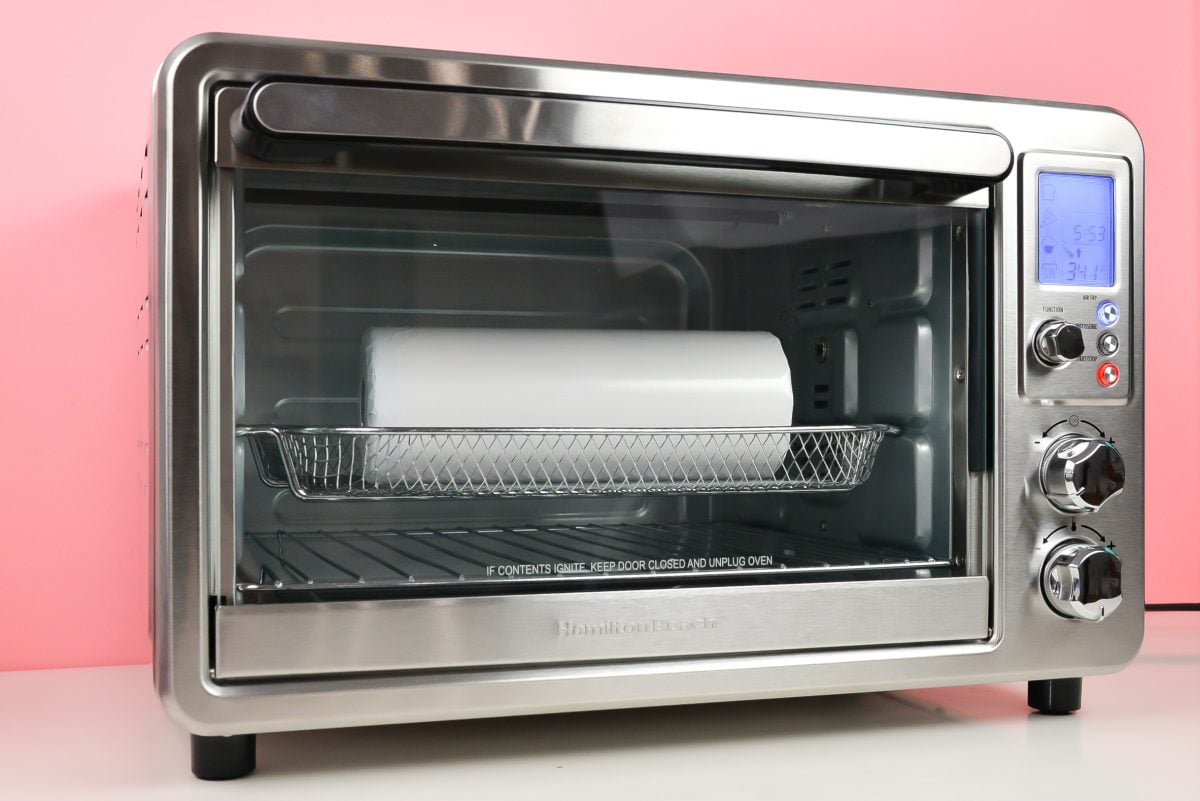
7. Bake The Tumbler
- Place the tumbler upright on the oven rack.
Use a baking tray lined with parchment paper for drips.
- Bake for 6 minutes.
Turn the tumbler halfway through for even heat, unless using convection (fan) ovens.
- Watch closely: Overheating can cause ghosting (fuzzy edges) or faded colors.
Tip: Every oven is a little different. Your first try is a test—take notes on time and temperature.
8. Remove And Cool The Tumbler
- Wear heat-resistant gloves.
- Carefully take out the tumbler.
- Place on a heat-safe mat or towel.
- Let cool for 10-15 minutes before removing tape and wrap.
Do not touch the tumbler with bare hands—it stays hot longer than you think.
9. Peel And Reveal
- Remove the shrink wrap or sleeve gently.
- Peel off tape and sublimation paper.
- Check your design: Colors should be bright, and lines sharp.
If you see faded spots, it’s often from low pressure or temperature. Make adjustments for your next try.
10. Clean And Finish
- Wash with mild soap to remove any residue.
- Inspect for defects: Tiny spots can be polished with a soft cloth.
Now Your Tumbler Is Ready For Use Or Gifting!
Common Problems And How To Fix Them
Even experienced crafters face challenges. Here are the most common issues and how to solve them:
Faded Or Dull Colors
- Check oven temperature: If it’s too low, the ink won’t transfer fully.
- Increase time slightly: But don’t overbake—this causes the opposite problem.
- Confirm you used sublimation ink and paper.
Ghosting Or Blurry Edges
- Tumbler moved during baking: Secure the wrap more tightly.
- Design not taped down fully: Tape all edges and seams.
White Or Unprinted Spots
- Lint or dust on tumbler: Always clean with alcohol and a lint roller.
- Paper not flat: Press out all wrinkles before baking.
Uneven Colors
- Oven hot spots: Turn your tumbler halfway through baking.
- Wrap too loose: Use better shrink wrap or a tighter silicone sleeve.
Wrinkled Or Shifted Design
- Paper was not tight: Re-wrap and tape more securely.
- Shrink wrap not applied evenly: Use a heat gun slowly and carefully.
Advanced Tips For Perfect Results
After mastering the basics, you can improve your technique with these advanced tips:
- Test strips: Print a small test design and sublimate on a scrap tumbler or mug to check colors.
- Double-wrapping: Some crafters use two layers of sublimation paper for deeper colors—experiment carefully.
- Color management: Use ICC color profiles with your printer for the most accurate color matching.
- Batch baking: Bake multiple tumblers at once if your oven is large enough, but space them apart for even heating.
- Design seams: Hide the seam under a logo or background pattern for a professional look.
How Regular Ovens Compare To Sublimation Ovens
You might wonder, “Should I upgrade to a special oven?” Here’s a look at the main differences for crafters:
| Feature | Regular Oven | Sublimation Oven |
|---|---|---|
| Cost | Low (already owned) | High ($200+) |
| Temperature Control | Less precise | Very precise |
| Batch Size | Multiple possible | Often 1-2 at a time |
| Fume Extraction | Not built-in | Often included |
| Learning Curve | More trial and error | Designed for sublimation |
A regular oven works well for hobbyists or small runs. If you plan to make dozens of tumblers weekly, investing in a sublimation oven may save time and reduce mistakes.

Credit: www.youtube.com
Creative Ideas For Sublimated Tumblers
Sublimation lets you create almost any design. Here are ideas to spark your creativity:
- Personalized names: Great for gifts or company branding.
- Photo tumblers: Family pictures, pets, or vacation memories.
- Holiday themes: Christmas, Halloween, or birthdays.
- Inspirational quotes: Motivational sayings or jokes.
- Business logos: Promote your brand with swag.
- Color-changing designs: Use special inks that react to temperature.
- Full-wrap patterns: Floral, geometric, or abstract art.
Experiment with color gradients, metallic backgrounds, or layered effects. The only limit is your imagination.
Cleaning Up: Caring For Your Sublimated Tumbler
With proper care, a sublimated tumbler lasts for years. Here’s how to keep it looking new:
- Hand wash is best: Even if labeled dishwasher safe, hand washing preserves the image longest.
- Avoid abrasive sponges: Use soft cloths to prevent scratches.
- Don’t microwave: Most tumblers are metal and not microwave safe.
- Store with the lid off: Prevents odors from building up.
If you sell your tumblers, always include care instructions for your customers.
Credit: heyletsmakestuff.com
Mistakes Beginners Often Make
Learning by doing is valuable, but some mistakes are easy to avoid if you know ahead of time:
- Using the wrong tumbler: Only polymer-coated tumblers work.
- Skipping image mirroring: Your text will appear backward if not mirrored.
- Not checking oven temperature: Guessing leads to faded or burned designs.
- Reusing a food oven: Unsafe—always separate craft and kitchen ovens.
- Rushing the cooling: Removing wrap while hot can blur the design.
One non-obvious insight: humidity affects sublimation. On rainy days, ink can react differently—run a dehumidifier if needed.
How To Choose Sublimation Supplies
With so many products online, it’s easy to buy the wrong item. Here’s what really matters:
- Tumbler quality: Buy from trusted sources—cheap tumblers often have poor coatings.
- Ink compatibility: Use ink made for your printer brand and model.
- Paper thickness: Thicker paper prevents bleed-through but may wrap less tightly.
- Tape residue: Look for tape labeled “no residue” for easy clean-up.
- Shrink wrap sizing: Match to your tumbler’s ounces for a snug fit.
If you’re unsure, read reviews or join online groups for advice. Avoid mixing brands until you’re comfortable with the process.
Troubleshooting: Real Examples
Let’s look at real scenarios beginners face and how to fix them:
Example 1:
“my Tumbler Came Out With Faded Colors And White Spots.”
- Likely cause: Oven was not hot enough, or there was lint on the surface.
- Solution: Increase temperature by 10°F, and clean with alcohol and a lint roller before wrapping.
Example 2:
“Design is sharp on one side but blurry on the other. ”
- Likely cause: Uneven oven heating, or wrap was loose on one side.
- Solution: Rotate halfway through baking, and use more tape.
Example 3:
“tape Left Marks Or Residue.”
- Likely cause: Wrong tape type or overheated.
- Solution: Only use heat-resistant tape, and don’t let tape touch the printed area.
Example 4:
“colors Are Too Dark After Baking.”
- Likely cause: Overbaked or oversaturated design.
- Solution: Decrease baking time by 1 minute, or adjust printer settings to ‘normal’ instead of ‘vivid.’
When To Consider Upgrading Equipment
If you enjoy sublimating tumblers and start making them regularly, upgrading your setup can save time and improve quality.
- Dedicated convection oven: Heats more evenly than standard ovens.
- Sublimation oven: Designed for crafts with safety features.
- Tumbler press: Gives perfect, even pressure but is more expensive.
- Better printer: Upgrading to a Sawgrass or high-end Epson increases color accuracy.
However, for most hobbyists, a regular oven works well with careful monitoring.
Useful Resources For Learning More
The world of sublimation is large, and there’s always more to learn. For deep dives into color profiles, printer maintenance, or creative design ideas, check out resources like the Wikipedia on Sublimation Printing. Online forums, YouTube tutorials, and Facebook groups are also full of real-world tips.
Frequently Asked Questions
What Kind Of Oven Can I Use For Sublimation?
You need a dedicated convection or regular oven that you will never use for food again. Sublimation releases fumes that can stay in the oven and are not safe for cooking.
How Do I Know If My Tumbler Is Sublimation-ready?
Check if it’s labeled sublimation tumbler and has a polymer coating. Regular stainless steel or plastic won’t work. Sellers usually state clearly if a tumbler is for sublimation.
Can I Use Any Printer For Sublimation Transfers?
No. You need a sublimation printer with special ink. Most people convert an Epson EcoTank or buy a Sawgrass printer. Standard inkjet or laser printers will not work.
Why Does My Design Look Faded After Baking?
This usually means the temperature was too low, or the design didn’t have enough pressure against the tumbler. Double-check your oven with a thermometer, and use more shrink wrap or a tighter sleeve.
Is Sublimation Dishwasher Safe?
Most sublimated tumblers are top-rack dishwasher safe if made with quality materials. However, for longest life, hand washing is recommended to avoid fading over time.
Sublimating tumblers in a regular oven is a fun, rewarding craft that opens endless creative doors. With the right preparation, materials, and a little practice, you can make stunning, personalized drinkware at home—no fancy equipment required. Always remember to work safely, test your process, and enjoy the journey of learning new skills.