
Installing a new kitchen faucet supply line might seem intimidating if you’ve never tried plumbing work before. But with careful preparation and some basic tools, you can handle this task yourself and save on plumber fees. A secure, leak-free supply line is crucial for your kitchen, as water leaks can cause expensive damage and mold over time.
If you understand the process and follow the right steps, you’ll not only improve your faucet’s performance but also gain confidence for future DIY projects.
This guide covers everything you need to know about installing a kitchen faucet supply line. You’ll learn how to select the right materials, prepare your workspace, connect and test the lines, and avoid common mistakes. Even if you’re a beginner, you’ll discover practical tips and solutions for tricky situations.
By the end, you’ll be ready to tackle the job with clarity and confidence.
Understanding Kitchen Faucet Supply Lines
Kitchen faucet supply lines are flexible tubes that connect the water supply valves under your sink to the faucet itself. These lines deliver both hot and cold water, and they are designed to withstand water pressure and temperature changes. Choosing the right supply line and installing it properly ensures your faucet works smoothly and helps prevent leaks.
Supply lines play a quiet but essential role in your kitchen’s plumbing. Without reliable lines, you might see slow drips, weak water flow, or even sudden bursts that can cause flooding. Many people don’t realize that even a tiny leak can lead to mold growth inside cabinets or behind walls, which can be very costly to repair.
Taking the time to understand your supply lines now can save you many headaches later.
Types Of Faucet Supply Lines
There are several types of supply lines, each with its strengths and weaknesses. Here’s a quick comparison:
| Type | Material | Pros | Cons |
|---|---|---|---|
| Braided Stainless Steel | Stainless steel outer layer, rubber or plastic inner tube | Durable, flexible, resists bursting | More expensive than vinyl |
| Vinyl (PVC) | Plastic | Inexpensive, easy to install | Less durable, can kink or burst |
| Copper | Copper metal | Very long-lasting, heat-resistant | Harder to bend, more costly, harder to install |
Most homeowners choose braided stainless steel because it’s strong and easy to work with. Vinyl lines are only suitable for temporary fixes or very low-budget projects.
It’s also important to match the supply line fittings to your faucet and shutoff valve. Some lines come with built-in connectors that fit most standard faucets, but if your plumbing is older or uses a different thread size, you may need to buy a special adapter.
Many people overlook this detail and only realize it after they’ve started the job.
How Supply Lines Work
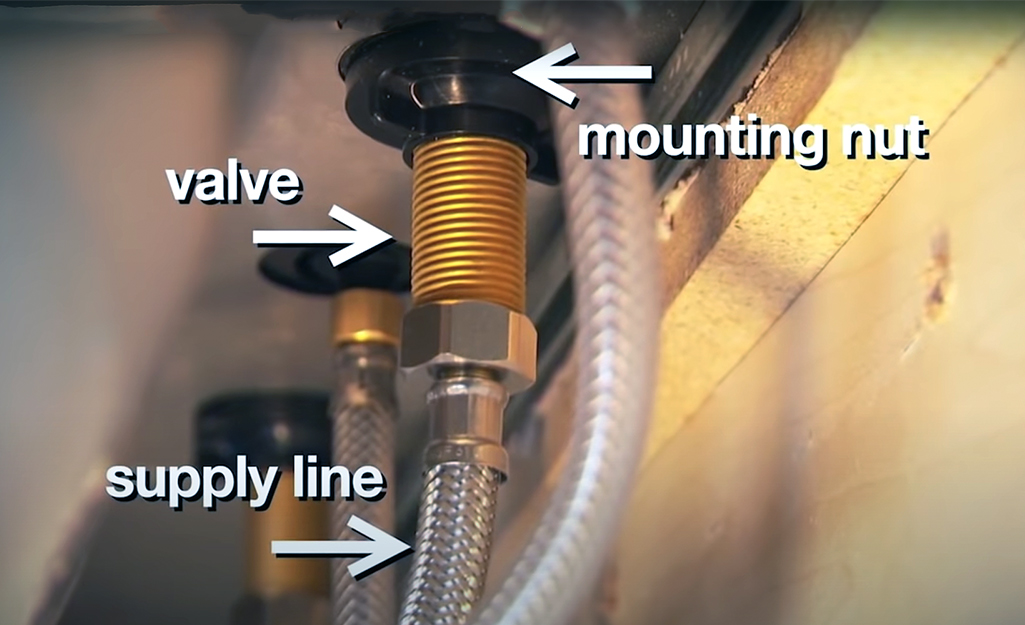
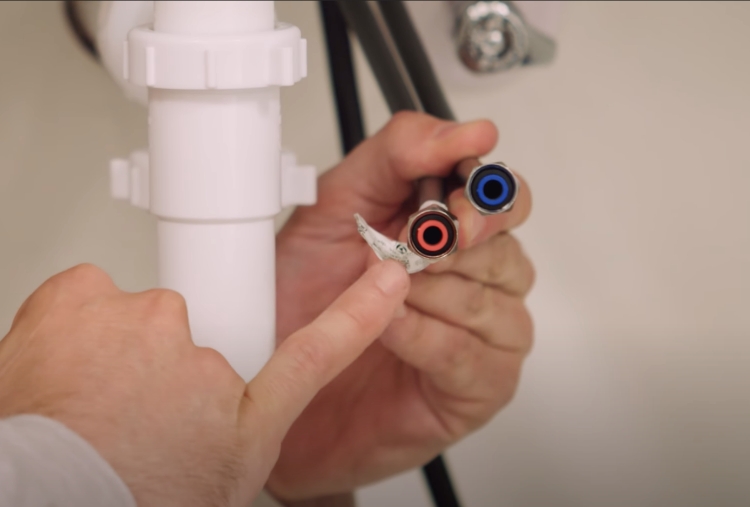
Each faucet has two supply lines: one for hot and one for cold water. These lines connect the shutoff valves (called angle stops) to the threaded inlets on the faucet. The connections must be tight and secure, but you should never overtighten, as this can damage the threads or crush washers.
Also, supply lines are designed to bend gently, not sharply. If you force a supply line into a tight corner, you risk kinks that slow the water flow or put pressure on the fittings. When this happens, you might notice weak water pressure or even leaks at the connection points.
What You Need Before You Start
Proper preparation saves time and prevents mistakes. Gather all materials and tools before you begin.
A little planning goes a long way in plumbing projects. For example, make sure you have enough light under the sink. A small work light or headlamp can help you see what you’re doing, especially if your kitchen has a deep cabinet or limited access.
If you are working in a cramped space, clear out cleaning supplies or trash bins so you have room to move.
Tools Required
- Adjustable wrench: For tightening and loosening nuts.
- Basin wrench: Helps reach tight spaces under the sink.
- Bucket or bowl: Catches drips when you disconnect old lines.
- Towel or rag: For cleaning up water spills.
- Plumber’s tape (Teflon tape): Seals threaded connections if needed.
A basin wrench is especially helpful if you have a deep or double sink, where it’s hard to reach the back of the faucet. Some people try to use only an adjustable wrench, but this can lead to scraped knuckles or loose fittings if you can’t grip the nut properly.
Materials Checklist
- New supply lines (length and type matched to your faucet and shutoff valves)
- Replacement washers (if not included with supply lines)
- Faucet with threaded inlets
- Shutoff valves in good working condition
If your shutoff valves are old or hard to turn, it’s smart to replace them while you have access. New valves only cost a few dollars and can prevent future leaks.
Measuring For New Supply Lines
Measure the distance from the shutoff valve to the faucet inlet. Add a few extra inches to avoid stress or kinks in the line. Most kitchen sinks use 12-inch or 16-inch lines, but always check before buying.
Pro Tip: If your sink is deep or the valve is far from the faucet, choose a longer supply line. Never force a short line to fit—it can pull loose or leak.
If you’re not sure what size you need, it’s better to buy a line that’s slightly longer. You can always add a gentle loop under the sink, but a line that’s too short can’t be stretched safely. Many beginners make the mistake of buying the exact length, only to find out that small changes in faucet position or valve location leave the line too tight.
Removing The Old Supply Line
Before installing a new supply line, you must remove the old one. This step is simple but requires caution to avoid water spills and damage.
Step 1: Turn Off The Water
Locate the hot and cold water shutoff valves under the sink. Turn them clockwise until they stop. Open the faucet to relieve pressure and drain any water remaining in the lines.
If your shutoff valves are stiff, use a towel for extra grip. Never force the valve if it won’t turn; older valves can break and leak if handled roughly.
Step 2: Place A Bucket Or Bowl
Put a bucket or bowl under the supply line connections. Some water may drip when you disconnect the lines.
Step 3: Loosen The Old Supply Line
Using an adjustable wrench or basin wrench, loosen the compression nut that connects the supply line to the shutoff valve. Hold the valve steady with one hand to avoid twisting the pipe.
Repeat this for the faucet end of the supply line. Some older supply lines may be stuck, so use gentle force and avoid damaging the valve or faucet threads.
If you have difficulty loosening the nut, apply a little penetrating oil and wait a few minutes. This can help break loose stubborn fittings. Also, keep in mind that old lines may leave behind fragments of washer or sealant—be ready to clean these off before installing the new line.
Step 4: Remove The Supply Line
Once both ends are loose, pull the supply line out and set it aside. Check the old washers—if they look worn or cracked, replace them.
Many people forget to check the condition of the washers, but they’re essential for a good seal. If your old washer is flattened or brittle, it may have been leaking for some time without you noticing.
Preparing To Install The New Supply Line
Small mistakes during preparation can lead to leaks later. Take your time to inspect and clean all parts.
Inspect The Shutoff Valves
Check that the shutoff valves are in good condition and not leaking. If you see corrosion, buildup, or leaks, replace the valve before installing new supply lines.
Corrosion or white mineral buildup is often a sign of slow leaks. If you see these, don’t just wipe them away—fix the source of the problem. Replacing a faulty valve now is much easier than dealing with a burst pipe later.
Clean The Threads
Use a rag to wipe the threads on the faucet inlet and the shutoff valve. Remove any old debris, tape, or sealant. Clean threads help create a better seal.
If there is stubborn buildup, use an old toothbrush or a small wire brush. Be gentle—you don’t want to damage the threads, just clean them. Even small bits of debris can prevent a watertight seal.
Check The Washers
Most new supply lines come with rubber washers already in place. If your lines don’t have washers, insert one into the nut before connecting. Washers prevent leaks by forming a tight seal.
Sometimes, washers shift out of position during shipping. Check before installation and make sure the washer sits flat inside the nut.
Credit: www.homedepot.com
Installing The New Faucet Supply Line
Now you’re ready to connect the new supply lines. Work carefully and double-check every connection.
Step 1: Attach To The Faucet Inlet
Start by connecting the top end of the supply line to the faucet’s threaded inlet (usually above the sink). Hand-tighten the nut, then use a wrench to give it an extra quarter turn. Do not overtighten—this can crush the washer.
If your faucet has limited space, you may need to use a basin wrench to reach the nut. Make sure the line is not cross-threaded; the nut should turn easily by hand before using a wrench.
Step 2: Connect To The Shutoff Valve
Attach the bottom end of the supply line to the shutoff valve. Again, hand-tighten first, then use a wrench to snug it up. Hold the valve steady with your other hand to avoid twisting.
Note: Some supply lines require a small amount of plumber’s tape on the valve threads. Check the manufacturer’s instructions. If in doubt, use a single layer of tape for extra security.
If you feel resistance while threading the nut, stop and realign. Cross-threading is a common beginner mistake and can damage both the valve and the supply line.
Step 3: Repeat For The Other Side
Connect the second supply line for the other water line (hot or cold) using the same process.
Label your lines if you’re unsure which is hot and which is cold. A small piece of colored tape or a written tag can help you avoid confusion later, especially if the valves are not clearly marked.
Step 4: Check For Kinks Or Twists
Make sure the supply lines are not bent sharply or twisted. Lines should have a gentle curve. A kinked line can block water flow or burst under pressure.
If you notice a kink, gently reposition the line or consider using a longer line. Don’t try to “work out” a kink with force, as this may weaken the tube.
Visual Reference: Proper Connection
Here’s a quick comparison of correct and incorrect supply line installations:
| Correct Installation | Incorrect Installation |
|---|---|
| Gentle curve, no kinks Hand-tight plus wrench snug | Sharp bends, twists Overtightened or cross-threaded |
Testing For Leaks And Final Adjustments
Testing is an important step that many beginners rush through. A slow leak can take hours to show, so test carefully.
Step 1: Open The Shutoff Valves
Slowly turn on the hot and cold water shutoff valves under the sink. Do this one at a time.
If you open the valves too quickly, you can cause a sudden rush of water that may shake loose debris or even burst a poorly connected line. Go slowly and watch for any sign of water escaping.
Step 2: Check For Leaks
Look closely at both ends of each supply line. Feel around the connections with a dry finger or tissue to detect moisture. If you see drips or wetness, turn off the valve and tighten the nut gently. Do not overtighten.
Step 3: Run The Faucet
Turn on the faucet and let the water run for one or two minutes. This helps clear out air and flushes any debris. Watch for leaks during this time.
Pay attention to water pressure. If you notice unusually low flow, check that you haven’t kinked the supply line, or that there isn’t debris trapped inside.
Step 4: Final Check
After several minutes, check again for leaks. If all connections are dry, your installation is complete. Wipe the area dry and monitor for the next 24 hours.
Non-obvious Insight: Small leaks sometimes appear only when the faucet is running hot water. This is because heat expands materials. Always test with both hot and cold water.
Another detail many overlook is checking for leaks after using the faucet for a day or two. Some leaks develop slowly, especially if the washer is not seated perfectly. Make it a habit to check under the sink for moisture during the first week.
Special Situations And Troubleshooting
Occasionally, you may face challenges that need extra attention. Here’s how to handle some common problems.
Your Faucet Or Valve Has Unusual Thread Sizes
Some faucets (especially imported brands) or older shutoff valves use non-standard threads. You may need an adapter to connect modern supply lines. Bring your old line or valve to the hardware store to find the correct adapter.
Adapters are inexpensive, but make sure to match both the thread size and type (compression, flare, etc. ). Installing the wrong adapter can lead to leaks or stripped threads.
The Shutoff Valve Won’t Turn
If the valve is stuck or leaks when used, it’s best to replace it. Don’t force a stuck valve—it can break and cause a major leak.
If you’re not comfortable replacing a valve, this is a good time to call a plumber. A broken valve can flood your kitchen quickly, so don’t take chances.
You Find Corrosion Or Mineral Buildup
Clean minor buildup with vinegar and a brush. If you see green or white crust, it may be time to replace the valve or faucet.
Corrosion around threads or fittings often means there was a leak in the past. Don’t ignore this warning sign—replace the affected part before installing new lines.
The Supply Line Is Too Short
Never stretch a line to fit. Always use a longer line. Forcing a short line can cause leaks or breakage.
If you’re unsure, buy two sizes and return the one you don’t use. A few extra dollars now can save a costly repair later.
Supply Line Keeps Leaking
If a connection keeps leaking after tightening, check for:
- Damaged washer
- Cross-threaded nut
- Debris on threads
- Wrong supply line size
Replace the washer or supply line if needed.
Beginner’s Mistake to Avoid: Don’t wrap plumber’s tape around compression or flare fitting threads. These are designed to seal with the washer, not tape.
Many new DIYers think more tape means better sealing, but for these connections, it can cause more problems than it solves.
Comparing Diy Vs. Professional Installation
Should you do it yourself or hire a plumber? Here’s a comparison to help you decide:
| Aspect | DIY Installation | Professional Installation |
|---|---|---|
| Cost | Only materials ($10–$30) | Labor + materials ($80–$200+) |
| Time | 30–60 minutes (beginner) | 15–30 minutes (experienced) |
| Skill required | Basic tools, patience | Professional experience |
| Warranty | None or limited | Usually includes service guarantee |
Most people with basic DIY skills can install a kitchen faucet supply line without problems. However, if you notice signs of bigger plumbing issues—like constant leaks, rust, or old pipes—it’s smart to call a professional.
Credit: www.deltafaucet.com
Tips For A Smooth Installation
- Buy quality supply lines: Cheap lines may leak or fail early.
- Label hot and cold: If you’re new to plumbing, tag the hot and cold lines so you don’t mix them up.
- Keep the area clean: Working in a tidy space reduces mistakes.
- Do not overtighten: Tight is enough; too tight can damage parts.
- Test with both hot and cold water: Some leaks only appear with hot water.
- Check after 24 hours: Look for slow leaks you may have missed at first.
A bonus tip: Take a quick photo of the connections before you start. If you have any doubts later, you can refer to your photo to make sure you’ve reconnected everything the right way.
Frequently Asked Questions
How Long Do Kitchen Faucet Supply Lines Last?
Most braided stainless steel supply lines last 5–10 years, while cheap vinyl lines may only last 2–3 years. Inspect your lines every year and replace them if you see cracks, corrosion, or bulging.
If you live in an area with hard water, mineral buildup can shorten the life of your supply lines. Regular inspection is especially important in these cases.
Can I Use Teflon Tape On Faucet Supply Line Connections?
Only use Teflon tape on threaded connections that don’t have a built-in washer. Most modern supply lines seal with a washer, not tape. Overusing tape on compression fittings can actually cause leaks.
What Length Supply Line Should I Buy?
Measure from the shutoff valve to the faucet inlet and add a few inches. Common lengths are 12″, 16″, and 20″. If you’re unsure, buy a slightly longer line—you can make a gentle curve, but a line that’s too short will not work.
Why Does My New Supply Line Still Leak?
Leaks can happen if the washer is missing, damaged, or not seated correctly. Make sure you haven’t cross-threaded the nut. Also, debris on the threads can prevent a good seal. Remove, clean, and reconnect if leaks persist.
Is It Safe To Install Supply Lines Myself?
Yes, installing kitchen faucet supply lines is safe if you follow instructions and use the right tools. Always shut off the water before starting. If you run into major issues—like stuck valves, old pipes, or constant leaks—call a licensed plumber.
—
Installing a kitchen faucet supply line is a manageable task that can save you both money and time. With careful preparation, the right tools, and an understanding of how the parts fit together, you can achieve a leak-free connection that will last for years.
Always choose quality materials, double-check your measurements, and don’t rush the testing process.
Remember, even small leaks can lead to big problems if left unattended. Take a little extra time to do it right, and you’ll enjoy peace of mind every time you use your kitchen faucet. For additional visual guides and safety tips, consider checking resources from Family Handyman, a trusted authority in DIY home improvement. With this knowledge, you’re ready to tackle your kitchen faucet supply line installation like a pro.

Credit: havensmetal.com