Adjusting a Square D pressure switch is a task that many homeowners, plumbers, and well water professionals may need to perform at some point. Whether your water pump is cycling too often, not starting at the right pressure, or your water pressure feels low, understanding how to make proper adjustments can save you time, money, and frustration. This guide explains every important detail, from identifying your switch to fine-tuning it safely and effectively.
Most people feel uncertain when opening the cover of a pressure switch for the first time. There are springs, screws, wires, and sometimes, unclear instructions. But with the right approach, you can make these adjustments confidently. Let’s break down everything you need to know, step by step, so your well system operates smoothly and reliably.
Understanding The Square D Pressure Switch
A Square D pressure switch is a small, box-like device attached to your well system’s pressure tank or nearby piping. Its job is simple but crucial: it turns your well pump on and off based on water pressure.
When you use water in your home, pressure drops. When it falls to a certain level (the cut-in pressure), the switch activates the pump. As the pump runs, pressure rises. When it reaches a higher set point (the cut-out pressure), the switch turns the pump off.
Types Of Square D Pressure Switches
The two most common models are:
- 20/40 psi: Pump turns on at 20 psi, off at 40 psi
- 30/50 psi: On at 30 psi, off at 50 psi
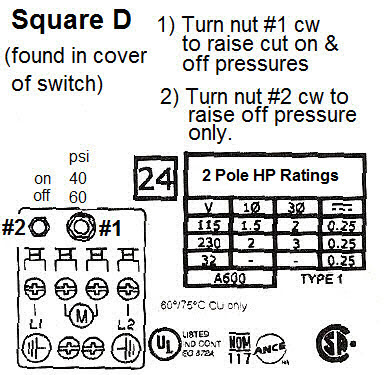
- 40/60 psi: On at 40 psi, off at 60 psi
Some commercial setups use different ranges, but for most homes, these are standard.
Pro tip: The numbers on the box (like “30/50”) show the factory settings, but you can adjust them within limits.
Key Parts Of The Switch
Inside the metal or plastic cover, you’ll find:
- Large spring: Controls both cut-in and cut-out pressure
- Small spring: Adjusts only the cut-out pressure (the “differential”)
- Electrical contacts: Where the pump wiring connects
- Pressure sensor: Feels the water pressure
Knowing which screw to turn is critical. Turning the wrong one can lead to system problems or even equipment damage.
Why Adjust A Square D Pressure Switch?
Before you start, it’s important to understand why you might need to adjust the pressure switch in the first place. Some common reasons include:
- Low water pressure: Showers and faucets feel weak
- Pump short cycling: The pump turns on and off too often
- Changed system needs: You added appliances or a sprinkler system
- Pressure tank replacement: New tanks sometimes need new settings
Making the right adjustments can improve comfort, save energy, and extend pump life.
Safety First: What To Do Before Adjusting
Working with a pressure switch involves both water pressure and electricity. Take these precautions:
- Turn off power: Shut off the breaker to the well pump before opening the switch
- Relieve water pressure: Open a faucet to release pressure (if needed)
- Wear safety gear: Eye protection is smart, especially if working with old or corroded equipment
- Use insulated tools: A screwdriver with a plastic handle reduces electrical risk
Never touch exposed wires with wet hands, and always double-check that the power is off.
Tools And Materials You Will Need
To adjust your Square D pressure switch safely and accurately, gather these items:
- Insulated flathead screwdriver: For turning adjustment screws
- Pressure gauge: To read the actual system pressure
- Flashlight: For seeing inside the switch housing
- Gloves: For hand protection
- Multimeter: Optional, to confirm power is off
Having the right tools makes the job smoother and prevents stripped screws or accidental shocks.
Credit: www.wwpp.co
Step-by-step: How To Adjust A Square D Pressure Switch
Let’s walk through the process, so you know exactly what to expect. Each step includes extra details that most guides skip, so you avoid mistakes.
1. Locate And Identify Your Pressure Switch
The pressure switch is usually mounted on a tee fitting near the pressure tank. It might be covered in dust or cobwebs, so wipe it clean. Confirm the brand (look for “Square D” on the cover) and model numbers. This helps if you need to look up manuals or specs.
2. Turn Off Power
Find your well pump breaker in the electrical panel and switch it off. Double-check by listening for silence at the pressure tank (no pump running), and use a non-contact voltage tester if you have one.
3. Remove The Switch Cover
Loosen the screw on top of the Square D switch and lift off the cover. Inside, you’ll see the large and small springs and their adjustment nuts.
4. Note The Current Settings
Before adjusting anything, record your current system pressure. Open a faucet, let the pressure drop until the pump clicks on, and note the pressure (cut-in). Then, let the pump run until it clicks off, and note that pressure (cut-out).
This helps you return to the old setting if needed, and it’s a smart troubleshooting habit.
5. Adjust The Main (large) Spring
The large spring raises or lowers both the cut-in and cut-out pressures equally.
- Turn the nut clockwise: Increases both cut-in and cut-out pressures
- Turn the nut counterclockwise: Decreases both pressures
One full turn usually changes pressure by about 2-3 psi. Make small adjustments (half turns) and re-test.
6. Adjust The Differential (small) Spring
The small spring only changes the differential—the gap between cut-in and cut-out.
- Turn the nut clockwise: Increases the cut-out pressure only (wider gap)
- Turn the nut counterclockwise: Decreases cut-out pressure only (narrower gap)
Most systems work best with a 20 psi differential (for example, 40/60). Too small a gap can cause short cycling, while too large a gap makes pressure swings noticeable.
7. Test Your New Settings
After adjusting, replace the switch cover and restore power. Let the system cycle, and use your gauge to check the new cut-in and cut-out pressures. Adjust again if needed.
This process may take 2–3 cycles to get exactly right.
8. Check For Leaks And Listen For Issues
After adjustment, inspect around the pressure switch and tank for leaks. Listen for unusual noises (clicks, buzzes, or rapid cycling). These may signal wiring issues, stuck contacts, or a failing pressure tank.
9. Replace The Cover And Restore Power
When you’re satisfied with the settings, make sure the cover is back on and secure. Restore power at the breaker.
10. Test Water Fixtures
Open faucets and showers around your home. Notice if water pressure feels improved, and listen for normal pump operation.
Tips For Accurate Adjustment
Getting the best results depends on a few practical tricks:
- Make small changes: A little goes a long way; over-adjusting can cause more problems
- Let pressure settle: Wait a minute between cycles so the tank fills properly
- Monitor over time: Test the system several times over a day to confirm stability
Most importantly, don’t exceed the limits marked on your pressure tank or the switch. Higher pressures may damage plumbing or void warranties.
Common Problems And How To Solve Them
Even with careful adjustment, some issues may appear. Here’s how to handle the most frequent ones:
Pump Rapidly Turns On And Off (short Cycling)
This often means the pressure tank air charge is too low, or the tank is waterlogged. Adjusting the switch won’t solve this—check the tank’s air charge with a tire gauge (should be 2 psi below cut-in pressure).
Pressure Switch Arcs Or Sticks
If the contacts look burned or don’t move freely, the switch may be failing. Replace it instead of adjusting further.
Can’t Reach Desired Pressure
Your pump may not be strong enough for higher settings, or there could be a clog. Lower the setting, or have a professional check the system.
Leaking At The Switch
Leaks at the base can damage the sensor. Tighten fittings gently or replace old, corroded parts.
How Adjustments Affect Your Well System
Changing pressure settings has real effects on your water system. Here’s a quick summary in table form:
| Adjustment | Effect | Possible Issues |
|---|---|---|
| Higher Cut-Out Pressure | Stronger water flow, longer pump run time | May overwork pump, risk leaks |
| Lower Cut-In Pressure | Longer intervals between pump starts | Pressure may feel too low at faucets |
| Narrower Differential | More frequent pump cycles | Short cycling, pump wear |
| Wider Differential | Longer cycles, wider pressure swing | Possible comfort issues, uneven pressure |
Example Scenario: Adjusting For A New Sprinkler System
Suppose you install a lawn sprinkler system, and the pressure is not high enough for good coverage. You could:
- Increase both cut-in and cut-out pressures by 5 psi
- Test system with all sprinklers running
- Monitor for leaks or pump strain
If the pump cannot keep up, you may need a larger pump or a separate booster.
Pressure Switch Settings Vs. Tank Air Charge
The pressure tank’s air charge must match your new pressure settings. For example, if your cut-in is set at 40 psi, the tank should have 38 psi of air (measured with the pump off and water drained).
Here’s a comparison table:
| Cut-In Setting (psi) | Tank Air Charge (psi) | Result |
|---|---|---|
| 30 | 28 | Normal performance |
| 40 | 38 | Best for 40/60 systems |
| 50 | 48 | Higher pressure, may need stronger tank |
Non-obvious insight: Many people forget to adjust the tank’s air charge when they change the pressure switch. This causes weak water flow and short cycling, even if the switch is set correctly.

Credit: www.youtube.com
Mistakes To Avoid When Adjusting A Square D Pressure Switch
Even experienced DIYers make errors when adjusting well system switches. Here are mistakes to watch out for:
- Forgetting to turn off power: This is dangerous and can lead to electric shock.
- Over-tightening adjustment nuts: Can strip threads or break the spring.
- Making large adjustments all at once: Can overshoot the desired pressure and create new problems.
- Ignoring the pressure tank’s air charge: As explained, this is critical for proper operation.
- Not testing all water fixtures: Some faucets may be on different floors or have special needs.
- Exceeding system limits: Always check your pump, tank, and plumbing specs.
When To Call A Professional
Some situations are best handled by a licensed plumber or well contractor:
- Electrical issues: If the switch is sparking or the wiring looks damaged
- Tank replacement: Installing or sizing a new tank
- Persistent short cycling: Usually a tank problem, not a switch issue
- No water at all: May indicate a pump failure or well issue
If you’re unsure, it’s safer and often more cost-effective to call a pro.
Maintenance Tips For Long-term Performance
Adjusting your Square D pressure switch is not a “set it and forget it” task. Regular checks keep your system running smoothly.
- Check pressure gauge regularly: Replace it if it sticks or fogs up
- Inspect for leaks: Water around the switch means a problem
- Clean the switch area: Keep insects and debris out
- Test the system: Every few months, especially after storms or power outages
How Long Do Square D Pressure Switches Last?
With normal use and good maintenance, a Square D pressure switch can last 10–15 years. Hard water, corrosion, or constant cycling can shorten its life. If you notice inconsistent operation or visible wear, replacement is better than constant adjustment.

Credit: www.wikihow.com
How To Identify A Failing Pressure Switch
Watch for these warning signs:
- Inconsistent pump operation: Pump doesn’t start or stop reliably
- Burned contacts: Black marks inside the switch
- Physical damage: Cracks, rust, or loose parts
- Switch feels hot: May indicate electrical issues
Replacement switches are not expensive, and installation is straightforward if you follow safety steps.
Upgrading To A Digital Pressure Switch
Some modern well systems use digital pressure switches with electronic displays and buttons. These offer more precise control and sometimes auto-diagnostics. However, installation can be more complex.
Here’s a quick comparison:
| Feature | Mechanical Switch | Digital Switch |
|---|---|---|
| Adjustment | Manual screws | Push buttons, digital readout |
| Cost | Low | Higher |
| Reliability | Very high | High, but needs power surge protection |
| Diagnostics | None | Some models show errors |
For most homeowners, the classic Square D switch remains the best value for ease of use and dependability.
Where To Find More Information
If you need detailed product specifications or wiring diagrams, visit the official manufacturer’s resource at Schneider Electric.
Frequently Asked Questions
How Do I Know If My Square D Pressure Switch Is Bad?
If your pump doesn’t start or stop when it should, or you see burned or corroded contacts inside the switch, it may be bad. Replace the switch if adjustments don’t fix the problem.
Can I Adjust The Pressure Switch While The Power Is On?
No. Always turn off the power at the breaker before opening the switch cover. Adjusting with power on is dangerous and can cause electric shock.
What’s The Best Pressure Setting For A Home Well System?
Most homes work well with a 30/50 psi or 40/60 psi setting. Higher pressures give stronger flow but may stress older plumbing. Always check your tank and pump ratings.
Why Does My Pump Keep Turning On And Off Quickly?
This is called short cycling. It’s usually caused by a waterlogged pressure tank, not the switch. Check the tank’s air charge and bladder before adjusting the switch.
How Often Should I Check Or Adjust My Pressure Switch?
Check your pressure switch every 6–12 months, or if you notice pressure changes. Adjust only if you add new appliances, fixtures, or notice problems.
Adjusting your Square D pressure switch may seem intimidating, but with the right knowledge and careful steps, you can improve your water system’s performance safely and effectively. Take your time, follow safety rules, and know when to call for help—your well and pump will thank you for years to come.