
Building a chimney for a wood stove is one of the most important steps to ensure safety, efficiency, and comfort in your home. A well-designed chimney takes smoke and gases out and brings in fresh air for burning. If done wrong, it can lead to fire hazards, poor heating, and even harmful gases inside your living space.
This guide will take you through every stage of building a chimney for a wood stove, from planning to finishing touches. Whether you are a homeowner planning a DIY project or just want to understand what professionals do, this article will give you clear, practical advice.
Understanding The Role Of A Chimney In Wood Stove Installations
Before you start building, it’s important to know why a chimney matters in a wood stove system. The main job of a chimney is to create a draft. This draft pulls air into the fire and pushes smoke and dangerous gases outside. Without a good chimney, your wood stove will not burn well, and you may face problems like backdrafts or smoke inside your house.
A chimney also protects your house from the high temperatures that come with burning wood. It directs heat and exhaust away from walls, ceilings, and other materials that could catch fire. A well-built chimney increases the efficiency of your wood stove, helping you use less wood and get more heat.
Planning: Codes, Permits, And Safety Requirements
You cannot just start building a chimney anywhere you like. There are important building codes and safety standards that you must follow. These rules help prevent fires and other risks.
- Check Local Codes: Building codes can be different in every city or country. They cover how tall the chimney should be, how far from walls, and the type of materials you can use.
- Get Permits: Most places require you to get a permit before building or changing a chimney. This makes sure your work will be inspected.
- Follow Manufacturer’s Instructions: Your wood stove will have a manual. Follow its advice, especially about clearances and chimney type.
- National Fire Protection Association (NFPA) 211: This is a trusted standard for chimneys and wood stoves. It explains everything from construction to maintenance.
Non-obvious insight: Even if you live in a rural area, insurance companies may not cover fire damage if your chimney was built without following code.
Another tip: Always plan your chimney to go as straight up as possible. Bends and turns reduce draft and make cleaning harder.
Choosing The Right Chimney System
There are two main types of chimneys for wood stoves: masonry chimneys and factory-built (metal) chimneys. Each has benefits and challenges.
| Type | Cost | Installation Speed | Durability | Maintenance |
|---|---|---|---|---|
| Masonry Chimney | High | Slow | Very High | High |
| Metal Chimney | Medium | Fast | High | Medium |
Masonry Chimneys
These are built from brick, stone, or concrete blocks. They are very durable and can last many decades. However, they are expensive, heavy, and take time to build.
Factory-built Metal Chimneys
These are made from stainless steel and often come as double- or triple-wall pipes. They are much lighter, faster to install, and often cheaper. Metal chimneys are popular in modern wood stove installations.
Pro tip: Unless you already have a masonry chimney, a metal chimney is usually the best choice for a new wood stove.
Gathering Materials And Tools
Before you start, gather all the materials and tools. Here are the basics for a metal chimney installation (most common for wood stoves):
- Chimney pipe (double or triple-wall)
- Stove pipe (single-wall, connects stove to chimney)
- Chimney cap
- Thimble (for wall or ceiling pass-through)
- Roof flashing and storm collar
- Support brackets and straps
- High-temperature silicone sealant
- Chimney brush (for cleaning)
- Measuring tape, level, and chalk line
- Saw (for cutting through roof or wall)
- Drill and screws
- Ladder and safety equipment
Non-obvious insight: Not all chimney pipes are the same. Make sure the inside diameter matches your wood stove’s output collar—usually 6 or 8 inches.
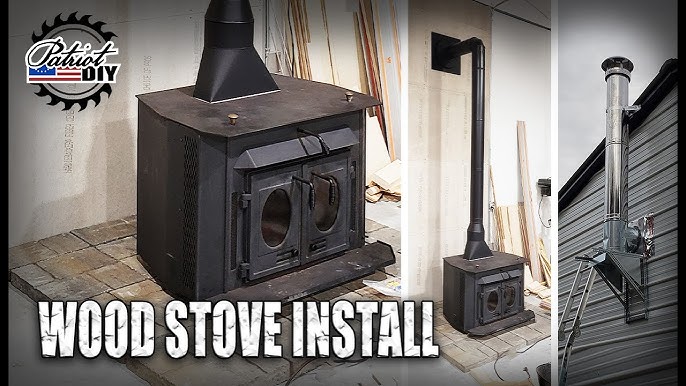
Credit: www.youtube.com
Deciding Chimney Location And Layout
Where you put your chimney is just as important as how you build it. The best location is straight up through the ceiling and roof. This creates the best draft and makes cleaning easier.
Key Points For Chimney Placement
- Avoid horizontal runs. Chimneys work best when vertical.
- Keep away from bedrooms to reduce noise and heat risks.
- Minimum clearance: Chimney must be at least 2 inches away from any combustibles (check your local code).
- Highest point: Chimney should extend at least 3 feet above the roof and 2 feet higher than anything within 10 feet.
Example: If your roof has a ridge nearby, your chimney must be 2 feet taller than the ridge within 10 feet.
Step-by-step: How To Build A Metal Chimney For A Wood Stove
Let’s break down the main steps for a standard metal chimney installation, which is the most common and recommended for wood stoves.
1. Mark The Chimney Path
Start by marking the path from your wood stove to the roof. Use a plumb line or level to make sure your path is straight up. Double-check there are no joists, wiring, or plumbing in the way.
2. Cut Ceiling And Roof Openings
Cut a hole in the ceiling and roof big enough for the chimney pipe plus the required clearance (usually 2 inches on all sides).
- For a 6-inch pipe, cut a 10-inch hole.
- Use a jigsaw or reciprocating saw.
- Wear safety goggles and gloves.
Tip: Place a drop cloth to catch debris.
3. Install The Chimney Support
In the attic, add a ceiling support box or firestop spacer. This holds the weight of the chimney and keeps hot pipes away from wood framing.
- Screw the support box to the framing.
- Make sure it’s level and secure.
4. Assemble And Connect Chimney Pipes
Start at the stove and work upward. Connect the single-wall stove pipe to the stove’s collar, then attach it to the chimney pipe at the ceiling support.
- Use self-tapping screws for each joint.
- Seal all joints with high-temperature sealant.
Non-obvious insight: Always put the female end of each pipe down. This stops creosote from leaking out.
5. Run The Chimney Through The Roof
From inside the attic, push the chimney pipe up through the roof opening. Outside, slide the roof flashing over the pipe and nail or screw it to the roof.
- Seal the edges of the flashing with silicone.
- Add a storm collar above the flashing to keep water out.
6. Extend The Chimney Above The Roof
Add chimney sections until the pipe is tall enough to meet code (3 feet above roof, 2 feet above any structure within 10 feet). Secure each section with screws and straps as needed.
7. Install The Chimney Cap
At the top, add a chimney cap. This keeps rain, birds, and debris out. The cap should fit snugly and be rated for wood stoves.
8. Connect The Stove Pipe Inside
Inside your house, connect the stove pipe from the wood stove to the chimney support box. Make sure all joints are tight and sealed.
9. Add Wall Thimble (if Needed)
If you must go through a wall instead of the ceiling, use a wall thimble. This keeps the hot pipe from touching the wall and holds the chimney securely.
10. Final Inspection And Safety Check
Check all joints, clearances, and supports. Make sure nothing is loose. Test for leaks by burning a small fire and watching for smoke at every joint.
Pro tip: Take photos of each stage for your records and insurance.
Building A Masonry Chimney (overview)
Masonry chimneys are strong and beautiful but require more skill and time. Here’s a basic outline of the steps:
- Build a concrete footing below the frost line.
- Lay firebrick for the flue liner.
- Build the outer shell with bricks or blocks.
- Install clean-out doors at the bottom for ash removal.
- Add a chimney crown at the top to keep water out.
- Install a chimney cap.
Non-obvious insight: Masonry chimneys must have a flue liner (clay tile or stainless steel) to protect the brickwork from heat and gases.
Another detail: Masonry chimneys take several days to build and need time to cure before use.
Key Safety Features And Practices
A wood stove chimney is safe only when built and used correctly. Here are essential safety features:
- Heat shields behind the stove and chimney pipe to protect walls.
- Carbon monoxide detectors in the same room as the stove.
- Smoke alarms on every floor.
- Proper clearances between pipes and combustibles.
- Regular cleaning to remove creosote (a sticky, flammable substance).
Common Mistakes To Avoid
- Using single-wall pipe for the entire chimney: Only use single-wall inside the room. Use double- or triple-wall through ceilings or walls.
- Not sealing joints: Even small leaks can cause smoke or fire risk.
- Too many bends: Each bend reduces draft and increases the risk of creosote.
- Wrong pipe size: This can cause poor burning and smoke back-up.
- Ignoring cleaning: Creosote can build up fast, especially if you burn wet wood.
How To Size Your Chimney
The size of your chimney must match your wood stove. Too small, and smoke will back up. Too big, and the draft will be weak.
- Pipe diameter: Usually 6 or 8 inches. Check your stove’s manual.
- Chimney height: At least 15 feet from stove to cap is ideal for most stoves.
- Horizontal runs: Should be short (less than 2 feet) and rise at least 1/4 inch per foot.
Example: For a standard wood stove with a 6-inch outlet, use a 6-inch chimney pipe. If you extend with a larger pipe, use an adapter.
Maintenance: Keeping Your Chimney Safe And Efficient
Once your chimney is built, maintenance is key to long-term safety.
- Clean at least once a year (or every 50-60 fires).
- Inspect after heavy storms or high winds.
- Check for blockages: Birds’ nests, leaves, or debris.
- Look for cracks or rust in pipes or masonry.
- Replace damaged parts right away.
Cleaning Tips
- Use a chimney brush that matches your pipe size.
- Clean from the top down for best results.
- Wear a mask and gloves.
Pro tip: Burning only dry, seasoned wood reduces creosote and makes cleaning easier.

Credit: www.reddit.com
Comparing Key Chimney Materials
Different materials can be used for different parts of your chimney. Here’s how some of the most common compare:
| Material | Use | Cost | Durability | Maintenance |
|---|---|---|---|---|
| Stainless Steel | Chimney Pipe | Medium | High | Low |
| Clay Tile | Masonry Flue | Low | Medium | Medium |
| Brick/Block | Chimney Shell | High | Very High | Medium |
| Galvanized Steel | Stove Pipe (not chimney) | Low | Low | High |
Important: Never use galvanized steel for the actual chimney. It’s not rated for high heat and can release toxic fumes.
Practical Tips For A Trouble-free Chimney
- Always use insulated (double- or triple-wall) chimney pipe where it passes through ceilings, attics, and roofs.
- Secure all pipes with proper supports and straps to stop movement.
- Check for leaks every year with a smoke test.
- Paint exterior metal chimneys with high-temperature paint to prevent rust.
- Label clean-out doors and keep them locked during use.
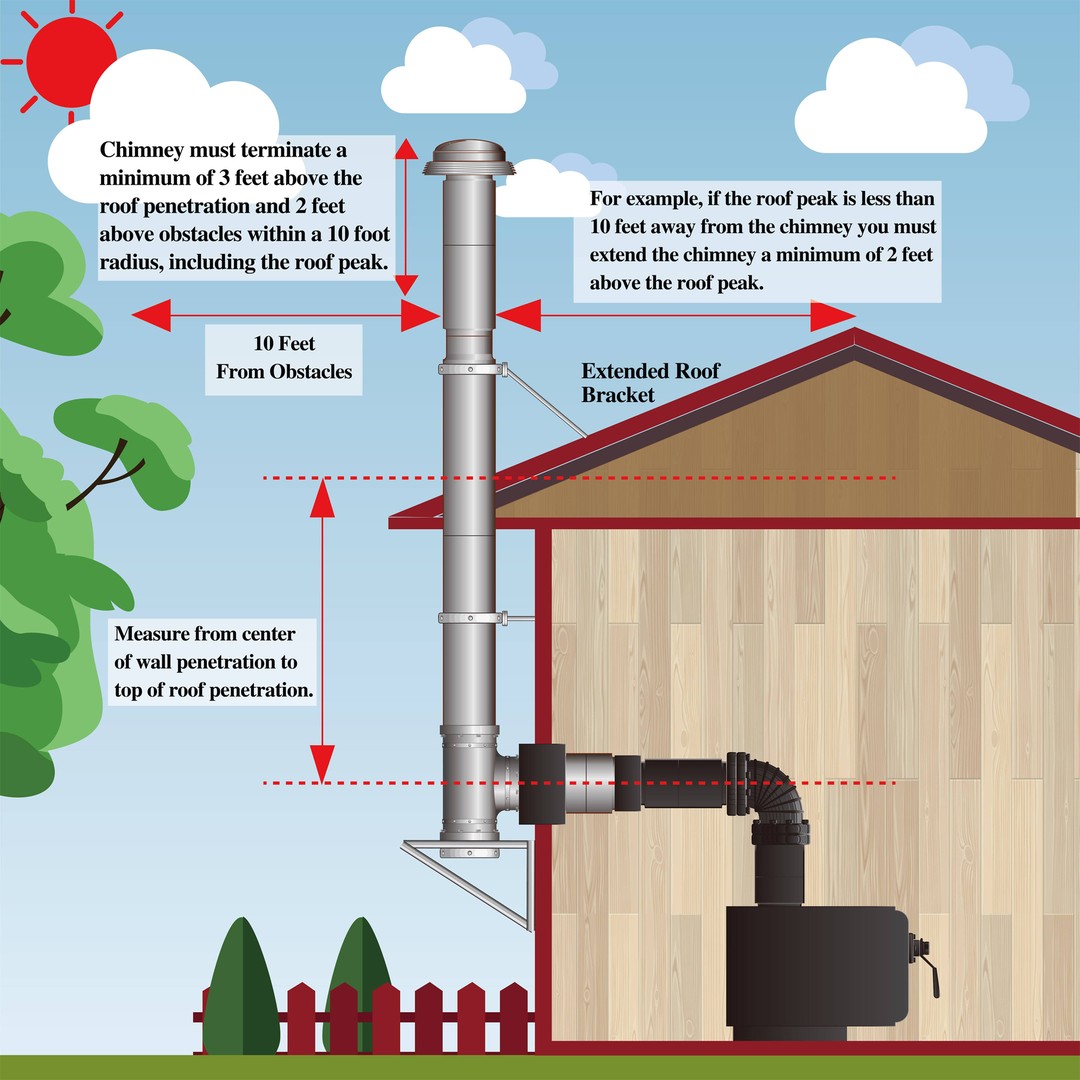
Credit: allfuelhst.com
The Importance Of Draft And How To Improve It
Draft is the force that pulls air up the chimney. Good draft means a hot, clean fire and no smoke indoors. Poor draft means trouble. If you have weak draft, try:
- Making the chimney taller: More height creates better draft.
- Reducing bends: Fewer turns help air move easily.
- Insulating the chimney: Warm chimneys draft better than cold ones.
Non-obvious detail: In very tight or new homes, you may need to add an outside air intake to balance air pressure.
Wood Stove Chimney Installation: Example Scenario
Imagine installing a wood stove in a one-story house with an unfinished attic and a shingle roof. You want a modern, safe, and efficient system.
- Place the stove on a fireproof hearth.
- Mark the path straight up to the roof, avoiding rafters.
- Cut ceiling and roof holes, maintaining all clearances.
- Install a support box in the ceiling and flashing on the roof.
- Connect double-wall chimney pipe up through the attic and above the roof.
- Seal all joints and add a chimney cap.
- Connect single-wall pipe from stove to ceiling box.
- Test with a small fire to check for leaks and draft.
After installation, you clean the chimney every fall before the heating season starts. You keep a carbon monoxide detector in the room with the stove, just in case.
When To Call A Professional
Building a chimney is a big job. While many handy homeowners can do it, there are times when you should call a licensed professional:
- If you need to cut through complicated roofs or walls.
- If you are unsure about local codes.
- If the stove is especially large or heavy.
- If you want a masonry chimney (requires skilled brickwork).
Non-obvious insight: A professional’s work may be required by your home insurance or warranty.
Legal And Insurance Considerations
- Always get the right permits before you start.
- Have the installation inspected by local authorities.
- Keep records of all work, materials, and inspections.
- Tell your insurance company after installation—some will ask for proof.
- Failing to do these can void your insurance if there is a fire.
For more information, you can check the NFPA guide on wood stove and chimney safety.
Frequently Asked Questions
How High Does My Wood Stove Chimney Need To Be?
Your chimney must be at least 3 feet above the point where it passes through the roof and 2 feet taller than anything within 10 feet. Most stoves work best with at least 15 feet of vertical chimney for good draft.
Can I Use A Regular Stove Pipe For The Whole Chimney?
No. Single-wall stove pipe is for inside use only, from the stove to the ceiling or wall. For the chimney through the attic and above the roof, you must use double- or triple-wall insulated chimney pipe rated for wood stoves.
How Often Should I Clean My Wood Stove Chimney?
Clean your chimney at least once a year, or more often if you burn a lot of wood. If you notice thick, black buildup (creosote), clean right away. Regular cleaning prevents chimney fires.
What Is Creosote And Why Is It Dangerous?
Creosote is a sticky, flammable substance that forms when wood smoke cools in the chimney. It can catch fire and cause a chimney fire if not removed. Burning dry, seasoned wood reduces creosote buildup.
Do I Need A Permit To Build A Chimney For A Wood Stove?
Yes, in most areas you need a building permit before starting. This ensures your chimney is safe and meets local codes. Always check with your local building department first.
Building a chimney for a wood stove takes planning, patience, and attention to detail. If you follow the steps carefully and respect safety rules, you can enjoy warm, safe fires all winter long. Remember, a good chimney is not just a pipe—it’s the heart of your wood heating system.