
Building an outdoor kitchen is a dream for many homeowners who love to entertain or simply enjoy the beauty of their backyard. Adding stone veneer to your outdoor kitchen can make it look professional and high-end, without the extreme cost of full stonework. But how do you actually build an outdoor kitchen with stone veneer? This guide will walk you through every step, from planning to finishing touches, with clear explanations, practical advice, and useful tips from real experience.
Why do people choose stone veneer? It’s not just about looks (though the natural stone effect is stunning). Stone veneer is lighter, often less expensive, and easier to install than solid stone. Plus, it’s durable, weather-resistant, and available in many styles and colors.
But before you start mixing mortar or cutting boards, it’s important to understand the entire process. Building an outdoor kitchen with stone veneer is a big project, but with careful planning, the right materials, and clear steps, even a determined beginner can succeed.
Planning Your Outdoor Kitchen
Every great outdoor kitchen starts with a good plan. Rushing into construction without a clear design usually leads to mistakes, wasted money, and disappointment. Take time to consider how you’ll use the kitchen, your budget, and the space available.
Key Questions To Answer
- How much space do you have?
- Measure your patio or yard area. Don’t guess; use a tape measure. Remember to leave room for movement and seating.
- What features do you want?
- Do you need a grill, sink, fridge, storage, pizza oven, or just a simple prep area?
- What is your budget?
- Outdoor kitchens with stone veneer can cost from $2,000 for a simple DIY project to $20,000 or more for large, custom setups.
- Where will the kitchen be located?
- Consider sunlight, wind, and proximity to your house. It’s easier (and cheaper) to build near your home for water, gas, and electricity access.
- Do you need permits?
- Check with your city or county. Many places require permits for outdoor kitchens, especially if you’ll connect to utilities.
Drawing Your Design
Sketch your outdoor kitchen on paper or use free design tools online. Mark the locations of appliances, counters, and any seating. Include space for opening grill lids or fridge doors.
Gathering Inspiration
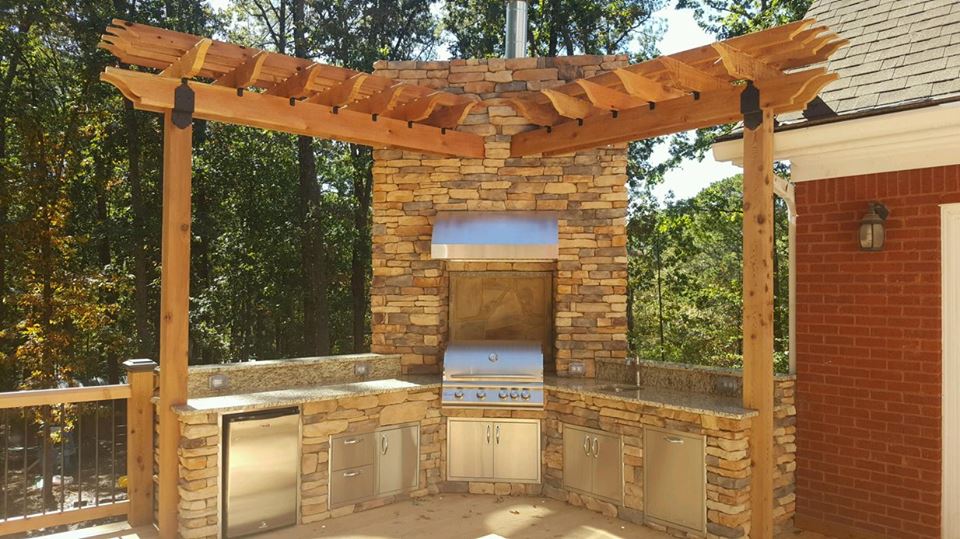
Look at photos of finished outdoor kitchens with stone veneer. Notice the layout, color combinations, and how the stone is used. Save images you like for reference.
Non-obvious insight: Plan for the future. It’s easier to add extra outlets or gas lines now, even if you don’t use them right away.
Choosing Stone Veneer And Materials
Selecting the right stone veneer is a big decision. The type, color, and shape will impact the final look, durability, and installation process.
Types Of Stone Veneer
There are two main types:
- Natural Stone Veneer
- Made from real stone cut thin (usually 1–2 inches thick).
- Each piece is unique.
- More expensive, heavier, but lasts a lifetime.
- Manufactured Stone Veneer
- Made from concrete and colored to look like stone.
- Lighter, easier to cut, and cheaper.
- Quality has improved a lot—many people can’t tell the difference from real stone.
Comparing Natural Vs. Manufactured Stone Veneer
| Feature | Natural Stone Veneer | Manufactured Stone Veneer |
|---|---|---|
| Cost | High | Medium–Low |
| Weight | Heavier | Lighter |
| Appearance | Unique, natural | Varies, often realistic |
| Installation | More challenging | Easier for DIY |
| Durability | Very high | High |
Non-obvious insight: If your outdoor kitchen is exposed to a lot of direct sunlight, lighter-colored manufactured stone can fade over time. Real stone generally holds its color better.
Other Materials Needed
- Cement board or concrete blocks for the frame
- Mortar (type S or N, depending on your stone veneer)
- Metal lath (if attaching stone to wood)
- Waterproofing membrane
- Grout or pointing mortar
- Sealer (for some stone types)
- Stainless steel screws and fasteners
- Galvanized corner beads (for edges)
- Weatherproof plywood (for countertop base, if not using concrete)
Tools Required
- Masonry trowel
- Notched trowel
- Level
- Tape measure
- Angle grinder with masonry blade (for cutting stone)
- Drill and driver
- Mixing bucket
- Sponge and brush
- Caulking gun (for sealant)
Pro tip: Rent a wet saw for smoother stone cuts, especially for natural stone veneer.
Building The Frame
The frame is the skeleton of your outdoor kitchen. It supports the appliances, counters, and the stone veneer.
Common Frame Options
- Steel Frame
- Made from galvanized steel studs.
- Light, strong, and fire-resistant.
- Requires metal-cutting tools.
- Wood Frame
- Use only treated, weatherproof lumber.
- Must be completely covered by cement board and waterproof membrane.
- Faster to build, but less fire-resistant.
- Concrete Block (CMU)
- Very strong and fireproof.
- Heavy and harder to modify.
- Ideal for permanent kitchens.
Pro tip: For most DIYers, steel or wood frames with cement board are the easiest and most flexible.
Step-by-step Frame Building
- Mark the footprint on the ground with chalk or string.
- Lay the base—use concrete pavers or a slab for a solid, level surface.
- Build the frame—assemble steel or wood studs to match your design. Check for level and square as you go.
- Add supports for appliances—reinforce areas for heavy grills or fridges.
- Attach cement board—secure it to the frame with stainless steel screws, covering all exterior surfaces.
- Seal all joints—use waterproof tape and membrane to prevent moisture damage.
Frame Strength Comparison
| Frame Type | Durability | Ease of Construction | Fire Resistance |
|---|---|---|---|
| Steel | High | Medium | Excellent |
| Wood | Medium | Easy | Low–Medium |
| Concrete Block | Very High | Hard | Excellent |
Non-obvious insight: Always check the weight rating for your frame, especially under heavy grills or pizza ovens. Stone veneer adds more weight than you might expect.
Utility Connections
If your outdoor kitchen includes appliances that need gas, water, or electricity, plan these connections before you finish the frame.
Key Tips
- Hire licensed professionals for gas and electrical work.
- Install conduit or pipes before covering the frame with cement board.
- Leave access panels for future repairs or inspections.
Example: A simple grill island may not need utilities, but adding a fridge or sink changes your plan completely. Even a small fridge needs a weatherproof outlet.
Preparing For Stone Veneer
With the frame built and all utilities roughed in, you’re ready to prepare for stone veneer installation.
Surface Preparation
- Check for stability. Make sure cement board is secure and solid.
- Install metal lath if attaching stone to wood or plywood. Overlap edges and fasten every 6 inches.
- Apply waterproofing membrane as recommended by the stone veneer manufacturer.
Mortar Bed
Most stone veneer systems require a scratch coat of mortar over the metal lath:
- Mix mortar to a peanut butter consistency.
- Apply a ½-inch layer over the lath using a trowel.
- Scratch lines into the mortar with a scarifier or notched trowel.
- Allow to cure (usually 24 hours).
Pro tip: Don’t skip the scratch coat. It helps the stone veneer grip securely.
Installing Stone Veneer
This is where your outdoor kitchen starts to look stunning. Stone veneer is installed piece by piece, similar to tiling, but with more attention to pattern and fit.
Step-by-step Stone Veneer Installation
- Lay out the stone on the ground first to plan your pattern. Mix colors and sizes for a natural look.
- Start at the corners if using corner pieces. Work from the bottom up.
- Apply mortar to the back of each stone (about ½ inch thick).
- Press the stone into the wall, wiggling slightly to set.
- Check for level and alignment as you go.
- Fill gaps with smaller stones or cut pieces.
- Clean excess mortar from the stone face with a damp sponge.
- Let the mortar cure as recommended (usually 24–48 hours).
Non-obvious insight: Keep joints between stones as narrow as possible for a more authentic, dry-stack look. If you prefer wider mortar joints, use a grout bag to fill them neatly.
Cutting Stone Veneer
Use an angle grinder with a diamond blade or rent a wet saw. Always wear eye and ear protection. Cut pieces to fit around outlets, edges, or appliances.
Stone Veneer Installation Mistakes To Avoid
- Leaving large, uneven gaps between stones.
- Creating “vertical seams” where joints line up.
- Using too much mortar on the stone face (it can stain).
- Not mixing stone from several boxes (leads to color patches).
Countertop Choices
The countertop is where you’ll prep food, serve drinks, and maybe even eat. It needs to be durable, weatherproof, and attractive.
Popular Countertop Materials
- Granite — Natural stone, very durable, many colors.
- Concrete — Customizable shape and color, can be poured in place.
- Tile — Affordable and DIY-friendly, but grout can stain.
- Stainless steel — Modern, easy to clean, but shows scratches.
- Porcelain slabs — Strong, stain-resistant, and stylish.
Pro tip: Never use indoor materials like laminate or wood outdoors—they will fail quickly in weather.
Countertop Installation
- Build a solid base using cement board or pour a concrete slab on top of your frame.
- For granite or stone, use a professional installer for perfect fit and safe handling.
- Seal porous countertops regularly to prevent stains and damage.
Adding Appliances And Features
Your outdoor kitchen can be as simple or as loaded as you wish.
Common Outdoor Kitchen Features
- Grill — Gas, charcoal, or pellet. The heart of most outdoor kitchens.
- Sink — Needs water supply and drainage.
- Refrigerator — Weatherproof models only.
- Side burner — For boiling or sautéing.
- Pizza oven — Adds a fun, gourmet touch.
- Storage cabinets — Stainless steel or weatherproof polymer.
- Bar or seating area — Include an overhang for stools.
Non-obvious insight: Outdoor-rated appliances cost more but last much longer than indoor models. Never use regular kitchen fridges or outlets outside.
Appliance Installation Tips
- Always follow manufacturer instructions.
- Allow enough clearance for hot appliances.
- Seal all edges to keep out rain and pests.
Credit: www.reddit.com
Sealing, Grouting, And Finishing Touches
After the stone veneer is set, you’ll add the final touches that protect your kitchen and make it look polished.
Grouting (if Needed)
- Use a grout bag to fill joints between stones.
- Smooth joints with a pointing tool or gloved finger.
- Wipe off excess grout before it dries.
Sealing Stone Veneer
Some stone veneer (especially manufactured or porous stone) should be sealed to protect from stains, water, and UV fading.
- Use a breathable, outdoor-rated stone sealer.
- Apply with a brush or sprayer, following instructions.
- Reapply every 1–3 years, depending on product.
Cleaning Up
- Remove mortar spills from stone faces immediately.
- Clean tools with water before mortar hardens.
- Check for sharp edges or loose stones.
Outdoor Kitchen Maintenance
A well-built outdoor kitchen with stone veneer needs little maintenance, but some care will keep it looking and working great for years.
Maintenance Tips
- Inspect stone veneer for cracks or loose pieces each spring.
- Reseal stone and countertops as needed.
- Clean grills and appliances regularly.
- Cover the kitchen in winter, if possible, to protect from freeze-thaw cycles.
Pro tip: Small repairs are easy if caught early. Replace cracked stones or add mortar where needed to prevent bigger issues.
Cost And Value Considerations
Building an outdoor kitchen with stone veneer is an investment in your home and lifestyle.
What Does It Cost?
- DIY outdoor kitchen with stone veneer: $3,000–$8,000 (including grill and basic appliances)
- Professionally built, large kitchen: $15,000–$25,000+
Labor is a big part of the cost. Doing it yourself saves money, but plan for 2–4 weekends of work for a medium-sized kitchen.
Value Added
- Outdoor kitchens can add 8–10% to home value (varies by region).
- Stone veneer boosts curb appeal and resale value.
- You’ll use your backyard more, enjoying time with family and friends.
Data: According to the National Association of Realtors, homes with outdoor kitchens are more attractive to buyers and often sell faster.
Real-world Example
Imagine a family in Texas who loves to grill. They build a 12-foot-long outdoor kitchen with a gas grill, fridge, and storage. Using manufactured stone veneer, steel framing, and granite countertops, they spend $7,500 and three weekends on the project.
Their friends are amazed by the “custom stonework,” and they use the space almost every week.
A year later, a neighbor builds a similar kitchen but skips the waterproofing and uses indoor cabinets. After the first winter, water damage ruins part of the structure. The lesson: follow every step, and don’t cut corners on materials or prep.
Credit: www.nativecustomstone.com
Common Beginner Mistakes
- Skipping permits — Can lead to fines or having to tear out work.
- Not planning for utilities — Adding gas or water later is much harder and more expensive.
- Choosing the wrong stone — Cheap veneer can fade or crack quickly.
- Poor drainage — Water can destroy cabinets and stone if not managed.
- Ignoring weight limits — Overloading a wood frame can cause failure.
Non-obvious insight: Always keep a few extra pieces of stone veneer for future repairs. Manufacturers sometimes discontinue styles, making matching impossible later.
Final Thoughts
Building an outdoor kitchen with stone veneer takes effort, planning, and patience, but the result is a stunning, functional space you’ll enjoy for years. By choosing the right materials, following each step, and paying attention to details, you can create an outdoor kitchen that looks like a professional built it—at a fraction of the cost.
Remember, the beauty of stone veneer is in its flexibility and style. Take your time, and your backyard will soon become your favorite room in the house.
If you want more tips on backyard projects and stonework, you can check resources like Family Handyman for further reading.

Credit: rtaoutdoorliving.com
Frequently Asked Questions
What Is The Best Base For An Outdoor Kitchen With Stone Veneer?
The best base is a concrete slab or paver patio, which provides a solid, level foundation. For the frame, galvanized steel studs or concrete blocks are most durable and fire-resistant. Always use cement board over frames before applying stone veneer.
Can I Use Regular Kitchen Appliances In My Outdoor Kitchen?
No, you should only use outdoor-rated appliances. Indoor appliances are not designed for exposure to weather and can fail quickly. Outdoor models are built to resist rust, moisture, and temperature changes.
How Long Does It Take To Build An Outdoor Kitchen With Stone Veneer?
For a medium-sized DIY project, expect 2–4 weekends, working 6–8 hours per day. Hiring professionals can reduce the time but increases cost. The most time-consuming steps are frame construction and stone veneer installation.
Does Stone Veneer Need To Be Sealed?
Some types of stone veneer, especially manufactured or porous stone, should be sealed to protect against stains, water damage, and fading. Natural stone may need less sealing but still benefits from regular maintenance.
How Do I Clean And Maintain Stone Veneer?
Clean stone veneer with mild soap and water. Avoid harsh cleaners that can damage the finish. Inspect yearly for cracks or loose pieces, and reseal as needed. Promptly repair any damage to keep your outdoor kitchen looking great.
Building an outdoor kitchen with stone veneer is a rewarding project. With good planning and careful work, you’ll enjoy a beautiful, durable space for years to come.