
Changing a kitchen tap mixer is a task that many homeowners face at some point. It might be because the tap is leaking, the style feels outdated, or you want features like a pull-out spray. While the idea may sound a bit technical, with the right guidance and tools, you can replace your kitchen tap mixer yourself and save money.
This article will walk you through every step, from planning to installation, while sharing tips that even some professionals miss. Whether you’re a first-timer or want to refresh your skills, you’ll find everything you need to know here.
Understanding Kitchen Tap Mixers
Before you begin, it’s important to know what a kitchen tap mixer is. Unlike separate hot and cold taps, a mixer combines both water feeds into a single spout. You control the temperature and flow with one or two handles. Most modern kitchens use this type because it’s easier and more efficient.
Kitchen mixer taps come in different types:
- Single-lever mixers: One handle controls both flow and temperature.
- Dual-handle mixers: Separate handles for hot and cold.
- Pull-out spray mixers: Include a hose for rinsing.
- Filtered water mixers: Provide filtered drinking water.
The main parts of a mixer tap are:
- Spout: Where the water comes out.
- Handles: For adjusting flow and temperature.
- Base: Connects to the sink.
- Flexible hoses: Link to the water supply.
Different sinks and plumbing setups require different mixer types. Choosing the right one is your first step.
Tools And Materials You Need
Having the correct tools is crucial for a smooth installation. Here’s a checklist to prepare before you start:
- Adjustable spanner (for tightening nuts)
- Basin wrench (to reach under the sink)
- Bucket or bowl (to catch water drips)
- Old towel or sponge (for spills)
- PTFE tape (for sealing threads)
- New kitchen mixer tap (with all included fittings)
- Flexible tap connectors (if not included)
- Flashlight (for better visibility)
- Screwdriver (may be needed for some taps)
- Cleaning cloth (to wipe surfaces)
Having everything on hand avoids frustration and saves time. Don’t forget safety gloves if you have sensitive hands.
Planning And Preparation
Good preparation makes the job easier and avoids surprises. Follow these steps:
1. Check Your Sink And Plumbing
- Measure the hole size in your sink (usually 35mm, but check).
- Look under the sink to see where the pipes run.
- Identify whether you have flexible hoses or rigid pipes. Flexible hoses make the job much easier.
2. Choose The Right Mixer Tap
Not all taps fit all sinks. Consider:
- Mounting type: Deck-mounted (on sink) or wall-mounted.
- Height and reach: Will a high spout fit under your cabinets? Will it reach the center of the sink?
- Number of holes: Most mixers need one hole. Some sinks have two or three.
3. Turn Off The Water Supply
This is vital for safety. Look for isolation valves under the sink. Turn them clockwise to close. If you can’t find them, turn off the main supply. Then, open the tap to let out water in the pipes.
4. Clear The Area
Remove everything from under the sink. Place a towel and bucket in case water spills. Good lighting helps you work faster and more safely.
Removing The Old Kitchen Mixer Tap
Once you’ve prepared, it’s time to take out the old tap. This is sometimes the hardest part, as old fittings can be stiff or corroded.
Step-by-step Guide
- Disconnect the Water Pipes
- Use an adjustable spanner to unscrew the flexible hoses from the isolation valves or pipes.
- Have a bowl ready for any water left in the hoses.
- Loosen the Tap Fixing Nut
- Under the sink, find the large nut holding the tap in place.
- Use a basin wrench (its long handle helps in tight spots).
- If it’s stuck, apply gentle pressure. Avoid hitting or forcing, as this can damage the sink.
- Remove the Old Tap
- Once the nut is off, lift the tap straight up from the top.
- Clean the area with a cloth. Remove any old sealant or dirt.
- Check the Holes
- Make sure the mounting hole is clear and matches the new tap’s base.
- If it doesn’t, you may need an adapter or to widen the hole (rare).
Non-obvious insight: Sometimes, old taps have a small metal or rubber washer that sticks to the sink. Remove these, or the new tap may not fit flush.
Installing The New Kitchen Tap Mixer
This is the main part of the job. Go step by step, and don’t rush. Most kitchen mixer taps follow a similar process, but always check the manufacturer’s instructions.
Step-by-step Installation
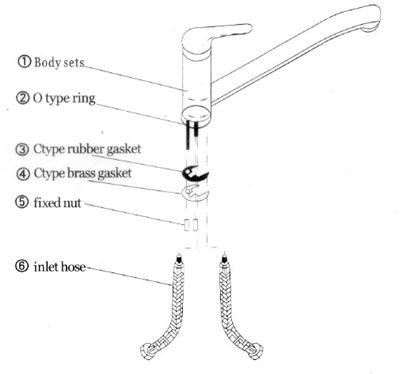
- Fit Flexible Hoses to the Tap
- Before placing the tap on the sink, screw the flexible hoses into the bottom of the new tap.
- Hand-tighten, then use a spanner for a snug fit. Don’t overtighten.
- Apply PTFE Tape
- Wrap a few layers of PTFE tape around the threaded ends of the hoses.
- This prevents leaks. Always wrap in the same direction as the thread.
- Position the Tap
- Place the tap through the sink hole.
- Make sure the base plate or rubber gasket is between the tap and sink for a watertight seal.
- Secure the Tap from Below
- Under the sink, screw on the fixing nut and washer (if included).
- Tighten until the tap is steady, but do not overtighten. A helper can hold the tap steady from above.
- Connect the Flexible Hoses
- Attach the hoses to the water supply pipes or valves.
- Use an adjustable spanner, but again, don’t overtighten.
- Check for Correct Alignment
- Make sure the tap is facing the right way and sits flat against the sink.
- Turn On the Water Supply
- Open the isolation valves or main water supply.
- Slowly turn on the tap and check for leaks.
- Check for Leaks
- Run both hot and cold water.
- Look under the sink for drips.
- If you see leaks, gently tighten the connections.
Installation Example
Let’s say you’re replacing a standard dual-handle mixer with a single-lever model:
- The old tap had copper pipes, but your new one has flexible hoses.
- You use adapters to join the old pipes to the new hoses.
- After fitting, you find a small drip under the sink. Re-tightening the fixing nut and adding more PTFE tape solves it.
Non-obvious insight: Always check the tap’s movement before fully tightening the fixing nut. If the tap turns with the nut, it’s not secure. Adjust before finishing.
Special Cases And Troubleshooting
Not all kitchens are the same. Here’s what to do if things get tricky.
1. Rigid Pipes Instead Of Flexible Hoses
Older taps sometimes connect with rigid copper pipes. Flexible hoses are easier, but you can use adapters to connect the new tap to old pipes.
2. Corroded Or Stuck Nuts
If a nut won’t move, use a little penetrating oil and wait 10 minutes. Never hit hard with a hammer—this can crack porcelain sinks.
3. Leaks Around The Base
If water leaks where the tap meets the sink, remove the tap and reseat it with a new rubber gasket or silicone sealant.
4. Low Water Pressure
Some mixer taps have filters inside. Check the instructions and clean the filter if water flow is weak after installation.
5. Multiple Sink Holes
If your new tap uses only one hole, but your sink has more, use blanking plates (covers) to hide the extra holes.
Common Mistakes To Avoid
Many DIYers make the same errors. Learn from these to get a professional result.
- Forgetting to turn off the water: This can flood your kitchen. Always double-check.
- Not using PTFE tape: Without it, joints can leak.
- Overtightening: This can break threads or deform washers.
- Not cleaning the area: Old sealant or grime can cause leaks or instability.
- Mixing up hot and cold feeds: Double-check which pipe is which before connecting.
Comparing Different Types Of Kitchen Tap Mixers
Choosing the best tap depends on your needs. Here’s a comparison of the main types:
| Type | Pros | Cons | Best For |
|---|---|---|---|
| Single-Lever Mixer | Easy to use, modern look | Can be hard for precise temp control | Most homes, families |
| Dual-Handle Mixer | Good temp control, classic style | More parts to maintain | Traditional kitchens |
| Pull-Out Spray Mixer | Flexible, great for rinsing | Hose can wear out | Busy cooks, large sinks |
| Filtered Water Mixer | Filtered drinking water | Needs filter changes | Health-conscious users |
Pro Tip: If you use a dishwasher, make sure your mixer tap is compatible with your plumbing.

Credit: www.airtasker.com
When To Call A Professional
While most people can change a kitchen mixer tap with patience, there are times to call an expert:
- Your pipes are very old or corroded
- You see water damage or mold under the sink
- You have no isolation valves and can’t turn off the water easily
- You feel unsure about any step
A plumber can also advise if your system needs upgrading for better water pressure or modern fixtures.
Cost Of Replacing A Kitchen Tap Mixer
Replacing a tap yourself saves money. But what does it cost if you hire someone, or if you do it yourself?
| Option | Average Cost (USD) | What’s Included |
|---|---|---|
| DIY (New Tap Only) | $50–$200 | Tap, hoses, basic tools |
| Professional Installation | $150–$400 | Tap, labor, warranty |
| Extra Plumbing Work | $100–$300 | Pipe upgrades, valves |
Tip: Get quotes from at least two plumbers if you’re hiring out the work.
Cleaning And Maintaining Your New Tap
A new tap looks great, but it also needs care to last. Here are some tips:
- Clean regularly: Wipe with a damp cloth. Avoid harsh chemicals.
- Check for leaks: Every few months, look under the sink for drips.
- Descale: In hard water areas, limescale can build up. Remove with vinegar or a gentle cleaner.
- Operate gently: Don’t force handles or spouts. This prevents wear.
- Replace washers: If dripping starts, replace washers or cartridges as needed.
Environmental Impact And Water Savings
Modern kitchen tap mixers can help save water:
- Many have aerators that mix air with water, reducing usage.
- Some include eco-modes or flow limiters.
- Fixing leaks quickly saves thousands of liters per year.
According to the Environmental Protection Agency, a leaking tap dripping once per second can waste more than 3,000 gallons per year. Changing to a new, efficient mixer tap can cut your water bill and help the environment.
Choosing The Right Kitchen Mixer Tap: Key Factors
Before buying, think about these factors:
- Water pressure compatibility: Not all taps work with low pressure. Check your system type.
- Sink size and depth: A large, deep sink needs a longer spout.
- Finish and style: Chrome, brushed steel, black, or brass—choose what matches your kitchen.
- Ease of use: Single-lever taps are simpler for children and elderly users.
- Extra features: Pull-out spray, filtered water, or touchless control.
- Warranty and support: Good brands offer at least 2–5 years warranty.
Real-life Example: Jane’s Diy Success
Jane, a homeowner with little DIY experience, wanted to update her kitchen. She watched a video and followed steps similar to those above. Her main challenges:
- The old tap’s fixing nut was rusted tight.
- The sink hole was slightly too small for the new tap’s base.
She used penetrating oil, waited an hour, and finally loosened the nut. For the hole, she gently filed the edge to fit. The job took two hours, and she saved $150 compared to hiring a plumber. Her advice: “Take your time, and don’t be afraid to stop and check online guides if you get stuck.”
Safety Tips
While changing a kitchen tap mixer is usually safe, keep these points in mind:
- Wear gloves to protect your hands from sharp edges.
- Don’t force pipes—if something doesn’t fit, double-check before using more strength.
- Keep children and pets away from the work area.
- Have a towel handy for any spills.
If you ever feel out of your depth, stop and ask for help.
Extra Tips For A Pro Finish
- Take a photo of the pipes before you start. This helps if you forget how things were connected.
- Use a headlamp or clip-on light under the sink. It makes a huge difference.
- Test the tap for leaks before cleaning up. Check every joint.
- Keep the manufacturer’s instructions for future reference.
- Write down the model number somewhere safe for warranty or repairs.

Credit: www.youtube.com
Troubleshooting Table: Common Problems And Solutions
Here’s a quick reference for the most common issues:
| Problem | Possible Cause | Solution |
|---|---|---|
| Tap leaks at base | Washer/gasket not seated | Reseat tap, use new gasket |
| Handles stiff | Limescale inside | Descale tap, lubricate |
| Low water flow | Filter blocked | Clean filter/aerator |
| Dripping after closing | Washer or cartridge worn | Replace washer/cartridge |
| Tap loose | Fixing nut not tight enough | Tighten fixing nut |
Frequently Asked Questions
How Long Does It Take To Change A Kitchen Tap Mixer?
For most people, it takes about 1 to 2 hours if you have the tools ready. If parts are corroded or the space is tight, it can take longer. Beginners should allow extra time to avoid rushing.
Can I Change A Kitchen Mixer Tap Without Turning Off The Main Water Supply?
Yes, if your system has isolation valves under the sink. Just turn them off. If not, you must turn off the main supply to avoid flooding.
What If The New Tap Doesn’t Fit My Sink?
First, check the hole size and tap base. Adapters or blanking plates can solve many fit problems. If the hole is too small, carefully widen it with a file. If it’s too big, use a larger base plate or consult a plumber.
Do I Need A Plumber’s License To Change A Kitchen Tap Mixer?
In most countries, you do not need a license to change a tap in your own home. However, check your local rules. If you change pipework or work on shared plumbing, rules may be different.
Where Can I Find More Guidance Or Videos?
Many hardware stores and official sites have tutorials. For detailed plumbing standards, visit the Wikipedia Plumbing Guide.
Changing your kitchen tap mixer is a rewarding DIY project. With the right tools and guidance, you’ll enjoy a modern, leak-free tap and the satisfaction of doing it yourself. Take your time, double-check each step, and celebrate your finished work with a clean, efficient kitchen.
Credit: artofdiy.wordpress.com