
Cleaning oven trays can feel like an endless battle. Grease, burnt-on food, and black stains often seem impossible to remove. Many people try scrubbing for hours or give up and buy new trays every year. But with the right methods, you can restore even the dirtiest oven trays to a sparkling finish.
This guide shows you everything you need to know, from quick daily cleaning to deep restoration. You’ll learn not just how to clean, but how to keep your trays in top shape, avoid common mistakes, and choose the best cleaning products for your needs.
Let’s make your oven trays look like new—without stress or wasted effort.
Why Oven Trays Get So Dirty
Oven trays collect layers of grease, oil, and food particles every time you cook. High heat bakes these leftovers onto the metal, turning soft spills into hard, black stains. Some foods, like roasted meats or cheesy dishes, create more mess than others.
If you wait too long between cleanings, these stains can become almost impossible to remove with normal washing.
There’s also a hidden danger: old grease can produce smoke and strange smells every time you use the oven. In some cases, it may even affect the taste of your food. Understanding why trays get dirty helps you see why regular cleaning is not just about looks—it’s about hygiene and better cooking results.
Essential Cleaning Supplies
Before you start, gather these essential items:
- Dish soap: Breaks down grease
- Baking soda: Lifts stains and neutralizes odor
- White vinegar: Cuts through tough residues
- Scouring pads or sponges: For scrubbing
- Steel wool: For extreme grime (use gently)
- Gloves: Protect your hands from chemicals
- Plastic scraper: Removes hard bits without scratching
- Heavy-duty trash bags: For overnight soaking tricks
- Old toothbrush: Gets into corners
You don’t need every supply for every cleaning. Choose based on the dirtiness of your tray and your preferred cleaning style. Some people also use commercial oven cleaners, but these can be harsh and create strong fumes.
Quick Clean: After Every Use
The best way to keep oven trays clean is to wash them after each use. This stops grease and food from hardening. Here’s a fast routine:
- Let the tray cool slightly, but don’t wait until it’s stone cold. Warm trays are easier to clean.
- Rinse off loose crumbs and grease in the sink.
- Fill the tray with hot water and a squirt of dish soap. Let it soak for 10–15 minutes.
- Use a sponge or cloth to wipe away soft food and stains.
- Rinse thoroughly and dry with a towel.
This daily effort can save you hours of hard scrubbing later. If you can’t clean right away, at least soak the tray to stop stains from setting.
Deep Clean: Removing Burnt-on Grease And Stains
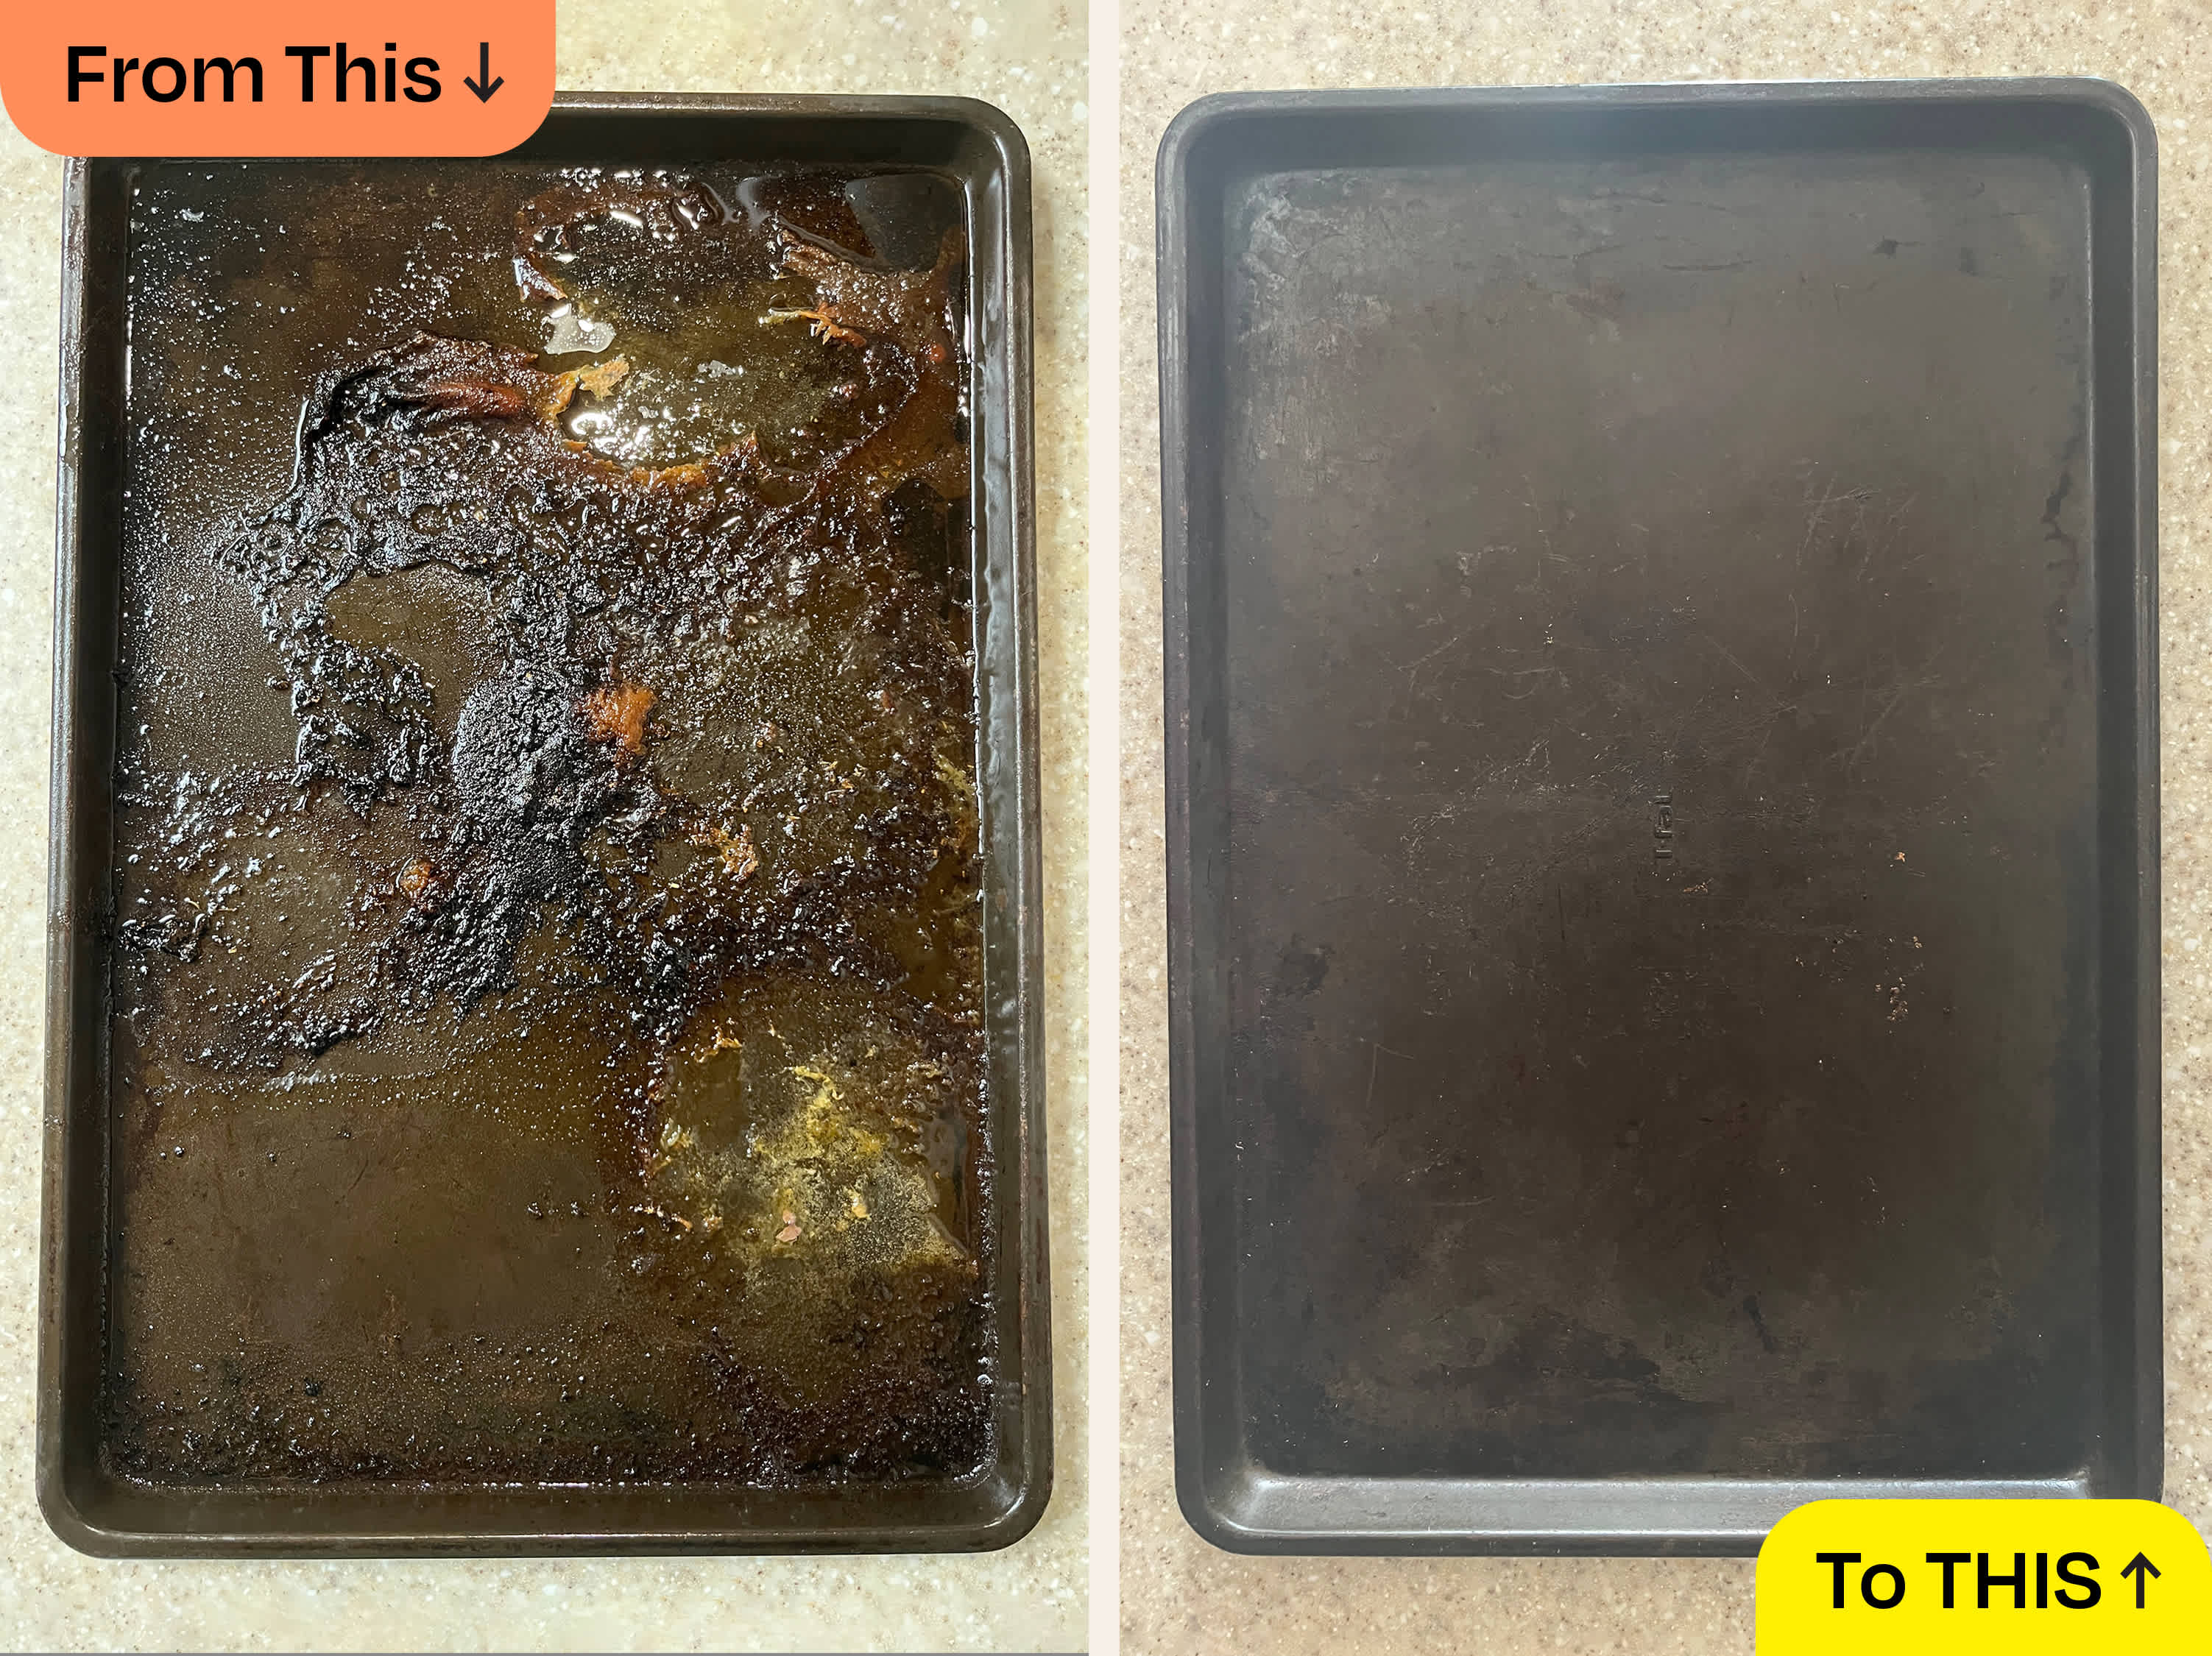
Sometimes, quick cleaning is not enough. For trays with black, sticky, or burnt patches, you’ll need a deep cleaning method. Here’s how to tackle tough stains step by step.
Baking Soda And Vinegar Method
This method uses kitchen staples to break down grease naturally:
- Sprinkle a thick layer of baking soda over the tray.
- Pour white vinegar over the baking soda. It will fizz—this is normal.
- Let the mixture sit for 30–60 minutes. For heavy stains, leave it overnight.
- Scrub with a sponge or scouring pad. Use a plastic scraper for very hard spots.
- Rinse with warm water and dry.
Soak And Scrape Method
For trays with years of build-up, soaking works wonders:
- Place the tray in a sink or large container.
- Fill with hot water and add a cup of dish soap or laundry detergent.
- Let it soak for at least 2 hours, or overnight for severe stains.
- Use a plastic scraper or steel wool to remove loosened grime.
- Rinse and repeat if needed.
Commercial Oven Cleaner
If natural methods don’t work, a commercial oven cleaner may be necessary. Always follow the instructions on the label, wear gloves, and work in a well-ventilated area. These cleaners are powerful but can damage the tray’s surface if used too often.
Aluminum Foil Cleaning Trick
For some nonstick trays, ball up a piece of aluminum foil and use it as a gentle scrubber. This removes baked-on bits without scratching. Do not use on coated or delicate surfaces.
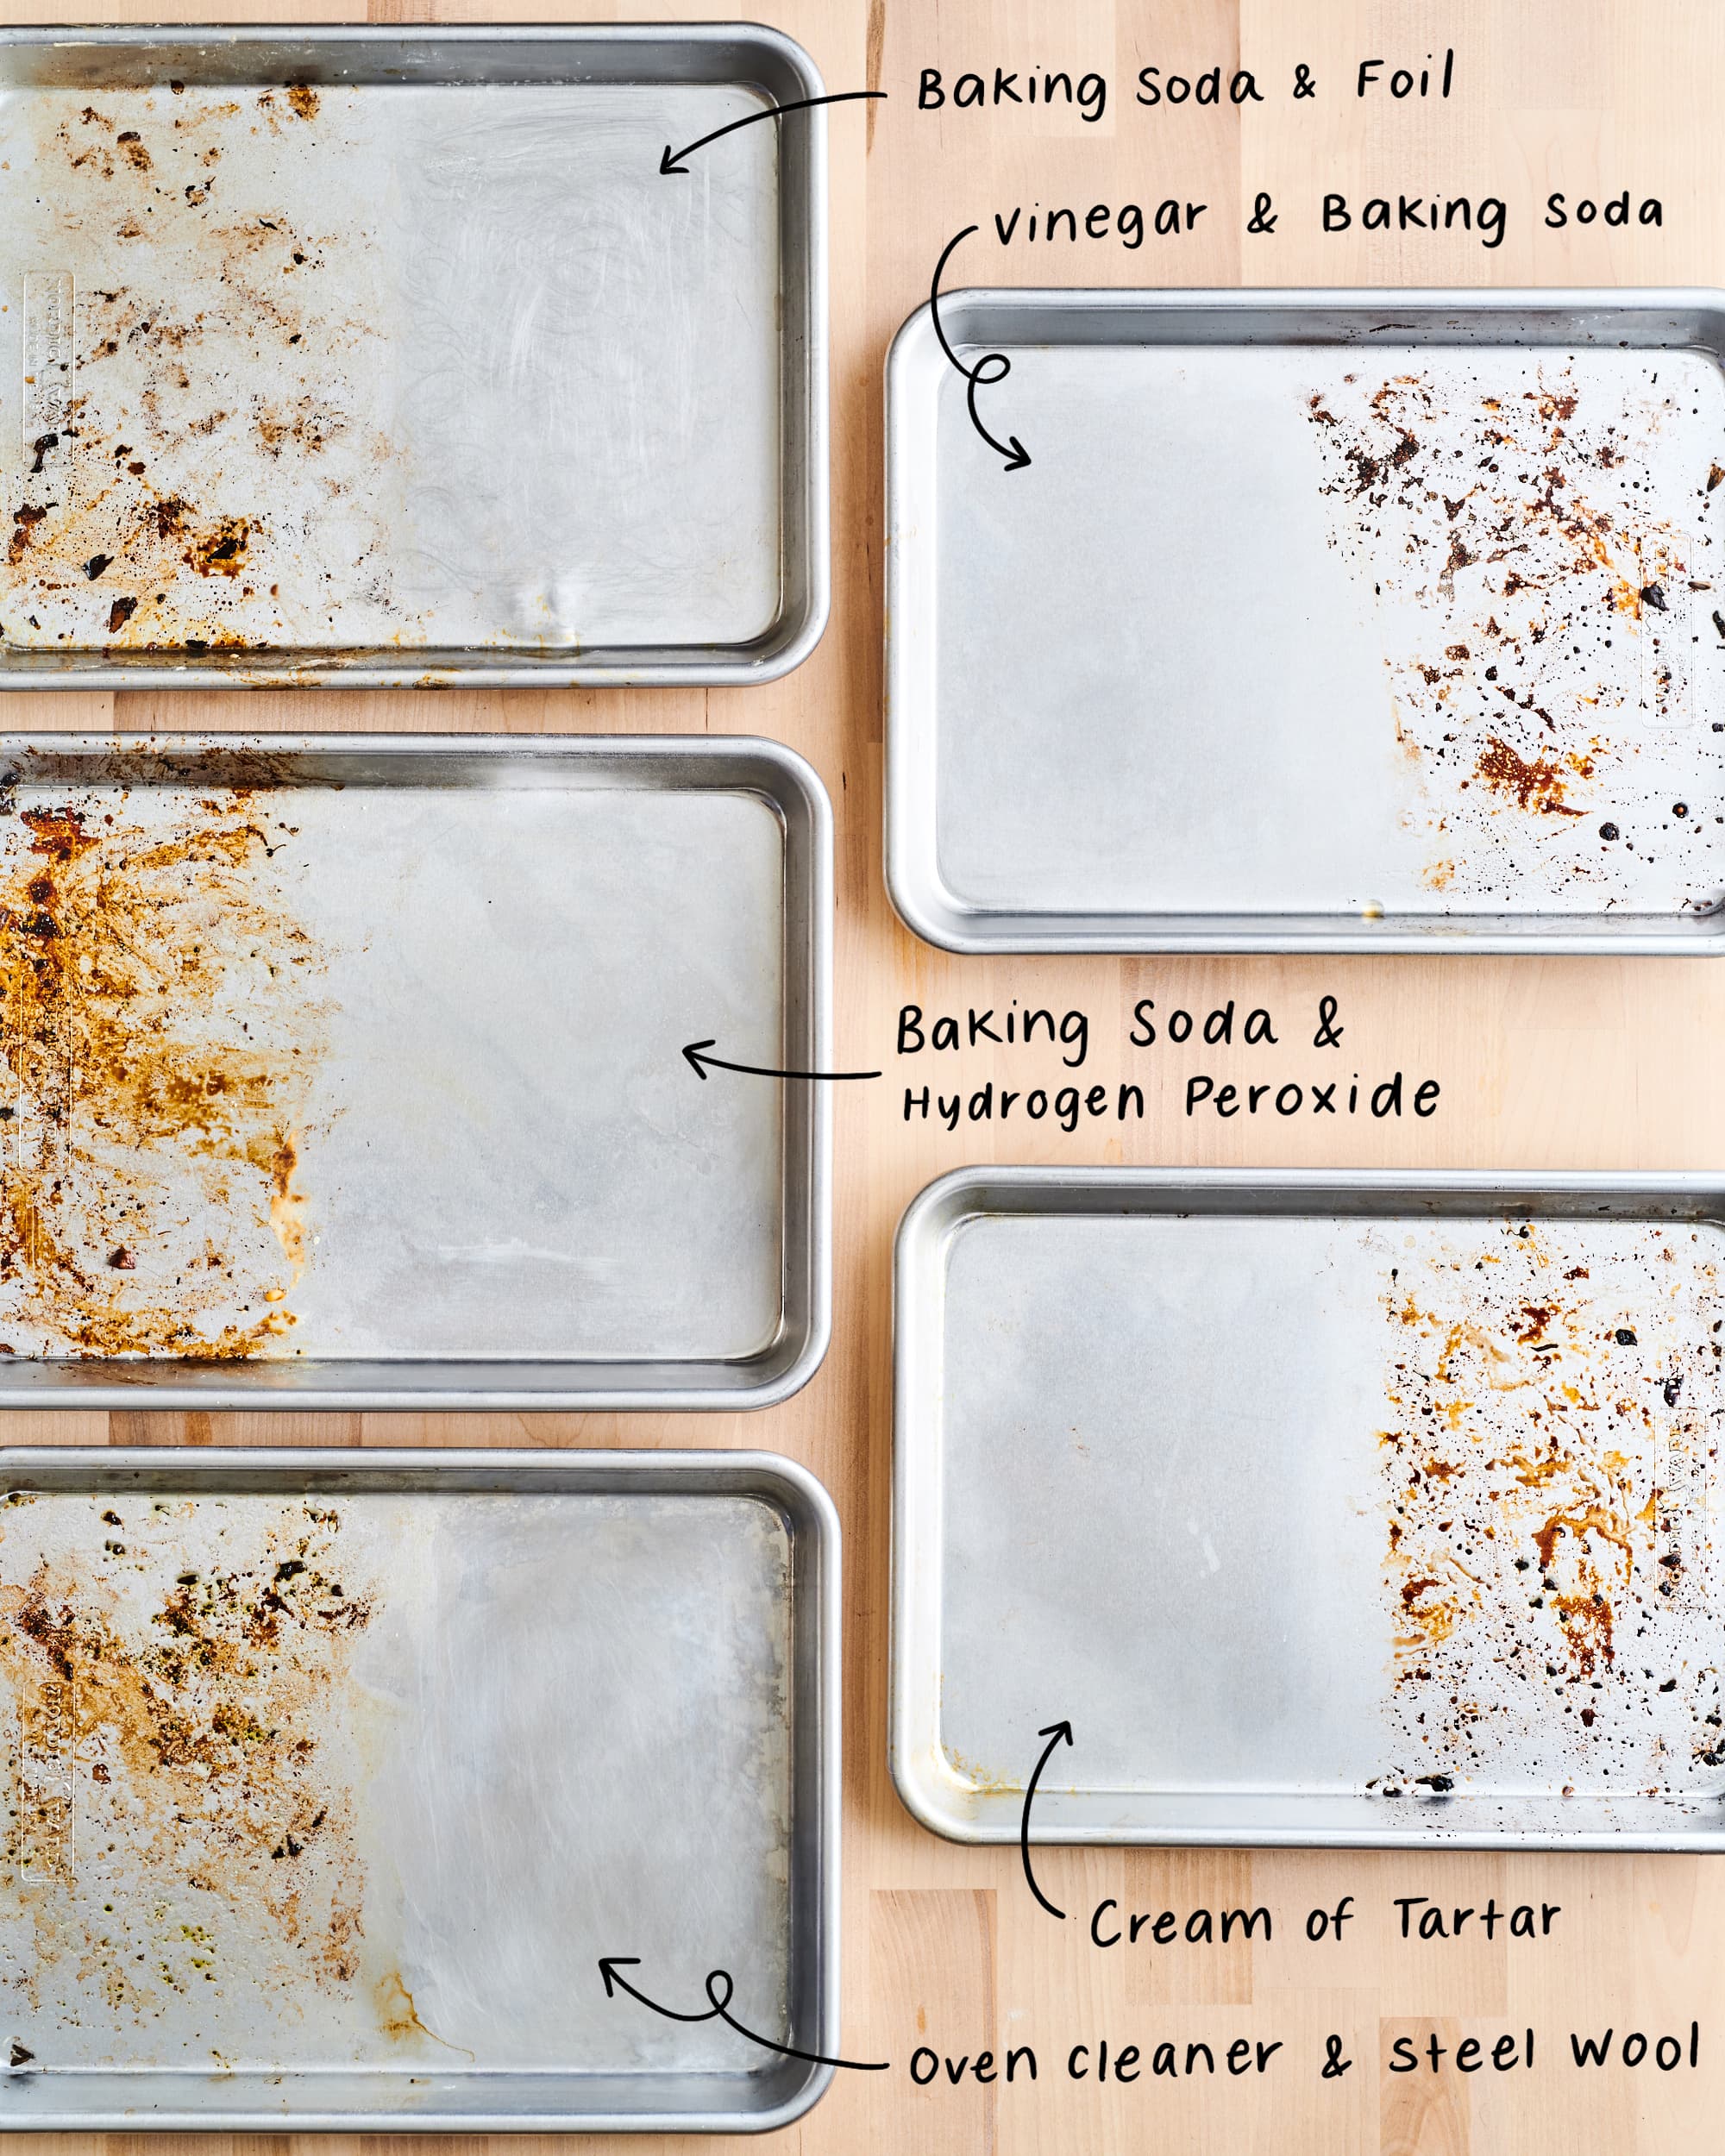
Comparing Cleaning Methods
Different stains need different approaches. Here’s a quick comparison to help you decide:
| Method | Best For | Time Needed | Safety |
|---|---|---|---|
| Baking Soda & Vinegar | Most food stains | 1–8 hours | Very safe, no harsh chemicals |
| Soak & Scrape | Heavy grease, old stains | 2–12 hours | Safe, but needs hot water |
| Oven Cleaner | Baked-on carbon, black stains | 1–3 hours | Use gloves and ventilation |
| Foil Scrubber | Lightly burnt bits | 5–10 minutes | Safe for metal, not for nonstick |
Choose the method that matches your tray’s condition and your comfort with cleaning products.
Special Techniques For Nonstick, Enamel, And Aluminum Trays
Not all oven trays are the same. Nonstick, enamel, and aluminum trays need special care. Using the wrong cleaner can ruin their surface or shorten their life.
Nonstick Trays
- Avoid steel wool, metal scrapers, or harsh chemicals.
- Use soft sponges and mild detergents.
- Never use the oven’s self-cleaning cycle on nonstick trays.
Enamel Trays
- Enamel is strong but can chip. Do not use sharp tools.
- Baking soda and vinegar work well.
- Dry thoroughly to prevent rust under chips.
Aluminum Trays
- Aluminum can discolor with some cleaners (like bleach).
- Use baking soda and mild soaps.
- Avoid acidic cleaners and scrub gently.
If in doubt, check the manufacturer’s instructions for your tray type.
The Overnight Trash Bag Soak: A Pro Tip
This method is popular in professional kitchens for restoring old trays. Here’s how it works:
- Place the oven tray in a large heavy-duty trash bag.
- Spray with commercial oven cleaner (or a strong degreaser).
- Seal the bag tightly and leave overnight, outside or in a ventilated area.
- The fumes soften baked-on grease and carbon.
- Next day, open the bag carefully (avoid breathing fumes), rinse the tray, and scrub off residue.
This trick can save trays that seem beyond help. Always use gloves and keep away from children and pets.
Homemade Cleaning Solutions
Some people prefer to avoid store-bought chemicals. Here are two effective homemade solutions:
Lemon And Salt Paste
- Mix lemon juice with coarse salt to make a paste.
- Spread on stains, let sit for 30 minutes, scrub, then rinse.
This method is gentle and leaves a fresh scent.
Baking Soda And Hydrogen Peroxide
- Mix baking soda with enough hydrogen peroxide to make a paste.
- Apply to burnt spots, leave for 2 hours, then scrub off.
Hydrogen peroxide helps lift stubborn marks but test on a small area first.
Preventing Oven Tray Stains
Cleaning is easier if you prevent stains from forming. Try these practical tips:
- Line trays with baking paper or foil when cooking sticky foods.
- Wipe up spills as soon as possible after cooking.
- Do not overfill trays—overflowing food burns onto the metal.
- Regularly clean your oven to prevent smoke and grease from settling on trays.
- Avoid using cooking sprays that can leave a hard-to-clean residue.
Simple habits can keep your trays looking new with much less effort.
How Often Should You Clean Oven Trays?
For best results, clean lightly after every use. Do a deep clean every 2–4 weeks, depending on how often you bake or roast. If you see smoke, smell burnt food, or notice black flakes on your cooking, clean the tray right away.
Regular care extends the life of your trays and keeps food tasting better.
When To Replace Your Oven Tray
No tray lasts forever. Here are signs you need a new one:
- Deep rust that won’t scrub off
- Flaking nonstick coating
- Warped shape (doesn’t sit flat)
- Holes or cracks in the metal
Damaged trays can be unsafe and may affect oven performance. Most trays last 3–7 years with good care.
Common Mistakes To Avoid
Many people make these mistakes without realizing:
- Using oven cleaner on nonstick trays: This can destroy the coating.
- Scrubbing too hard: Heavy scrubbing can scratch and damage trays.
- Letting trays soak for days: Prolonged soaking can cause rust or loosen coatings.
- Skipping drying: Always dry trays completely to prevent rust.
- Mixing different metals in the dishwasher: This can cause discoloration or pitting.
Avoid these errors to keep your trays working well for years.
Credit: www.thekitchn.com
Real-world Cleaning Example
Let’s walk through a real cleaning situation.
Maria, a home cook, forgets her roasted chicken in the oven. The juices burn onto her aluminum tray, leaving a thick, black crust. She tries dish soap and a sponge but nothing happens. Instead of giving up, she tries the baking soda and vinegar method:
- She sprinkles baking soda, pours vinegar, and leaves it overnight.
- Next morning, the black spots are much softer.
- She uses a plastic scraper and most of the stain comes off.
- For the last bits, she repeats the process and finishes with a lemon and salt scrub.
- The tray is not perfect, but it’s clean and ready for use.
Her mistake? Waiting too long to clean. Her new habit: soaking trays right after cooking.
Professional Vs. Home Cleaning Products
Should you buy special tray cleaners or stick to home remedies? Here’s a comparison:
| Product Type | Pros | Cons | Cost |
|---|---|---|---|
| Professional Oven Cleaner | Very effective, fast | Strong fumes, can damage coatings | Medium to high |
| Baking Soda & Vinegar | Safe, cheap, eco-friendly | Slower, may need repeat | Low |
| Lemon & Salt | Fresh smell, gentle | Not for heavy stains | Low |
For most people, home remedies work well for regular cleaning. Save commercial cleaners for emergencies.
Credit: www.thekitchn.com
Oven Tray Cleaning For Busy Schedules
If you have little time, focus on these time-saving strategies:
- Soak while you eat: Place the tray in hot, soapy water immediately after removing food. Scrub later.
- Use liners: Baking paper or reusable silicone liners reduce mess.
- Set a reminder: Deep clean once a month. Mark it on your calendar.
- Clean with friends or family: Make it a group chore and share tips.
These tricks turn cleaning into a small daily habit, not a big weekend problem.
What If You Have No Sink Large Enough?
Some oven trays are too big for standard sinks. Here’s what you can do:
- Soak the tray in the bathtub (clean the tub first and rinse after).
- Use an outdoor hose and a large plastic bin.
- Try the trash bag method outdoors.
Always rinse thoroughly to remove all cleaning products.
How Clean Is Clean Enough?
Not every stain must be gone. Some discoloration, especially on old trays, is normal and does not affect safety. Focus on removing loose food and sticky grease. If you see black flakes or smell burning, it’s time for a deeper clean.
Old trays may always look a little stained, but as long as they are free from grease and crusty food, they are safe to use.
Eco-friendly Cleaning Ideas
If you want to protect the environment, use these ideas:
- Choose baking soda, vinegar, and lemon over harsh chemicals.
- Use old t-shirts as cleaning cloths instead of buying new sponges.
- Avoid single-use liners; try reusable silicone mats.
- Dispose of dirty water responsibly.
Eco cleaning may take a bit more time, but it’s safer for your family and the planet.
Storing Clean Oven Trays
After cleaning, dry trays completely. Store them in a dry place to prevent rust. If you stack trays, place a paper towel or cloth between each one to avoid scratching. Never store trays with food residue, as this can attract pests and create odors.
What About Dishwasher Cleaning?
Some oven trays are dishwasher-safe, but check the manufacturer’s label first. Nonstick and aluminum trays may lose their coating or discolor in the dishwasher. Also, the dishwasher may not remove heavy grease or burnt spots. For best results, combine hand cleaning with occasional dishwasher use.
Signs Your Tray Is Too Far Gone
If your oven tray has deep rust, large flakes of coating coming off, or a warped shape, it’s time to replace it. Cooking on damaged trays can affect your food and even be a safety hazard. New trays are worth the investment for better results and peace of mind.
Frequently Asked Questions
How Can I Remove Black, Burnt Stains From Oven Trays?
Soak the tray with baking soda and white vinegar for several hours or overnight. Scrub with a scouring pad or a plastic scraper. For very heavy stains, use a commercial oven cleaner, but only on metal trays, not nonstick.
Is It Safe To Use Oven Cleaner On All Types Of Trays?
No, avoid oven cleaner on nonstick or aluminum trays. It can damage the coating or discolor the metal. Use natural methods like baking soda and vinegar instead.
Can I Put Oven Trays In The Dishwasher?
Some trays are dishwasher-safe, especially stainless steel. Check the label or manufacturer’s instructions. Nonstick and aluminum trays may get damaged. Dishwashers also may not remove heavy stains.
How Often Should I Clean My Oven Trays?
Wipe trays after each use and do a deep clean every 2–4 weeks, depending on how much you cook. If you see smoke or smell burning, clean right away.
What’s The Best Way To Prevent Stains On Oven Trays?
Line trays with baking paper or foil, avoid cooking sprays that leave residue, and clean trays soon after use. Don’t let food burn onto the surface.
Cleaning oven trays does not have to be a dreaded chore. With the right methods and a little regular effort, you can keep your trays in top shape for years. For more tips on safe household cleaning, visit Good Housekeeping. Taking care of your oven trays means better food, a cleaner kitchen, and less waste. Make these methods part of your kitchen routine and enjoy stress-free cooking every time.
:max_bytes(150000):strip_icc()/GettyImages-1401319836-2000-29124dc365434a97abc51ff6f52b93d7.jpg)
Credit: www.southernliving.com