
If you feel your refrigerator stands out in your kitchen in a way you don’t like, you’re not alone. Many homeowners want a seamless kitchen look, where major appliances blend in with the cabinetry. Covering your refrigerator with a cabinet is a smart solution. It hides the fridge, gives your kitchen a high-end custom look, and can even increase your home’s value. But how do you actually do it? This guide will walk you through every detail of how to cover a refrigerator with a cabinet, including planning, choosing materials, step-by-step installation, and common mistakes to avoid. You’ll learn practical strategies, get real examples, and find answers to questions that often confuse beginners.
Why Cover Your Refrigerator With A Cabinet?
Most kitchens have a fridge that doesn’t match the cabinets. This creates a visual break in the design. By covering your refrigerator with a cabinet, you get a built-in look. Here are a few reasons people choose to do this:
- Aesthetics: Cabinets hide the fridge, making the kitchen look more uniform.
- Higher Home Value: Custom kitchens are more desirable to buyers.
- Easier Cleaning: Cabinets around the fridge prevent dust from collecting in gaps.
- Noise Reduction: Cabinetry can slightly muffle refrigerator sounds.
A hidden refrigerator is a feature you’ll see in high-end kitchens, show homes, and interior design magazines. But even in a regular home, you can get this look with a bit of planning and effort.
What You Need To Consider Before Starting
Not every refrigerator or kitchen can use a cabinet cover. Here are the key things to check before you start:
1. Type Of Refrigerator
Not all fridges are the same. Some are easier to cover with cabinetry than others.
- Freestanding refrigerators are the most common. They stand alone and have sides that are visible.
- Built-in refrigerators are designed to sit flush with cabinets.
- Counter-depth refrigerators are shallower and also fit better with cabinetry.
Freestanding fridges can be covered, but you need to ensure enough air circulation. Built-in and counter-depth models are ideal for this project.
2. Kitchen Layout
Measure the space around your fridge. Is there enough room to add cabinetry on the sides and top? Check the distance to nearby walls, counters, and appliances. Make sure there is enough clearance for the refrigerator doors to open fully.
3. Ventilation Requirements
Refrigerators need to release heat. If you cover a fridge with cabinets, poor airflow can cause overheating and increase your energy bill—or even damage the appliance. Always check your fridge’s manual for ventilation requirements.
4. Budget
Covering a refrigerator with cabinetry is not free, but you can control costs. Custom cabinets are expensive, while DIY cabinet panels or ready-made kits are cheaper. Plan your budget before you begin.
5. Diy Skill Level
Are you comfortable with tools and carpentry? Building a cabinet cover is not the hardest kitchen project, but it does require measuring, cutting, and installing panels. If you’re not confident, consider hiring a professional.
.jpg)
Credit: themerrythought.com
Key Materials And Tools Needed
Let’s break down what you’ll need to successfully cover your refrigerator with a cabinet.
Essential Materials
- Cabinet panels: Plywood, MDF, or matching cabinet-grade material
- Trim moldings: For a finished look
- Cabinet doors: If you want to completely hide the fridge front
- Hinges and brackets
- Paint or laminate: To match existing cabinetry
- Screws and mounting hardware
Tools
- Measuring tape
- Level
- Circular saw or table saw
- Drill and bits
- Screwdriver
- Clamps
- Stud finder
- Pencil and notepad
Optional Add-ons
- Vent grills
- Soft-close hinges
- Cabinet handles
A common mistake is underestimating the number of small hardware pieces you need. Always buy a few extra hinges and screws, just in case.
How To Plan Your Refrigerator Cabinet Cover
Planning is the single most important step. Here’s how to do it:
Measure Your Refrigerator
Use your measuring tape to record:
- Height, width, and depth of the fridge
- Space above, on the sides, and behind the fridge
- Door swing clearance
Add at least 1 inch on all sides for ventilation, unless your fridge’s manual says otherwise.
Decide On Cabinet Style
You have a few choices:
- Partial cover: Only sides and top are covered, fridge doors remain visible.
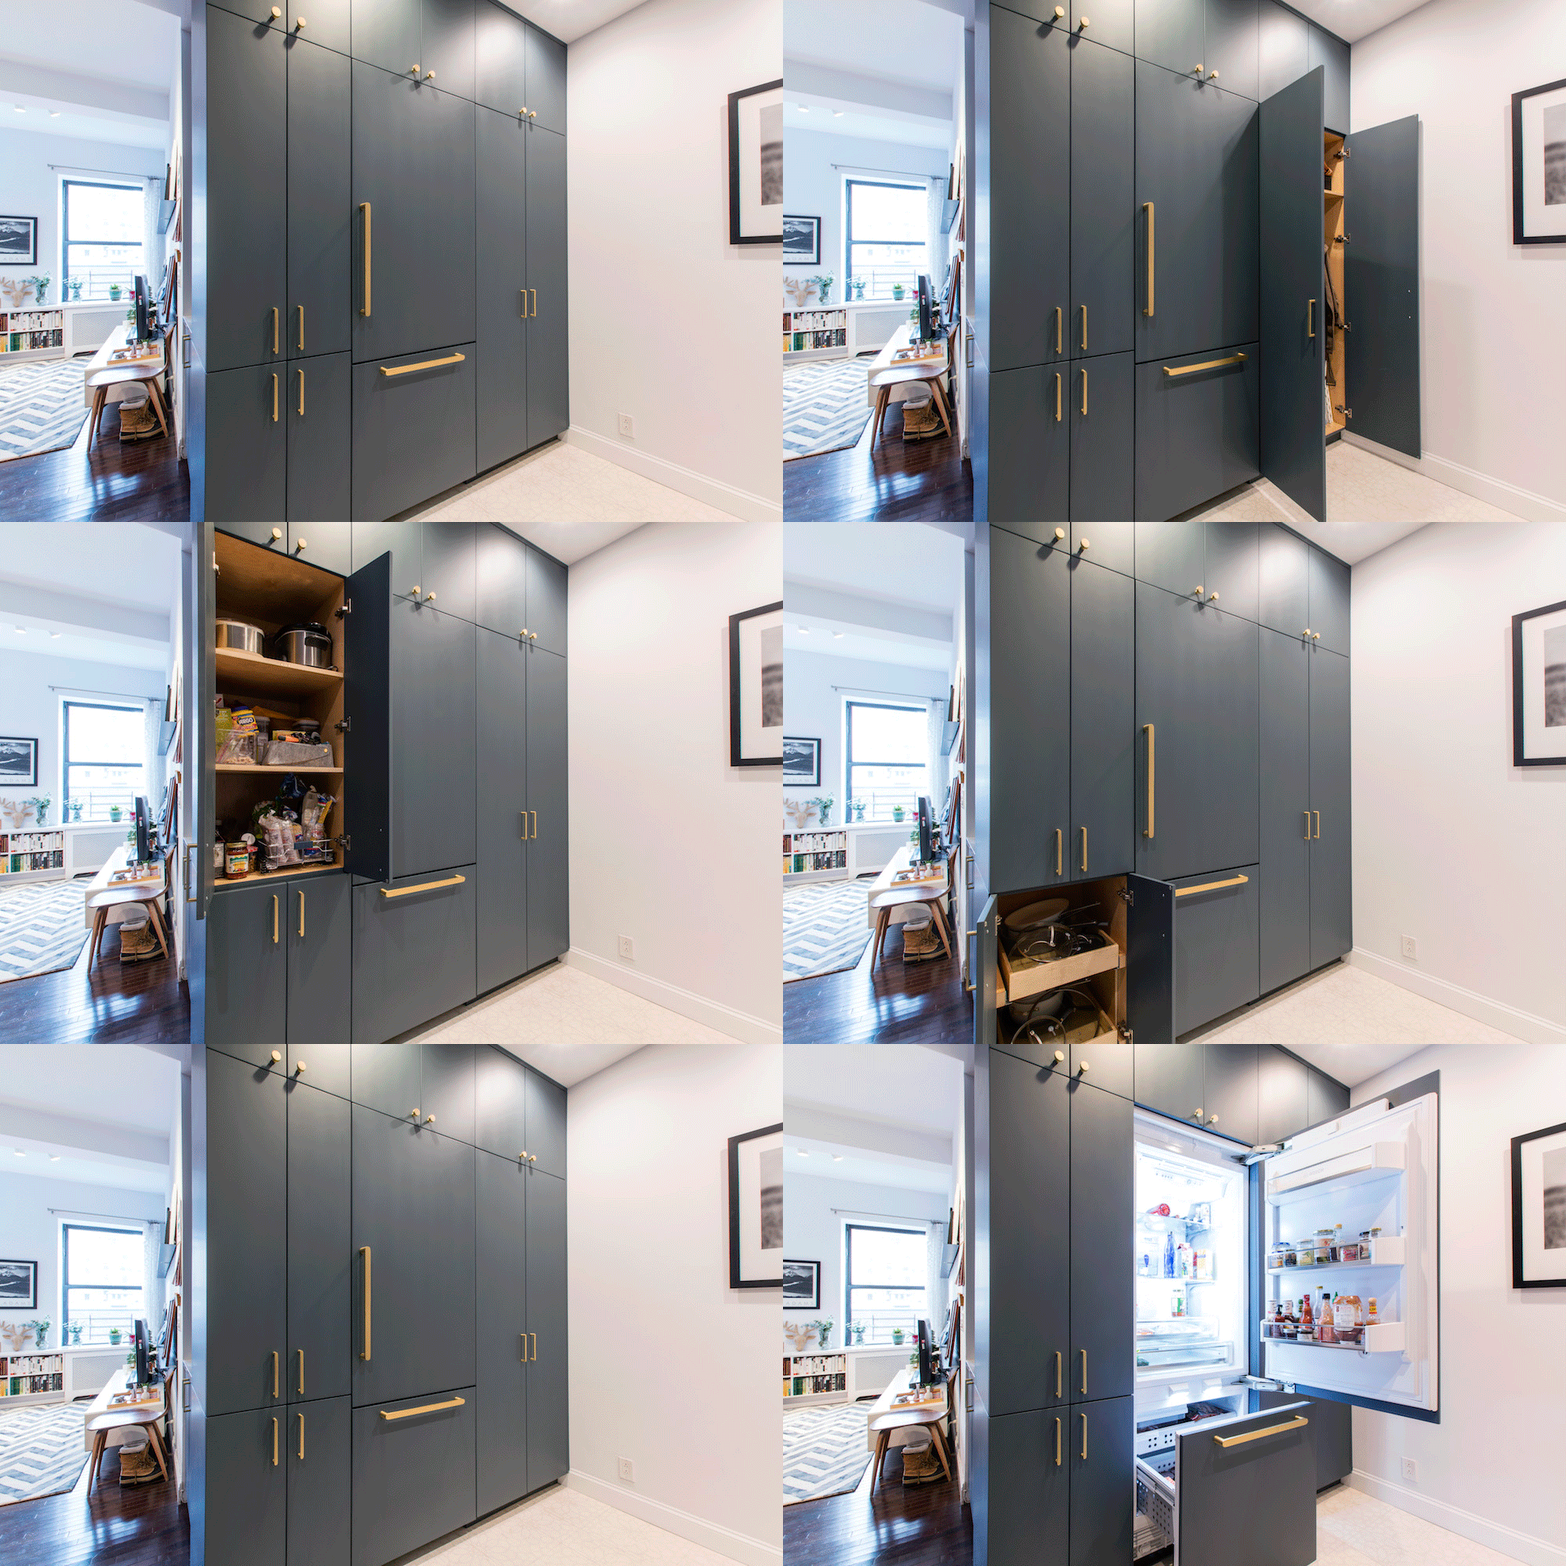
- Full panel overlay: Cabinet panels cover the fridge doors, making it look like a pantry.
- Built-in look: Custom cabinets surround the fridge, but doors are not hidden.
If you want a truly hidden fridge, you’ll need special hinges and panel-ready refrigerator doors.
Match Cabinet Design
The new cabinet should match your existing kitchen in:
- Material (wood, MDF, laminate)
- Color/finish
- Door style (shaker, flat, raised panel)
- Handles/knobs
A good tip: Take a door or drawer from your cabinets to the hardware store to match colors and styles exactly.
Plan For Power And Water
If your refrigerator has an ice maker or water dispenser, make sure you leave access to the water line and power outlet.
Step-by-step: How To Build A Cabinet Around Your Refrigerator
Now let’s get into the detailed steps. This is where most people get stuck, but if you follow each stage, you’ll get a professional result.
1. Prepare The Area
Clear out the fridge and unplug it. Move it out of the way if possible. Clean the floor and walls behind the fridge. Remove any baseboards where your cabinet sides will go.
2. Build The Side Panels
Cut two panels for the sides. These should be:
- The same height as your upper cabinets (often 84 or 90 inches)
- Slightly deeper than the fridge (add 1-2 inches for ventilation and door swing)
Attach edge banding or finish the front edge for a clean look.
3. Secure The Side Panels
Use a stud finder to locate wall studs. Attach the side panels to the wall studs with L-brackets or screws. The panels must be perfectly vertical—use a level to check. If your panels touch the floor, you may need to trim the bottom around uneven flooring.
4. Add The Upper Cabinet
Above the fridge, add a horizontal cabinet or shelf. This often matches the rest of your upper cabinets.
- Measure the width between the two side panels.
- Cut a top cabinet to fit.
- Attach the cabinet to the side panels using screws or brackets.
- Anchor the upper cabinet to wall studs for stability.
This creates a bridge over the fridge and connects the two panels.
5. Install Trim And Moldings
Add matching trim to the front edges of the panels and upper cabinet. This hides any rough cuts and gives a built-in appearance.
6. Attach Cabinet Doors (optional)
If you want to fully hide the fridge doors, you’ll need panel-ready refrigerator doors or special hardware. Most standard fridges cannot support heavy cabinet doors without modification. If you have the right fridge, follow the manufacturer’s instructions to mount cabinet panels.
7. Push The Refrigerator Back
Slide your fridge back into place. Plug it in and reconnect the water line if needed. Check that the doors open fully without hitting the panels.
8. Final Touches
Touch up paint or finish as needed. Add handles or knobs to the cabinet doors. Clean up the area.
Example Timeline
Most DIYers can complete this project in a weekend. Here’s a rough estimate:
| Step | Time Needed |
|---|---|
| Planning & Measuring | 2-3 hours |
| Cutting & Prepping Panels | 2-3 hours |
| Installation | 4-6 hours |
| Finishing Touches | 2 hours |
Comparing Cabinet Cover Options
You don’t have to build custom cabinetry from scratch. Here’s a quick look at common options:
| Option | Cost | Difficulty | Appearance |
|---|---|---|---|
| Custom Cabinetry | High | Advanced | Best, seamless |
| DIY Panel Kit | Medium | Intermediate | Good, some seams |
| Prefab Surround | Low-Medium | Beginner | Decent, not custom |
If you want the highest quality, custom cabinetry is the way to go. For a quick update, a prefab surround or panel kit works fine.
Common Mistakes And How To Avoid Them
Many DIYers make avoidable errors. Here are a few tips to help you avoid frustration:
- Ignoring Ventilation: Never build panels tight against the fridge. Leave at least 1 inch on the sides and top.
- Not Leveling Panels: Cabinets look sloppy if they are not perfectly vertical. Use a long level.
- Wrong Material Choice: MDF is cheaper but can swell if exposed to moisture. Use plywood if possible.
- Misaligned Doors: Check the fridge door swing before installing side panels.
- Skipping Studs: Attaching panels to drywall alone is not secure—always screw into wall studs.
- Forgetting Access: Leave a way to get to the power outlet and water line for repairs.
One non-obvious insight: Consider removable panels for one side. This allows for easier fridge replacement later.
Matching Cabinet Covers To Your Kitchen Style
Your refrigerator cabinet should look like it was always part of your kitchen. Here’s how to make sure it blends in:
- Color Match: Paint or stain panels to match your cabinets. For painted kitchens, get the same brand and color code.
- Door Style: Use the same type of door panel (flat, shaker, raised).
- Hardware: Match handles and hinges to existing cabinet hardware.
- Crown Molding: Add matching molding to the top for a finished look.
If your kitchen is older, it can be hard to find an exact match. In that case, use a contrasting color (e.g., white cabinets with a black fridge surround) for a deliberate design choice.
Advanced Tips For A Pro Look
Want your refrigerator cabinet to stand out in a good way? Try these advanced ideas:
- Built-in Lighting: Add LED strip lights under the upper cabinet for a soft glow.
- Pull-out Pantry: Use the side panel as a wall for a pull-out spice rack.
- Integrated Vents: Install decorative metal grills in the upper panel for better airflow.
- Soft-close Hinges: Upgrade to premium hinges for smooth, quiet operation.
- Hidden Outlets: Add a recessed outlet behind the fridge for a flush fit.
One detail many people miss: Use a filler strip between the fridge and cabinet if your walls are not perfectly straight. This hides any gaps.
Maintenance And Cleaning
Once you have your new cabinet, you want it to last. Here’s how to care for it:
- Clean the panels with a damp cloth and mild soap.
- Check for dust buildup on top and sides every few months.
- Inspect for moisture if your fridge has a water line—fix leaks fast to avoid damage.
- Repaint or touch up chips and scratches as needed.
If you chose MDF panels, be extra careful with water. Plywood or laminate panels are more resistant to damage.
Cost Breakdown: What To Expect
How much will it cost to cover your refrigerator with a cabinet? Here’s a typical breakdown:
| Item | Low End | High End |
|---|---|---|
| Side Panels (2) | $80 | $300 |
| Upper Cabinet | $100 | $500 |
| Trim/Molding | $30 | $100 |
| Hardware | $20 | $60 |
| Paint/Finish | $20 | $50 |
| Total | $250 | $1,010 |
Labor is not included. If you hire a carpenter, expect to pay $500–$1,500 more, depending on your area.
When To Call A Professional
Not everyone wants to DIY. Here are signs you should hire a professional:
- Complicated Layout: Tight spaces, uneven floors, or odd wall angles.
- High-End Kitchen: You want a perfect match to custom cabinetry.
- No Tools or Experience: If you’ve never installed cabinets before.
- Heavy Panels: If your materials are too heavy to lift alone.
Professionals can also help with custom panels for panel-ready fridges, electrical work, or water line changes.
.jpg)
Credit: themerrythought.com
Environmental Impact And Sustainability
If you care about the environment, you can make your project greener:
- Choose FSC-certified wood for panels.
- Use water-based paints and finishes.
- Recycle old panels or donate them.
- Buy local to reduce transport emissions.
A hidden benefit: By covering your fridge and improving airflow, you may reduce its energy use slightly.
Examples And Inspiration
It’s easier to imagine your project if you see real examples.
- Modern kitchens often use flat, white panels with hidden handles.
- Farmhouse kitchens might use beadboard panels and vintage hardware.
- Luxury kitchens sometimes add glass-front cabinets above the fridge or even a wine rack.
For more inspiration, check out Houzz’s refrigerator cabinet gallery.
Credit: sweeten.com
Frequently Asked Questions
How Much Space Should I Leave Around My Refrigerator When Adding Cabinets?
Always leave at least 1 inch of space on each side and at the top of your refrigerator for ventilation. Check your refrigerator’s manual—some models require more space. Not enough airflow can cause overheating or reduce the lifespan of your fridge.
Can I Use Mdf Panels To Cover My Refrigerator?
Yes, MDF panels are a popular, budget-friendly choice. However, MDF is sensitive to moisture. If your fridge area is humid or near a water line, consider plywood or laminate panels for better durability.
Is It Possible To Add Cabinet Panels To Any Refrigerator?
Not all refrigerators can be covered with cabinet doors. Only panel-ready refrigerators are designed for this. Standard models can be surrounded by cabinetry, but you can’t attach doors directly unless your fridge is rated for extra weight and has special mounting points.
What’s The Difference Between A Built-in And A Cabinet-covered Fridge?
A built-in refrigerator is designed to sit flush with cabinets and often comes panel-ready. A cabinet-covered fridge usually means adding panels or a surround to a regular fridge to mimic the built-in look. Built-in models are more expensive and require professional installation.
Will Covering My Fridge With A Cabinet Affect Its Warranty?
It might. Some refrigerator warranties require proper ventilation. If you build cabinetry that restricts airflow, you could void the warranty. Always follow the manufacturer’s installation and ventilation guidelines.
Covering your refrigerator with a cabinet is a rewarding project that can transform your kitchen. With careful planning, the right materials, and attention to detail, you can achieve a professional, custom look—even on a budget. Take your time, measure twice, and don’t hesitate to ask for help if you need it.
Your kitchen will thank you for the upgrade!