
Using an Instant Pot can change the way you cook at home. It saves time, cooks food evenly, and makes meals taste great. But sometimes, you want your dinner ready later, not right away. Maybe you’re at work, out for errands, or want to wake up to a hot breakfast. That’s where the Delay Start feature comes in. With this function, you can set up your Instant Pot in advance, and it will start cooking at a time you choose. This means more flexibility and less stress around meal times.
Many Instant Pot owners do not use the Delay Start feature, often because they are unsure how it works, or they worry about food safety. This guide aims to clear up confusion and help you use this feature safely and confidently.
You’ll learn how to set up Delay Start, which foods are best for delayed cooking, and important safety tips. By the end, you’ll be ready to use your Instant Pot in a new, smarter way.
What Is Delay Start On An Instant Pot?
The Delay Start function is like a timer for your Instant Pot. Instead of starting to cook right away, you tell it to wait. For example, you might set up your ingredients in the morning, but want the cooking to begin two hours before you get home. The Instant Pot will count down and start at your chosen time.
Not every model has this feature, but most newer ones do. It’s found on most Duo, Duo Plus, and Ultra models, as well as many others. The main benefit is convenience—you can have hot, freshly cooked food at the time you want, without being in the kitchen.
Some people confuse Delay Start with the Keep Warm function. They are different. Keep Warm holds your food at a safe temperature after cooking, while Delay Start postpones cooking until later.
Why Use Delay Start?
You might wonder why you’d want to delay cooking in the first place. Here are some common reasons:
- Meal Timing: You can have dinner ready when you walk in the door.
- Breakfast Prep: Wake up to oatmeal or porridge, ready and hot.
- Busy Schedules: If you know you’ll be home late, set the meal to finish just as you arrive.
- Batch Cooking: Prepare multiple meals in a day, using Delay Start to space out cooking times.
- Save Time in the Morning: Prepare everything the night before and set the Instant Pot to start before you wake up.
For example, if you leave for work at 8 a. m. and return at 6 p. m. , but want your soup ready by 7 p. m. , you can use Delay Start to have the Instant Pot begin at 5 p.
m. This function gives you more control over your daily routine.
Credit: www.youtube.com
How Delay Start Works
Understanding how Delay Start operates is important. When you set it, the Instant Pot waits for the time you selected, then begins the cooking process. It does not keep food hot during the waiting period, so food will sit at room temperature until cooking starts.
Here’s a step-by-step look at what happens:
- You load your ingredients and select your cooking program.
- You set the Delay Start timer for how long to wait before starting.
- The Instant Pot counts down the delay period.
- When the delay ends, it automatically begins the cooking cycle.
- After cooking, it switches to Keep Warm (if enabled).
Most models let you delay start by up to 24 hours, but not all foods are safe to leave sitting that long (more on this later).
How To Set Delay Start On Your Instant Pot
Let’s walk through the exact steps to use Delay Start. The process may vary a little by model, but the basics are similar. Here’s how to use it on most models:
- Prepare Ingredients: Add all your ingredients to the pot and make sure the inner pot is properly seated.
- Select Cooking Program: Choose the cooking mode you want (Pressure Cook, Rice, Porridge, etc. ).
- Set Cooking Time: Adjust the cooking time using the + or – buttons.
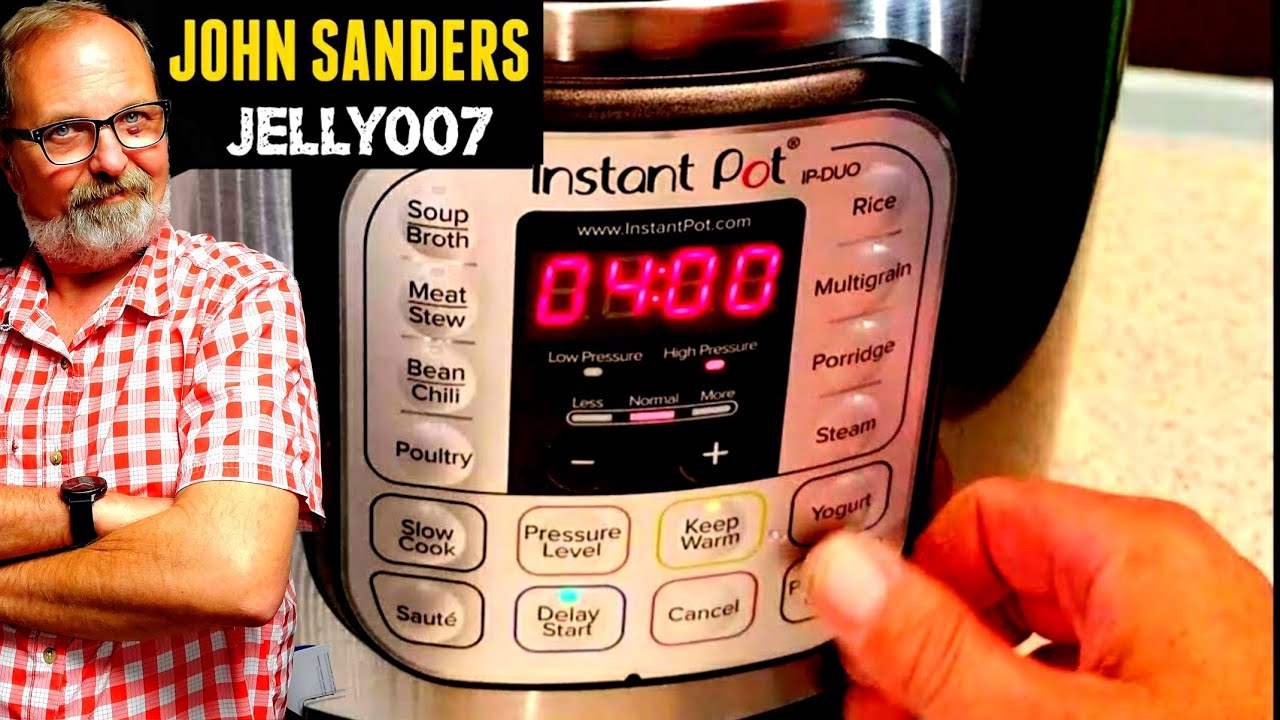
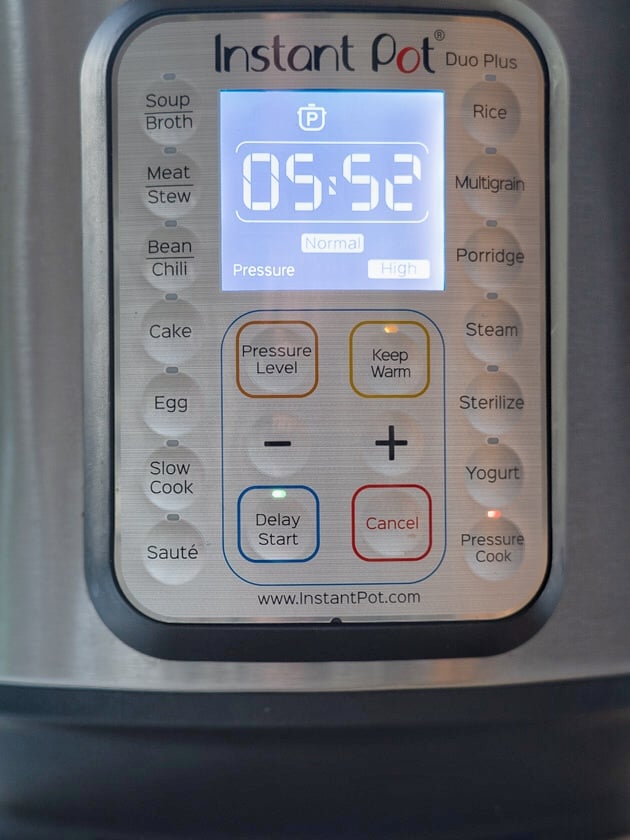
- Set Delay Start: Press the Delay Start or Timer button. The display will show “00:00.”
- Set Delay Time: Use the + or – buttons to set how many hours and minutes to wait before cooking starts.
- Confirm: Wait a few seconds, and the Instant Pot will beep and begin counting down the delay.
- Check Sealing: Make sure the steam release handle is set to “Sealing.”
- Walk Away: Your Instant Pot will start cooking when the delay finishes.
If your model uses a different button name, check your manual. Older models might call it “Timer” instead of “Delay Start. ” The order of steps may also vary slightly.
Example: Delaying Cooking For 3 Hours
Suppose you want to start cooking in three hours. After preparing everything and selecting your program, press Delay Start, set it to 3:00, and the Instant Pot will wait three hours before turning on the heat.
Important: Always Check Your Manual
Some Instant Pot models have different buttons, or the sequence of steps changes. Always review your model’s instructions to avoid mistakes.
Delay Start: Food Safety And What You Need To Know
Using Delay Start can be risky if not done correctly. The main concern is food safety. Raw meat, dairy, eggs, and cooked rice can spoil or grow bacteria quickly if left at room temperature for too long. The “danger zone” for bacteria is between 40°F and 140°F (4°C–60°C).
Which Foods Are Safe For Delay Start?
Some foods are safer to use with Delay Start than others. Here are some guidelines:
- Safe Foods: Dried beans, grains, oats, pasta, lentils, canned goods, root vegetables (like potatoes and carrots).
- Risky Foods: Raw meat, poultry, fish, eggs, dairy, cooked rice, and anything that spoils quickly.
If you’re using meat or dairy, the safest way is to keep everything in the fridge and transfer it to the Instant Pot right before cooking. Or, use Delay Start only for recipes with shelf-stable ingredients.
How Long Can Food Sit Before Cooking?
A good rule is: Do not let perishable foods sit for more than 2 hours at room temperature. If you plan to delay longer, keep ingredients cold until right before cooking, or avoid Delay Start for those recipes.
Non-obvious Insight: Use Ice
One trick is to add ice cubes on top of meats or dairy in your Instant Pot. This keeps them cool longer, reducing the risk of spoilage during the delay period. The ice will melt as cooking starts.
Non-obvious Insight: Use Frozen Ingredients
Using frozen meat or vegetables instead of fresh can buy you more safety time. The food will thaw slowly, staying out of the danger zone longer.
Best Recipes And Ideas For Delay Start
Not every recipe is a good match for Delay Start. Here are some meal ideas that work well:
- Oatmeal or Porridge: Use steel-cut oats and water. Add fruit or milk after cooking.
- Rice and Grains: White or brown rice, quinoa, or barley.
- Dried Beans and Lentils: Soak overnight, then set to cook before you get home.
- Vegetable Soups: Use canned broth and root vegetables.
- Steel-Cut Oats: Great for breakfast, just add water and oats.
- Pasta Dishes: Only if using dried pasta and no meat.
- Vegetarian Chili: Beans, tomatoes, and spices.
Avoid recipes with raw meat, eggs, or dairy unless you can keep them cold during the delay.
Step-by-step Example: Delay Start Overnight Oatmeal
Let’s look at a practical example for overnight oatmeal. This is a classic use of Delay Start.
- Ingredients:
- 1 cup steel-cut oats
- 3 cups water
- Pinch of salt
- Cinnamon or dried fruit (optional)
- Instructions:
- Add oats, water, salt, and extras to the inner pot.
- Select the Porridge or Manual/Pressure Cook program.
- Set cooking time to 10 minutes.
- Press Delay Start. Set it for 7 hours (if you want breakfast at 7 a.m. and you set it at midnight).
- Seal the lid and make sure the vent is set to Sealing.
- Go to bed. The Instant Pot will start at 6: 50 a.m. and finish by 7 a.m.
When you wake up, you’ll have hot oatmeal waiting.
Common Mistakes To Avoid With Delay Start
Even experienced users can make mistakes with Delay Start. Here are some to watch out for:
- Using Perishable Foods: Don’t leave raw meat or dairy out for more than 2 hours.
- Forgetting to Seal: Make sure the steam release is in “Sealing” position.
- Wrong Delay Time: Double-check you set the correct delay. A mistake could mean food is not ready when you need it.
- Overfilling: Don’t fill past the “Max” line—this can cause spills or errors.
- Forgetting to Stir Ingredients: Some thick ingredients (like oatmeal) stick to the bottom. Stir before cooking to avoid a burn notice.
- Not Enough Liquid: Always use enough water for your recipe to avoid burn errors.
- Leaving Cooked Food Too Long: After cooking, don’t leave food on Keep Warm for hours, especially with rice or dairy.
Comparing Delay Start Vs. Keep Warm Functions
It’s easy to mix up Delay Start and Keep Warm. Here’s a clear comparison:
| Feature | Delay Start | Keep Warm |
|---|---|---|
| When it operates | Before cooking | After cooking |
| Main purpose | Postpone cooking | Maintain food temperature |
| Food safety risk | Yes (if food sits too long) | Low (keeps food at safe temp) |
| Maximum time | Up to 24 hours (not for perishables) | Up to 10 hours |
Understanding the difference will help you choose the right option for your needs.
Delay Start: Model Differences And Button Names
Different Instant Pot models use different names and buttons for Delay Start. Here’s a quick look at some common models:
| Instant Pot Model | Delay Start Button Name | Maximum Delay Time |
|---|---|---|
| Duo | Timer | 24 hours |
| Duo Plus | Delay Start | 24 hours |
| Ultra | Delay | 24 hours |
| Viva | Delay Start | 24 hours |
| Lux | Timer | 24 hours |
Always check your user manual for the exact method on your model.
Tips For Using Delay Start Successfully
Getting the most from Delay Start means planning and following best practices:
- Use Shelf-Stable Ingredients: Stick to grains, dried beans, and root vegetables for safety.
- Set Delay Carefully: Double-check the time to make sure cooking finishes when you want.
- Use Cold Water: If possible, use cold water to keep the temperature low during the delay period.
- Layer Ingredients Properly: Put dense items like beans at the bottom and lighter ones on top.
- Add Dairy and Fresh Herbs After Cooking: This keeps flavors fresh and avoids spoilage.
- Clean the Sealing Ring: Odors can transfer if not cleaned well.
- Test with Small Batches First: Try new delay recipes on a day you’re at home, just in case.
- Check for Firmware Updates: Some newer models get updates for added safety features.
- Consider a Smart Plug: If your model doesn’t have Delay Start, you can use a smart plug to control when your Instant Pot receives power, but only for shelf-stable recipes.
Troubleshooting Delay Start Problems
If Delay Start isn’t working right, here are some solutions:
- Display Flashes or Error: Check that the lid is locked, and the sealing ring is in place.
- Burn Notice: Add more liquid and stir ingredients well.
- Food Not Ready on Time: Double-check you set the correct delay and cook times.
- No Delay Start Button: On some models, it’s called “Timer” or “Delay.”
- Lid Won’t Close: The sealing ring may not be seated properly, or the float valve is stuck.
If problems continue, reset your Instant Pot by unplugging it for a minute, then try again.
Real-world Example: Family Dinner With Delay Start
Consider a parent who wants a hot meal ready after soccer practice. At noon, they add dried beans, water, canned tomatoes, and spices to the Instant Pot. They set Delay Start for five hours, so cooking starts at 5 p.m. When the family comes home at 6:30, dinner is done and kept warm. This method means less stress and more family time.
Delay Start And Meal Planning
Delay Start can make meal planning easier. Here’s how:
- Batch Prep: Prepare several meal packs on Sunday, then use Delay Start during the week.
- Healthy Eating: Home-cooked meals are ready when you need them—less temptation for takeout.
- Less Waste: Use up pantry staples like beans and grains.
If you’re new to meal planning, start with simple recipes and build confidence using Delay Start.
Delay Start For Breakfasts
Many people use Delay Start for breakfast recipes. Here are a few ideas:
- Overnight Oats: Set up before bed, ready when you wake.
- Quinoa Porridge: Add quinoa, water, dried fruit, and spices.
- Rice Pudding: Use only shelf-stable ingredients and add milk after cooking.
Breakfast is a low-risk time for Delay Start, as the delay is usually less than 8 hours and uses grains or dried foods.
Delay Start For Workday Dinners
If you have a busy job, Delay Start can be a game changer. Here’s one way to do it:
- Before work, add dried beans, broth, and vegetables to the Instant Pot.
- Set Delay Start so cooking begins two hours before you get home.
- When you walk in the door, dinner is ready.
This works best with recipes that do not use raw meat or dairy.
Advanced: Using Delay Start With Frozen Ingredients
As mentioned earlier, using frozen ingredients can improve food safety. Here’s how:
- Add frozen chicken breasts (not fresh) with rice, water, and spices.
- Set Delay Start for up to 2 hours.
- The frozen chicken keeps the overall temperature lower during the delay.
This method is not perfect, but it reduces the risk compared to using fresh meat. Always check for doneness before serving.
Delay Start Vs. Slow Cooker Function
Some Instant Pot models also have a Slow Cooker function. Here’s how Delay Start compares:
| Feature | Delay Start | Slow Cooker |
|---|---|---|
| Cooking Time | Short (after delay) | Long (6-10 hours) |
| When it starts | After delay period | Immediately |
| Food Safety Risk | High if food sits unrefrigerated | Low (cooks at safe temp) |
| Best For | Grains, dried beans | Stews, braises, tough meats |
If you need a meal ready after many hours, slow cooking may be safer than Delay Start, especially with meats.
Credit: www.dadcooksdinner.com
Cleaning And Maintenance Tips After Delay Start Use
Using Delay Start means food might sit in the pot for a while. Here’s how to keep your Instant Pot clean and fresh:
- Wash the Sealing Ring: Odors can build up, especially with long delays. Use vinegar if smells persist.
- Wipe the Lid and Pot: Clean after each use to prevent bacteria growth.
- Check for Residue: Grains and beans sometimes stick to the bottom—scrub gently.
- Dry Thoroughly: After washing, let all parts dry before storing.
Good cleaning habits will keep your Instant Pot working well and your food tasting great.
Delay Start: When Not To Use It
Even though Delay Start is useful, sometimes it’s better not to use it:
- If your home is very hot (above 80°F/27°C), bacteria can grow faster.
- For recipes with eggs, fish, or dairy.
- If power outages are common in your area.
- If your Instant Pot is older and does not seal well.
In these cases, plan to start cooking when you are home, or use the Slow Cooker setting instead.

Credit: www.paintthekitchenred.com
Frequently Asked Questions
Can I Use Delay Start With Meat Dishes?
It is not recommended to use Delay Start with raw meat unless you can keep the ingredients cold (below 40°F/4°C) until cooking begins. If you use frozen meat, it is safer but not risk-free. Always check for doneness and consider food safety first.
Why Does My Instant Pot Say “timer” Instead Of “delay Start”?
Some models use the word “Timer” instead of “Delay Start. ” They work the same way. Just press the Timer button and set the delay as you would with Delay Start.
How Long Can I Safely Delay Cooking Food?
For non-perishable foods (dried beans, grains, root vegetables), you can use up to 24 hours. For anything with meat, eggs, or dairy, do not delay more than 2 hours at room temperature. When in doubt, keep delays short or avoid perishable foods.
Can I Open The Lid During Delay Start?
You can open the lid before the delay period ends, but be careful not to disturb the ingredients or the seal. After the cooking cycle begins, the lid will be locked and cannot be opened until pressure drops.
Where Can I Find More Recipes That Use Delay Start?
You can find many Delay Start-friendly recipes in the official Instant Pot recipe book or on the Instant Pot official website. Look for recipes that do not require perishable ingredients for best results.
Using Delay Start in your Instant Pot can make your life easier, save time, and help you enjoy hot meals when you want them. With good planning and safe practices, you can unlock a new level of convenience in your kitchen.
Experiment with simple recipes first, always pay attention to food safety, and soon you’ll be using this feature with confidence every week.