
Finishing cabinet ends is a detail that separates an average kitchen or bathroom remodel from a truly professional result. When you walk into a newly renovated kitchen, you might notice the beautiful cabinet doors and sparkling hardware first. But soon, your eyes will wander to the sides of the cabinets—these are the cabinet ends. If they are unfinished, rough, or not matching the rest of the cabinetry, the whole space can look incomplete.
Many homeowners and DIYers underestimate how important cabinet ends are. These surfaces are often visible on islands, at the end of a row of cabinets, or wherever a cabinet run stops against a wall or appliance. How you finish these ends can make a big impact on both the look and the value of your kitchen or bathroom.
In this guide, you’ll discover everything you need to know to finish cabinet ends the right way. Whether you’re a homeowner planning a remodel, a DIY enthusiast, or a professional looking for advanced tips, this article will give you clear, step-by-step instructions and expert advice.
You’ll learn about the different finishing options, materials, tools, and techniques, as well as how to choose the best method for your needs and budget. We’ll also cover common mistakes, how to fix problems, and some non-obvious tips that even experienced remodelers sometimes miss.
Understanding Cabinet Ends
Before you start, it’s important to know exactly what “cabinet ends” are and why they matter. The end of a cabinet is the exposed side panel, usually found at the end of a cabinet run, on the side of an island, or anywhere the cabinetry does not meet a wall.
These sides are often made from plywood, particleboard, or MDF and are not intended to be seen as-is.
Unfinished cabinet ends can:
- Show mismatched materials or colors
- Reveal rough or exposed wood edges
- Collect dirt and moisture, leading to damage
- Make new cabinetry look cheap or incomplete
Finishing the ends properly adds visual continuity, protects the cabinets, and gives your room a polished, high-quality look.
Main Methods For Finishing Cabinet Ends
There are several popular ways to finish cabinet ends. Each has its own look, cost, and difficulty level. The best choice depends on your cabinet material, your skill level, and the style you want to achieve.
1. End Panels (applied Panels)
End panels are thin, decorative boards that match your cabinet doors and are attached to the exposed end. They create a seamless, furniture-like appearance.
How It Works
- You measure the cabinet end and cut an end panel to fit.
- The panel is usually 1/4″ to 3/4″ thick and can be made from wood, veneer, MDF, or laminate.
- The panel is attached with adhesive, finish nails, or screws.
Pros And Cons
End panels are the most professional-looking option, but they cost more and take more time to install.
| Pros | Cons |
|---|---|
| Seamless look | Costs more |
| Matches cabinet doors | Requires precise cutting |
| Very durable | Extra installation time |
When To Use
- High-end kitchens
- Visible cabinet ends (islands, peninsulas)
- When you want a custom look
2. Skin Panels (veneer Or Laminate Skins)
Skin panels are thin sheets (often 1/8″ thick or less) of wood veneer or laminate that cover the cabinet side. They’re glued directly onto the surface.
How It Works
- Clean and lightly sand the cabinet end.
- Cut the skin panel slightly larger than the surface.
- Apply adhesive and press the skin in place.
- Trim the edges flush with a utility knife or router.
Pros And Cons
Skin panels are affordable and quick to install but may not hide large flaws or texture underneath.
| Pros | Cons |
|---|---|
| Budget-friendly | Thin (not as sturdy) |
| Easy to install | Shows surface flaws underneath |
| Good for large areas | Less “furniture” look |
When To Use
- Quick kitchen updates
- Rental units or budget projects
- When cabinet ends are flat and in good shape
3. Paint Or Stain
If your cabinet ends are made of solid wood or high-quality plywood, you can finish them with paint or stain to match your doors and frames.
How It Works
- Clean and sand the surface.
- Apply primer if needed (especially for paint).
- Use paint or stain in thin, even coats.
- Add a clear protective finish if desired.
Pros And Cons
This is the simplest method but only works if your cabinet ends are in good condition.
| Pros | Cons |
|---|---|
| Very affordable | Shows grain differences |
| Easy for DIYers | Doesn’t hide rough edges |
| Fast to do | May need touch-ups |
When To Use
- Solid wood or plywood ends
- When the end grain matches door faces
- For quick color updates
4. Edge Banding
Edge banding is a thin strip of wood or plastic glued to the raw edge of the cabinet end. It covers the unfinished side and gives a neat look.
How It Works
- Cut edge banding to the length of the exposed edge.
- Apply glue or use pre-glued “iron-on” banding.
- Press in place and trim the excess.
Pros And Cons
Edge banding is great for hiding rough plywood edges but does not cover the full end panel.
| Pros | Cons |
|---|---|
| Inexpensive | Only covers edges |
| Easy for DIYers | Needs careful trimming |
| Many colors available | May peel over time |
When To Use
- Plywood cabinet boxes
- When only the edge shows (not the whole panel)
- For repairs and touch-ups
5. Decorative Moldings
Adding decorative molding (like baseboard, beadboard, or corner trim) is an effective way to upgrade plain cabinet ends.
How It Works
- Cut molding to size and miter corners if needed.
- Attach with finish nails or adhesive.
- Caulk and paint or stain to match.
Pros And Cons
Moldings add style but require careful measuring and cutting.
| Pros | Cons |
|---|---|
| Custom look | Extra cost and labor |
| Many styles available | Can look busy if overdone |
| Hides flaws | Tough for beginners |
When To Use
- Traditional or farmhouse kitchens
- When you want to add architectural detail
- Covering seams or joints

Credit: www.thriftydecorchick.com
How To Finish Cabinet Ends: Step-by-step Guide
Choosing the right finishing method is only the first step. Getting a professional look depends on careful planning, the right tools, and attention to detail. Here’s a step-by-step process that works for most methods, with expert tips for each stage.
Step 1: Evaluate The Cabinet End
- Check if the surface is flat, clean, and undamaged.
- Look for gaps, rough patches, or unevenness.
- Decide if you need to sand, repair, or add filler.
Pro Tip: If the cabinet end is warped or damaged, replace the whole panel or cover with a thick end panel. Thin skins won’t hide big flaws.
Step 2: Choose And Measure The Finish Material
- Decide if you’ll use an end panel, skin, edge banding, paint, or molding.
- Measure the width and height of the exposed end.
- Add 1/16″ to each side for trimming after installation (for skins/panels).
Pro Tip: Always measure twice, cut once. For panels, order from the cabinet manufacturer for a perfect match if possible.
Step 3: Cut And Prepare The Material
- Use a fine-tooth saw or utility knife for skins.
- For panels, a table saw or circular saw with a guide gives straight edges.
- Sand all cut edges lightly to remove splinters.
Pro Tip: If using veneer, score the back with a knife before snapping to prevent tear-out.
Step 4: Dry Fit And Test
- Hold the panel or skin in place without glue.
- Check for gaps, overhang, or misalignment.
- Mark the position with a pencil if needed.
Pro Tip: Mark “up” and “front” on the back of your panel so you don’t mix up sides during installation.
Step 5: Install The Finish
For End Panels Or Skins
- Clean the cabinet side with a tack cloth.
- Apply construction adhesive or contact cement (for skins).
- Press the panel/skin in place, aligning carefully.
- Use finish nails or brads at the corners for extra hold (if the panel is thick).
- Clamp or tape in place until the adhesive sets.
For Edge Banding
- Heat pre-glued banding with an iron (medium heat, no steam).
- Press firmly and roll with a J-roller or wood block.
- Trim excess with a sharp chisel or edge trimmer.
For Paint Or Stain
- Apply primer (if needed) and let dry.
- Brush or roll on paint/stain in thin, even coats.
- Sand lightly between coats for a smooth finish.
- Add a polyurethane topcoat for durability.
For Moldings
- Cut and test-fit all pieces before attaching.
- Use finish nails and a nail set to recess nail heads.
- Fill nail holes with wood putty.
- Caulk seams for a seamless look.
Pro Tip: For skins and panels, start at the bottom and work up. Gravity helps prevent sliding and misalignment.
Step 6: Trim And Finish
- For skins/panels, trim any overhang with a laminate trimmer or sharp knife.
- Sand corners lightly to remove sharp edges.
- Caulk any visible seams for a built-in look.
- Clean the surface and remove any glue residue.
Step 7: Final Inspection
- Check for gaps, loose spots, or misaligned edges.
- Touch up with paint, stain, or caulk as needed.
- Wipe down all surfaces for a clean, professional result.
Non-Obvious Insight: Many pros use a color-matched marker or crayon to touch up tiny gaps between panels and cabinet frames. This hides the seam and makes the finish seamless.
Matching Cabinet End Finishes To Styles
Choosing the right finish is not just about covering the end—it’s about matching your kitchen’s style and your personal taste. Here’s how common finish methods fit different cabinet styles:
- Shaker/Transitional: Painted or stained end panels for a clean, simple look
- Traditional: Raised panel end panels or decorative moldings
- Modern: Flat veneer skins or high-gloss laminate panels
- Rustic/Farmhouse: Beadboard paneling or rough-sawn wood skins
- Budget/Quick Fix: Paint, stain, or basic edge banding
If you’re not sure, take a cabinet door to your local hardware store and ask for help finding a matching end panel or skin.
Materials And Tools Needed
You’ll need different materials and tools depending on the finishing method. Here’s a checklist for the most common methods.
For End Panels/skins
- End panel or skin (wood, MDF, or laminate)
- Construction adhesive or contact cement
- Finish nails or brads and hammer
- Saw (circular, table, or miter)
- Clamps or painter’s tape
- Sandpaper (120–220 grit)
- Measuring tape and pencil
For Paint Or Stain
- Primer (if painting)
- Paint or wood stain
- Brushes or rollers
- Drop cloth
- Painter’s tape
- Polyurethane or sealer
For Edge Banding
- Edge banding tape (pre-glued or glue-on)
- Household iron (for pre-glued)
- Edge trimmer or sharp chisel
- J-roller or wood block
For Moldings
- Molding strips (base, corner, beadboard, etc.)
- Miter saw or box
- Finish nails and nail set
- Caulk and wood filler
Non-Obvious Insight: Always buy a little extra material for mistakes, test cuts, or future touch-ups. Matching old finishes later can be nearly impossible.
Cost Comparison Of Cabinet End Finishing Methods
How much you spend depends on the method, material quality, and whether you do it yourself or hire a pro. Here’s a rough cost comparison for a typical cabinet end (about 24″ x 34″).
| Method | DIY Cost (per end) | Pro Install Cost (per end) | Durability |
|---|---|---|---|
| End Panel | $40–$100 | $100–$250 | Very High |
| Skin Panel | $10–$40 | $50–$100 | Medium |
| Paint/Stain | $5–$20 | $40–$80 | Medium–High |
| Edge Banding | $5–$15 | $20–$40 | Medium |
| Molding | $15–$50 | $60–$150 | High |
Note: Prices vary by region and material quality.
Common Mistakes And How To Avoid Them
Even experienced remodelers can make errors when finishing cabinet ends. Here are the most common mistakes and how to avoid them:
- Not prepping the surface: Skipping sanding or cleaning leads to poor adhesion and a bumpy finish.
- Using the wrong adhesive: Some glues can cause veneer to bubble or peel. Always use adhesive recommended for your material.
- Mismatched color or grain: Different lots of wood or veneer can look very different. Buy all materials at once and check color in good light.
- Rushing installation: Not allowing glue to dry or trimming too early causes panels to shift or edges to chip.
- Skipping edge banding on plywood: Raw edges soak up moisture and look rough. Always add banding or paint/seal the edge.
- Overusing caulk: Caulk is for tiny gaps, not for filling large joints or covering bad cuts.
- Not sealing paint or stain: Unprotected finishes will scratch and stain easily. Always use a clear topcoat in kitchens.
Repairing And Upgrading Old Cabinet Ends
Sometimes, you’re not starting from scratch—you’re dealing with old, damaged, or outdated cabinet ends. Here’s how to fix or upgrade them:
- Loose veneer or skin: Inject wood glue under the loose area, clamp until dry, and touch up with stain or paint.
- Chipped edges: Fill with wood filler, sand, and touch up with matching paint or marker.
- Deep scratches: Sand smooth, apply matching stain or paint, and seal.
- Peeling edge banding: Remove old banding, sand the edge, and apply new tape.
Pro Tip: If old cabinet ends are badly damaged, cover them with a new skin or panel instead of trying to repair every flaw. It’s faster and gives a better result.
Credit: www.durasupreme.com
Advanced Tips For A Professional Finish
If you want your cabinet ends to look like custom furniture, consider these advanced techniques:
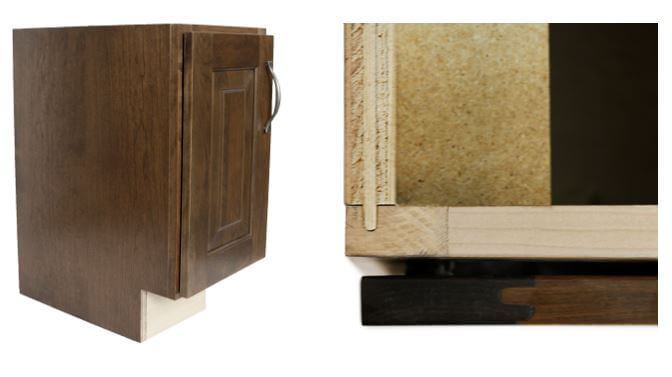
- Inlay strips: Add a contrasting wood inlay around the edge for a high-end detail.
- Flush installation: Set the end panel flush with the cabinet frame, not just over the side, for a seamless look.
- Routered details: Use a router to add grooves or patterns to end panels.
- Integrated shelving: Build shallow open shelves into the end panel for cookbooks or decor.
These options require more skill and planning, but they can make your cabinets stand out.
When To Hire A Professional
DIY is a good option for simple paint, skins, or edge banding. But for complex moldings, raised panels, or matching expensive custom cabinetry, hiring a professional is smart.
- Hire a pro if:
- You want an exact match to high-end cabinet doors.
- Your cabinet ends are out of square or damaged.
- You want detailed moldings or integrated features.
Pro Insight: Many cabinet shops can make custom end panels for you, even if your cabinets are older or from a different brand.
Sustainability And Eco-friendly Options
You can finish cabinet ends with the environment in mind:
- Choose low-VOC paints or adhesives to reduce indoor air pollution.
- Use bamboo veneer or other sustainable woods for skin panels.
- Refinish instead of replacing: Paint or re-skin old ends to save materials.
For more on eco-friendly cabinetry, check guidelines from the US EPA.
Frequently Asked Questions
How Do I Match New End Panels To Old Cabinets?
It’s best to take a cabinet door to a paint or cabinet store for a color match. For wood, test stains on scrap pieces until you get the closest match. Remember that lighting changes how colors look—check your sample in your kitchen, not just in the store.
Can I Use Peel-and-stick Wallpaper Or Contact Paper On Cabinet Ends?
Yes, peel-and-stick wallpaper or contact paper is a fast, budget-friendly way to cover cabinet ends. It’s not as durable as wood or laminate but is easy to replace. Clean the surface well and smooth out bubbles during application.
What If My Cabinet End Is Not Flat?
If your cabinet end is warped, bowed, or damaged, thin skins or veneers won’t look good. Remove the old panel and replace it with new plywood or MDF. For minor bumps, fill with wood filler and sand flat before finishing.
Is It Possible To Add End Panels After Cabinets Are Already Installed?
Absolutely. End panels and skins are designed to be applied after cabinet installation. You may need to scribe or trim the panel to fit uneven walls or floors. Use clamps or painter’s tape to hold panels in place while glue dries.
How Do I Clean And Maintain Finished Cabinet Ends?
For painted or stained finishes, wipe with a damp cloth and mild soap. Avoid harsh chemicals or scrubbing pads. For laminate or veneer, use a non-abrasive cleaner. Inspect for peeling or damage every few months, especially near sinks or dishwashers.
Finishing cabinet ends is a detail that makes a big difference in your kitchen or bathroom’s appearance and durability. With the right materials, careful measurements, and attention to detail, you can achieve a result that looks custom-built and lasts for years.
Whether you choose end panels, skins, paint, or decorative moldings, the key is preparation and patience. Take your time, use quality materials, and you’ll be proud every time you see your completed cabinets.

Credit: www.reddit.com