
A KitchenAid mixer is a loyal friend in many kitchens. When it stops spinning, it can feel like a big problem, especially if you’re in the middle of baking. But don’t worry—most issues are fixable with a little patience and some basic tools.
This article will help you understand why your KitchenAid mixer isn’t spinning and walk you step-by-step through how to get it working again. You’ll learn not only the common causes but also what to do, what tools to use, and how to avoid mistakes that could make things worse.
Understanding The Problem: Why Your Kitchenaid Mixer Isn’t Spinning
When your mixer’s head or attachments stop turning, it’s usually a sign of something wrong inside the machine. The cause could be electrical issues, mechanical problems, or even something simple like a loose attachment. Understanding these causes is the first step toward fixing your mixer.
Common Causes
- Power supply problems: Sometimes, the mixer isn’t getting power from the outlet.
- Faulty speed control: The control lever or switch could be broken.
- Damaged gears: Inside the mixer, gears might be stripped or worn out.
- Broken or loose worm gear: This is a common failure point.
- Obstructed or misaligned planetary assembly: The part that spins attachments might be jammed.
- Motor issues: The motor might be burned out or not receiving power.
- Attachment problems: Sometimes, the attachment isn’t correctly locked in place.
A beginner often misses the connection between a simple power issue and more complex internal failures. For example, a mixer might appear dead from a tripped circuit rather than a broken part. Also, if the mixer is making noise but not spinning, the problem is likely mechanical rather than electrical.
Safety First: Preparing To Fix Your Mixer
Before opening your KitchenAid mixer, it’s important to follow a few basic safety rules.
- Unplug the mixer before you start. Never work on electrical appliances while they are plugged in.
- Clear your workspace so you don’t lose screws or small parts.
- Gather the right tools: You’ll usually need a Phillips and flathead screwdriver, a small hammer, needle-nose pliers, and possibly a food-safe grease.
- Take pictures as you go. This helps you remember how to put things back together.
Don’t rush. Take your time so you don’t damage the mixer further.
Quick Checks: Ruling Out Simple Problems
Before you open the mixer, check the following easy-to-fix issues:
- Power outlet: Plug another device into the same outlet. If it doesn’t work, the problem is with your power supply, not the mixer.
- Power cord and plug: Look for cuts, burns, or loose wires.
- Speed control lever: Move the lever through all settings. If it feels stuck, it might be jammed with food debris.
- Attachment fit: Remove and re-insert the beater or dough hook. Sometimes, the attachment isn’t locked in place.
- Mixer bowl: Make sure the bowl is correctly seated. Some models have a safety feature that prevents spinning if the bowl isn’t locked.
If your mixer still isn’t spinning after these checks, it’s time to open the case.
Diagnosing Internal Issues
Once you’ve ruled out simple fixes, you’ll need to look inside your KitchenAid mixer. The following steps will help you check for mechanical and electrical problems.
Opening The Mixer
- Unplug the mixer.
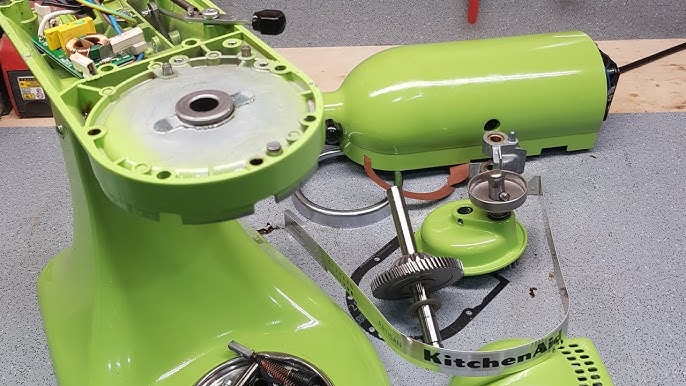
- Remove the trim band: Unscrew the end screws to slide off the metal band around the head.
- Take off the rear cover: There’s usually a screw at the back holding this in place.
- Remove the screws on the mixer head: These connect the top and bottom halves.
- Lift off the top cover: Be gentle; some wires may be attached.
It’s a good idea to keep screws in a cup or magnetic tray. Take a photo after each step.
Checking The Gears
The most common cause for a KitchenAid mixer not spinning is a broken worm gear. This gear is designed to fail if the mixer is overloaded, protecting the motor.
- Signs of gear failure: Mixer makes noise but attachments don’t turn, or the mixer is silent and the motor hums.
- What to look for: Stripped teeth, metal shavings, or grease with metal bits in it.
If the worm gear is damaged, you’ll need to replace it.
Testing The Motor
If the gears look fine, the problem could be the motor.
- Look for burn marks or a burning smell.
- Check if the wires to the motor are connected.
- Use a multimeter to test the continuity of the motor windings.
Motors rarely fail unless the mixer was used with very heavy dough for a long time.
Inspecting The Speed Control
The speed control assembly regulates power to the motor. If the lever feels loose or doesn’t click into place, the switch might be broken.
- Make sure wires are connected.
- Check for broken or burned contacts.
If the control is faulty, you may need a replacement part.
Step-by-step: How To Replace A Broken Worm Gear
The worm gear is a common failure point, and replacing it can bring your mixer back to life. Here’s how to do it:
Tools And Parts Needed
- New worm gear (make sure it matches your model)
- Food-grade grease
- Screwdrivers
- Pliers
Steps
- Open the mixer head as described above.
- Locate the gear assembly: It’s at the center, under the motor.
- Remove the old grease with a spatula or paper towel. Inspect for metal bits.
- Remove the retaining clip and pin holding the worm gear in place.
- Slide out the broken worm gear.
- Insert the new worm gear.
- Replace the pin and clip to secure the gear.
- Apply new food-grade grease to the gears.
- Reassemble the mixer in the reverse order.
A non-obvious tip: use only food-grade grease. Regular grease can contaminate your food.
Fixing Planetary Assembly Problems
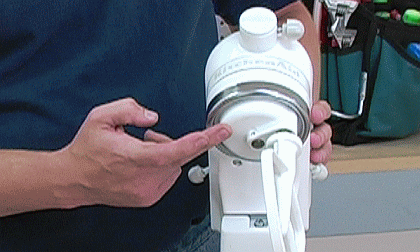
The planetary assembly is the part that spins the attachment. If it’s loose or jammed, the mixer won’t spin.
Steps To Fix
- Remove the attachment and bowl.
- Unscrew the attachment hub cover.
- Tap the planetary assembly gently with a rubber mallet to remove it.
- Check for food debris or bent parts.
- Clean and realign the assembly.
- Reattach and test the mixer.
Sometimes, the planetary gear pin works loose. If you see a small pin sticking out, tap it back in with a hammer.

Credit: www.instructables.com
Electrical Problems: How To Spot And Fix
Electrical problems are less common but can stop your mixer from spinning.
Speed Control Board
- If the mixer is dead, test the speed control board with a multimeter.
- Look for burned spots or melted connectors.
Power Cord Replacement
If you see cuts or burns on the cord, replace it.
- Open the mixer rear cover.
- Disconnect the old cord from the terminal block.
- Attach the new cord and secure with screws.
- Replace the cover.
A loose cord connection can cause intermittent spinning problems.
Comparing Common Mixer Problems And Solutions
Here’s a comparison of common KitchenAid mixer issues and the best solutions.
| Problem | Symptoms | Best Solution |
|---|---|---|
| Worm gear failure | Makes noise, attachments don’t spin | Replace worm gear, apply fresh grease |
| Power cord damage | Dead mixer, cord looks worn | Replace power cord |
| Planetary assembly loose | Attachment wobbles, doesn’t spin | Re-seat planetary assembly, tighten pin |
| Speed control fault | Lever stuck or loose, no speed change | Replace speed control plate or switch |
How To Lubricate Your Mixer For Long Life
A key part of KitchenAid mixer maintenance is proper lubrication. The gears need food-safe grease to work smoothly.
- How often: Every 1-2 years for home use, more often for heavy use.
- Signs you need to re-grease: Grinding noises, visible old/dry grease, or after repairing gears.
- What grease to use: Only food-grade gear grease.
Steps
- Open the mixer head.
- Remove old grease with a paper towel.
- Apply a generous layer of new grease to all gears.
- Reassemble and test.
A beginner mistake is using too little grease. Don’t be shy—gears need plenty.
When To Call A Professional
Some problems are best left to experts:
- If your mixer has burned wires or motor damage.
- If you’re not comfortable with electrical repairs.
- If the mixer is still under warranty.
Attempting a complex repair can void your warranty or make the issue worse. Check the KitchenAid warranty terms on their official site before opening your mixer.
Mixer Attachments: Could They Be The Cause?
Sometimes, the attachment itself causes spinning problems.
- Bend or damage: Check if the beater or hook is bent.
- Wrong attachment: Don’t force an attachment that doesn’t fit your model.
- Attachment hub: For some models, the hub cover must be closed or locked.
Try a different attachment to see if the problem goes away.
Preventing Future Problems
A little care goes a long way. Here’s how to keep your KitchenAid mixer spinning for years.
- Don’t overload the mixer. Follow recommended batch sizes.
- Clean attachments and bowl after each use.
- Store in a dry place to avoid rust on parts.
- Lubricate gears every year or two.
- Check the cord and plug regularly for damage.
A non-obvious tip: Let the mixer rest after 10-15 minutes of heavy use. This prevents overheating and gear damage.
Comparing Kitchenaid Models: Repair Complexity
Not all KitchenAid mixers are built the same. Some are easier to fix than others.
| Model Series | Ease of Gear Replacement | Ease of Motor Access |
|---|---|---|
| Artisan Tilt-Head | Easy | Moderate |
| Professional Bowl-Lift | Moderate | Difficult |
| Classic Series | Easy | Easy |
If you have a bowl-lift model, you may need extra time or a service manual.
Signs You Should Replace Instead Of Repair
Sometimes, repair isn’t worth it. Here are signs to consider buying a new mixer:
- Repair cost exceeds half the price of a new mixer
- Motor is burned out
- Repeated gear failures
- Cracked housing or major rust
Check the age of your mixer. Models over 20 years old may be harder to find parts for.
Credit: www.youtube.com
Tools And Supplies: What You Need For Most Repairs
Having the right tools can make repair easier and safer.
- Screwdrivers: Both Phillips and flathead
- Needle-nose pliers
- Small hammer or mallet
- Food-grade grease
- Multimeter (for electrical checks)
- Replacement parts: Worm gear, power cord, speed control switch
You don’t need special skills, but patience and care are important.
Real-world Example: Fixing A Mixer At Home
Let’s look at an example. Maria’s KitchenAid stopped spinning during bread dough mixing. She:
- Checked the outlet and power cord—no problem found.
- Noticed the mixer made a humming noise but didn’t spin.
- Opened the mixer, found metal shavings in the grease.
- Ordered a replacement worm gear and food-safe grease.
- Watched a video to help with reassembly.
- After replacing the gear and greasing, her mixer worked like new.
She learned to rest the mixer more often and never overload it with extra flour.
Credit: www.instructables.com
Common Mistakes To Avoid
Beginners often make these errors:
- Forgetting to unplug the mixer before opening.
- Losing screws or mixing up different sizes.
- Using regular grease instead of food-grade.
- Forcing parts instead of gently wiggling them.
- Skipping photos during disassembly.
Avoid these mistakes to keep your repair smooth and safe.
Comparing Repair Costs: Diy Vs Professional
Here’s a comparison of average costs.
| Repair Type | DIY Cost | Professional Cost |
|---|---|---|
| Worm gear replacement | $20-$40 | $80-$120 |
| Power cord replacement | $10-$20 | $50-$90 |
| Full motor replacement | $60-$100 | $150-$250 |
DIY saves money, but only if you feel comfortable with the steps.
Where To Find Help And Parts
You can find parts and guides online. The official KitchenAid website is a good place to start, and forums often have step-by-step photo guides. For more information, check KitchenAid on Wikipedia.
Wrapping Up: Get Your Mixer Spinning Again
Fixing a KitchenAid mixer that isn’t spinning can feel challenging, but most repairs are within reach for careful DIYers. Start with simple checks, move to gear and electrical inspections, and remember to use only food-grade grease. If you ever feel unsure, a professional repair or new mixer may be the best option.
With patience, the right tools, and a little know-how, you can save money and enjoy your favorite recipes once more.
Frequently Asked Questions
Why Does My Kitchenaid Mixer Make Noise But Not Spin?
This usually means the worm gear is broken. The motor works, but the gear can’t transfer power to the attachments. Replacing the worm gear is the most common fix.
Can I Use Regular Grease For My Kitchenaid Mixer Gears?
No, only food-grade grease should be used. Regular grease can contaminate food and is unsafe.
How Often Should I Lubricate My Kitchenaid Mixer?
For most home bakers, every 1-2 years is enough. If you use your mixer heavily, check the grease and gears yearly.
Is It Worth Repairing An Old Kitchenaid Mixer?
If the motor and housing are in good shape, repair is usually worth it. But if repair costs are more than half the price of a new mixer, consider replacing it.
Can I Fix My Kitchenaid Mixer Myself Or Should I Call A Professional?
Many repairs (like worm gear or power cord replacement) can be done at home with basic tools. For electrical issues or if you’re unsure, it’s safer to call a professional.