
Hanging a cutting board on the wall can make your kitchen more organized, save counter space, and even add a touch of style. Many people have cutting boards but don’t know how to store them efficiently. Some tuck them away in drawers, others leave them on the counter, and a few just stack them wherever there’s space.
But what if there was a better way? Mounting your cutting board on the wall not only keeps it within arm’s reach but also helps it stay dry and clean. This guide will show you exactly how to hang a cutting board on the wall, step by step.
Whether you’re a beginner or you’ve done some DIY before, you’ll find useful tips and tricks here. Let’s explore the different methods, materials, and ideas to help you make the best choice for your kitchen.
Why Hang A Cutting Board On The Wall?
Many kitchens are crowded, and every inch of space counts. If you often cook at home, you know how quickly counters can fill up with utensils and appliances. Hanging a cutting board on the wall solves several problems:
- Saves counter space – You don’t need to leave your cutting board out.
- Prevents moisture buildup – Air circulation helps the board dry, stopping mold or bacteria.
- Easy access – Your board is always in sight and ready to use.
- Decorative – Some boards are beautiful and add a rustic or modern feel to the kitchen.
Some people worry that wall-mounting is only for small or light boards. But there are solutions for almost any board size or weight if you use the right method. For renters, there are non-permanent options too.
Choosing The Right Spot
Before you grab your tools, think carefully about where to hang your cutting board. The location can make a big difference in convenience and safety.
Consider these points:
- Accessibility: Hang the board close to your main food prep area.
- Away from heat and water: Avoid placing it directly above the stove or too near the sink. Excess heat or moisture can damage wood or plastic over time.
- Wall strength: Make sure the wall can hold the board’s weight. Plaster, tile, and drywall all have different strengths.
- Height: Hang the board at a comfortable height for easy grabbing. Usually, this is just above counter level.
- Multiple boards: If you use several boards (e.g., for meat and vegetables), leave enough space between hooks for each one.
Practical tip: Hold your cutting board against the wall and imagine taking it down and putting it back. Is there enough room to do this easily? It’s a simple way to test your chosen spot before making holes.
Tools And Materials Needed
The tools and materials you need will depend on the hanging method you choose. Here’s a list of common items:
Basic tools:
- Drill (for permanent hooks or racks)
- Screwdriver
- Level
- Measuring tape
- Pencil
Materials for hanging:
- Wall hooks (adhesive or screw-in)
- Wall-mounted racks
- Magnetic strips
- Screws and wall anchors (for heavy boards)
- Double-sided mounting tape
- Picture hanging strips
- Cup hooks or command hooks
Optional items:
- Stud finder (for heavy boards)
- Sandpaper (if you need to smooth board edges)
- Finish nails (for lightweight boards)
Not every tool is required for each method. You’ll find the right combination as you read the methods below.
Methods For Hanging A Cutting Board
There’s no single “best” way to hang a cutting board. The right method depends on your kitchen, your board, and whether you want a permanent or temporary solution. Let’s look at the most popular and practical options.
1. Using Adhesive Hooks
Adhesive hooks are popular because they don’t require any drilling. They’re perfect for renters or anyone who doesn’t want to damage their walls.
How to do it:
- Choose strong adhesive hooks that support the weight of your cutting board. Check the package for weight limits.
- Clean the wall where you’ll stick the hook. Grease or dust can make adhesive fail.
- Mark the spot with a pencil. Use a level to make sure it’s straight.
- Stick the hook to the wall and press firmly for at least 30 seconds.
- Wait for the adhesive to set. Some products need an hour or more before use.
- Hang the cutting board by its handle, hole, or a small loop.
Advantages:
- No tools needed (except maybe a level).
- Easy to remove without damage.
- Cheap and widely available.
Common mistake: People often overload adhesive hooks. If your board is heavy, use two hooks or choose another method.
2. Installing Screw-in Wall Hooks
For a more permanent and sturdy solution, screw-in wall hooks are ideal. They work well for heavy wooden boards.
Steps:
- Find a wall stud for maximum strength, especially if your board is over 2 lbs (900 grams).
- Mark the spot with a pencil.
- Drill a pilot hole if needed.
- Insert a wall anchor if not screwing into a stud.
- Screw in the hook.
- Hang the board.
Advantages:
- Holds more weight than adhesive hooks.
- Very stable and secure.
Insider tip: Choose stainless steel hooks for kitchens. They resist rust and are easy to clean.
3. Using A Wall-mounted Rack
A wall-mounted rack can hold one or more boards. Some racks are designed for cutting boards, while others are general-purpose.
How to install:
- Buy a rack that fits your board’s size and thickness.
- Mark mounting points on the wall.
- Drill holes and insert anchors if necessary.
- Screw the rack to the wall.
- Slide your board into place.
Benefits:
- Can store multiple boards.
- Looks neat and organized.
Example: Metal racks suit modern kitchens, while wood racks match rustic styles.
4. Magnetic Strips
Magnetic strips are popular for knives, but you can use them for metal-edged cutting boards. Some boards have a small metal piece added to one edge for this purpose.
Installation:
- Mount the magnetic strip using screws and anchors.
- Attach the board if it has a metal edge or add a small metal plate to the board.
Note: Pure wood or plastic boards won’t stick unless you attach a metal part.
Unique insight: If you already use a magnetic strip for knives, adding a small metal plate to your board lets you hang it with your knives. It’s a space-saving trick.
5. Picture Hanging Strips
If you want a non-permanent and hidden option, picture hanging strips (like Command Strips) are a great choice.
Steps:
- Stick one side of the strip to the wall, and the other to the back of the board.
- Press them together firmly for a few seconds.
- Wait for the adhesive to set before hanging.
Advantages:
- No tools required.
- Doesn’t damage the wall or board.
- Easy to remove.
Warning: Don’t use this for heavy or very thick boards. The adhesive is strong, but not as much as screws or hooks.
6. Custom Leather Or Rope Loops
For a unique look, attach a leather or rope loop to the board and hang it from a hook or peg.
How to add a loop:
- Drill a small hole in one corner or use the existing handle.
- Thread leather or rope through the hole.
- Tie a knot to secure.
- Hang from a sturdy hook.
Style tip: Choose a loop that matches your kitchen’s design. Leather is classic, rope is rustic.
7. Peg Rails And Pegboards
Peg rails or pegboards are flexible and let you hang multiple items, not just cutting boards.
How to use:
- Install the rail or board following manufacturer’s instructions.
- Insert pegs or hooks where you need them.
- Hang your board.
Why choose this?
- Easy to change the layout.
- Great for small kitchens with lots of tools.
Table: Comparing Hanging Methods
Below is a quick comparison of the most popular methods, showing their main strengths and limits:
| Method | Strength | Best For | Removability |
|---|---|---|---|
| Adhesive Hooks | Low–Medium | Light to medium boards | Easy |
| Screw-in Hooks | High | Heavy boards | Permanent |
| Wall Racks | High | Multiple boards | Semi-permanent |
| Picture Strips | Medium | Light boards | Easy |
| Magnetic Strips | Medium | Metal-edged boards | Semi-permanent |
| Peg Rails/Boards | Medium–High | Flexible use | Semi-permanent |
Step-by-step Guide: Hanging A Cutting Board Safely
Let’s walk through a common method: using a screw-in hook for a wooden board. This approach works for most kitchens and keeps your board secure.
Step 1: Gather Materials
You’ll need:
- 1 or 2 stainless steel screw-in hooks
- Drill and small drill bit
- Wall anchors (if hanging on drywall)
- Pencil and measuring tape
- Level
Step 2: Find The Right Spot
Hold the board up against the wall. Mark where the hook(s) will go. Make sure the spot is not too close to the stove or sink. Use a level to ensure your marks are straight.
Step 3: Install The Hook
If your wall is drywall and you’re not drilling into a stud:
- Drill a small hole for the wall anchor.
- Tap the anchor into the hole.
- Screw the hook into the anchor.
If you hit a stud:
- Drill a pilot hole.
- Screw the hook directly into the stud.
For tile or masonry:
- Use a masonry bit and special anchors.
Step 4: Hang The Board
Place the board on the hook. If it has a handle or hole, hang it through there. If not, you may need two hooks to support it from underneath.
Step 5: Test For Stability
Gently pull the board to make sure it’s secure. If it wobbles or feels loose, tighten the hook or check the anchor.
Insider tip: If you’re hanging a very heavy board, use two hooks evenly spaced for balance.
Ideas For Multiple Cutting Boards
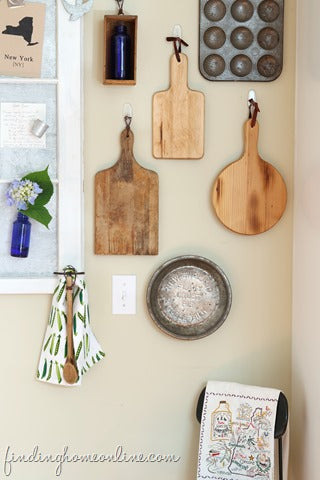
Many home cooks use separate cutting boards for meat, vegetables, and bread. You can hang all of them in a tidy row or group.
How to organize:
- Use a wall-mounted rack with dividers.
- Line up several hooks in a row.
- Use a peg rail so you can move boards as needed.
Spacing advice: Leave at least 2 inches (5 cm) between each hook or rack slot to avoid boards touching and to allow air to flow.
Credit: findinghomefarms.com
Caring For Your Wall-hung Cutting Board
Hanging your board helps keep it dry, but you still need to care for it properly.
Tips:
- Always dry the board fully before hanging it up.
- Oil wooden boards once a month to prevent cracking.
- Wash both sides to avoid warping.
- Never hang up a board that’s still wet – it can drip on your wall and create mildew.
For plastic boards, check for deep knife grooves. If they get too deep, bacteria can hide there, and it’s time for a new board.
Mistakes To Avoid
Many people make small mistakes when hanging cutting boards. Here’s how to avoid them:
- Overloading hooks: Don’t hang a heavy board on a small hook or adhesive. Always check the weight limit.
- Placing near heat or water: Constant steam or splashes can ruin the board and damage the wall.
- Not using wall anchors: For heavy boards on drywall, always use anchors so the hooks don’t pull out.
- Ignoring board material: Glass or thick stone boards need much stronger supports than wood or plastic.
- Hanging wet boards: This leads to mold, warping, and stains on your wall.
Non-obvious insight: If you change your kitchen layout, patch old holes before installing new hooks. It keeps your kitchen looking tidy and avoids confusion later.

Credit: livelovesophia.com
Choosing The Right Hook Or Rack
Not all hooks and racks are equal. Here’s what to look for:
- Weight capacity: Always choose a hook that can hold more than your board’s weight.
- Material: Stainless steel is best for kitchens, but brass and powder-coated hooks also work.
- Size: Make sure the hook fits through the board’s handle or is long enough to support the board’s width.
- Ease of cleaning: Smooth hooks are easier to wipe down.
- Design: Some hooks have a lip to prevent the board from slipping off.
Table: Hook and Rack Material Comparison
See how different materials perform for kitchen use:
| Material | Strength | Rust Resistance | Style |
|---|---|---|---|
| Stainless Steel | High | Excellent | Modern/Classic |
| Brass | Medium | Good | Classic/Vintage |
| Plastic | Low–Medium | Excellent | Casual/Colorful |
| Powder-Coated Metal | High | Very Good | Modern |
| Wood | Medium | Depends on finish | Rustic/Natural |
Expert tip: For extra safety, use hooks with a safety lip, especially in homes with children or pets.
Decorative And Creative Hanging Ideas
Hanging a cutting board doesn’t have to be purely functional. Here are some creative ideas to add style to your kitchen:
- Decorative racks: Use vintage or hand-crafted racks for a unique look.
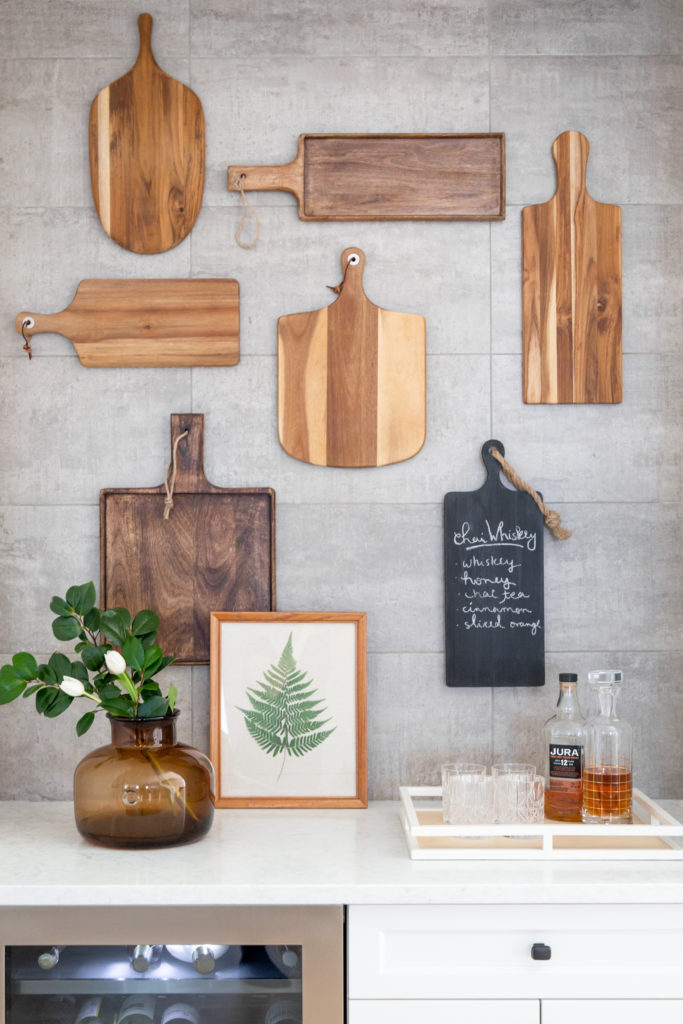
- Mix and match: Hang boards of different shapes and colors together for a visual effect.
- Wall art: Mount old or unused boards as kitchen art, especially if they’re made from beautiful wood.
- Personalized hooks: Choose hooks shaped like kitchen tools or in bold colors.
- Backsplash mounting: Hang boards on a tiled backsplash for a modern look.
Extra tip: If you have a beautiful board, hang it with the most attractive side facing out.
When Not To Hang A Cutting Board
Sometimes, wall hanging isn’t the best option:
- If your kitchen is very humid, boards may not dry well on the wall.
- If your walls are fragile or covered with valuable tiles, avoid drilling.
- If your board is extremely heavy (like marble or thick glass), shelving might be safer.
In these cases, a countertop rack or vertical storage inside a cabinet could be a better solution.
Environmental And Safety Considerations
Think about safety and the environment before hanging your board.
- Use non-toxic adhesives if you choose adhesive hooks or strips.
- Make sure hanging hardware is food-safe if it touches the board.
- For households with children, hang boards out of reach to avoid accidents.
- If you ever move, remove all hooks and patch holes so the next resident isn’t left with a damaged wall.
Environmental tip: Use long-lasting, reusable hooks and racks rather than single-use adhesives if possible. Stainless steel can last decades.
Credit: dwkinteriors.com
Case Study: Real-life Example
Julia, a home baker, had three wooden boards crowding her counter. She chose a wall-mounted rack above her prep area. The rack held all three boards, and she installed it with wall anchors for extra strength. Julia reports her kitchen feels bigger, and her boards dry faster.
She also finds she cleans them more regularly now that she sees them every day.
This is just one example, but it shows how wall hanging can improve both kitchen space and hygiene.
Advanced: Custom Diy Wall Mount
If you enjoy DIY, you can create a custom wall mount for a perfect fit.
What you’ll need:
- A wooden strip (like a 1×2 board)
- 2 or 3 sturdy hooks
- Drill, screws, and wall anchors
- Sandpaper and finish (optional)
How to build:
- Cut the wooden strip to your desired length.
- Sand and finish if desired.
- Attach hooks evenly spaced along the strip.
- Mount the strip to the wall with screws and anchors.
- Hang your boards.
This approach lets you choose the exact look and size you want.
How To Remove A Cutting Board Hook Safely
Sometimes you need to take down a hook or rack, especially if you’re moving or changing your kitchen.
For adhesive hooks:
- Pull gently on the tab to release the adhesive.
- Clean the wall with warm, soapy water to remove residue.
For screw-in hooks:
- Unscrew the hook.
- Patch the hole with wall filler.
- Paint over if necessary.
Pro tip: Don’t rush. Removing hooks too quickly can damage paint or drywall.
Combining Function And Style
The best kitchens are both practical and beautiful. Hanging your cutting board on the wall is a simple way to achieve both. Choose hardware that matches your kitchen’s style, keep your board clean and dry, and use the space you save for more cooking or baking.
If you want more inspiration on kitchen storage and wall organization, the Apartment Therapy Kitchen Storage Guide has creative ideas and expert advice.
Frequently Asked Questions
How Much Weight Can Adhesive Hooks Hold For A Cutting Board?
Most adhesive hooks hold between 1 to 5 pounds (0. 5 to 2. 2 kg). Always check the packaging for the exact weight limit. For heavy wooden boards, choose screw-in hooks or wall-mounted racks instead.
Can I Hang A Cutting Board On Tile Without Drilling?
Yes, you can use strong adhesive hooks or picture hanging strips on tile. Clean the tile well before attaching. For very heavy boards, drilling may be safer, but always use the right drill bit for tile to avoid cracks.
Will Hanging My Cutting Board Damage The Wall?
If you use adhesive hooks or strips, there is usually no damage if you remove them carefully. Screw-in hooks leave small holes, but these can be patched easily. For valuable tiles or painted walls, always test in a small area first.
What Is The Best Way To Hang Multiple Cutting Boards?
Install a wall-mounted rack or peg rail. These allow you to hang several boards in a row, keeping them organized and easy to reach. Leave space between each board for air circulation.
Can I Hang A Plastic Cutting Board The Same Way As A Wooden One?
Yes, you can use the same methods for plastic boards. However, they are usually lighter, so adhesive hooks or picture strips often work well. Just make sure the board is dry before hanging.
Hanging your cutting board on the wall is a smart move for any kitchen. With the right tools and a bit of planning, you can save space, keep your board clean, and add a touch of style to your cooking area.
Whether you want a temporary fix or a custom look, there’s a perfect solution for your needs.