
Many homeowners find the dishwasher air gap sticking out on their sink countertop unattractive. It can break up the smooth lines of a beautiful kitchen, clash with the faucet style, and sometimes even collect grime. But this small device is important for your kitchen plumbing, as it keeps dirty water from washing back into your dishwasher. If you’re wondering how to hide a dishwasher air gap without breaking plumbing codes or risking water damage, you’re not alone. This guide walks you through creative and safe ways to conceal your air gap, from simple cosmetic tricks to smart installations.
Why Hiding A Dishwasher Air Gap Is A Common Concern
Kitchens today are about both function and style. Open concept homes, stone countertops, and high-end fixtures are everywhere. But the air gap—that small cylindrical piece of metal or plastic—often stands out awkwardly. Many people feel it interrupts the flow of their kitchen design or makes cleaning the sink area harder.
At the same time, you can’t just remove it. In many areas, plumbing codes require an air gap for dishwashers. It’s also a valuable safety device, preventing sewage from backing up into your clean dishes during a clog or flood.
So, the challenge is to hide or minimize the air gap’s presence without affecting its function.
Understanding The Dishwasher Air Gap
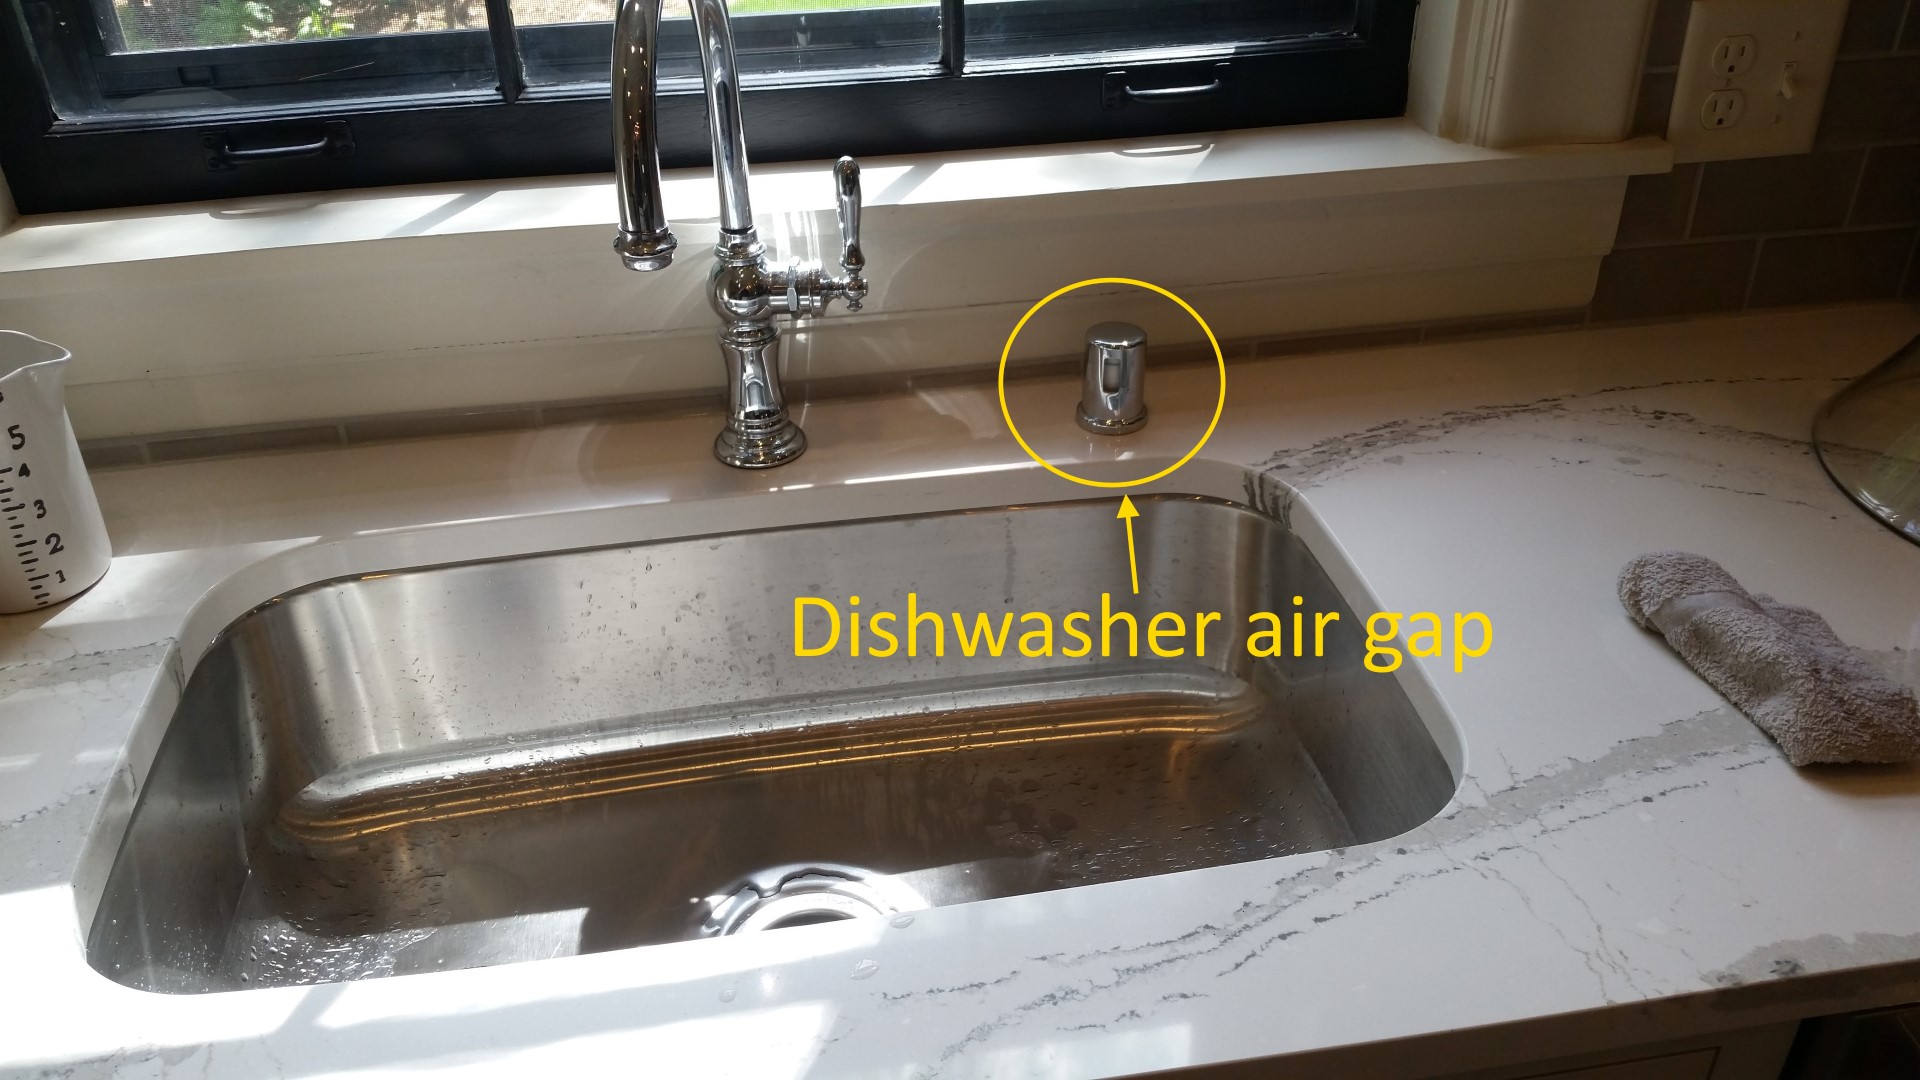
Before you start hiding your air gap, it helps to know what it does. The air gap is a small device mounted on your sink or countertop. It connects to the drain hose of your dishwasher. Its main job is to allow air into the plumbing, which breaks any siphon effect and keeps dirty water from flowing back into your dishwasher.
If your kitchen sink ever backs up, the air gap creates a physical break in the line. This makes sure only clean water can go into your dishwasher.
There are a few key things you should know:
- Required by Code: In many US states, air gaps are required by building codes.
- Visible Placement: Air gaps are usually installed on the sink or counter, close to the faucet.
- Design: Most air gaps look like small metal or plastic caps, but some are available in different finishes.
Credit: homesmsp.com
Key Factors To Consider Before Hiding An Air Gap
Hiding your air gap isn’t just about appearance. You need to keep the device working properly and stay within local plumbing codes. Here’s what you should consider:
- Ventilation: The air gap needs airflow to work. Blocking vents can cause water to back up or leak.
- Access: You may need to clean or check the air gap. Make sure you don’t seal it in tightly.
- Plumbing Codes: Check your city or state’s rules before changing how your air gap is installed.
- Material Compatibility: If you use covers or decorative elements, choose materials that can handle moisture and won’t rust or grow mold.
- Countertop Space: Some solutions take up more space or make the area around your sink harder to clean.
Popular Ways To Hide A Dishwasher Air Gap
There are several approaches to hiding your air gap, ranging from simple disguises to more involved installations. Each has pros and cons. Let’s explore the best options.
1. Decorative Air Gap Covers
The easiest way to hide an air gap is to upgrade the cover. Many brands now make air gap covers that match popular faucet finishes, like brushed nickel, matte black, or oil-rubbed bronze. Some covers are even designed to look like soap dispensers or faucet handles.
- Pros: Easy to install, inexpensive, no changes to plumbing.
- Cons: Does not completely hide the air gap, just makes it less noticeable.
Tip: Choose a cover that matches your faucet style for a seamless look.
2. Integrated Air Gap And Faucet
Some modern faucets come with a built-in air gap. These units combine the air gap with the faucet body, so you don’t have a separate device sticking out of your sink.
- Pros: No extra holes in the countertop, a clean look, often meets code.
- Cons: More expensive, limited style choices, may require professional installation.
Non-obvious insight: Not all integrated faucets are approved by building codes in every location. Always check before buying.
3. Relocating The Air Gap
If your kitchen has an island sink or a multi-level counter, sometimes you can install the air gap in a less visible spot. For example, it can go behind the faucet, off to the side, or even in the back corner of the sink ledge.
- Pros: Keeps the air gap accessible but less noticeable.
- Cons: May require extending hoses, which could affect performance.
Practical example: Some homeowners place the air gap behind a large kitchen faucet, where it’s hidden from most angles.
4. Camouflaging With Sink Accessories
A creative trick is to use sink accessories to hide the air gap. For example:
- Soap Dispensers: Place a soap dispenser or lotion bottle next to the air gap.
- Sink Caddies: Use a stainless steel caddy that fits around or in front of the air gap.
- Cutting Board or Sink Mat: When not in use, cover the sink edge with a cutting board.
- Pros: Inexpensive, easy to remove for cleaning.
- Cons: Only hides from certain angles, may not work with all sink styles.
5. Under-counter Air Gap Installation
In some rare cases, it’s possible to install the air gap under the countertop instead of on top. This method is less common but can be done with special air gap models or with local plumbing approval.
- Pros: Completely hides the air gap from view.
- Cons: Not always allowed by code, harder to access for maintenance.
Non-obvious insight: Even when allowed, this method requires careful attention to airflow. The vent must still be able to release water if a backup happens.
6. Custom Air Gap Solutions
Some high-end kitchens use custom cabinetry or counter modifications to hide the air gap. For example, a small hinged door or removable panel can be built into the counter ledge. This keeps the air gap hidden but accessible.
- Pros: Perfect match for custom kitchens, can be very discreet.
- Cons: Expensive, requires a skilled carpenter or installer.
7. Upgrading To A Low-profile Air Gap
Older air gaps are often tall and noticeable. Newer models, called low-profile air gaps, are shorter and have a sleeker look. They stick up less from the countertop and are often available in more finishes.
- Pros: Easy to install, less visible, affordable.
- Cons: Still slightly visible, not as hidden as other methods.
8. Coordinating With Countertop Material
If you’re remodeling, consider asking your installer to use the same countertop material for the air gap base or cover. For example, a piece of granite or quartz can be cut to fit the air gap, blending it with the rest of the counter.
- Pros: Seamless look, fully coordinated design.
- Cons: Only practical during a full remodel, may be costly.
9. Using A Dishwasher High Loop (where Allowed)
In some locations, a high loop is allowed as an alternative to an air gap. This means the dishwasher drain hose is looped up as high as possible under the counter, preventing backflow. However, this is not legal everywhere.
- Pros: No visible air gap, simpler installation.
- Cons: May not meet code, less reliable than an air gap.
Important: Only use a high loop if you’ve checked your local codes.
10. Concealing With Decorative Objects
Some homeowners use decorative objects—like small potted plants, figurines, or a row of spice jars—to distract from the air gap. While this doesn’t hide the air gap completely, it makes it less noticeable.
- Pros: Flexible, can change decor seasonally.
- Cons: May clutter the sink area, not a true hiding method.
Comparing Common Air Gap Hiding Methods
It’s helpful to look at the main differences between popular hiding methods. Here is a comparison of three common options:
| Method | Cost | Difficulty | Appearance | Meets Code |
|---|---|---|---|---|
| Decorative Cover | Low | Easy | Partially Hidden | Yes |
| Integrated Faucet | High | Medium | Fully Hidden | Usually |
| Under-Counter Install | High | Hard | Fully Hidden | Sometimes |
Step-by-step: How To Hide A Dishwasher Air Gap With A Decorative Cover
For most homeowners, using a decorative air gap cover is the safest and simplest way to minimize the visual impact. Here’s how to do it:
Materials Needed
- Decorative air gap cover (choose a finish to match your faucet)
- Screwdriver or small wrench
- Cleaning cloth
Instructions
- Choose the Right Cover: Measure your current air gap. Most are standard size, but check before buying.
- Remove the Old Cover: Unscrew or lift off the old air gap cap. Some covers simply snap off; others have a small screw underneath.
- Clean the Area: Wipe away any grime, water spots, or old caulk from the sink or countertop.
- Install the New Cover: Place the new decorative cover over the air gap body. Secure it according to the manufacturer’s instructions. Most simply press into place, but some have a small screw to tighten.
- Check Alignment: Make sure the cover sits flat and straight. Adjust as needed.
- Test for Leaks: Run your dishwasher through a drain cycle. Check for water leaks or spray from the air gap opening.
- Wipe Down: Clean any water spots and polish the new cover for a finished look.
Tip: Choose a cover with a vent opening at the side, not the top, for better performance.
Credit: www.youtube.com
Advanced Options: Under-counter Or Custom Air Gap Installation
If you want your air gap completely out of sight, you may consider a more advanced method. Here’s what’s involved in an under-counter installation:
Materials Needed
- Specialized under-counter air gap kit
- Drill and hole saw (if making a new opening)
- Screwdriver, pliers, plumbing tape
- Flexible air gap hose
Steps
- Check Local Codes: Confirm under-counter installation is allowed in your area.
- Plan the Location: Choose a spot under the sink that’s accessible but hidden.
- Mount the Air Gap: Attach the air gap to the cabinet wall or underside of the counter, following kit instructions.
- Connect Hoses: Run the dishwasher drain hose to the air gap, then from the air gap to the garbage disposal or sink drain.
- Vent Properly: Some kits require a special vent that can release water into the sink if there’s a backup.
- Test the System: Run the dishwasher and watch for leaks or slow draining.
Non-obvious insight: Some plumbers install a small overflow tube from the under-counter air gap to a hidden spot in the sink, in case of a backup.
Mistakes To Avoid When Hiding A Dishwasher Air Gap
Many homeowners make small mistakes that can lead to big problems later. Here are common pitfalls:
- Sealing the Air Gap: Never seal the air gap completely or cover the vent. This can cause leaks or dishwasher flooding.
- Ignoring Codes: Always check with your local building department. Some inspectors require a visible air gap.
- Blocking Maintenance: Don’t bury the air gap so deeply that you can’t clean or inspect it.
- Using the Wrong Materials: Avoid covers that rust, flake, or grow mold. Stainless steel or solid plastic are best.
- Choosing Style Over Function: The air gap is a safety device first. Make sure any change does not block its purpose.
Maintenance Tips For Air Gaps (hidden Or Not)
Even if you hide your air gap, you still need to keep it clean. A clogged air gap can cause dishwasher leaks, poor draining, or even water damage. Here’s how to keep it working:
- Check Regularly: Every few months, remove the cover and check for debris.
- Clean the Vent: Use a small bottle brush or old toothbrush to clear the vent.
- Flush with Water: Pour hot water through the air gap to clear minor clogs.
- Watch for Leaks: If you see water around the air gap, check hoses and connections.
- Replace Worn Parts: Air gaps can wear out over time. Replace any cracked or corroded pieces.
Case Study: Real Homeowner Solutions
Consider Amy, who remodeled her kitchen with a white quartz countertop and a matte black faucet. The standard chrome air gap stood out like a sore thumb. She chose a matte black decorative air gap cover that matched her faucet perfectly. Guests barely notice the air gap now, and her kitchen looks professionally designed.
Another example: Mark wanted no visible air gap at all. He worked with his plumber and local inspector to install an under-counter air gap with a small vent tube. The result was a flawless granite counter with no interruptions—yet the system still met code.
Data: Air Gap Usage In The Us
To understand how common air gaps are, here’s a look at air gap requirements in major US cities:
| City | Air Gap Required? | High Loop Allowed? | Notes |
|---|---|---|---|
| Los Angeles | Yes | No | Strict enforcement |
| Chicago | Yes | No | Visible air gap needed |
| Houston | No | Yes | High loop usually allowed |
| Seattle | Yes | No | Countertop air gap required |
| Miami | No | Yes | High loop allowed if installed correctly |
Insight: Even if not required by code, air gaps are still the safest choice for preventing backflow.
Professional Vs. Diy: When To Call An Expert
While many air gap hiding methods can be done by a handy homeowner, some cases call for professional help:
- Custom installations: If you want a built-in or under-counter air gap, hire a licensed plumber.
- Code compliance: A pro will know your local regulations and ensure you pass inspection.
- Major remodels: If you’re replacing countertops or sinks, include the air gap in your planning.
For simple cover swaps or accessory tricks, most DIYers can handle the job with basic tools.
Cost Breakdown: Hiding A Dishwasher Air Gap
Wondering how much it costs to hide your air gap? Here’s a general breakdown:
- Decorative cover: $10–$50
- Integrated faucet: $200–$600 (plus installation)
- Under-counter kit: $50–$150 (plus labor)
- Custom cabinetry: $100–$500 (varies widely)
Tip: The cheapest solution is often the best—just matching the air gap cover to your faucet can make a big difference.
Practical Advice For Best Results
- Always prioritize function over looks. The air gap’s job is to protect your dishwasher.
- If selling your home, make sure any change meets local code. Inspectors look for a visible air gap.
- If you want a seamless look, plan your air gap strategy during a kitchen remodel, not after.
- For small changes, a matching cover or well-placed accessory often does the trick.

Credit: www.youtube.com
Where To Find More Information
For further reading on plumbing codes and dishwasher installation, you can visit the official Wikipedia page on air gaps. This resource has code details, diagrams, and more examples.
Frequently Asked Questions
What Is The Main Purpose Of A Dishwasher Air Gap?
The dishwasher air gap prevents dirty water from flowing back into your dishwasher. It creates a break in the plumbing, protecting your dishes and kitchen from contamination during a drain backup.
Can I Remove The Air Gap If I Don’t Like How It Looks?
In most US locations, you cannot remove the air gap without breaking plumbing code. If your area allows a high loop, you may be able to replace it, but always check with a plumber or inspector first.
Are There Any Air Gap Designs That Are Completely Invisible?
Some integrated faucet models or under-counter installations make the air gap nearly invisible. However, total invisibility is rare because some part of the device must be accessible for maintenance and code reasons.
How Often Should I Clean Or Check My Air Gap?
Inspect your air gap every 3–6 months, or whenever you notice slow draining or leaks. Clean away debris and flush with water to keep it working well.
Does Hiding The Air Gap Affect My Dishwasher’s Warranty?
If you modify the air gap in a way that blocks its function, you could void your dishwasher’s warranty. Always follow manufacturer guidelines and local codes to protect your investment.
Hiding a dishwasher air gap is all about smart design and safety. With the right approach, you can enjoy a beautiful, clean kitchen—without giving up the protection your dishwasher needs.